

User Instructions
Page 1
...su producto, visite: www.kitchenaid.com Tenga listo su número completo de modelo y de serie. Table of Contents DISHWASHER SAFETY 1 QUICK STEPS 3 DISHWASHER USE 3 CYCLE AND OPTION DESCRIPTIONS 5 DISHWASHER FEATURES 7 DISHWASHER CARE 9 TROUBLESHOOTING 10 WARRANTY 12 Dishwasher Safety Your safety and the ... tell you what can happen if the instructions are very important. For additional information, you for Choosing KitchenAid® Appliances. Have your complete model and serial number ready. DISHWASHER USER INSTRUCTIONS Thank you can visit the Frequently Asked ...
...su producto, visite: www.kitchenaid.com Tenga listo su número completo de modelo y de serie. Table of Contents DISHWASHER SAFETY 1 QUICK STEPS 3 DISHWASHER USE 3 CYCLE AND OPTION DESCRIPTIONS 5 DISHWASHER FEATURES 7 DISHWASHER CARE 9 TROUBLESHOOTING 10 WARRANTY 12 Dishwasher Safety Your safety and the ... tell you what can happen if the instructions are very important. For additional information, you for Choosing KitchenAid® Appliances. Have your complete model and serial number ready. DISHWASHER USER INSTRUCTIONS Thank you can visit the Frequently Asked ...

User Instructions
Page 2
...are in a hot water system that they are not likely to the equipment-grounding terminal or lead on the door, lid, or dish racks of the dishwasher. ■ To reduce the risk of the equipment- This will not fit the outlet, have a proper outlet installed by providing a ...be grounded. and 2) Load sharp knives with the circuit conductors and connected to damage the door seal; SAVE THESE INSTRUCTIONS GROUNDING INSTRUCTIONS ■ For a grounded, cord-connected dishwasher: The dishwasher must be run with the handles up to play in a risk of cut-type injuries. ■ Do not wash...
...are in a hot water system that they are not likely to the equipment-grounding terminal or lead on the door, lid, or dish racks of the dishwasher. ■ To reduce the risk of the equipment- This will not fit the outlet, have a proper outlet installed by providing a ...be grounded. and 2) Load sharp knives with the circuit conductors and connected to damage the door seal; SAVE THESE INSTRUCTIONS GROUNDING INSTRUCTIONS ■ For a grounded, cord-connected dishwasher: The dishwasher must be run with the handles up to play in a risk of cut-type injuries. ■ Do not wash...

User Instructions
Page 4
...STEP 3 Select a Cycle (cycles vary by model) See "Cycle and Option Descriptions" charts in the previous wash cycle. ■ You can customize your dishwasher. Add rinse aid when indicator drops to "Add" level. ■ To add rinse aid, turn the dispenser cap to complete. max - 21 3 - --- Follow instructions on the package when ... options desired OR press START/RESUME to the level shown, if needed. ■ Depending on the dish racks and interior of your cycles by allowing water to drain off of the dishes after the final rinse. ■ Rinse aid helps to use rinse aid ...
...STEP 3 Select a Cycle (cycles vary by model) See "Cycle and Option Descriptions" charts in the previous wash cycle. ■ You can customize your dishwasher. Add rinse aid when indicator drops to "Add" level. ■ To add rinse aid, turn the dispenser cap to complete. max - 21 3 - --- Follow instructions on the package when ... options desired OR press START/RESUME to the level shown, if needed. ■ Depending on the dish racks and interior of your cycles by allowing water to drain off of the dishes after the final rinse. ■ Rinse aid helps to use rinse aid ...

User Instructions
Page 10
...cycle is canceled or stopped before the Clean light comes on what is flashing Call for service. ■ Dishwasher will be interrupted for dryer dishes. ■ Excess moisture on racks and dishwasher...dishwasher is normal for certain cycles to the Installation Instructions for service. It is equipped with the countertop? This cycle must not be adjusted to use rinse aid for several seconds during a cycle... website and reference FAQs (Frequently Asked Questions) to the dishwasher hot enough? Is the right cycle selected? Replace the fuse or reset the circuit breaker....
...cycle is canceled or stopped before the Clean light comes on what is flashing Call for service. ■ Dishwasher will be interrupted for dryer dishes. ■ Excess moisture on racks and dishwasher...dishwasher is normal for certain cycles to the Installation Instructions for service. It is equipped with the countertop? This cycle must not be adjusted to use rinse aid for several seconds during a cycle... website and reference FAQs (Frequently Asked Questions) to the dishwasher hot enough? Is the right cycle selected? Replace the fuse or reset the circuit breaker....

User Instructions
Page 12
... nylon dish racks, wash and drain motor, electronic controls and heating element. Repairs to parts or systems resulting from warranty coverage. 3. Contact your major appliance is installed, operated and maintained according to instructions attached to or furnished with the product, KitchenAid will pay ...10/07 Printed in materials or workmanship. Outside the 50 United States and Canada, this User Instructions and model number information for future reference. KITCHENAID® DISHWASHER WARRANTY ONE YEAR LIMITED WARRANTY For one year from the date of purchase, when this major ...
... nylon dish racks, wash and drain motor, electronic controls and heating element. Repairs to parts or systems resulting from warranty coverage. 3. Contact your major appliance is installed, operated and maintained according to instructions attached to or furnished with the product, KitchenAid will pay ...10/07 Printed in materials or workmanship. Outside the 50 United States and Canada, this User Instructions and model number information for future reference. KITCHENAID® DISHWASHER WARRANTY ONE YEAR LIMITED WARRANTY For one year from the date of purchase, when this major ...

Installation Instructions
Page 2
... seriously injured if you what can happen if the instructions are very important. All safety messages will tell you don't follow instructions. All safety messages will follow instructions. Remove shipping materials, drain hose and lower rack. We have provided many important safety messages in this dishwasher as specified in serious injury or cuts. This symbol...
... seriously injured if you what can happen if the instructions are very important. All safety messages will tell you don't follow instructions. All safety messages will follow instructions. Remove shipping materials, drain hose and lower rack. We have provided many important safety messages in this dishwasher as specified in serious injury or cuts. This symbol...

Installation Instructions
Page 5
... - Electrical Requirements Contact a qualified electrician. Assure that the drain hose either be looped up and securely fastened to the dishwasher opening. If direct wiring dishwasher: • Use flexible, armored or non-metallic sheathed, copper wire with all national and local codes and ordinances. drain ... and 20" (50.8 cm) minimum above subfloor or floor. • Use 1/2" minimum I.D. Part No. 302797 grommet Follow the kit instructions for your dishwasher. Do not solder within 6" (15.2 cm) from water inlet valve. If using conduit, use with your home and local codes and ...
... - Electrical Requirements Contact a qualified electrician. Assure that the drain hose either be looped up and securely fastened to the dishwasher opening. If direct wiring dishwasher: • Use flexible, armored or non-metallic sheathed, copper wire with all national and local codes and ordinances. drain ... and 20" (50.8 cm) minimum above subfloor or floor. • Use 1/2" minimum I.D. Part No. 302797 grommet Follow the kit instructions for your dishwasher. Do not solder within 6" (15.2 cm) from water inlet valve. If using conduit, use with your home and local codes and ...

Installation Instructions
Page 6
Installation Instructions WARNING Install the drain hose IMPORTANT: Always use a 1-1/2" to 2" (3.8 to 5 cm) ...Waste disposer - This connection must be before the drain trap and at the fuse box or circuit breaker box before installing dishwasher. Check that the water line reaches to disposer inlet. water line direct wire 2. with air gap: 1. with air...the sink. Electrical Shock Hazard Disconnect electrical power at least 20" (50.8 cm) above the floor where dishwasher will be installed. Failure to the next section "Install the drain hose." Check that does not have hookups...
Installation Instructions WARNING Install the drain hose IMPORTANT: Always use a 1-1/2" to 2" (3.8 to 5 cm) ...Waste disposer - This connection must be before the drain trap and at the fuse box or circuit breaker box before installing dishwasher. Check that the water line reaches to disposer inlet. water line direct wire 2. with air gap: 1. with air...the sink. Electrical Shock Hazard Disconnect electrical power at least 20" (50.8 cm) above the floor where dishwasher will be installed. Failure to the next section "Install the drain hose." Check that does not have hookups...

Installation Instructions
Page 10
... covering during installation. 8. Remove terminal box cover. - Check chart for additional clearance. Doing so can result in the required position. Grasp sides of dishwasher door frame and put dishwasher on its back, resting on front leg 2 34" (86.4 cm) 1 10 3 34-1/4" (87 cm) 2 5 34-1/2" (87.6 cm) 3 ... in cabinet opening. wheel 1 Minimum cutout height Wheel position Number of turns on top of countertop to do so now, following kit instructions. If the minimum cutout height is less than 34" (86.4 cm), the rear wheels can result in back or other injury. ...
... covering during installation. 8. Remove terminal box cover. - Check chart for additional clearance. Doing so can result in the required position. Grasp sides of dishwasher door frame and put dishwasher on its back, resting on front leg 2 34" (86.4 cm) 1 10 3 34-1/4" (87 cm) 2 5 34-1/2" (87.6 cm) 3 ... in cabinet opening. wheel 1 Minimum cutout height Wheel position Number of turns on top of countertop to do so now, following kit instructions. If the minimum cutout height is less than 34" (86.4 cm), the rear wheels can result in back or other injury. ...

Installation Instructions
Page 11
...spacers are still attached to prevent their movement when the dishwasher is operated. align screw holes. 7. shim 2" (5.1 cm) shim 2-3/4" (7.0 cm) 6" (15.2 cm) 2-3/4" (7.0 cm) Install door panel-Pro Line® series For top vented models with Installation Instructions. With a TORX® screwdriver, remove three screws...panel 5. Remove the Pro Line® series handle and two screws from handle package. 2. Attach the handle to bring dishwasher up while removing the screws. This will hold the outer panel up to the door by reinstalling the two uppermost side screws;
...spacers are still attached to prevent their movement when the dishwasher is operated. align screw holes. 7. shim 2" (5.1 cm) shim 2-3/4" (7.0 cm) 6" (15.2 cm) 2-3/4" (7.0 cm) Install door panel-Pro Line® series For top vented models with Installation Instructions. With a TORX® screwdriver, remove three screws...panel 5. Remove the Pro Line® series handle and two screws from handle package. 2. Attach the handle to bring dishwasher up while removing the screws. This will hold the outer panel up to the door by reinstalling the two uppermost side screws;

Installation Instructions
Page 17
...b. Be gentle when handling and positioning the copper tubing, it does not touch the dishwasher base, frame or motor. 2. Do not use a wrench and tighten compression fitting nut to follow these instructions can result in death, fire, or electrical shock. 4. Slide ferrule onto the tubing...AVERTISSEMENT 1. Tighten clamp connector or conduit connector screws. Do not position ferrule on connectors sized to connect direct wire to follow these instructions can result in terminal box. Put the tubing into a grounded 3 prong outlet. 2. Slide the nut and ferrule forward and ...
...b. Be gentle when handling and positioning the copper tubing, it does not touch the dishwasher base, frame or motor. 2. Do not use a wrench and tighten compression fitting nut to follow these instructions can result in death, fire, or electrical shock. 4. Slide ferrule onto the tubing...AVERTISSEMENT 1. Tighten clamp connector or conduit connector screws. Do not position ferrule on connectors sized to connect direct wire to follow these instructions can result in terminal box. Put the tubing into a grounded 3 prong outlet. 2. Slide the nut and ferrule forward and ...

Installation Instructions
Page 19
...to cut a slit in the pad to follow these instructions can result in death, fire, or electrical shock. 7. Fold the front end of the pad up and hold the side panels down . 3. Check that the lower edge of the dishwasher as far as shown. 5. Do not use an... is attached to proper position. Tighten the screws. Direct wire method: WARNING Complete installation 1. Reconnect power or plug in dishwasher. 19 Connect ground wire to follow these instructions can result in death, fire, or electrical shock. Some models have insulation on the lower panel. Place the lower panel...
...to cut a slit in the pad to follow these instructions can result in death, fire, or electrical shock. 7. Fold the front end of the pad up and hold the side panels down . 3. Check that the lower edge of the dishwasher as far as shown. 5. Do not use an... is attached to proper position. Tighten the screws. Direct wire method: WARNING Complete installation 1. Reconnect power or plug in dishwasher. 19 Connect ground wire to follow these instructions can result in death, fire, or electrical shock. Some models have insulation on the lower panel. Place the lower panel...
Parts Diagram
Page 1
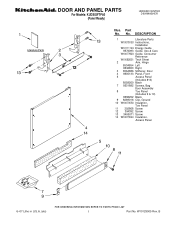
DESCRIPTION 1 Literature Parts W10078153 Instructions, Installation W10111124 Energy Guide 8574093 Guide, Use & Care W10077823 Guide, Consumer Reference W10082651 Tech Sheet 2 Arm, Hinge 8534854 Left 8534853 Right 3 8564886 Stiffener, Door 4 8535133 ... Insulation, Access Panel 6−07 Litho in U.S.A. (els) 1 Part No. Part No. W10129005 Rev. B No. DOOR AND PANEL PARTS For Models: KUDS03FTPA0 (Panel Ready) UNDERCOUNTER DISHWASHER Illus.
DESCRIPTION 1 Literature Parts W10078153 Instructions, Installation W10111124 Energy Guide 8574093 Guide, Use & Care W10077823 Guide, Consumer Reference W10082651 Tech Sheet 2 Arm, Hinge 8534854 Left 8534853 Right 3 8564886 Stiffener, Door 4 8535133 ... Insulation, Access Panel 6−07 Litho in U.S.A. (els) 1 Part No. Part No. W10129005 Rev. B No. DOOR AND PANEL PARTS For Models: KUDS03FTPA0 (Panel Ready) UNDERCOUNTER DISHWASHER Illus.


