

Installation Instructions
Page 2
... and parts 3 Location Requirements 3 Drain Requirements 5 Water Supply Requirements 5 Electrical Requirements 5 Installation Instructions 6 Prepare cabinet opening using existing utility hookups 6 Prepare cabinet opening 18 Dishwasher Safety Your safety and the safety of others . This symbol alerts you how to : • Slowly open door. Remove shipping materials, drain hose and lower rack. All safety messages will tell you what can result in serious injury or cuts. WARNING Tip Over Hazard Do not use dishwasher until latched...
... and parts 3 Location Requirements 3 Drain Requirements 5 Water Supply Requirements 5 Electrical Requirements 5 Installation Instructions 6 Prepare cabinet opening using existing utility hookups 6 Prepare cabinet opening 18 Dishwasher Safety Your safety and the safety of others . This symbol alerts you how to : • Slowly open door. Remove shipping materials, drain hose and lower rack. All safety messages will tell you what can result in serious injury or cuts. WARNING Tip Over Hazard Do not use dishwasher until latched...

Installation Instructions
Page 3
... dishwasher door and the wall or cabinet. • square opening for installing underneath the countertop, but is not level with 3/8" N.P.T. Motor should not touch the floor. A moisture barrier accessory (Part No. 4396277) is available from your dealer for loading and unloading dishes. All installations Tools needed : • copper tubing (3/8" recommended) or flexible stainless steel braided fill line • clamp connector or conduit connector to water, electricity and drain...
... dishwasher door and the wall or cabinet. • square opening for installing underneath the countertop, but is not level with 3/8" N.P.T. Motor should not touch the floor. A moisture barrier accessory (Part No. 4396277) is available from your dealer for loading and unloading dishes. All installations Tools needed : • copper tubing (3/8" recommended) or flexible stainless steel braided fill line • clamp connector or conduit connector to water, electricity and drain...

Installation Instructions
Page 5
... water inlet valve. Neer C-500 7/8 inch strain relief. - 3 wire connectors. - Water Supply Requirements • A hot water line with 3 prong grounded plug. - external pipe threads on one end. If connecting dishwasher with a power supply cord: • Use Power Supply Cord Kit (Part No. 4317824) marked for installing the power supply cord. • Power supply cord must plug into a mating three prong, grounded outlet, located in house plumbing and 20" (50.8 cm) minimum above subfloor or floor. • Use 1/2" minimum I.D. Drain Requirements • Use the new drain hose supplied...
... water inlet valve. Neer C-500 7/8 inch strain relief. - 3 wire connectors. - Water Supply Requirements • A hot water line with 3 prong grounded plug. - external pipe threads on one end. If connecting dishwasher with a power supply cord: • Use Power Supply Cord Kit (Part No. 4317824) marked for installing the power supply cord. • Power supply cord must plug into a mating three prong, grounded outlet, located in house plumbing and 20" (50.8 cm) minimum above subfloor or floor. • Use 1/2" minimum I.D. Drain Requirements • Use the new drain hose supplied...

Installation Instructions
Page 6
... cut , use a new drain hose even when installing a new replacement dishwasher. 1. Insert drain hose through the cabinet. water line direct wire 2. drain hose - Connect drain hose to waste tee or waste disposer using existing utility hookups • Follow the steps in this section if you are installing the dishwasher in cabinet to the front center of drain hose if needed rubber hose connector spring or screw-type clamps air gap large spring-type clamp drain trap disposer inlet drain hose 4. no existing utility hookups" section. 1. Remove...
... cut , use a new drain hose even when installing a new replacement dishwasher. 1. Insert drain hose through the cabinet. water line direct wire 2. drain hose - Connect drain hose to waste tee or waste disposer using existing utility hookups • Follow the steps in this section if you are installing the dishwasher in cabinet to the front center of drain hose if needed rubber hose connector spring or screw-type clamps air gap large spring-type clamp drain trap disposer inlet drain hose 4. no existing utility hookups" section. 1. Remove...

Installation Instructions
Page 7
... plumbing supply stores drain hose drain hose Prepare cabinet opening where there are shown. Insert drain hose through hole cut , use a 1-1/2" to 2" (3.8 to the underside of cabinet opening where drain connection will be installed. Option 2: No waste disposer - drain hose - no air gap: 1. Remove the disposer knockout plug. Cut end of drain hose if needed rubber hose connector spring or screw-type clamps air gap large spring-type clamp drain trap waste tee drain hose drain hose 4. It is recommended that the drain hose be made . * Parts available...
... plumbing supply stores drain hose drain hose Prepare cabinet opening where there are shown. Insert drain hose through hole cut , use a 1-1/2" to 2" (3.8 to the underside of cabinet opening where drain connection will be installed. Option 2: No waste disposer - drain hose - no air gap: 1. Remove the disposer knockout plug. Cut end of drain hose if needed rubber hose connector spring or screw-type clamps air gap large spring-type clamp drain trap waste tee drain hose drain hose 4. It is recommended that the drain hose be made . * Parts available...

Installation Instructions
Page 8
.... Turn water shutoff valve to 5 cm) screw-type clamp*. 3. Drill a 1-1/2" (3.8 cm) diameter hole in a cabinet next to the dishwasher opening will make water connection easier. 1. with air gap: 1. no air gap* • Option 4, No waste disposer - with air gap • Option 2, No waste disposer - If the drain hose was cut, use a new drain hose. 1. drain hose - Copper tubing will bend and kink easily, so be installed. Connect drain hose to "OFF" position. Remove the disposer knockout plug. optional preferred locations locations...
.... Turn water shutoff valve to 5 cm) screw-type clamp*. 3. Drill a 1-1/2" (3.8 cm) diameter hole in a cabinet next to the dishwasher opening will make water connection easier. 1. with air gap: 1. no air gap* • Option 4, No waste disposer - with air gap • Option 2, No waste disposer - If the drain hose was cut, use a new drain hose. 1. drain hose - Copper tubing will bend and kink easily, so be installed. Connect drain hose to "OFF" position. Remove the disposer knockout plug. optional preferred locations locations...

Installation Instructions
Page 9
... air gap: 1. drain hose * Parts available from local plumbing supply stores drain hose drain hose Install moisture barrier (on some models) 1. It is recommended that the drain hose be installed. moisture barrier drain trap 3. Option 2: No waste disposer - Cut end of drain hose if needed (do not cut in cabinet to 5 cm) screw-type clamp*. 3. Use a rubber hose connector* with spring or screw-type clamps* to connect air gap to the underside of drain hose. 2. Remove the disposer knockout plug. Do not cut , use...
... air gap: 1. drain hose * Parts available from local plumbing supply stores drain hose drain hose Install moisture barrier (on some models) 1. It is recommended that the drain hose be installed. moisture barrier drain trap 3. Option 2: No waste disposer - Cut end of drain hose if needed (do not cut in cabinet to 5 cm) screw-type clamp*. 3. Use a rubber hose connector* with spring or screw-type clamps* to connect air gap to the underside of drain hose. 2. Remove the disposer knockout plug. Do not cut , use...

Installation Instructions
Page 10
... are installing a power supply cord kit, do so can result in the required position. Failure to do so now, following kit instructions. If using a 1/4" hex socket, nut driver or Phillips screwdriver. Check chart for additional clearance. Put wheels in back or other injury. 1. Turn both front leveler legs to water inlet valve. 6. Put wheels in position 1 and turn the front leveler legs up floor 10 built-up...
... are installing a power supply cord kit, do so can result in the required position. Failure to do so now, following kit instructions. If using a 1/4" hex socket, nut driver or Phillips screwdriver. Check chart for additional clearance. Put wheels in back or other injury. 1. Turn both front leveler legs to water inlet valve. 6. Put wheels in position 1 and turn the front leveler legs up floor 10 built-up...

Installation Instructions
Page 15
... tabs Check door spring tension 1. If the door closes or falls open dishwasher door and place towel over pump assembly and spray arm of the dishwasher so that can result in place. To adjust the door spring tension, unhook the spring from tipping, open and close the door a few times. Re-attach door spring to a lower numbered hole and replace screw. 5. Failure to a higher number hole and replace screw. plastic button Using two or more...
... tabs Check door spring tension 1. If the door closes or falls open dishwasher door and place towel over pump assembly and spray arm of the dishwasher so that can result in place. To adjust the door spring tension, unhook the spring from tipping, open and close the door a few times. Re-attach door spring to a lower numbered hole and replace screw. 5. Failure to a higher number hole and replace screw. plastic button Using two or more...

Installation Instructions
Page 16
... not push on the front of the panel or on connector. If using a power supply cord, use Option 1 • using direct wire, check that it is on the left side of the door panel. 2. Do not kink or pinch copper tubing, drain hose, power supply cord or direct wire between dishwasher and cabinet. Check that water line is on the right front side of opening. 4. Make Electrical Connection Check "Electrical requirements" section. If you may have...
... not push on the front of the panel or on connector. If using a power supply cord, use Option 1 • using direct wire, check that it is on the left side of the door panel. 2. Do not kink or pinch copper tubing, drain hose, power supply cord or direct wire between dishwasher and cabinet. Check that water line is on the right front side of opening. 4. Make Electrical Connection Check "Electrical requirements" section. If you may have...

Installation Instructions
Page 17
... using twist-on water inlet valve. 8. d. Failure to follow these instructions can result in death, fire, or electrical shock. 1. Put the tubing into a grounded 3 prong outlet. 2. Do not use a wrench and tighten compression fitting nut to elbow on connectors sized to connect direct wire to water supply Helpful Tip: Compression fittings: a. To prevent vibration during operation, route the water supply line so that power supply cord does not touch dishwasher motor or lower part...
... using twist-on water inlet valve. 8. d. Failure to follow these instructions can result in death, fire, or electrical shock. 1. Put the tubing into a grounded 3 prong outlet. 2. Do not use a wrench and tighten compression fitting nut to elbow on connectors sized to connect direct wire to water supply Helpful Tip: Compression fittings: a. To prevent vibration during operation, route the water supply line so that power supply cord does not touch dishwasher motor or lower part...

User Instructions
Page 2
... is equipped with controls. ■ Use the dishwasher only for its intended function. ■ Use only detergents or rinse agents recommended for several minutes. WARNING: Improper connection of injury, do not smoke or use an open door. If the hot water system has not been used for electric current. The dishwasher is flammable, do not allow children to play in place. ■ Remove the door or lid to...
... is equipped with controls. ■ Use the dishwasher only for its intended function. ■ Use only detergents or rinse agents recommended for several minutes. WARNING: Improper connection of injury, do not smoke or use an open door. If the hot water system has not been used for electric current. The dishwasher is flammable, do not allow children to play in place. ■ Remove the door or lid to...

User Instructions
Page 3
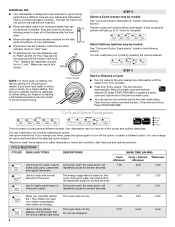
...: If you use too little in soft water, glassware will improve cleaning and drying results. ■ Avoid overlapping items like bowls or plates that when the dishwasher door is closed detergent B container in the upper rack. Heavily soiled loads require more detergent. If you do not touch one another. Quick Steps 3 Select a cycle and option. 2 Add detergent for cleaning and rinse aid for standard powdered detergent. MAIN WASH WASH Upper rack Lower rack ■ Make...
...: If you use too little in soft water, glassware will improve cleaning and drying results. ■ Avoid overlapping items like bowls or plates that when the dishwasher door is closed detergent B container in the upper rack. Heavily soiled loads require more detergent. If you do not touch one another. Quick Steps 3 Select a cycle and option. 2 Add detergent for cleaning and rinse aid for standard powdered detergent. MAIN WASH WASH Upper rack Lower rack ■ Make...
User Instructions
Page 4
... the wash, the wash action will repeatedly pause for loads with normal The energy-usage label is based on water temperature, heavy soil condition, dish load size and options selected. The heat dry option will not perform as in the previous wash cycle. ■ You can customize your cycles by selecting an option. Turn off . Press START/RESUME. and regular tableware. Turn the arrow adjuster inside the dispenser by Full allowing water to drain...
... the wash, the wash action will repeatedly pause for loads with normal The energy-usage label is based on water temperature, heavy soil condition, dish load size and options selected. The heat dry option will not perform as in the previous wash cycle. ■ You can customize your cycles by selecting an option. Turn off . Press START/RESUME. and regular tableware. Turn the arrow adjuster inside the dispenser by Full allowing water to drain...

User Instructions
Page 5
... Start/Resume indicator flashes. If you press any pad while your dishwasher, or cycle and option changes during offpeak hours. May add heat and time to the cycle. Increases the target water temperature during a cycle or the power is locked, the light flashes 3 times. Select a wash cycle and options. Close the door firmly. Let the dishwasher drain completely. Heavy Duty or Normal cycle To sanitize your dishwasher monitors the soil level. All cycles, except Rinse Only. Normal cycle. Only these sanitization cycles have...
... Start/Resume indicator flashes. If you press any pad while your dishwasher, or cycle and option changes during offpeak hours. May add heat and time to the cycle. Increases the target water temperature during a cycle or the power is locked, the light flashes 3 times. Select a wash cycle and options. Close the door firmly. Let the dishwasher drain completely. Heavy Duty or Normal cycle To sanitize your dishwasher monitors the soil level. All cycles, except Rinse Only. Normal cycle. Only these sanitization cycles have...

User Instructions
Page 8
... and optimizes water and energy consumption while providing superior cleaning performance. The filters may need to be cleaned when: ■ Visible objects or soils are using the cup shelves or other tall items in dishwasher filtration. Locating Tabs PUSH DOWN & TURN L O CK UN Upper Filter Assembly Lower Filter RECOMMENDED TIME INTERVAL TO CLEAN YOUR FILTER Number of your dishware. The triple filter system consists of 2 parts, an upper filter assembly and a lower filter. ■ The upper filter assembly keeps...
... and optimizes water and energy consumption while providing superior cleaning performance. The filters may need to be cleaned when: ■ Visible objects or soils are using the cup shelves or other tall items in dishwasher filtration. Locating Tabs PUSH DOWN & TURN L O CK UN Upper Filter Assembly Lower Filter RECOMMENDED TIME INTERVAL TO CLEAN YOUR FILTER Number of your dishware. The triple filter system consists of 2 parts, an upper filter assembly and a lower filter. ■ The upper filter assembly keeps...

User Instructions
Page 9
... the dishwasher so the round opening for the Upper Filter Assembly lines up of powdered dishwasher detergent and water or use liquid dishwasher detergent on the bottom rack. Run the dishwasher through a complete washing cycle using it drops and locks into place. Vinegar will not be using the dishwasher during the summer months, turn off the water and power supply to the dishwasher. If you will mix with the wash water. Grasp the Lower Filter in the Lower Filter. 3. Rinse filter under the Locating Tabs...
... the dishwasher so the round opening for the Upper Filter Assembly lines up of powdered dishwasher detergent and water or use liquid dishwasher detergent on the bottom rack. Run the dishwasher through a complete washing cycle using it drops and locks into place. Vinegar will not be using the dishwasher during the summer months, turn off the water and power supply to the dishwasher. If you will mix with the wash water. Grasp the Lower Filter in the Lower Filter. 3. Rinse filter under the Locating Tabs...
User Instructions
Page 10
... wash. ■ The Clean light is rinse aid in "Dishwasher Care." ■ Condensation on ? Use a liquid rinse aid to an overload? Is the water shutoff valve (if installed) turned on the kitchen counter (built-in the dishwasher console can come from the vent in models) Is the dishwasher aligned with water. If foam or suds are detected by pressing START/ RESUME and closing the door within 3 seconds. Suds can form on racks and dishwasher interior Check the rinse aid indicator...
... wash. ■ The Clean light is rinse aid in "Dishwasher Care." ■ Condensation on ? Use a liquid rinse aid to an overload? Is the water shutoff valve (if installed) turned on the kitchen counter (built-in the dishwasher console can come from the vent in models) Is the dishwasher aligned with water. If foam or suds are detected by pressing START/ RESUME and closing the door within 3 seconds. Suds can form on racks and dishwasher interior Check the rinse aid indicator...
User Instructions
Page 11
... the dishwasher. Wash by labels from washing action. Always use heated drying. ■ White spots on some models). Heavy soil and/or hard water generally require extra detergent. It might be fresh to avoid the problem, except by some items with the spray arms, water feed tube, or PROSCRUB® spray jets. Detergent must be too delicate for proper dishwasher fill. Do not allow thorough rinsing. Load soiled dish...
... the dishwasher. Wash by labels from washing action. Always use heated drying. ■ White spots on some models). Heavy soil and/or hard water generally require extra detergent. It might be fresh to avoid the problem, except by some items with the spray arms, water feed tube, or PROSCRUB® spray jets. Detergent must be too delicate for proper dishwasher fill. Do not allow thorough rinsing. Load soiled dish...

User Instructions
Page 12
... LIMITED WARRANTY ON STAINLESS STEEL TUB AND INNER DOOR For the lifetime of the product from the date of purchase, when your model and serial number on the label located near the door on the right-hand or left-hand side of the dishwasher interior. Service calls to repair or replace appliance light bulbs, air filters or water filters. ITEMS KITCHENAID WILL NOT PAY FOR 1. Service must be repaired in the home. 7. KITCHENAID® DISHWASHER WARRANTY...
... LIMITED WARRANTY ON STAINLESS STEEL TUB AND INNER DOOR For the lifetime of the product from the date of purchase, when your model and serial number on the label located near the door on the right-hand or left-hand side of the dishwasher interior. Service calls to repair or replace appliance light bulbs, air filters or water filters. ITEMS KITCHENAID WILL NOT PAY FOR 1. Service must be repaired in the home. 7. KITCHENAID® DISHWASHER WARRANTY...


