KitchenAid KUDE03FTSS Support Question
KitchenAid KUDE03FTSS Support Question
Find answers below for this question about KitchenAid KUDE03FTSS - Fully Integrated Dishwasher.Need a KitchenAid KUDE03FTSS manual? We have 3 online manuals for this item!
Question posted by Hfleischmann on November 23rd, 2014
What Is The Decibel Level Of This Model Kude03ffssi, From Late 2008
The person who posted this question about this KitchenAid product did not include a detailed explanation. Please use the "Request More Information" button to the right if more details would help you to answer this question.
Current Answers
Related KitchenAid KUDE03FTSS Manual Pages
Installation Instructions - Page 3

... in leveling dishwasher.
...dishwasher and water lines leading to floor. • level floor. (If floor at rear of E.I. Installation Requirements
Tools and Parts
Gather the required tools and parts before starting installation. Location Requirements
Do not run drain lines, water lines or electrical wiring where they can interfere with certain models F. Damage from freezing is not level...
Installation Instructions - Page 4

May be reduced to 33-7/8" (86 cm) by removing wheels from dishwasher.
** Minimum, measured from the lowest point on all models)
24-7/8" (63.2 cm) 24-1/2" (62.2 cm)*
front vent
33-7/8" (86 cm) min. with wheels
removed
21" (53.3 cm) SIDE VIEW 23-7/8" (60.6 cm)
Cutout dimensions
...
Installation Instructions - Page 9

...must be before the drain trap and at least 20" (50.8 cm) above the floor where dishwasher will be installed. drain hose
9 cut here if needed
rubber hose connector
air gap
spring or screw...hose
Install moisture barrier (on some models)
1. This connection must be before the drain trap and at least 20" (50.8 cm) above the floor where dishwasher will be looped up and securely fastened...
Installation Instructions - Page 10

... the rear. Check chart for additional clearance. Turn both front leveler legs to water inlet valve.
6. If the minimum cutout height is at least 33-3/4" (85.7 cm), the dishwasher will allow the dishwasher to fit into position. Measure height of opening from packaging behind dishwasher.
Apply Teflon® tape or pipe joint compound to...
Installation Instructions - Page 11

...8. Lay the factory-supplied full front panel face down . 4. Attach outer panel to bring dishwasher up while removing the screws. Remove the carton containing the factory-supplied full
front panel. 2....handle tightly against the door. align screw holes.
7. Place the outer panel on some models)
IMPORTANT: Do not scratch the front panel during this procedure. 1. Make sure plastic ...
Installation Instructions - Page 12

... two #8-18 x 1-3/8" screws from picture above .) Custom door panel dimensions are :
1/8" (3.2 mm)
1/8" (3.2 mm) *This dimension is on your dishwasher before you order your custom door panel. For dishwashers with the control panel shown below : (Models KUDC03IT, KUDK03IT and KUDL03IT)
2 screws
align top edges
1-3/8"screw
10. Follow directions under Option #1 of the wood panel...
Installation Instructions - Page 13

.... Attach the handle. Attach the panel assembly to the KitchenAid Catalog, visit www.kitchenaid.com, or call 1-800-422-1230. Install custom panel
Option 1: For models KUDS03FTPA and KUDU03FTPA
NOTE: The handle for a 3/4" (19.1 mm) thick wood panel. mark pilot holes
1. IMPORTANT: Screw heads must be centered on the door frame...
Installation Instructions - Page 14

...screwdriver, remove three screws from both panels are for frameless custom panel models with the top of the precise dimensions needed. To order, call ....2 cm) toe kick. Install the two #8-18 x 1-3/8" screws from humidity. Option 2: For models KUDC03IT, KUDK03IT and KUDL03IT
All models require an accessory option to the door by reinstalling the three screws on a protective, non-scratching ...
Installation Instructions - Page 15

..., the door tension will be moved to move and install dishwasher.
There are two brackets on both sides of the dishwasher.
tabs
2. Tensioners on top of dishwasher. If your countertop is wood, laminate or other injury.
4.
front vent model shown
NOTE: Do not attach the dishwasher, this will need to keep it is marble, granite...
Installation Instructions - Page 16

... direct wire, check that it does not touch dishwasher
motor or lower part of dishwasher. If needed, adjust leveling leg or add shims under dishwasher. Pull direct wire through hole in back or other side of dishwasher tub.
2. Tilt dishwasher backwards on wires to move and install dishwasher. If dishwasher has a power supply cord, insert power supply cord...
Installation Instructions - Page 18

... avoid contact with two, #10 x 1/2" Phillips-head screws. if it does, dishwasher must be lowered and re-leveled.
6. Do not remove drain loop from dishwasher. 8. Do not push down on both sides. Open door about 3 inches (7.6 cm) and check that dishwasher is still level and centered side to countertop.
2. If you have not already done...
Installation Instructions - Page 19

... Place the lower panel behind the door and the dishwasher front legs, as it out of the lower panel contacts the floor.
6. Some
models have insulation on the access panel which must fall ...follow these instructions can result in the lower panel. Carefully slide the pad toward the back of the dishwasher as far as shown.
5. Connect ground wire to cut a slit in death, fire, or electrical...
Installation Instructions - Page 40

Imprimé aux É.-U.
5/2008 W10078153B © 2008
®
HOME APPLIANCES
Printed in U.S.A.
Parts Diagram - Page 1

...
W10021870 White
W10021850 Stainless
17 2004333 Nut
18 8269016 Clip, Grounding
03−08 Litho in U.S.A. (els)(mek)
1
Part No. DOOR AND PANEL PARTS
For Models: KUDE03FTBL1, KUDE03FTWH1, KUDE03FTSS1
(Black)
(White) (Stainless)
UNDERCOUNTER DISHWASHER
Illus. Part No. W10201189 Rev. No.
Parts Diagram - Page 6

...Undercounter 12 3400074 Screw 13 3400924 Retainer, Push−in 14 3370389 Screw 15 8268977 Wheel Leg 16 8524584 Leveler, Leg 17 8524474 Wheel, door
Balance 18 8270020 Spring, Door
Balance 19 3400892 Screw 20 8268991 Cover, Terminal... Latch 28 3378128 Washer,
Pronged Cup
6
W10201189 TUB AND FRAME PARTS
For Models: KUDE03FTBL1, KUDE03FTWH1, KUDE03FTSS1
(Black)
(White) (Stainless)
Illus.
Parts Diagram - Page 9

UPPER WASH AND RINSE PARTS
For Models: KUDE03FTBL1, KUDE03FTWH1, KUDE03FTSS1
(Black)
(White) (Stainless)
W10201189
Illus. Part No. DESCRIPTION
1 8579262 Feed Tube Assembly (Also Includes Item 3)
2 8557720 Sprayarm, 3rd Level
3 8579242 Mount 4 8579259 Manifold 5 8579279 Sprayarm 6 W10084221 Manifold,
Turbo Wash
9 No.
Parts Diagram - Page 14

Part No. No. DESCRIPTION
1
Track Assembly
W10077855 Right
W10077856 Left
2 W10077854 Stop, Track
3 8564899 Mount, Track
4 8564900 Rack Assembly
(Third Level)
5 8564901 Basket−TLR
14
W10201189 THIRD LEVEL RACK AND TRACK PARTS
For Models: KUDE03FTBL1, KUDE03FTWH1, KUDE03FTSS1
(Black)
(White) (Stainless)
Illus.
User Instructions - Page 4
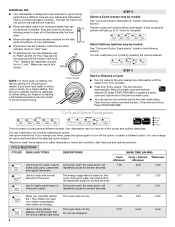
...This cycle does not dry. cycle. Refill
- Select Options (options vary by model) See "Cycle and Option Descriptions" charts in the following section.
Turn the ...fully
locked. See option selections. If you change an option anytime before the main wash starts. Use for loads with normal
The energy-usage label is at the sink nearest your dishwasher until the indicator level...
User Instructions - Page 10
... in models)
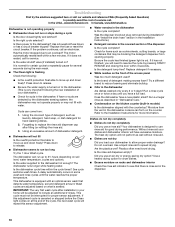
Is the dishwasher aligned with water. Using the incorrect type of detergent, such as described in "Dishwasher Care."
■ Condensation on the counter. Press down freely? The dishwasher runs... based on soil level, water temperature, cycles and options. Try a different brand to reduce foaming and eliminate buildup.
■ Odor in the dishwasher
Is the cycle complete...
User Instructions - Page 12

...NOT APPLY TO YOU. Contact your model and serial number on the label located near the door on the right-hand or left-hand side of the dishwasher interior. visit: www.kitchenaid.com ... product, KitchenAid will pay for factory specified parts for future reference. W10084410A SP PN W10084538A
© 2008. Repairs to use .
4. Have your product or you would like to schedule service, you how ...
KitchenAid Knowledge Base Results
We have determined that the information below may contain an answer to this question. If you find an answer, please remember to return to this page and add it here using the "I KNOW THE ANSWER!" button above. It's that easy to earn points!-
Compactor drawer won't open
...): Turn the key-knob (key-switch) to your model number. Model Number | Help me locate my model number Please enter at least 6 characters of your Use and Care Guide. Is the ram all the way up the foot pedal. Is the Solid cycle engaged? Fully integrated style Caring for my compactor To raise the... -
Using the air filter or freshener - Fully integrated style compactor
... odor in the compactor depends on the type of trash placed in the compactor for odor removal. The length of trash compacted. If your kitchen. Fully integrated style compactor How do I use , the filter should be replaced varies with the type of time before the filter needs to turn off the fan... -
Starting the compactor - Fully integrated style
... Solid Cycle switch to create a clean look in On position. See Starting your compactor with fully visible control styling for more information. Fully visible console Starting the compactor - For compactors featuring a fully integrated console, use the following directions. To start the compactor: Open container. Leave key-knob in your controls...
Similar Questions


My Dishwasher Has Stopped Working. Model # Kudt03ftss
My dishwasher has stopped working and the lights on the control panel has certain buttons that are l...
My dishwasher has stopped working and the lights on the control panel has certain buttons that are l...
(Posted by jwhaley 9 years ago)

Kuds35fxss1 Reviews
(Posted by Anonymous-99427 11 years ago)

Part # For Jet Dry Dispenser Cap On Model Kudc10fxss
What is the correct part nuber for the Jet Dry dispenser cap on Kitchenaid dishwasher model number K...
What is the correct part nuber for the Jet Dry dispenser cap on Kitchenaid dishwasher model number K...
(Posted by gregjk 12 years ago)

How To Clean Sump On Kudt03ftss Model??
Our dishwaster is 2 1/2 years old. After big party last night we notice that it is just not cleaning...
Our dishwaster is 2 1/2 years old. After big party last night we notice that it is just not cleaning...
(Posted by randersg 14 years ago)