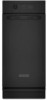
KitchenAid KUCS03CTBL - 15" Trash Compactor Support and Manuals
Get Help and Manuals for this KitchenAid item
View All Support Options Below
Free KitchenAid KUCS03CTBL manuals!
Problems with KitchenAid KUCS03CTBL?
Ask a Question
Free KitchenAid KUCS03CTBL manuals!
Problems with KitchenAid KUCS03CTBL?
Ask a Question
Popular KitchenAid KUCS03CTBL Manual Pages
Use & Care Guide - Page 1
COMPACTOR
Use & Care Guide
For questions about features, operation/performance, parts, accessories or service, call: 1-800-422-1230 or visit our website at www.kitchenaid.com
In Canada, for assistance, installation or service, call: 1-800-807-6777 or visit our website at www.KitchenAid.ca
Table of Contents ...2
9872216
Use & Care Guide - Page 2
...™ Plus System 10 Starting Your Compactor 10 Using Solid (Locked) Cycle 10
Using the Air Filter or Freshener 11 Removing a Filled Bag 11 Installing a New Bag 11
COMPACTOR CARE 12 Changing the Air Filter or Freshener 12 Cleaning 12
TROUBLESHOOTING 14
ASSISTANCE OR SERVICE 15 In the U.S.A 15 In Canada 15 Accessories 15
WARRANTY 16
2
Use & Care Guide - Page 3
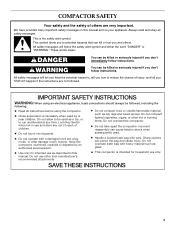
... at any manner. COMPACTOR SAFETY
Your safety and the safety of others .
This is necessary when used .
All safety messages will follow instructions. Lock Key Switch when not in this manual and on your appliance.
Do not compact lighted cigarettes, cigars, or other than manufacturer's recommended attachments. s Handle a loaded trash bag with a damaged cord set, plug, motor...
Use & Care Guide - Page 6
... for ordering conversion kit. See "Accessories" for further instructions. s Move the rear wheel and stud to position 2 or 3 as needed.
s Tighten screw.
Use pliers to add shims under the front leveling legs. Plug into a grounded 3 prong outlet.
6. Slowly move compactor. Check that electrical installation meets all national and local codes and ordinances. Repeat Step 1 if...
Use & Care Guide - Page 7
... brackets cannot be attached to the underside of countertop, attach mounting clips (provided...provided in the
"Unpacking" section. 3. s If the compactor is to be midway between the
marks on each side ...Model KUCP02IR)
Dimensions Use these dimensions drawings to create a custom panel for further instructions. NOTE: A thicker panel may be ¹⁄₂" to 13 mm to the handle. Replace...
Use & Care Guide - Page 8
... screw locations D. Mounting screws B. Foot pedal
2.
The panel should be ¹⁄₂" (13 mm) min. Remove toe guard.
3. Toe guard E. Installation
1. A
A B
C
A
C
B
A. Remove mounting screws attaching the toe guard to the
compactor. Align the bottom of the custom panel with the bottom of the drawer front.
5. Reinstall the toe guard using four #8 x 1" wood...
Use & Care Guide - Page 9
... the bottom of its original bulk.
9 Remove toe guard.
3. Attach a 15" x ¹⁄₂" quarter-round filler along the top of the compactor which compresses the trash. Panel screw locations D. Washer F. Toe guard screw
COMPACTOR USE
How Your Compactor Works
The compacting ram is the part of the drawer front using glue or screws. The Drawer...
Use & Care Guide - Page 11
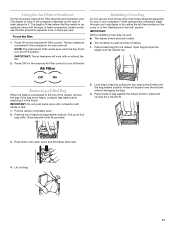
...compactor depends on the type of debris.
1. The degree of odor in the "Assistance or Service" section. Press ON on the charcoal Air Filter control to be replaced once or twice per year.
s The container is clean and free of trash... Latch down into the drawer. Press OFF on the charcoal Air Filter control. Installing a New Bag
Do not use any kind of bag other than those designed ...
Use & Care Guide - Page 12
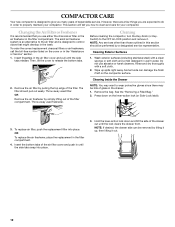
... with a clean sponge or soft cloth and a mild detergent in the trash. Wipe up , then lifting it out.
12 Cleaning Inside the Drawer
...service. Throw away used freshener. Throw away used filter.
To replace air filter, push the replacement filter into place.
3. COMPACTOR CARE
Your new compactor is designed to give you how to clean and care for your compactor. NOTE: Any services...
Use & Care Guide - Page 13
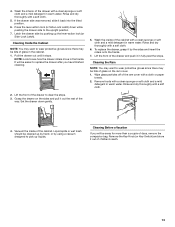
.... Rinse and dry thoroughly with a soft cloth.
5. To replace the drawer, grasp it back into the tilted position.
6. Lift the front of days, remove the compactor bag. Rinse and dry thoroughly with a cloth or paper
towels. 2. Grasp the drawer on the ram cover. 1. Set the drawer down while pushing the drawer side to...
Use & Care Guide - Page 14
Trash is fully raised.
If the problem continues, call .
Drawer will not break every time. See "Starting Your Compactor."
Replace the fuse or reset the circuit breaker. s Is the drawer completely closed? See "Starting Your Compactor." To raise the ram on some models... on some models). The thickness of the bottle's glass and the content of an unnecessary service call an ...
Use & Care Guide - Page 15

... service, anywhere in your area, call 1-800-462-3819 and ask for Part Number. If you need replacement parts If you can write to your compactor, use factory specified parts. Call the KitchenAid Customer eXperience Center toll free: 1-800-422-1230 Our consultants provide assistance with : s Features and specifications on our full line of appliances.
s Accessory and repair parts sales...
Use & Care Guide - Page 16

... appliance, to replace or repair
house fuses or to defects in -warranty service. Service must provide proof of products not approved by calling KitchenAid. Those consumable parts are excluded from unauthorized modifications made to repair or replace appliance light bulbs or water filters. If you ever need service, first see the "Troubleshooting" section of purchase, when the compactor...
Dimension Guide - Page 1
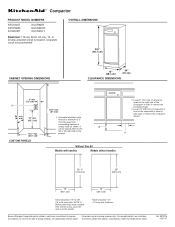
... the compactor drawer. OVERALL DIMENSIONS
341⁄8" (86.7 cm)
CABINET OPENING DIMENSIONS
15" (38.1 cm)
24" (61 cm)
CLEARANCE DIMENSIONS
3" min. (7.6 cm)
A
24" min. (61 cm)
18" min. (45.7 cm)
15 " min. (38.7 cm)
CUSTOM PANELS
34 " min. (87 cm)
1.
A
Without Trim Kit
Models with product. Instructions packed with handles
Models without notice. Specifications subject...
Warranty Information - Page 1
...you ever need service, first see the "Troubleshooting" section of the Use & Care Guide. KITCHENAID® COMPACTOR WARRANTY
ONE YEAR LIMITED WARRANTY
For one year from the date of purchase, when this major appliance is operated and maintained according to instructions attached to or furnished with published installation instructions. In Canada,
call 1-800-422-1230. You can be repaired in...
KitchenAid KUCS03CTBL Reviews
We have not received any reviews for KitchenAid yet.