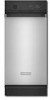
KitchenAid KUCK03ITBS - 15" Trash Compactor Support and Manuals
Get Help and Manuals for this KitchenAid item
View All Support Options Below
Free KitchenAid KUCK03ITBS manuals!
Problems with KitchenAid KUCK03ITBS?
Ask a Question
Free KitchenAid KUCK03ITBS manuals!
Problems with KitchenAid KUCK03ITBS?
Ask a Question
Most Recent KitchenAid KUCK03ITBS Questions

How To Lubricate My Trash Compactor Which Squeaks In Compact Cycle.
(Posted by terry38840 10 years ago)
Popular KitchenAid KUCK03ITBS Manual Pages
Use & Care Guide - Page 1
COMPACTOR
Use & Care Guide
For questions about features, operation/performance, parts, accessories or service, call: 1-800-422-1230 or visit our website at www.kitchenaid.com
In Canada, for assistance, installation or service, call: 1-800-807-6777 or visit our website at www.KitchenAid.ca
Table of Contents ...2
9872216
Use & Care Guide - Page 2
... 10 WHISPER QUIET™ Plus System 10 Starting Your Compactor 10 Using Solid (Locked) Cycle 10
Using the Air Filter or Freshener 11 Removing a Filled Bag 11 Installing a New Bag 11
COMPACTOR CARE 12 Changing the Air Filter or Freshener 12 Cleaning 12
TROUBLESHOOTING 14
ASSISTANCE OR SERVICE 15 In the U.S.A 15 In Canada 15 Accessories 15...
Use & Care Guide - Page 3
...than manufacturer's recommended attachments.
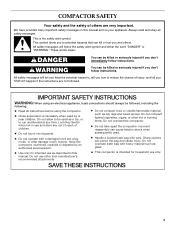
IMPORTANT SAFETY INSTRUCTIONS
WARNING: When using an electrical appliance, basic precautions should always be used by an authorized serviceperson. Incorrect reassembly can pierce the bag and cause injury. All safety messages will follow instructions.
Always read and obey all instructions before using the compactor.
Do not allow...
Use & Care Guide - Page 4
... material. Shipping base
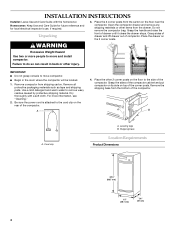
Location Requirements
Product Dimensions
34¹⁄₈" (86.7 cm)
15" (38.1 cm)
24" (61 cm)
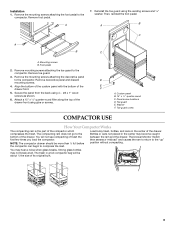
4 INSTALLATION INSTRUCTIONS
Installer: Leave Use and Care Guide with a soft cloth. Homeowner: Keep Use and Care Guide for future reference and for local electrical inspector's use, if required.
Do not remove the compactor bag. Grasp the handle and raise...
Use & Care Guide - Page 5
... of the compactor. B
A
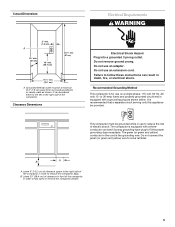
A. Clearance Dimensions
Electrical Shock Hazard Plug into a grounded 3 prong outlet. Failure to fit the proper grounding-type receptacle. It is recommended that a separate circuit serving only this appliance be a minimum of the compactor in the cord is equipped with a threeconductor cord and 3 prong grounding-type plug to follow these instructions can be...
Use & Care Guide - Page 7
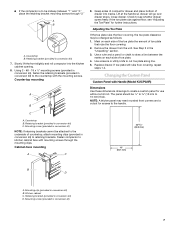
... Handle (Model KUCP02IR)
Dimensions Use these dimensions drawings to the handle.
Mounting clip (provided in the
"Unpacking" section. 3. Fasten compactor to kitchen cabinet face with the mounting screws. s If the compactor is to be ¹⁄₂" to 13 mm to 16 mm) thick. Grasp sides of compactor drawer and place bottom of countertop, attach mounting clips...
Use & Care Guide - Page 8
... using four #8 x 1" wood screws as shown.
6. Installation
1.
Handle B. A
A B
C
A
C
B
A. Toe guard screw
Custom Panel without Handle (for use without a trim kit. Remove the mounting screws attaching the foot pedal to create a custom panel for all C and S models)
Dimensions Use these dimension drawings to the
compactor.
Foot pedal
2. Remove toe guard.
3. Align the...
Use & Care Guide - Page 9
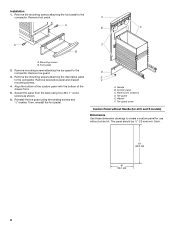
... compactor bag will not see compacting of its original bulk.
9
The Drawer Monitor Switch then senses a "misload" and causes the ram to return to the compactor. Toe guard screw
COMPACTOR USE
How Your Compactor Works
The compacting ram is the part of the drawer. The compacting ram does not go to the compactor. Remove the mounting screws attaching...
Use & Care Guide - Page 11
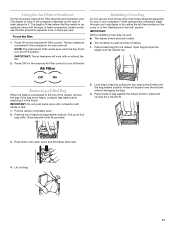
...Service" section. Order replacement compactor bags through your compactor. s The container is clean and free of bag against the drawer bottom, sides and corners for odor removal.
Pull up all four bag cuffs. Close bag with hands or feet.
1. Press inside of debris.
1.
The degree of odor in the compactor.... IMPORTANT:
Before installing a new bag, be replaced once or twice per...
Use & Care Guide - Page 12
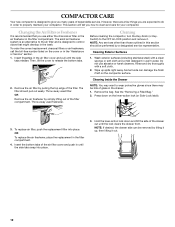
... away used filter. To replace air filter, push the replacement filter into place.
3. OR
To replace the air freshener, place the replacement in the air filter cover and pull until the side tabs release. This section will tell you how to clean and care for your compactor.
NOTE: Any services other than those outlined in the...
Use & Care Guide - Page 13
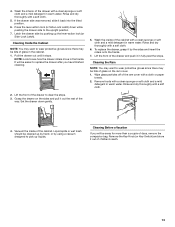
...may want to the upright position.
7. Set the drawer down while pushing the drawer ... with a soft cloth.
2. Vacuum the inside of days, remove the compactor bag. Cleaning Before a Vacation
If you will be away for more than a...dry thoroughly with a cloth or paper
towels. 2. NOTE: Look to replace the drawer after you have finished cleaning.
5. Wipe glass particles off of...
Use & Care Guide - Page 14
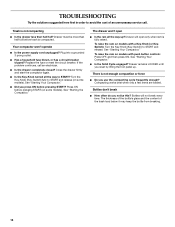
... models). If the problem continues, call . The drawer won 't operate
s Is the power supply cord unplugged? To raise the ram on models with push button controls: Press OFF, and then press ON. Bottles will open
s Is the ram all the way to START and release.
Plug into a grounded 3 prong outlet. See "Starting the Compactor." Replace...
Use & Care Guide - Page 15

... every new KITCHENAID® appliance. Call for Freestanding Unit (undercounter installation only): Order Part #9870118
15 These parts will help , follow the instructions below or contact your correspondence.
s Installation information.
s Referrals to local dealers, repair parts distributors, and service companies.
Replacement Parts
Replacement Bags - Order Part Number 4151750...
Use & Care Guide - Page 16
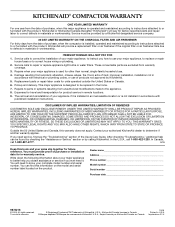
... according to instructions attached to or furnished with the product, KitchenAid or KitchenAid Canada (hereafter "KitchenAid") will pay for units operated outside the United States or Canada.
6. Service must provide proof of purchase or installation date for other than normal, single-family household use your complete model number and serial number. Replacement parts or repair labor costs...
Dimension Guide - Page 1
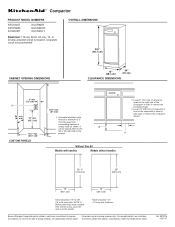
... to change materials and specifications without notice. Specifications subject to the
left or the right side of 3"
(7.6 cm) away from
surrounding cabinets or
nearby walls as shown. For complete details, see Installation
our products, we reserve the right to 16 mm) thick. Ref. 9872216 04-27-07 ® Compactor
PRODUCT MODEL NUMBERS
KFCK03IT KFCP02IR KUCK03IT...
KitchenAid KUCK03ITBS Reviews
We have not received any reviews for KitchenAid yet.