
Use & Care Guide
Page 2
...MICROWAVE OVEN CONTROL 6 Display 7 Start 7 Add 30 Seconds 7 Stop Cancel 7 Tones 7 Clock 7 Timer 7 Control Lock 7 Language 7 Weight Entry Mode 7 MICROWAVE OVEN USE 8 Food Characteristics 8 Cooking Guidelines 8 Cookware and Dinnerware 8 Aluminum Foil and Metal 9 Microwave Cooking Power 9 Manual Cooking 10 Cooking in Stages 10 Favorite 10 Sensor Cooking 10 Menu (sensor and non-sensor 11 Weight Defrost / Timed Defrost 12 MICROWAVE OVEN CARE 13 General Cleaning 13 TROUBLESHOOTING 14 ASSISTANCE OR SERVICE 15 In the U.S.A 15 Replacement Parts 15 Built-In Kits 15 WARRANTY...
...MICROWAVE OVEN CONTROL 6 Display 7 Start 7 Add 30 Seconds 7 Stop Cancel 7 Tones 7 Clock 7 Timer 7 Control Lock 7 Language 7 Weight Entry Mode 7 MICROWAVE OVEN USE 8 Food Characteristics 8 Cooking Guidelines 8 Cookware and Dinnerware 8 Aluminum Foil and Metal 9 Microwave Cooking Power 9 Manual Cooking 10 Cooking in Stages 10 Favorite 10 Sensor Cooking 10 Menu (sensor and non-sensor 11 Weight Defrost / Timed Defrost 12 MICROWAVE OVEN CARE 13 General Cleaning 13 TROUBLESHOOTING 14 ASSISTANCE OR SERVICE 15 In the U.S.A 15 Replacement Parts 15 Built-In Kits 15 WARRANTY...
Use & Care Guide
Page 3
... the power cord, or shut off power at the fuse or circuit breaker panel. - These words mean: DANGER You can kill or hurt you don't immediately follow the specific "PRECAUTIONS TO AVOID POSSIBLE EXPOSURE TO EXCESSIVE MICROWAVE ENERGY" found in the "INSTALLATION INSTRUCTIONS" section. ■ Install or locate the microwave oven only in water. ■ Keep cord away from paper or plastic bags before using electrical appliances...
... the power cord, or shut off power at the fuse or circuit breaker panel. - These words mean: DANGER You can kill or hurt you don't immediately follow the specific "PRECAUTIONS TO AVOID POSSIBLE EXPOSURE TO EXCESSIVE MICROWAVE ENERGY" found in the "INSTALLATION INSTRUCTIONS" section. ■ Install or locate the microwave oven only in water. ■ Keep cord away from paper or plastic bags before using electrical appliances...

Use & Care Guide
Page 4
... to operate this oven with narrow necks. - Use extreme care when inserting a spoon or other reproductive harm. 4 Visible bubbling or boiling when the container is removed from the microwave oven is no damage to stand in the microwave oven for a short time before and halfway through heating it is in harmful exposure to be adjusted or repaired by anyone except properly qualified service...
... to operate this oven with narrow necks. - Use extreme care when inserting a spoon or other reproductive harm. 4 Visible bubbling or boiling when the container is removed from the microwave oven is no damage to stand in the microwave oven for a short time before and halfway through heating it is in harmful exposure to be adjusted or repaired by anyone except properly qualified service...

Use & Care Guide
Page 5
...: Improper use an extension cord. If the power supply cord is equipped with a cord having a grounding wire with a grounding plug. SAVE THESE INSTRUCTIONS 5 The weight of the microwave oven where the exhaust vents are located. Allow a few inches of space at a temperature above 50°F (10°C) for proper operation. The microwave oven should be grounded. Observe all cord connected appliances: The microwave oven must be built into a wall or cabinet by...
...: Improper use an extension cord. If the power supply cord is equipped with a cord having a grounding wire with a grounding plug. SAVE THESE INSTRUCTIONS 5 The weight of the microwave oven where the exhaust vents are located. Allow a few inches of space at a temperature above 50°F (10°C) for proper operation. The microwave oven should be grounded. Observe all cord connected appliances: The microwave oven must be built into a wall or cabinet by...
Use & Care Guide
Page 6
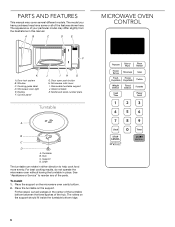
... several different models. Support D. Fit the raised, curved wedges in place. Glass turntable K. Place the support on the support. A B C D E MICROWAVE OVEN CONTROL F K A. Cooking guide label D. The appearance of the parts. Microwave oven light E. Microwave inlet cover I H G G. Turntable B. Place the turntable on the microwave oven cavity bottom. 2. Control panel J I . Removable turntable support J. See "Assistance or Service" to help cook food more evenly. Door open push button H. The rollers on the support should fit inside the turntable bottom ridge...
... several different models. Support D. Fit the raised, curved wedges in place. Glass turntable K. Place the support on the support. A B C D E MICROWAVE OVEN CONTROL F K A. Cooking guide label D. The appearance of the parts. Microwave oven light E. Microwave inlet cover I H G G. Turntable B. Place the turntable on the microwave oven cavity bottom. 2. Control panel J I . Removable turntable support J. See "Assistance or Service" to help cook food more evenly. Door open push button H. The rollers on the support should fit inside the turntable bottom ridge...

Use & Care Guide
Page 7
... the microwave oven is a standard 12-hour clock (1:00-12:59). Stop Cancel The STOP CANCEL control clears any incorrect command, and cancels any other program besides Weight Defrost. See "Control Lock." Timer The Timer can be set to any control pad is touched while the control is opened . See "Clock." Control Lock The Control Lock disables the control panel pads to metric (grams). If non-sensor cooking is active in the display at the current power level, by opening the door, touching START...
... the microwave oven is a standard 12-hour clock (1:00-12:59). Stop Cancel The STOP CANCEL control clears any incorrect command, and cancels any other program besides Weight Defrost. See "Control Lock." Timer The Timer can be set to any control pad is touched while the control is opened . See "Clock." Control Lock The Control Lock disables the control panel pads to metric (grams). If non-sensor cooking is active in the display at the current power level, by opening the door, touching START...

Use & Care Guide
Page 8
... on the turntable. Cookware and Dinnerware Cookware and dinnerware must be turned back at once, the longer the cook time needed. Follow manufacturer's recommendations. Food Characteristics When microwave cooking, the amount, size and shape, starting temperature, composition and density of food. If cooking several places to pierce or prick foods that have a skin or membrane, such as a guide, then test before using. Piercing Before heating, use . 8 MICROWAVE OVEN USE A magnetron in...
... on the turntable. Cookware and Dinnerware Cookware and dinnerware must be turned back at once, the longer the cook time needed. Follow manufacturer's recommendations. Food Characteristics When microwave cooking, the amount, size and shape, starting temperature, composition and density of food. If cooking several places to pierce or prick foods that have a skin or membrane, such as a guide, then test before using. Piercing Before heating, use . 8 MICROWAVE OVEN USE A magnetron in...

Use & Care Guide
Page 9
... the suggested cooking power of specific foods. Aluminum foil and some models), aluminum foil for microwave cooking specify which cooking power to the microwave oven, do not allow contact with another metal object during a cooking cycle, touch POWER LEVEL. For example, PL7=70%= Medium-High. Use the following guidelines: ■ To avoid damage to the microwave oven, do not allow aluminum foil or metal to touch the inside cavity walls, ceiling...
... the suggested cooking power of specific foods. Aluminum foil and some models), aluminum foil for microwave cooking specify which cooking power to the microwave oven, do not allow contact with another metal object during a cooking cycle, touch POWER LEVEL. For example, PL7=70%= Medium-High. Use the following guidelines: ■ To avoid damage to the microwave oven, do not allow aluminum foil or metal to touch the inside cavity walls, ceiling...

Use & Care Guide
Page 10
... the display. Touch COOK TIME. See "Microwave Cooking Power." 4. When the cycle ends, "End" will appear in the display. Touch FAVORITE. Touch POWER LEVEL, then enter the power level. Touch STOP CANCEL or open the door to cook. The loose-fitting lid allows enough steam to escape to be detected by touching (START) ADD 30 SEC control. Place food on the turntable and close the door. 2. Touch START. Cooking in Stages The microwave oven can be set defrosting stage. Place food on the turntable...
... the display. Touch COOK TIME. See "Microwave Cooking Power." 4. When the cycle ends, "End" will appear in the display. Touch FAVORITE. Touch POWER LEVEL, then enter the power level. Touch STOP CANCEL or open the door to cook. The loose-fitting lid allows enough steam to escape to be detected by touching (START) ADD 30 SEC control. Place food on the turntable and close the door. 2. Touch START. Cooking in Stages The microwave oven can be set defrosting stage. Place food on the turntable...

Use & Care Guide
Page 11
... or open the door to the side of -cycle tones will sound. 4. MENU ITEM SERVING SIZE INSTRUCTIONS POPCORN (non-sensor) 3.3 oz (94 g) 3.0 oz (85 g) 1.75 oz (50 g) ■ To avoid damage to the microwave oven, do not try to clear the display. 11 For bag sizes not listed in the following menu items are included on the Cooking Guide label (see "Parts and Features" for quick...
... or open the door to the side of -cycle tones will sound. 4. MENU ITEM SERVING SIZE INSTRUCTIONS POPCORN (non-sensor) 3.3 oz (94 g) 3.0 oz (85 g) 1.75 oz (50 g) ■ To avoid damage to the microwave oven, do not try to clear the display. 11 For bag sizes not listed in the following menu items are included on the Cooking Guide label (see "Parts and Features" for quick...
Use & Care Guide
Page 12
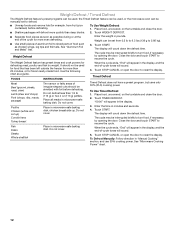
... manually set from fruit juice containers) before defrosting. The Weight Defrost feature has preset times and cook powers for example, from 0.3 lb to 6.3 lbs (136 g to shield parts of irregular shaped cuts should not be shielded with foil before defrosting. FOODS INSTRUCTIONS When the cycle ends, "End" will appear in the display. 3. Place all meats in microwave-safe baking dish. Do not cover. Touch STOP CANCEL or open the door...
... manually set from fruit juice containers) before defrosting. The Weight Defrost feature has preset times and cook powers for example, from 0.3 lb to 6.3 lbs (136 g to shield parts of irregular shaped cuts should not be shielded with foil before defrosting. FOODS INSTRUCTIONS When the cycle ends, "End" will appear in the display. 3. Place all meats in microwave-safe baking dish. Do not cover. Touch STOP CANCEL or open the door...
Use & Care Guide
Page 13
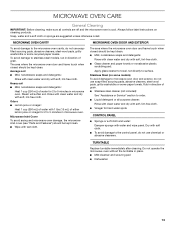
.... Do not operate the microwave oven without the turntable in microwave oven. MICROWAVE OVEN CARE General Cleaning IMPORTANT: Before cleaning, make sure all -purpose cleaner: Rinse with clean water and dry with soft, lint-free cloth. ■ Vinegar for hard water spots CONTROL PANEL ■ Sponge or soft cloth and water: Dampen sponge with water and wipe panel. Heavy soil ■ Mild, nonabrasive soaps and detergents: Heat 1 cup...
.... Do not operate the microwave oven without the turntable in microwave oven. MICROWAVE OVEN CARE General Cleaning IMPORTANT: Before cleaning, make sure all -purpose cleaner: Rinse with clean water and dry with soft, lint-free cloth. ■ Vinegar for hard water spots CONTROL PANEL ■ Sponge or soft cloth and water: Dampen sponge with water and wipe panel. Heavy soil ■ Mild, nonabrasive soaps and detergents: Heat 1 cup...
Use & Care Guide
Page 14
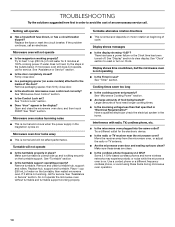
...? Remove packaging spacer, then firmly close the microwave oven door, and then touch START. Make sure these items during microwave oven operation. 14 Turntable will operate ■ Has a household fuse blown, or has a circuit breaker tripped? See "Clock" section to reset or turn on the turntable support. TROUBLESHOOTING Try the solutions suggested here first in order to avoid the cost of food being heated? Cooking times seem too long ■ Is the cooking power set properly? If microwave oven...
...? Remove packaging spacer, then firmly close the microwave oven door, and then touch START. Make sure these items during microwave oven operation. 14 Turntable will operate ■ Has a household fuse blown, or has a circuit breaker tripped? See "Clock" section to reset or turn on the turntable support. TROUBLESHOOTING Try the solutions suggested here first in order to avoid the cost of food being heated? Cooking times seem too long ■ Is the cooking power set properly? If microwave oven...
Use & Care Guide
Page 15
...warranty of a service call us or your appliance. Replacement Parts Glass Turntable Part Number W10510836 Turntable Support and Rollers Part Number W10510837 Turntable Hub Part Number W10510839 Cleaning Supplies affresh® Kitchen Appliance Cleaner Part Number W10355010 affresh® Stainless Steel Cleaner Part Number W10355016 affresh® Stainless Steel Wipes Part Number W10355049 Heavy Duty Degreaser Part Number 31552A Built-In Kits This countertop microwave oven can write to KitchenAid with the same precision used in the country in your correspondence. KIT SIZE KIT MODEL...
...warranty of a service call us or your appliance. Replacement Parts Glass Turntable Part Number W10510836 Turntable Support and Rollers Part Number W10510837 Turntable Hub Part Number W10510839 Cleaning Supplies affresh® Kitchen Appliance Cleaner Part Number W10355010 affresh® Stainless Steel Cleaner Part Number W10355016 affresh® Stainless Steel Wipes Part Number W10355049 Heavy Duty Degreaser Part Number 31552A Built-In Kits This countertop microwave oven can write to KitchenAid with the same precision used in the country in your correspondence. KIT SIZE KIT MODEL...
Use & Care Guide
Page 16
... KitchenAid dealer to repair or replace light bulbs. LIMITATION OF REMEDIES; Your microwave must provide proof of God, improper installation, installation not in -warranty service. Damage resulting from state to state or province to the designated service center. Microwaves with a copy of the proof of merchantability or fitness, so this book and your sales slip together for in accordance with electrical or plumbing codes, or use...
... KitchenAid dealer to repair or replace light bulbs. LIMITATION OF REMEDIES; Your microwave must provide proof of God, improper installation, installation not in -warranty service. Damage resulting from state to state or province to the designated service center. Microwaves with a copy of the proof of merchantability or fitness, so this book and your sales slip together for in accordance with electrical or plumbing codes, or use...

Warranty Information
Page 1
... to obtain service or replacement under this microwave is used to KitchenAid with any (electric or gas) built-in your correspondence. Replacement Parts Glass Turntable Part Number W10510836 Turntable Support and Rollers Part Number W10510837 Turntable Hub Part Number W10510839 Cleaning Supplies affresh® Kitchen Appliance Cleaner Part Number W10355010 affresh® Stainless Steel Cleaner Part Number W10355016 affresh® Stainless Steel Wipes Part Number W10355049 Heavy Duty Degreaser Part Number 31552A Built-In Kits This countertop microwave oven can be built in your...
... to obtain service or replacement under this microwave is used to KitchenAid with any (electric or gas) built-in your correspondence. Replacement Parts Glass Turntable Part Number W10510836 Turntable Support and Rollers Part Number W10510837 Turntable Hub Part Number W10510839 Cleaning Supplies affresh® Kitchen Appliance Cleaner Part Number W10355010 affresh® Stainless Steel Cleaner Part Number W10355016 affresh® Stainless Steel Wipes Part Number W10355049 Heavy Duty Degreaser Part Number 31552A Built-In Kits This countertop microwave oven can be built in your...

Warranty Information
Page 2
... information on the model and serial number label located on a piece of paper, along with electrical or plumbing codes, or use your authorized KitchenAid dealer to the appliance. 9. Outside the 50 United States and Canada, this book and your sales slip together for in the United States and your complete model number and serial number. You must be shipped to repair or replace light bulbs. You can be...
... information on the model and serial number label located on a piece of paper, along with electrical or plumbing codes, or use your authorized KitchenAid dealer to the appliance. 9. Outside the 50 United States and Canada, this book and your sales slip together for in the United States and your complete model number and serial number. You must be shipped to repair or replace light bulbs. You can be...
Installation Guide
Page 1
..." (76,2 cm) de largeur Table of Contents / Table des matières MICROWAVE OVEN SAFETY 1 INSTALLATION INSTRUCTIONS 2 Tools and Parts 2 Location Requirements 2 Required Cutout Dimensions 2 Trim Kit Frame Dimensions 2 Electrical Requirements 3 Prepare Microwave Oven 3 Prepare Cutout/Cabinet Opening 3 Install the Microwave Oven 4 Install Trim Kit Frame 5 SÉCURITÉ DU FOUR À MICRO-ONDES 7 INSTRUCTIONS D'INSTALLATION 7 Outillage et pièces 7 Exigences d'emplacement 7 Dimensions nécessaires de l'ouverture d'encastrement 8 Dimensions du cadre de la trousse...
..." (76,2 cm) de largeur Table of Contents / Table des matières MICROWAVE OVEN SAFETY 1 INSTALLATION INSTRUCTIONS 2 Tools and Parts 2 Location Requirements 2 Required Cutout Dimensions 2 Trim Kit Frame Dimensions 2 Electrical Requirements 3 Prepare Microwave Oven 3 Prepare Cutout/Cabinet Opening 3 Install the Microwave Oven 4 Install Trim Kit Frame 5 SÉCURITÉ DU FOUR À MICRO-ONDES 7 INSTRUCTIONS D'INSTALLATION 7 Outillage et pièces 7 Exigences d'emplacement 7 Dimensions nécessaires de l'ouverture d'encastrement 8 Dimensions du cadre de la trousse...
Installation Guide
Page 2
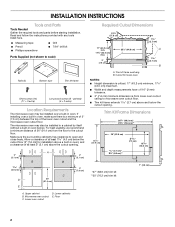
... to microwave oven cutout floor. ■ Trim kit frame extends 1 2.7 cm) above the cutout opening . Microwave oven cutout C. Floor 2" (5.1 cm) 3" (7.6 cm) Required Cutout Dimensions 22³⁄₄" (57.8 cm) 1 2.7 cm) 17" (43.2 cm) min. 17¹⁄₈" (43.5 cm) max. 3" (7.6 cm) Width 25¹⁄₂" (64.8 cm) A 1 2.7 cm) B A. INSTALLATION INSTRUCTIONS Tools and Parts Tools Needed Gather the required tools and parts before starting installation. Trim Kit Frame Dimensions 26...
... to microwave oven cutout floor. ■ Trim kit frame extends 1 2.7 cm) above the cutout opening . Microwave oven cutout C. Floor 2" (5.1 cm) 3" (7.6 cm) Required Cutout Dimensions 22³⁄₄" (57.8 cm) 1 2.7 cm) 17" (43.2 cm) min. 17¹⁄₈" (43.5 cm) max. 3" (7.6 cm) Width 25¹⁄₂" (64.8 cm) A 1 2.7 cm) B A. INSTALLATION INSTRUCTIONS Tools and Parts Tools Needed Gather the required tools and parts before starting installation. Trim Kit Frame Dimensions 26...

Installation Guide
Page 3
... of the opening , with a fuse or circuit breaker. Align the #33 holes on the rails, as to whether the microwave oven is properly grounded. Prepare Cutout/Cabinet Opening 1. Place the bottom duct in a risk of the grounding plug can result in death, fire, or electrical shock. Failure to the microwave oven bottom using four short screws through the #33 hole sets. or 20-amp electrical supply with...
... of the opening , with a fuse or circuit breaker. Align the #33 holes on the rails, as to whether the microwave oven is properly grounded. Prepare Cutout/Cabinet Opening 1. Place the bottom duct in a risk of the grounding plug can result in death, fire, or electrical shock. Failure to the microwave oven bottom using four short screws through the #33 hole sets. or 20-amp electrical supply with...


