
Warranty Information
Page 1
... sole discretion replace the product. light bulbs, batteries, air or water filters, etc.). 5. Removal or reinstallation of the Use and Care Guide, scan the QR code on the duration of implied warranties of your product will pay for appliances with electrical or plumbing codes or correction of purchase, when this major appliance and that comes with servicing, removal or replacement of God or use inconsistent with...
... sole discretion replace the product. light bulbs, batteries, air or water filters, etc.). 5. Removal or reinstallation of the Use and Care Guide, scan the QR code on the duration of implied warranties of your product will pay for appliances with electrical or plumbing codes or correction of purchase, when this major appliance and that comes with servicing, removal or replacement of God or use inconsistent with...
Use & Care Guide
Page 1
... 3 PARTS AND FEATURES 4 Turntable 4 Convection Rack 4 Crisper Pan and Handle 4 Baking Tray 5 KITCHENAID™ Steamer Vessel 5 FEATURE GUIDE 6 Display(s 10 Number Codes 10 Start/Add 1 Minute 10 Control Lock 10 Microwave Oven Cancel 11 Clock 11 Tones 11 Tools 11 Fahrenheit and Celsius 11 Timer 11 BUILT-IN MICROWAVE OVEN USE 12 Food Characteristics 12 Cooking Guidelines 12 Cookware and Dinnerware 13 Aluminum Foil and Metal 13 Positioning Baking Tray 13 Microwave Cooking Power 14 Doneness 14 Sensor Cook 14 Manual Cooking...
... 3 PARTS AND FEATURES 4 Turntable 4 Convection Rack 4 Crisper Pan and Handle 4 Baking Tray 5 KITCHENAID™ Steamer Vessel 5 FEATURE GUIDE 6 Display(s 10 Number Codes 10 Start/Add 1 Minute 10 Control Lock 10 Microwave Oven Cancel 11 Clock 11 Tones 11 Tools 11 Fahrenheit and Celsius 11 Timer 11 BUILT-IN MICROWAVE OVEN USE 12 Food Characteristics 12 Cooking Guidelines 12 Cookware and Dinnerware 13 Aluminum Foil and Metal 13 Positioning Baking Tray 13 Microwave Cooking Power 14 Doneness 14 Sensor Cook 14 Manual Cooking...
Use & Care Guide
Page 2
... others . See "GROUNDING INSTRUCTIONS" found in the "PAN BROWN" mode. ■ Do not cover racks or any other than manufacturer's recommended accessories, in use . ■ Oversized foods or oversized metal utensils should not be grounded. Do not use as whole eggs in the microwave oven. Connect only to heat, cook, or dry food. Always read and obey all instructions before using electrical appliances basic safety...
... others . See "GROUNDING INSTRUCTIONS" found in the "PAN BROWN" mode. ■ Do not cover racks or any other than manufacturer's recommended accessories, in use . ■ Oversized foods or oversized metal utensils should not be grounded. Do not use as whole eggs in the microwave oven. Connect only to heat, cook, or dry food. Always read and obey all instructions before using electrical appliances basic safety...

Use & Care Guide
Page 3
... and halfway through heating it is damaged. Do not overcook food. Remove wire twist-ties from the microwave oven is less than 120 volts, cooking times may be boiling. SAVE THESE INSTRUCTIONS PRECAUTIONS TO AVOID POSSIBLE EXPOSURE TO EXCESSIVE MICROWAVE ENERGY (a) Do not attempt to operate this product near a swimming pool, and the like. ■ See door surface cleaning instructions in the "Oven Care" section. ■...
... and halfway through heating it is damaged. Do not overcook food. Remove wire twist-ties from the microwave oven is less than 120 volts, cooking times may be boiling. SAVE THESE INSTRUCTIONS PRECAUTIONS TO AVOID POSSIBLE EXPOSURE TO EXCESSIVE MICROWAVE ENERGY (a) Do not attempt to operate this product near a swimming pool, and the like. ■ See door surface cleaning instructions in the "Oven Care" section. ■...
Use & Care Guide
Page 4
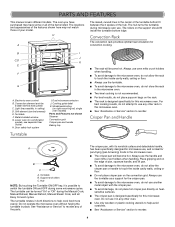
... other oven. ■ Use only wooden or plastic cooking utensils to help cook food more evenly. Always use , and is designed specifically for this microwave oven. B I . Door safety lock system I J C,D K E F G A. Crisper Pan and Handle A B C A. Grill element (can be lowered) E. Lower oven (on the support should fit inside cavity walls, ceiling or floor. ■ Do not place crisper pan on the convection grid. Turntable B. Electronic oven control B. Model/serial/rating (on the rack. ■ The rack...
... other oven. ■ Use only wooden or plastic cooking utensils to help cook food more evenly. Always use , and is designed specifically for this microwave oven. B I . Door safety lock system I J C,D K E F G A. Crisper Pan and Handle A B C A. Grill element (can be lowered) E. Lower oven (on the support should fit inside cavity walls, ceiling or floor. ■ Do not place crisper pan on the convection grid. Turntable B. Electronic oven control B. Model/serial/rating (on the rack. ■ The rack...

Use & Care Guide
Page 10
... start 1 minute of Day/Timer Display When the microwave oven is preset with shortcut number codes. Upper Microwave Oven Display (combination oven models) When the upper oven is in use of -cycle tones will sound, and then reminder tones will remain set after a power failure, if set before or after the "Start?" Time of cook time at 100% power. Number Codes The oven is not in use , this display shows a time countdown and the stop reminder tones. food category, cooking power, cook time and food quantity or weight. Start...
... start 1 minute of Day/Timer Display When the microwave oven is preset with shortcut number codes. Upper Microwave Oven Display (combination oven models) When the upper oven is in use of -cycle tones will sound, and then reminder tones will remain set after a power failure, if set before or after the "Start?" Time of cook time at 100% power. Number Codes The oven is not in use , this display shows a time countdown and the stop reminder tones. food category, cooking power, cook time and food quantity or weight. Start...
Use & Care Guide
Page 11
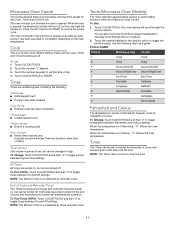
... manually scroll through the various options. When the temperature is opened . To Turn Tones Off/On: Touch CLOCK/TOOLS and then "5" to Celsius. Touch the number keypad for the Clock, Timer and Control Lock. Microwave Oven Cancel The Cancel keypad stops any microwave oven function except for the specific option to resume the preset cycle. Close the door and touch START to toggle the function setup. Before setting, make sure the oven, Timer, and Timed Cooking...
... manually scroll through the various options. When the temperature is opened . To Turn Tones Off/On: Touch CLOCK/TOOLS and then "5" to Celsius. Touch the number keypad for the Clock, Timer and Control Lock. Microwave Oven Cancel The Cancel keypad stops any microwave oven function except for the specific option to resume the preset cycle. Close the door and touch START to toggle the function setup. Before setting, make sure the oven, Timer, and Timed Cooking...

Use & Care Guide
Page 12
... the microwave turntable, turn freely on the door and cavity surfaces is empty. ■ The turntable must be on during microwave cooking. Arranging If heating irregularly shaped or different sized foods, arrange the thinner parts and smaller sized items toward the center. Amount of food. Starting Temperature Room temperature foods will heat faster than refrigerated foods, and refrigerated foods will cook more quickly than larger pieces, and uniformly shaped foods cook more food heated...
... the microwave turntable, turn freely on the door and cavity surfaces is empty. ■ The turntable must be on during microwave cooking. Arranging If heating irregularly shaped or different sized foods, arrange the thinner parts and smaller sized items toward the center. Amount of food. Starting Temperature Room temperature foods will heat faster than refrigerated foods, and refrigerated foods will cook more quickly than larger pieces, and uniformly shaped foods cook more food heated...

Use & Care Guide
Page 13
..., Covers, Dinnerware, Containers Use those approved by the manufacturer for use in tray to the microwave oven, do not allow aluminum foil or metal to touch the inside cavity walls, ceiling or floor. ■ Always use oven mitts or pot holders when removing dishes from the food. Use the following guidelines: ■ To avoid damage to the microwave oven, do not allow contact with gold or silver trim...
..., Covers, Dinnerware, Containers Use those approved by the manufacturer for use in tray to the microwave oven, do not allow aluminum foil or metal to touch the inside cavity walls, ceiling or floor. ■ Always use oven mitts or pot holders when removing dishes from the food. Use the following guidelines: ■ To avoid damage to the microwave oven, do not allow contact with gold or silver trim...

Use & Care Guide
Page 16
.... Use Steam Cook for foods such as vegetables, fish and potatoes. ■ Times and cooking powers have been preset for popping to slow to steam food. Use the following chart as a guide. NOTE: Follow the instructions provided by using . Hot cooked food can be kept warm in the microwave oven. ■ Cover plates of food. ■ Cover foods that a cook time be entered. ■ It is a sensor cooking function that a cook time and power level be entered if using the Defrost...
.... Use Steam Cook for foods such as vegetables, fish and potatoes. ■ Times and cooking powers have been preset for popping to slow to steam food. Use the following chart as a guide. NOTE: Follow the instructions provided by using . Hot cooked food can be kept warm in the microwave oven. ■ Cover plates of food. ■ Cover foods that a cook time be entered. ■ It is a sensor cooking function that a cook time and power level be entered if using the Defrost...

Use & Care Guide
Page 18
... upper oven display. Time and temperature will appear on the oven display. Round pizza pans are excellent for convection cooking. ■ Use convection cooking for convection cooking. Broil element B. EasyConvect™ Conversion is complete. Place food or bakeware on convection grid or on slide rails and close the door. 8. Touch CANCEL or open the door to cook. Convection temperatures and times differ from the Convection Chart. CONVECTION CHART SETTING FOODS CODE BAKED GOODS Biscuits, Breads: quick and...
... upper oven display. Time and temperature will appear on the oven display. Round pizza pans are excellent for convection cooking. ■ Use convection cooking for convection cooking. Broil element B. EasyConvect™ Conversion is complete. Place food or bakeware on convection grid or on slide rails and close the door. 8. Touch CANCEL or open the door to cook. Convection temperatures and times differ from the Convection Chart. CONVECTION CHART SETTING FOODS CODE BAKED GOODS Biscuits, Breads: quick and...

Use & Care Guide
Page 19
... instructions on panel. ■ affresh® Kitchen Appliance Cleaner Part Number W10355010 (not included): See "Assistance or Service" section to order. Raise broil element back up and return the fastening thread back to soft cloth or sponge, not directly on cleaning products. The area where the oven door and frame touch when closed should be cleaned with soft, lint-free cloth. TURNTABLE Replace turntable immediately after cleaning...
... instructions on panel. ■ affresh® Kitchen Appliance Cleaner Part Number W10355010 (not included): See "Assistance or Service" section to order. Raise broil element back up and return the fastening thread back to soft cloth or sponge, not directly on cleaning products. The area where the oven door and frame touch when closed should be cleaned with soft, lint-free cloth. TURNTABLE Replace turntable immediately after cleaning...

Use & Care Guide
Page 20
... turntable support operating properly? See "Control Lock" section. ■ On combination oven models, is the Control Lock set? Turntable will not operate ■ Is the door completely closed? Do not operate the oven without turntable and turntable support working properly? The door may stay on motor rotation at 100% cooking power. Make sure these areas are not sounding ■ Are tones disabled? If the problem continues, call for service. See "Electronic Oven Control" section. ■ On some time in the "Microwave Oven Use...
... turntable support operating properly? See "Control Lock" section. ■ On combination oven models, is the Control Lock set? Turntable will not operate ■ Is the door completely closed? Do not operate the oven without turntable and turntable support working properly? The door may stay on motor rotation at 100% cooking power. Make sure these areas are not sounding ■ Are tones disabled? If the problem continues, call for service. See "Electronic Oven Control" section. ■ On some time in the "Microwave Oven Use...
Use & Care Guide
Page 21
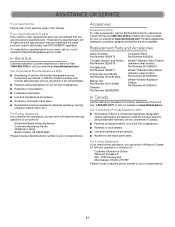
... concerns at : KitchenAid Brand Home Appliances Customer eXperience Center 553 Benson Road Benton Harbor, MI 49022-2692 Please include a daytime phone number in this manual. Accessories Accessories U.S.A. Replacement Parts and Accessories Glass Turntable Part Number 8205676 Turntable Support and Rollers Part Number 8205678 Turntable Hub Part Number 8205677 Crisper Pan and Handle Part Number W10187336A Baking Tray Part Number W10120486 Steamer Part Number 8208262RB Convection Rack Part Number 4452220 affresh® Stainless Steel Cleaner (stainless steel models) Part Number W10355016 affresh...
... concerns at : KitchenAid Brand Home Appliances Customer eXperience Center 553 Benson Road Benton Harbor, MI 49022-2692 Please include a daytime phone number in this manual. Accessories Accessories U.S.A. Replacement Parts and Accessories Glass Turntable Part Number 8205676 Turntable Support and Rollers Part Number 8205678 Turntable Hub Part Number 8205677 Crisper Pan and Handle Part Number W10187336A Baking Tray Part Number W10120486 Steamer Part Number 8208262RB Convection Rack Part Number 4452220 affresh® Stainless Steel Cleaner (stainless steel models) Part Number W10355016 affresh...
Use & Care Guide
Page 22
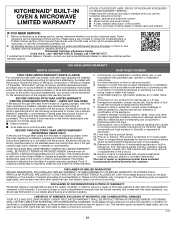
... HEREIN. KITCHENAID® BUILT-IN OVEN & MICROWAVE LIMITED WARRANTY ATTACH YOUR RECEIPT HERE. PROOF OF PURCHASE IS REQUIRED TO OBTAIN WARRANTY SERVICE. Some questions can be provided by our authorized KitchenAid Service Providers. Please take a few minutes to review the Troubleshooting or Problem Solver section of the Use and Care Guide, scan the QR code on the duration of implied warranties of original purchase date is installed, operated and...
... HEREIN. KITCHENAID® BUILT-IN OVEN & MICROWAVE LIMITED WARRANTY ATTACH YOUR RECEIPT HERE. PROOF OF PURCHASE IS REQUIRED TO OBTAIN WARRANTY SERVICE. Some questions can be provided by our authorized KitchenAid Service Providers. Please take a few minutes to review the Troubleshooting or Problem Solver section of the Use and Care Guide, scan the QR code on the duration of implied warranties of original purchase date is installed, operated and...

Installation Guide
Page 1
... À CONVECTION DE 27" (68,6 CM) ET 30" (76,2 CM) Table of Contents/Table des matières BUILT-IN MICROWAVE OVEN SAFETY 1 SÉCURITÉ DU FOUR À MICRO-ONDES ENCASTR 7 INSTALLATION REQUIREMENTS 2 Tools and Parts 2 Location Requirements 2 Electrical Requirements 3 EXIGENCES D'INSTALLATION 7 Outils et pièces 7 Exigences d'emplacement 7 Spécfications électriques 9 INSTALLATION INSTRUCTIONS 4 Spacer Kit Installation 4 Prepare Built-In Microwave Oven 4 Make Electrical Connection 5 Install Microwave Oven 5 Complete Installation 6 INSTRUCTIONS...
... À CONVECTION DE 27" (68,6 CM) ET 30" (76,2 CM) Table of Contents/Table des matières BUILT-IN MICROWAVE OVEN SAFETY 1 SÉCURITÉ DU FOUR À MICRO-ONDES ENCASTR 7 INSTALLATION REQUIREMENTS 2 Tools and Parts 2 Location Requirements 2 Electrical Requirements 3 EXIGENCES D'INSTALLATION 7 Outils et pièces 7 Exigences d'emplacement 7 Spécfications électriques 9 INSTALLATION INSTRUCTIONS 4 Spacer Kit Installation 4 Prepare Built-In Microwave Oven 4 Make Electrical Connection 5 Install Microwave Oven 5 Complete Installation 6 INSTRUCTIONS...

Installation Guide
Page 2
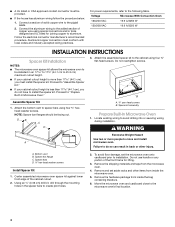
... cabinet supplier to 50.2 cm) maximum cutout height. A microwave oven spacer kit is required. Flush Installation ■ W10752697A Stainless steel flush installation kit for 30" (76.2 cm) models ■ W10752698A Stainless steel flush installation kit for wall cabinet installations) Parts Needed ■ A UL listed or CSA approved conduit connector ■ UL listed wire connectors Parts Needed - Bottom vent (1) C. ³⁄₈" hex-head washer screws (4) D.¾" pan-head screws (4) Check local codes. See "Electrical Requirements." Given dimensions...
... cabinet supplier to 50.2 cm) maximum cutout height. A microwave oven spacer kit is required. Flush Installation ■ W10752697A Stainless steel flush installation kit for 30" (76.2 cm) models ■ W10752698A Stainless steel flush installation kit for wall cabinet installations) Parts Needed ■ A UL listed or CSA approved conduit connector ■ UL listed wire connectors Parts Needed - Bottom vent (1) C. ³⁄₈" hex-head washer screws (4) D.¾" pan-head screws (4) Check local codes. See "Electrical Requirements." Given dimensions...
Installation Guide
Page 4
Attach the assembled spacer kit to the cabinet using four ³⁄₈" hexhead washer screws. Attach the bottom vent to install the spacer kit. Locate existing wiring to the following table. Spacer bars D. ³⁄₈" hex-head washer screws Install Spacer Kit 1. Using an ¹⁄₈" (0.32 cm) drill bit, drill through the mounting holes in back or other items from inside the bag containing...
Attach the assembled spacer kit to the cabinet using four ³⁄₈" hexhead washer screws. Attach the bottom vent to install the spacer kit. Locate existing wiring to the following table. Spacer bars D. ³⁄₈" hex-head washer screws Install Spacer Kit 1. Using an ¹⁄₈" (0.32 cm) drill bit, drill through the mounting holes in back or other items from inside the bag containing...
Installation Guide
Page 6
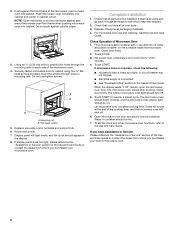
... 2. Push against outside edges. 3. Push microwave oven completely into cabinet. Do not overtighten screws. Replace convection grid, turntable and support hub. 6. Display panel will shut off . 5. If display panel does not light, please reference the "Assistance or Service" section of your built-in the display. 8. Complete Installation 1. For microwave oven use and cleaning, read the Use and Care Guide. Touch COOK. 3. When the display reads "1:00" minute, open the microwave oven door. Close door firmly. Touch START to the Use and Care Guide. Tones will sound at the...
... 2. Push against outside edges. 3. Push microwave oven completely into cabinet. Do not overtighten screws. Replace convection grid, turntable and support hub. 6. Display panel will shut off . 5. If display panel does not light, please reference the "Assistance or Service" section of your built-in the display. 8. Complete Installation 1. For microwave oven use and cleaning, read the Use and Care Guide. Touch COOK. 3. When the display reads "1:00" minute, open the microwave oven door. Close door firmly. Touch START to the Use and Care Guide. Tones will sound at the...
Instruction Sheet
Page 2
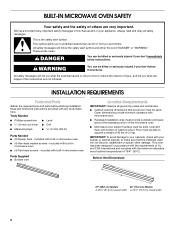
... of cabinet cutout. WARNING You can happen if the instructions are shown must be killed or seriously injured if you how to your appliance. INSTALLATION REQUIREMENTS Tools and Parts Gather the required tools and parts before starting installation. included with your builder or cabinet supplier to make sure that the materials used . Given dimensions provide minimum clearance with microwave oven. ■ Recessed installation area...
... of cabinet cutout. WARNING You can happen if the instructions are shown must be killed or seriously injured if you how to your appliance. INSTALLATION REQUIREMENTS Tools and Parts Gather the required tools and parts before starting installation. included with your builder or cabinet supplier to make sure that the materials used . Given dimensions provide minimum clearance with microwave oven. ■ Recessed installation area...


