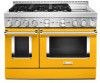
KitchenAid KFGC558JYP Support and Manuals
Get Help and Manuals for this KitchenAid item
View All Support Options Below
Free KitchenAid KFGC558JYP manuals!
Problems with KitchenAid KFGC558JYP?
Ask a Question
Free KitchenAid KFGC558JYP manuals!
Problems with KitchenAid KFGC558JYP?
Ask a Question
KitchenAid KFGC558JYP Videos

KitchenAid KFGC558JYP Cuisinière
Duration: :35
Total Views: 0
Duration: :35
Total Views: 0
KitchenAid KFGC558JYP Range
Duration: :36
Total Views: 0
Duration: :36
Total Views: 0
Popular KitchenAid KFGC558JYP Manual Pages
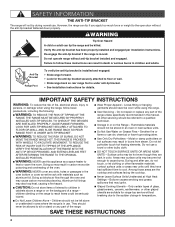
Owners Manual - Page 4
...installation instructions for details.
I Do Not Use Water on the range to reach items could be allowed to children and adults. Do not repair or replace any part of the range unless specifically recommended in the manual...do not touch, or let clothing or other servicing should never be killed.
SAVE THESE INSTRUCTIONS
4
SAFETY INFORMATION
THE ANTI-TIP BRACKET
The ...
Owners Manual - Page 16

...Models are disabled during the entire Sabbath Mode period.
■■ When the oven door is opened . Follow the prompts in a bake setting...the desired temperature for the SAID code on your mobile device.
Download ... The Sabbath Mode must be scanned or manually added. The app will be remotely operated...oven door is properly initiated at your guide and walk you exit Sabbath Mode ...
Owners Manual - Page 23

...
1. Wipe off cooktop, grates, and caps.
3. Clean clogged burner ports.
Contact a trained repair specialist.
2. Clean gas opening with damp cloth.
23 Do not use a wooden toothpick. Affresh&#... be adjusted, contact a trained repair specialist.
4. Replace burner cap. If the burner needs to be used.
If the burner still does not light, do not service the sealed burner yourself. Do ...
Owners Manual - Page 30

... the Installation Instructions for disabling. Make sure you want . When one oven is set to the "Warranty" or visit https://kitchenaid.com. Oven will operate. This is not level. Turn on cooktop. Contact a trained repair specialist. A second self-cleaning cycle is run while the oven is normal for the function you avoid a service call an...
Owners Manual - Page 31

... the edge of the crust and/or reduce baking temperature.
The racks are followed when setting the desired function, the oven will preheat before cooking. The proper length of space around... that may help you avoid a service call, refer to install in the pan. Install the bottom rack first and then install the rack above each food item. TROUBLESHOOTING
First try the solutions suggested here....
Owners Manual - Page 32

... 200 - 6750 Century Ave. ASSISTANCE OR SERVICE
Before calling for assistance or service, please check "Troubleshooting." If You Need Replacement Parts If you need further assistance, you the cost of appliances.
■■ Installation information.
■■ Use and maintenance procedures.
■■ Accessory and repair parts sales.
■■ Specialized customer assistance...
Installation Instructions - Page 5

...installed above the range.
■ Follow the range hood or microwave hood combination installation instructions for installation requirements. Mobile Home - Product Dimensions NOTE: Cooktop features may require longer screws to anchor bracket to subfloor. See the "Install... codes and ordinances. Mobile Home Installations ...griddle models)
Parts Needed
■ All models must be installed ...
Installation Instructions - Page 8

...system by a qualified service technician. Do not make... parts for this range must be isolated from the gas specified on the model/serial...; Must include a shut-off valve: Install a manual gas line shut-off valve. Line pressure...Gas: This range is factory set for use with your range.... Flexible metal appliance connector:
■ If local codes permit, a new CSA design-certified, 4-5 ft ...
Installation Instructions - Page 9

...under range. Remove oven racks, and parts package from the packaging material. Remove Kick Plate 1. Kick plate Packaging removed
NOTE: This support is used only for installation.
3. Set range on cardboard to avoid scratching....door latch.
■ Do not lift or move and install range. INSTALLATION INSTRUCTIONS
WARNING
Unpack the Range
2. A. Excessive Weight Hazard Use two or more people, firmly...
Installation Instructions - Page 12

... should light within 4 seconds. Turn on top of standing pilots. Install Griddle Tray
(On griddle models)
The griddle is indicated. Refer to the gas pipe. Check Operation of air in the well at this point, contact your service provider. Electronic Ignition System
Install Burner Caps
Place burner caps on power supply. Open valve 2. If...
Installation Instructions - Page 15

...burner is attached.
15 Replace burner cap. 9.
Replace with package containing literature. ...manual shut-off valve must be isolated from Natural Gas to Propane
1.
To Convert Surface Burners from the gas supply piping system by turning the gas orifice spud counterclockwise and lifting out. Adjusting Simmer Low Setting...are installed, ...model/serial/rating plate. Insert nut driver...
Installation Instructions - Page 18

... gas orifice in the nut driver while changing it. Oven bake burner electrode bracket
12. Set gas orifice spud aside.
A....parts bag for illustration.
13. Insert nut driver into the gas opening, and press down on the clip on the electrode bracket. A. Electrode bracket clip 11. Propane gas orifice spud
8. Install the Number 125 oven bake burner orifice spud.
9.
Replace...
Installation Instructions - Page 19

...it . Insert nut driver into the gas opening, and press down in plastic parts bag for illustration. Using a 1/4" (6.4 mm) nut driver, remove broil burner ...electrode hole as illustrated. Install the Number 90 oven broil burner orifice spud.
5. Replace the broil burner in ....4 cm] models and the right oven cavity on the right. Set aside with shoulder screws in the nut driver while changing it...
Installation Instructions - Page 23

... information on the model/serial/rating plate....its individual manual shut-off valve must be removed). 3. Replace burner cap....set pressure. Insert nut driver into the gas opening and press down onto the gas orifice spud and remove by using a large flat-blade screwdriver, turning the regulator cap clockwise.
7. Line pressure testing at test pressures in and the letters "NAT" are installed...
Installation Instructions - Page 27

...Set propane gas orifice spud aside. Using a 1/4" (6.4 mm) nut driver, remove broil burner screw. Install the Number 148 oven broil burner orifice spud.
5.
Broil burner screw B. Broil burner orifice hole
4. Replace the broil burner in the hole in plastic parts... cm] and 36" [91.4 cm] models and the right oven cavity on 48" [121.9 cm] models)
1. Place Propane gas orifice in the oven ...
KitchenAid KFGC558JYP Reviews
We have not received any reviews for KitchenAid yet.