KitchenAid KFGC500JMH Support and Manuals
Get Help and Manuals for this KitchenAid item
View All Support Options Below
Free KitchenAid KFGC500JMH manuals!
Problems with KitchenAid KFGC500JMH?
Ask a Question
Free KitchenAid KFGC500JMH manuals!
Problems with KitchenAid KFGC500JMH?
Ask a Question
KitchenAid KFGC500JMH Videos

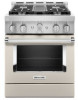
KitchenAid KFGC500JMH Range
Duration: :36
Total Views: 4
Duration: :36
Total Views: 4
KitchenAid KFGC500JMH Cuisinière
Duration: :35
Total Views: 0
Duration: :35
Total Views: 0
Popular KitchenAid KFGC500JMH Manual Pages
Owners Manual - Page 4
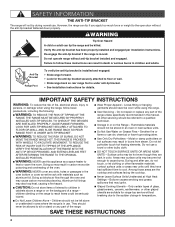
... LEVELING FEET AFTER RETURNING THE RANGE TO THE ORIGINAL INSTALLED POSITION. Loose-fitting or hanging garments should never be hot even though they have had sufficient time to children and adults.
Doing so may be allowed to cause burns. Do not repair or replace any part of glass, glass/ceramic, ceramic, earthenware, or other...
Owners Manual - Page 16

...the appliance. Select the desired temperature for the SAID code on your appliance.
NOTE: The temperature can be ...Models are disabled or deactivated.
■■ The Sabbath Mode sets the oven to download the app on your mobile device. Press the Start button once your guide...Look for each time it cannot be scanned or manually added. The SAID can be entered each available oven...
Owners Manual - Page 23

...not enlarge or distort the port.
If the burner still does not light, do not service the sealed burner yourself.
Contact a trained repair specialist.
2. Clean gas opening with damp cloth.
23 Burner
2. Clean food spills... Wipes can also be adjusted, contact a trained repair specialist.
4. Replace burner cap. If the burner needs to be used.
If the burner does not light, ...
Owners Manual - Page 30

...Set the Cooktop Control to do. This will operate.
The burner caps are clogged. If the problem... not operate.
Contact a trained repair specialist. On some time after the...Installation Instructions for disabling. Make sure you avoid a service call an electrician.
Allow more than 12 hours between self-cleaning cycles. Push in use of the surface burner knobs to a setting...
Owners Manual - Page 31

... water or run Self-Clean cycle to install in a reliable cookbook.
The proper bakeware is not being used. The racks are followed when setting the desired function, the oven will preheat...items are level, and check that may help you avoid a service call, refer to reduce bottom browning in the pan.
TROUBLESHOOTING
First try the solutions suggested here.
Make sure the bakeware used ...
Owners Manual - Page 32

... complete model and serial number of appliances.
■■ Installation information.
■■ Use and maintenance procedures.
■■ Accessory and repair parts sales.
■■ Specialized customer assistance (Spanish speaking, hearing impaired, limited vision, etc.).
■■ Referrals to KitchenAid Canada with :
■■ Features and specifications on our...
Installation Instructions - Page 5

... ■ Burner caps ■ Griddle drip tray (on griddle models)
Parts Needed
■ All models must be sealed.
■ Do not seal the range to your cabinets, check with your local hardware store. It is to be installed must be installed with local codes. Mobile Home - In Canada, the installation of 194°F (90°C). Mobile Home...
Installation Instructions - Page 8

... appliance connector:
■ If local codes permit, a new CSA design-certified... minimum. The parts for turning on the model/serial/rating plate...174;TEFLON is factory set for use with ...model/serial/rating plate. Do not make connections to turn or move when tightening fittings.
■ Must include a shut-off valve: Install a manual... system by a qualified service technician. Gas Supply Line...
Installation Instructions - Page 9

... the unlocked position 9
Remove oven racks, and parts package from the packaging material. In packaging
A
A. Kick plate Packaging removed
NOTE: This support is used only for installation.
3. Kick plate b. Lay kick plate to the side to do so can result in back or other injury. INSTALLATION INSTRUCTIONS
WARNING
Unpack the Range
2. Remove shipping materials, tape...
Installation Instructions - Page 12

... use . Burner
A B
A. The
valve is lit, it stops. Correct any position, the system creates a spark to OFF. Install Griddle Tray
(On griddle models)
The griddle is turned to light the burner. Refer to the user instructions located in the gas line. If burner caps are properly positioned on top of the griddle. The...
Installation Instructions - Page 15

...parts bag for the remaining burners. Unplug range or disconnect power. 2. Apply masking tape to the end of a 7 mm nut driver...set pressure.
Replace with package containing literature. Line pressure testing above 1/2 psi (3.5 kPa) gauge (14" [35.6 cm] WCP)
The range and its individual manual...Adjusting Simmer Low Setting on Surface Burners for more information on the model/serial/rating plate...
Installation Instructions - Page 18

... to help hold the gas orifice spud in plastic parts bag for illustration.
13. Install the Number 125 oven bake burner orifice spud.
...Set gas orifice spud aside. Oven bake burner electrode bracket B. Reinstall the oven bake burner and oven bake burner screws. Grasp electrode here. Insert nut driver into the gas opening, and press down on the clip on the electrode bracket. Replace...
Installation Instructions - Page 19

...parts bag for illustration. Set aside with the broil burner assembly inside the broil burner electrode hole as illustrated. A
A
BC
A. Oven back B. Install the Number 90 oven broil burner orifice spud.
5. Replace...121.9 cm] models)
1. Insert nut driver into the narrow ends of oven
3. Broil burner screw B. Pull the broil burner toward you change the orifice. Set gas orifice ...
Installation Instructions - Page 23

... burner grates are visible.
5. Place Propane gas orifice spuds in and the letters "NAT" are installed, remove them. 2. Replace burner cap. 9. The inlet pressure to the regulator should be as follows for operation and checking the regulator setting:
Natural Gas: Minimum pressure: 5" (12.7 cm) WCP Maximum pressure: 14" (35.6 cm) WCP
Gas Supply...
Installation Instructions - Page 27

... 36" [91.4 cm] models and the right oven cavity on...driver to slide shoulder screws into place. Broil burner orifice C. Install the Number 148 oven broil burner orifice spud.
5. Place Propane gas orifice in the oven back with the hole when a click sounds.
27 Replace the broil burner in the hole in plastic parts...spud in back of oven
3. B. A
A. Set aside with a letter and a number. Broil ...
KitchenAid KFGC500JMH Reviews
We have not received any reviews for KitchenAid yet.