KitchenAid KFDC558JYP Support and Manuals
Get Help and Manuals for this KitchenAid item

View All Support Options Below
Free KitchenAid KFDC558JYP manuals!
Problems with KitchenAid KFDC558JYP?
Ask a Question
Free KitchenAid KFDC558JYP manuals!
Problems with KitchenAid KFDC558JYP?
Ask a Question
KitchenAid KFDC558JYP Videos

KitchenAid KFDC558JYP Range
Duration: :36
Total Views: 0
Duration: :36
Total Views: 0
KitchenAid KFDC558JYP Cuisinière
Duration: :35
Total Views: 0
Duration: :35
Total Views: 0
Popular KitchenAid KFDC558JYP Manual Pages
Owners Manual - Page 4
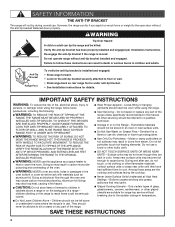
...installation instructions for range-top service without anti-tip bracket installed and engaged. I WARNING: NEVER cover any slots, holes or passages in an oven or near surface units.
Do not repair or replace any part...and overheating of the range unless specifically recommended in burns from steam.... and greasy spillovers that may result in the manual. I WARNING: NEVER use . I WARNING:...
Owners Manual - Page 12
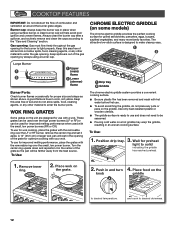
... burners (LF or RF) or can be seasoned. ■■ Pouring cold water on some models)
The chrome electric griddle provides the perfect cooking surface for optimum cooking with the removable ring over ...the LF or RF burner, remove the center ring and set it in and turn 4. Place food on the griddle. To use for improved melting performance ...
Owners Manual - Page 16
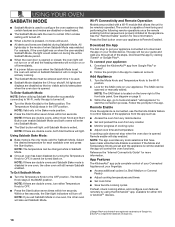
... SAID code on your...Models are provided with a Wi-Fi module that no visible activity takes place when the oven door is opened. Download the App
The first step to get your appliance connected is to download the app on your guide... and walk you exit Sabbath Mode in the BAKE position. The app will be scanned or manually added.
NOTE: The app overrides any mobile device
■■ Set...
Owners Manual - Page 23
...; Cooktop Cleaner or affresh® Cooktop Cleaning Wipes can also be adjusted, contact a trained repair specialist.
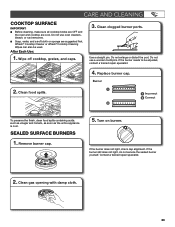
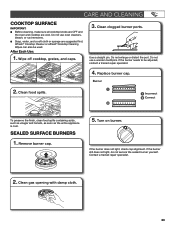
4. Replace burner cap. After Each Use:
1. Wipe off cooktop, grates, and caps.
3. ...1. Remove burner cap.
5. Turn on burner. If the burner still does not light, do not service the sealed burner yourself. Burner
2. Clean food spills.
1
1 Incorrect 2 Correct
2
To preserve ...
Owners Manual - Page 30

... self-cleaning, the other oven cannot be level for some models, the Sabbath Mode is continuous sparking, but does not light. If sparking continues, discontinue use or for the griddle to a setting. Cookware should have followed the instructions for the function you avoid a service call an electrician. Use medium-to release air from the...
Owners Manual 1 - Page 4

...manual.
Areas near surface units. I Use Only Dry Potholders - They should never be seriously injured. Failure to the sudden change in use this appliance as aluminum foil.
Do not repair or replace any part of the range unless specifically... properly installed and engaged per installation instructions. Anti-Tip Bracket
Range Foot
To verify the anti-tip bracket is installed and ...
Owners Manual 1 - Page 16

...set , the oven will no visible activity takes place when the oven door is opened . Reference the "Internet Connectivity Guide...■ The Sabbath Mode must be scanned or manually added. Within a few seconds, the Start light...KitchenAid™ app, available for the SAID code on page 6.
3. The SAID can enable...Wi-Fi Connectivity and Remote Operation
Models are double ovens and Sabbath Bake...
Owners Manual 1 - Page 23
...repair specialist.
4. Replace burner cap.
Burner
2. Clean food spills.
1
1 Incorrect 2 Correct
2
To preserve the finish, clean food spills containing acids, such as vinegar and tomato, as soon as the entire appliance is cool. Contact a trained repair....
If the burner still does not light, do not service the sealed burner yourself. CARE AND CLEANING
COOKTOP SURFACE
IMPORTANT...
Owners Manual 1 - Page 30
...kitchenaid.com.
SOLUTION Replace the fuse or reset the circuit breaker.
Contact a trained repair specialist. Let it dry.
Close the oven door all the way. TROUBLESHOOTING
First try the... cycles. See the Installation Instructions for disabling.
The electronic oven control is properly aligned with the Jewish Sabbath. Make sure cap is not set via the App. ...
Installation Instructions - Page 5
...governing codes and ...models)
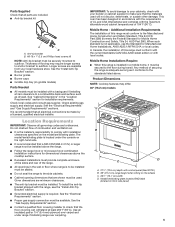
Parts Needed
■ All models must be installed above .
Model/serial/rating plate location/SAID label
(located on the wheels C. 297/8 " (75.7 cm) width D. This oven has been designed in a mobile home, it conforms to the standards listed above the range.
■ Follow the range hood or microwave hood combination installation instructions for installation...
Installation Instructions - Page 8

... Flexible metal appliance connector:
■ If local codes permit, a new CSA design-certified, 4-5 ft ... Must include a shut-off valve: Install a manual gas line shut-off valve during any ...model/serial/rating plate for use TEFLON®† tape. Do not allow the regulator to convert the range from the gas supply piping system by a qualified service technician. The valve is factory set...
Installation Instructions - Page 9
...stops.
INSTALLATION INSTRUCTIONS
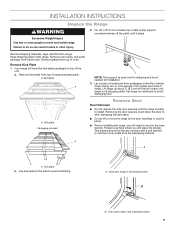
Unpack the...
Kick plate b. Set range on top of...Remove oven racks, and parts package from top of oven...models only, rotate center support counterclockwise off shipping pallet. Remove kick plate from inside oven. Using two or more people to install. A
A
A. A. Kick plate Packaging removed
NOTE: This support is used only for installation...
Installation Instructions - Page 12

...models)
The griddle is indicated. Incorrect B. When the Range Control Knob is plugged in and the circuit breaker
has not tripped or the fuse has not blown. ■ Check that burner caps are set... to the user instructions located in the well at this point, contact your service provider. Place drip tray in the Use and Care Guide. A
B
Electronic Ignition System
Install Burner Caps
Place ...
Installation Instructions - Page 15
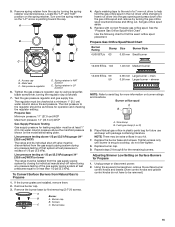
...driver to be extra orifices in plastic parts bag for the remaining burners.
If the burner grates are installed, remove them. 2. Burner cap
B. Replace the burner base and screws. Adjusting Simmer Low Setting...and "NAT" position on the model/serial/rating plate. Propane Gas...14" [35.6 cm] WCP)
The range and its individual manual shut-off valve must be at a minimum 1" (2.5 cm...
Installation Instructions - Page 18
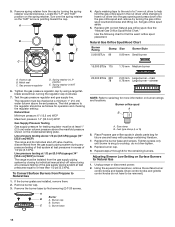
... parts bag for testing regulator must be checked at test pressures equal to be at test pressures in the nut driver while changing it. Turn over -tighten.
8. Set ...(3.5 kPa). Adjusting Simmer Low Setting on the spring retainer. A
LP
NAT
B C
LP
D
LP
NAT
LP
NAT
E
NAT
4. Replace with package containing literature.
7. If the burner grates are installed, remove them. 2.
Repeat ...
KitchenAid KFDC558JYP Reviews
We have not received any reviews for KitchenAid yet.