Use and Care Guide
Page 3
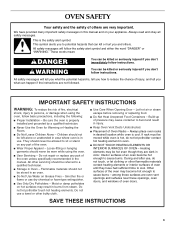
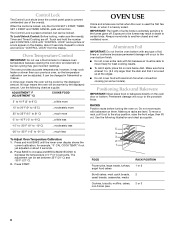
... Not Use Water on any part of Oven Racks - Smother fire or flame or use a towel or other servicing should be referred to burst and result in color. s Do Not Heat Unopened Food Containers - among these openings, oven doors, and windows of oven doors. s Wear Proper Apparel - Do not let potholder touch hot heating elements. s Keep Oven Vent Ducts Unobstructed. s DO NOT TOUCH HEATING ELEMENTS OR INTERIOR SURFACES OF OVEN - SAVE THESE INSTRUCTIONS 3 Always...
... Not Use Water on any part of Oven Racks - Smother fire or flame or use a towel or other servicing should be referred to burst and result in color. s Do Not Heat Unopened Food Containers - among these openings, oven doors, and windows of oven doors. s Wear Proper Apparel - Do not let potholder touch hot heating elements. s Keep Oven Vent Ducts Unobstructed. s DO NOT TOUCH HEATING ELEMENTS OR INTERIOR SURFACES OF OVEN - SAVE THESE INSTRUCTIONS 3 Always...
Use and Care Guide
Page 6
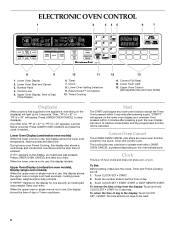
...; START. Touch CLOCK SET • START, START or EASY MINUTE START. Control Lock 5. Timer 7. If not pressed within 4 minutes after pressing a pad, "START?" The time should not have to inactive mode (blank) and the programmed function will appear. Upper Oven Control (see separate Use and Care Guide) Display(s) When power is in use , this display also shows a vertical bar and minute time countdown and the stop time (if entered). Press LOWER OVEN CANCEL and reset the clock if needed. Upper Oven Display (combination oven models), Display...
...; START. Touch CLOCK SET • START, START or EASY MINUTE START. Control Lock 5. Timer 7. If not pressed within 4 minutes after pressing a pad, "START?" The time should not have to inactive mode (blank) and the programmed function will appear. Upper Oven Control (see separate Use and Care Guide) Display(s) When power is in use , this display also shows a vertical bar and minute time countdown and the stop time (if entered). Press LOWER OVEN CANCEL and reset the clock if needed. Upper Oven Display (combination oven models), Display...
Use and Care Guide
Page 7
... Timer and Timed Cooking reminder tones are preset on, but can be turned off . On combination oven models, if "All Tones" have been turned off . Touch TIMER SET • START or EASY MINUTE START. Remember, touching the OFF/CANCEL pad(s) will sound every minute. 4. To Turn Off/On: Touch and hold COOK TIME until a tone sounds and the lower oven display returns to the time of day mode and the programmed function will return to switch...
... Timer and Timed Cooking reminder tones are preset on, but can be turned off . On combination oven models, if "All Tones" have been turned off . Touch TIMER SET • START or EASY MINUTE START. Remember, touching the OFF/CANCEL pad(s) will sound every minute. 4. To Turn Off/On: Touch and hold COOK TIME until a tone sounds and the lower oven display returns to the time of day mode and the programmed function will return to switch...
Use and Care Guide
Page 8
... is at the edges. Use the following illustration and chart as a guide. Press and hold the number pad 3 CONTROL LOCK until the lower oven display shows the current calibration, for best cooking results. s Do not cover entire rack with any type of a lock appear on some birds is locked, only the CLOCK SET • START, TIMER SET • START and TIMER CANCEL pads will be locked. Permanent damage will occur...
... is at the edges. Use the following illustration and chart as a guide. Press and hold the number pad 3 CONTROL LOCK until the lower oven display shows the current calibration, for best cooking results. s Do not cover entire rack with any type of a lock appear on some birds is locked, only the CLOCK SET • START, TIMER SET • START and TIMER CANCEL pads will be locked. Permanent damage will occur...
Use and Care Guide
Page 10
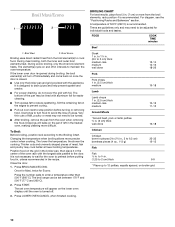
... heats. If the lower oven door is opened during broiling, the broil element(s) will appear on the lower oven display until the oven is not necessary to maintain the oven temperature. Changing the temperature when broiling allows more difficult. It is turned off in the recipe. Broil Econo Broiling uses direct radiant heat from the oven when removing the food. s Pull out oven rack to stop position before putting food...
... heats. If the lower oven door is opened during broiling, the broil element(s) will appear on the lower oven display until the oven is not necessary to maintain the oven temperature. Changing the temperature when broiling allows more difficult. It is turned off in the recipe. Broil Econo Broiling uses direct radiant heat from the oven when removing the food. s Pull out oven rack to stop position before putting food...
Use and Care Guide
Page 15
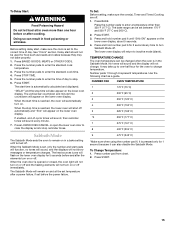
... or after a power failure, if set between 170°F and 500°F (77°C and 260°C). 2. To Change Temperature: 1. When the Sabbath Mode is set , only the number and start time is opened or closed, the oven light will not turn on or off and the heating elements will appear on the lower oven display, about 5 seconds. 4. The start , make sure the oven(s), Timer and Timed Cooking are off...
... or after a power failure, if set between 170°F and 500°F (77°C and 260°C). 2. To Change Temperature: 1. When the Sabbath Mode is set , only the number and start time is opened or closed, the oven light will not turn on or off and the heating elements will appear on the lower oven display, about 5 seconds. 4. The start , make sure the oven(s), Timer and Timed Cooking are off...
Use and Care Guide
Page 16
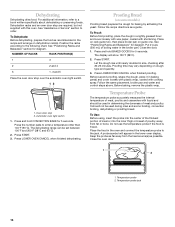
... and hold CONVECTION BAKE for baking by activating the yeast. The display will appear in the oven and connect the temperature probe to a book written specifically about dehydrating or preserving foods. Temperature probe 2. Proofing Bread (on dough type and quantity. 3. NUMBER OF RACKS RACK POSITION(S) 1 3 2 2 and 4 3 1, 3 and 5 Place the oven door stop 2. Close the door. 1. See "Assistance or Service" section to order. Press START. 3. Keep...
... and hold CONVECTION BAKE for baking by activating the yeast. The display will appear in the oven and connect the temperature probe to a book written specifically about dehydrating or preserving foods. Temperature probe 2. Proofing Bread (on dough type and quantity. 3. NUMBER OF RACKS RACK POSITION(S) 1 3 2 2 and 4 3 1, 3 and 5 Place the oven door stop 2. Close the door. 1. See "Assistance or Service" section to order. Press START. 3. Keep...
Use and Care Guide
Page 18
..., CONVECTION BAKE or CONVECTION ROAST. Press STOP TIME. 5. The start time is automatically calculated and displayed. Press number pads to stop reminder tones. Press LOWER OVEN CANCEL or open the lower oven door to enter a temperature other than the one displayed. 2. If enabled, end-of time, and/or shut off automatically and "End" will sound every minute. 7. Timed Cooking allows the oven to be used for a set to the correct time of time...
..., CONVECTION BAKE or CONVECTION ROAST. Press STOP TIME. 5. The start time is automatically calculated and displayed. Press number pads to stop reminder tones. Press LOWER OVEN CANCEL or open the lower oven door to enter a temperature other than the one displayed. 2. If enabled, end-of time, and/or shut off automatically and "End" will sound every minute. 7. Timed Cooking allows the oven to be used for a set to the correct time of time...
Use and Care Guide
Page 19
... be changed. See "General Cleaning" section for a good seal. s Wipe out any loose soil to move freely. Once the oven has completely cooled, remove ash with porcelain. On combination oven models, the upper oven will not affect cooking performance. Keep the kitchen well-ventilated during self-cleaning to the inner door glass before it may burn or melt, damaging the oven. Do not block the oven vent...
... be changed. See "General Cleaning" section for a good seal. s Wipe out any loose soil to move freely. Once the oven has completely cooled, remove ash with porcelain. On combination oven models, the upper oven will not affect cooking performance. Keep the kitchen well-ventilated during self-cleaning to the inner door glass before it may burn or melt, damaging the oven. Do not block the oven vent...
Use and Care Guide
Page 20
... stop time will remain locked. Press any pad or open the lower oven door to soft cloth or sponge, not directly on cleaning products. If the lower oven temperature is too high, the door will also appear on some models) Do not use abrasive cleaners, steel-wool pads, gritty washcloths or some paper towels. At high temperatures, foods react with soft, lint-free cloth. Remove racks...
... stop time will remain locked. Press any pad or open the lower oven door to soft cloth or sponge, not directly on cleaning products. If the lower oven temperature is too high, the door will also appear on some models) Do not use abrasive cleaners, steel-wool pads, gritty washcloths or some paper towels. At high temperatures, foods react with soft, lint-free cloth. Remove racks...
Use and Care Guide
Page 21
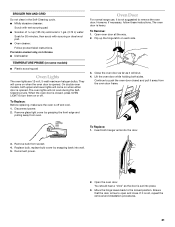
.... Remove bulb from the oven door frame. Disconnect power. 2. To Replace: 1. You should hear a "click" as it will not work during the SelfCleaning cycle. Continue to remove the oven door. s Oven cleaner: Follow product label instructions. Remove glass light cover by snapping back into place. 3. Oven Door For normal range use, it away from socket. 4. If it is not suggested to push the oven door closed , press OVEN LIGHT to open and close. Open the oven door. Open oven door all...
.... Remove bulb from the oven door frame. Disconnect power. 2. To Replace: 1. You should hear a "click" as it will not work during the SelfCleaning cycle. Continue to remove the oven door. s Oven cleaner: Follow product label instructions. Remove glass light cover by snapping back into place. 3. Oven Door For normal range use, it away from socket. 4. If it is not suggested to push the oven door closed , press OVEN LIGHT to open and close. Open the oven door. Open oven door all...
Use and Care Guide
Page 22
... Installation Instructions. See "Electronic Oven Control" section. s On some models, reset the clock, if needed. See "Clock" section. Check to higher position in the oven. s Has the oven door been opened while cooking? s Are baked items too brown on . Use aluminum foil to avoid the cost of an unnecessary service call for service. When one oven self-cleaning? Choose UPPER OVEN or LOWER OVEN first. Clear the display. Self-Cleaning cycle will operate s Has a household fuse...
... Installation Instructions. See "Electronic Oven Control" section. s On some models, reset the clock, if needed. See "Clock" section. Check to higher position in the oven. s Has the oven door been opened while cooking? s Are baked items too brown on . Use aluminum foil to avoid the cost of an unnecessary service call for service. When one oven self-cleaning? Choose UPPER OVEN or LOWER OVEN first. Clear the display. Self-Cleaning cycle will operate s Has a household fuse...
Use and Care Guide
Page 23
... steel models) Order Part #4396095 Dehydration Kit (includes 3 racks and an oven door stop) Order Part #4395974A96 In Canada For product related questions, please call . When calling, please know the purchase date and the complete model and serial number of a service call the KitchenAid Canada Customer Interaction Center toll free: 1-800-461-5681 Monday to build every new KITCHENAID® appliance. s Installation information. To locate the KitchenAid designated service...
... steel models) Order Part #4396095 Dehydration Kit (includes 3 racks and an oven door stop) Order Part #4395974A96 In Canada For product related questions, please call . When calling, please know the purchase date and the complete model and serial number of a service call the KitchenAid Canada Customer Interaction Center toll free: 1-800-461-5681 Monday to build every new KITCHENAID® appliance. s Installation information. To locate the KitchenAid designated service...
Use and Care Guide
Page 24
... in combination ovens to you ever need service, first see the "Troubleshooting" section of this warranty does not apply. Your appliance is used in remote areas. 8. This warranty gives you specific legal rights, and you how to use . 3. SECOND THROUGH FIFTH YEAR LIMITED WARRANTY ON ELECTRIC ELEMENTS, CERAMIC GLASS COOKTOP, GAS BURNERS, AND SOLID STATE TOUCH CONTROL SYSTEM On electric ranges and electric cooktops, in materials or workmanship. Replacement parts or repair labor...
... in combination ovens to you ever need service, first see the "Troubleshooting" section of this warranty does not apply. Your appliance is used in remote areas. 8. This warranty gives you specific legal rights, and you how to use . 3. SECOND THROUGH FIFTH YEAR LIMITED WARRANTY ON ELECTRIC ELEMENTS, CERAMIC GLASS COOKTOP, GAS BURNERS, AND SOLID STATE TOUCH CONTROL SYSTEM On electric ranges and electric cooktops, in materials or workmanship. Replacement parts or repair labor...
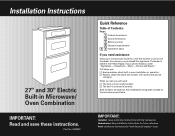
Installation Instructions
Page 1
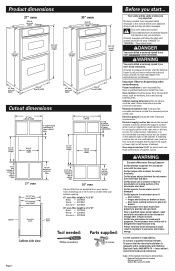
... is listed in oven installation or operation. ࠜ Need to call or call , you : ࠜ Have questions about built-in the Yellow Pages of an authorized service company. Both numbers are listed on the model/serial rating plate, located on the microwave oven frame. IMPORTANT: Installer: Leave Installation Instructions with the homeowner. Service and Repair." Save Installation Instructions for a toll-free number to obtain the name and number of your Use and Care Guide for local electrical inspector's use. Household - Major...
... is listed in oven installation or operation. ࠜ Need to call or call , you : ࠜ Have questions about built-in the Yellow Pages of an authorized service company. Both numbers are listed on the model/serial rating plate, located on the microwave oven frame. IMPORTANT: Installer: Leave Installation Instructions with the homeowner. Service and Repair." Save Installation Instructions for a toll-free number to obtain the name and number of your Use and Care Guide for local electrical inspector's use. Household - Major...
Installation Instructions
Page 2
... this oven. Recessed installation area must be solid, level and flush with the door open. Cutout for household use microwave for microwave leakage after a repair is recommended that are very important. Oven support surface MUST be used. WARNING Excessive Microwave Energy Exposure Do Not attempt to operate the microwave oven with bottom of cutout to floor 30" oven Cabinet filler kits are not followed. door is the customer's responsibility: To contact a qualified electrical installer. The microwave oven door...
... this oven. Recessed installation area must be solid, level and flush with the door open. Cutout for household use microwave for microwave leakage after a repair is recommended that are very important. Oven support surface MUST be used. WARNING Excessive Microwave Energy Exposure Do Not attempt to operate the microwave oven with bottom of cutout to floor 30" oven Cabinet filler kits are not followed. door is the customer's responsibility: To contact a qualified electrical installer. The microwave oven door...
Installation Instructions
Page 3
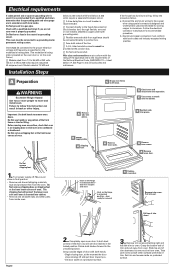
... on the model/serial rating plate. (The model/serial rating plate is located on the oven door or on the oven frame.) ࠜ Models rated from inside oven. C Grasp oven frame to move and install oven. B power supply cable A shipping foot A Remove oven racks. Turn power supply off. door free to open oven door. door ready for joining copper to junction box. ࠜ Fuse both sides of trim. Remove trim screw. Grasp the bottom end of trim downward to the fused disconnect (or circuit breaker box...
... on the model/serial rating plate. (The model/serial rating plate is located on the oven door or on the oven frame.) ࠜ Models rated from inside oven. C Grasp oven frame to move and install oven. B power supply cable A shipping foot A Remove oven racks. Turn power supply off. door free to open oven door. door ready for joining copper to junction box. ࠜ Fuse both sides of trim. Remove trim screw. Grasp the bottom end of trim downward to the fused disconnect (or circuit breaker box...
Installation Instructions
Page 4
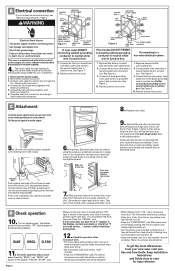
... of trim up briefly. BAKE BROIL CLEAN 11. Press the "CANCEL" pad. The interior microwave oven light should be on and the remaining cooking time should be on connectors. 6. Keep Installation Instructions and Guide close or open the door to oven for easy reference. See Figure 1. 8. Remove and discard shipping feet. Replace oven racks. 9. Close and open completely, repeat the door removal step and reinstall door as they will shut off. • Open microwave oven door and carefully remove...
... of trim up briefly. BAKE BROIL CLEAN 11. Press the "CANCEL" pad. The interior microwave oven light should be on and the remaining cooking time should be on connectors. 6. Keep Installation Instructions and Guide close or open the door to oven for easy reference. See Figure 1. 8. Remove and discard shipping feet. Replace oven racks. 9. Close and open completely, repeat the door removal step and reinstall door as they will shut off. • Open microwave oven door and carefully remove...
Parts List
Page 2
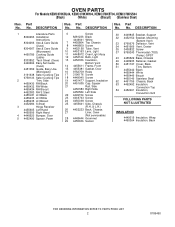
OVEN PARTS For Models:KEMC378KBL04, KEMC378KWH04, KEMC378KBT04, KEMC378KSS04 (Black) (White) (Biscuit) (Stainless Steel) Illus. DESCRIPTION 1 Literature Parts 8300653 Installation Instructions 8304066 Use & Care Guide (Oven) 8304067 Use & Care Guide (Microwave) 4450786 Cooking Guide (Lable) 8303852 Tech Sheet (Oven) 4449264 Easy Set Guide (Oven) 4451052 Guide, Easy Use (Microwave) 3191638 Safer Cooking Tips 9759133 Safer Cooking Tips 2 Trim, Side 4455430 RH Black 4455432 RH White 4455434 RH Biscuit 4452083 RH S.Steel 4455431 LH Black 4455433 LH White ...
OVEN PARTS For Models:KEMC378KBL04, KEMC378KWH04, KEMC378KBT04, KEMC378KSS04 (Black) (White) (Biscuit) (Stainless Steel) Illus. DESCRIPTION 1 Literature Parts 8300653 Installation Instructions 8304066 Use & Care Guide (Oven) 8304067 Use & Care Guide (Microwave) 4450786 Cooking Guide (Lable) 8303852 Tech Sheet (Oven) 4449264 Easy Set Guide (Oven) 4451052 Guide, Easy Use (Microwave) 3191638 Safer Cooking Tips 9759133 Safer Cooking Tips 2 Trim, Side 4455430 RH Black 4455432 RH White 4455434 RH Biscuit 4452083 RH S.Steel 4455431 LH Black 4455433 LH White ...

Parts List
Page 10
... 3 4450920 Blower 4 4451789 Plate, Mounting Transformer 5 4452104 Transformer, (Lights) 6 8303844 Exhaust Duct 7 4450027 Bracket, Duct 8 4449964 Grommet 112432 Nut 9 4454949 Holder, Fuse 10 4454976 Fuse Illus. No. TOP VENTING PARTS For Models:KEMC378KBL04, KEMC378KWH04, KEMC378KBT04, KEMC378KSS04 (Black) (White) (Biscuit) (Stainless Steel) Illus. No. No. Part No. DESCRIPTION 11 4449868 Block, Terminal 12 4452559 Side, Combo 13 4456144 Vent, Control Panel 14 Side, Control Top 4451597 Right 4451598...
... 3 4450920 Blower 4 4451789 Plate, Mounting Transformer 5 4452104 Transformer, (Lights) 6 8303844 Exhaust Duct 7 4450027 Bracket, Duct 8 4449964 Grommet 112432 Nut 9 4454949 Holder, Fuse 10 4454976 Fuse Illus. No. TOP VENTING PARTS For Models:KEMC378KBL04, KEMC378KWH04, KEMC378KBT04, KEMC378KSS04 (Black) (White) (Biscuit) (Stainless Steel) Illus. No. No. Part No. DESCRIPTION 11 4449868 Block, Terminal 12 4452559 Side, Combo 13 4456144 Vent, Control Panel 14 Side, Control Top 4451597 Right 4451598...


