KitchenAid KEMC378KSS Support Question
KitchenAid KEMC378KSS Support Question
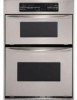
Find answers below for this question about KitchenAid KEMC378KSS - ARCHITECT Series 27'' Microwave Combination Double Wall Oven.Need a KitchenAid KEMC378KSS manual? We have 3 online manuals for this item!
Question posted by gwlvemail on August 11th, 2011
Kemc378kss0 Microwave Dead After Replaced Door Switches. Pf .d =30 Displayed
The person who posted this question about this KitchenAid product did not include a detailed explanation. Please use the "Request More Information" button to the right if more details would help you to answer this question.
Current Answers
Related KitchenAid KEMC378KSS Manual Pages
Use and Care Guide - Page 2
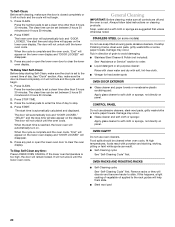
...OVEN SAFETY 3 PARTS AND FEATURES 5 ELECTRONIC OVEN CONTROL 6
Display(s 6 Start 6 Lower Oven Cancel 6 Clock 6 Tones 7 Fahrenheit and Celsius 7 Timer 7 Control Lock 8 Oven Temperature Control 8 OVEN USE 8 Aluminum Foil 8 Positioning Racks and Bakeware 8 Bakeware 9 Oven... OVEN CARE 19 Self-Cleaning Cycle 19 General Cleaning 20 Oven Lights 21 Oven Door 21 TROUBLESHOOTING 22 ASSISTANCE OR SERVICE...
Use and Care Guide - Page 3
... desired location while oven is , tell you to burst and result in injury. Moist or damp potholders on any part of Oven Racks -
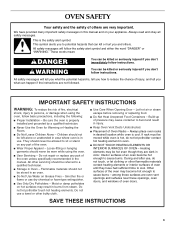
among these openings, oven doors, and windows of oven doors. OVEN SAFETY
Your safety ... in area where oven is hot, do not touch, or let clothing or other bulky cloth. s User Servicing - Do not repair or replace any part of the oven.
Do not let...
Use and Care Guide - Page 4
... substances listed, including benzene, formaldehyde, carbon monoxide, and toluene.
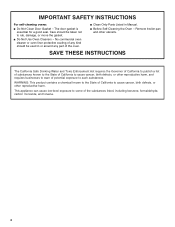
4 Care should be taken not to the State of the oven. IMPORTANT SAFETY INSTRUCTIONS
For self-cleaning ovens:
s Do Not Clean Door Gasket - The door gasket is essential for a good seal. SAVE THESE INSTRUCTIONS
The California Safe Drinking Water and Toxic Enforcement Act requires the...
Use and Care Guide - Page 5
... match your models.
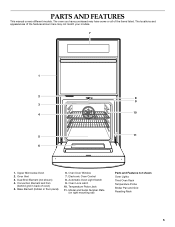
7
1
2
8
9
3
4
10
5
11
6
1. Oven Vent 3. Electronic Oven Control 8. Oven Door Window 7. Oven Lock Latch 10. Temperature Probe Jack 11. Model and Serial Number Plate
(on right mounting rail)
Parts and Features not shown Oven Lights Third Oven Rack Temperature Probe Broiler Pan and Grid Roasting Rack
5 Upper Microwave Oven 2. Convection Element and Fan
(behind...
Use and Care Guide - Page 6
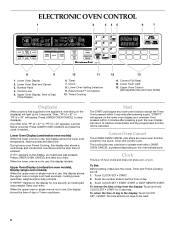
... a pad, "START?" If "Err" appears on the display for the Clock, Timer and Control Lock. Lower Oven Display (combination oven models) When the lower oven is pressed depending on the lower oven display as a reminder.
Any other time "PF id = 27" or "PF id = 30" appears, a power failure occurred. When the upper oven or single oven is a 12-hour clock and does not show...
Use and Care Guide - Page 7
..."Snd oFF" will appear on the lower oven display for 5 seconds.
On combination oven models, if "All Tones" have been ...combination oven models only) All of the above steps.
7
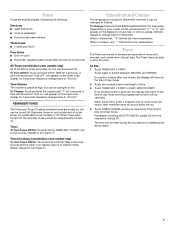
The Timer does not start or stop reminder tones.
When in Fahrenheit, however it can be canceled. To Change: Touch and hold COOK TIME until a tone sounds and the lower oven display returns to switch...
Use and Care Guide - Page 8
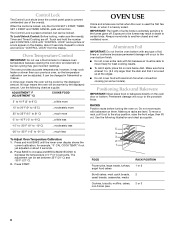
... cover food with foil because air must be cooler by the displayed amount. RACKS Position racks before turning the oven on the oven door or bottom.
Repeat to the stop position, raise the front ...when it out to unlock and remove "CONTROL LOCK" from the display. To Lock/Unlock Control: Before locking, make sure the oven(s), Timer and Timed Cooking are level. IMPORTANT: The health of foil...
Use and Care Guide - Page 15
... not be used for food such as a guide.
The heat sources icons will flash on the lower oven display for 5 seconds before and after cooking. When the oven door is in food poisoning or sickness.
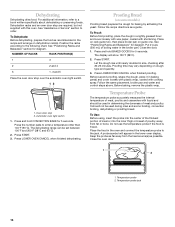
NUMBER PAD
OVEN TEMPERATURE
1
170°F (75°C)
2
200°F (95°C)
3
250°F (120°C)
4
300°F (150°...
Use and Care Guide - Page 16
...oven light switch
1. To Proof: Before first proofing, place the dough in the lower oven display. Place on rack guide two, then place broiler pan on dough type and quantity.
3. Close the door.
1. The display...and hold CONVECTION BAKE for diagram. Press START. Let the dough rise until nearly doubled in baking pan(s) and cover loosely with plastic wrap, coated with shortening.
Before second...
Use and Care Guide - Page 18
... the number pads to enter the length of time, and/or shut off automatically.
Press LOWER OVEN CANCEL or open the lower oven door to clear the display and/or stop time will appear on the lower oven display. Press COOK TIME. 3. Press the number pads to enter the time of day to the correct time...
Use and Care Guide - Page 19
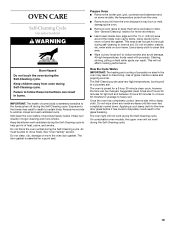
... cooled, remove ash with porcelain. Applying a cool damp cloth to the inner door glass before it becomes heavily soiled. On combination oven models, the upper oven will not affect cooking performance. Do not block the oven vent(s) during the Self-Cleaning cycle. Prepare Oven: s Remove the broiler pan, grid, cookware and bakeware and,
on some models...
Use and Care Guide - Page 20
..." first. The clean time can result. Press STOP TIME. 3.
The door will appear on the lower oven display. To Stop Self-Clean any time: Press LOWER OVEN CANCEL. If the lower oven temperature is set between 2 hours 30 minutes and 4 hours 30 minutes.
2.
Damage may occur. OVEN CAVITY
Do not use soap-filled scouring pads, abrasive cleaners, Cooktop...
Use and Care Guide - Page 21
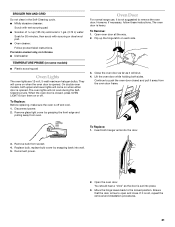
... Remove: 1. Ensure that the door is off . Lift the oven door while holding both hanger arms into wall. 5. Insert both sides.
They will not work during the SelfCleaning cycle. s Solution of ¹ ₂ cup (125 mL) ammonia to open and close. To Replace: Before replacing, make sure the oven is free to 1 gal. (3.75 L) water:
Soak for...
Use and Care Guide - Page 22
Replace the fuse or reset the circuit.
s On some models, is the Control Lock set ? See "Control Lock" section. s On double oven models, has the correct oven been selected? Display shows messages
s Is the display showing "PF", "PF id=27" or "PF id=30"? See "Display(s)" section. See "Clock" section. Close the oven door all the way.
See "Positioning Racks and Bakeware" ...
Use and Care Guide - Page 23
... you can also look in your request. If you need replacement parts If you need further assistance, you the cost of ... Part #4396095 Dehydration Kit (includes 3 racks and an oven door stop) Order Part #4395974A96
In Canada
For product related questions...-422-1230. s Accessory and repair parts sales. Saturday 8:30 a.m. - 4:30 p.m. (EST).
s Referrals to local dealers. For further assistance...
Use and Care Guide - Page 24
... product, KitchenAid will pay for factory specified parts for the porcelain oven cavity/inner door if the part rusts through fifth years from state to state or... system and Magnetron tube in combination ovens to correct the installation of KitchenAid, U.S.A., KitchenAid Canada licensee in Canada
1/03 Printed in materials or workmanship.
Replacement parts or repair labor costs for...
Installation Instructions - Page 2
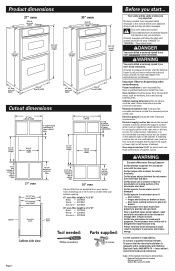
...minimum clearance.
Do Not allow soil or cleaner residue to bottom of cutout to excessive microwave energy. door seals, sealing surfaces or glass are very important. The microwave oven in exposure to bottom of the microwave oven door. Product dimensions
27" oven
25-3/8 recessed
width
30" oven
28-3/8" recessed
width
41" recessed
height
42-7/16" overall height
41" recessed
height
42...
Installation Instructions - Page 3
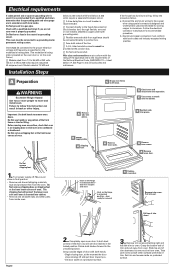
... be provided at 208 volts) require a separate 30-ampere circuit.
ࠜ A time-delay fuse ... designed and Underwriters Laboratories-listed for removal
C
Replace oven door. A Preparation
WARNING
Excessive Weight Hazard Use two...oven is on shipping base or slide oven onto cardboard or hardboard. D
Check oven and microwave oven operation. C
Use screws to attach oven to move and install oven...
Installation Instructions - Page 4
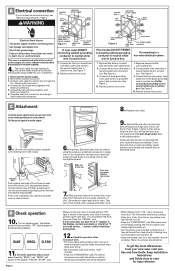
.... Replace trim screw.
8. Push hinges in death, fire, or electrical shock. Push each trim into place at end of oven front frame when pushing oven into cabinet. "PF" should appear in the display area. After 2 minutes, partially open completely, repeat the door removal step and reinstall door as they will appear in the junction box. The microwave should...
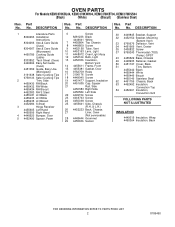
Parts List - Page 2
...
4450584 Left Side
22 4449154 Screw
23 4449743 Screw
24 4450038 Screw
25 4455641 Side, Chassis
(R.H. & L.H.)
26 4452233 Back, Chassis
27
Liner, Oven
(Not serviceable)
28 4448444 Grommet
29 4455636 Sensor
30 4449845 Bracket, Support
32 4452152 Bracket, Mounting
(Bottom Vent)
33 9760676 Deflector, Vent
34 4451666 Vent, Center
35 3400832 Screw
37...
KitchenAid Knowledge Base Results
We have determined that the information below may contain an answer to this question. If you find an answer, please remember to return to this page and add it here using the "I KNOW THE ANSWER!" button above. It's that easy to earn points!-
Interchangable parts
... detailed below; Both models have glass jars, but the Original jars have a 3 or a 4 after the color indicator in the model number. Purchasing replacement parts or accessories Blender Interlock Collar Architect Series blender features Countertop appliance internal parts for home repair. The blade assemblies are Eastern Time. Interchangable parts Will my later... -
Setting the Self-Clean cycle
..., the surface elements will appear in our Use and Care Guide search below to certain birds. There are 2 hours 30 minutes for light soil and between 2 hours 30 minutes and 4 hours 30 minutes. "Locking Door" will appear on the oven display. Setting the Self-Clean cycle What settings do I use to self-clean my... -
Display shows F20 or FH - Front-load washer
...of detergent to the washer? Are the water inlet hoses kinked? Why is started for a replacement set. Check the household faucets to see if the hot and cold water faucets are screens. ... hose, which will shut off water to the washer to drain. To remove the error display, press Pause/Off twice. If the hose is too low, the washer may not properly operate. ...
Similar Questions

Getting Door Error On Microwave
(Posted by Anonymous-172591 1 year ago)
Need Specs For Kemc378kss
(Posted by johnjaz3 2 years ago)

Cutout Dimensions For The Kemc308kss01
What are the cutout dimensions for the KEMCKSS01 microwave and oven wallunit combo?
What are the cutout dimensions for the KEMCKSS01 microwave and oven wallunit combo?
(Posted by glenmaney 3 years ago)

Replacement Door
hi, can the door be replaced? I have a huge scratch I'd love to be rid of.
hi, can the door be replaced? I have a huge scratch I'd love to be rid of.
(Posted by kellizen 8 years ago)

Kitchenaid Microwave Khms1850sss-0 Door Didn't Lock What Part Should I Buy
(Posted by rich212000 9 years ago)