
Use & Care Guide
Page 1
www.KitchenAid.ca Table of Contents/Table des matières 2 Models/Modèles KEBS107 KEBS177 KEBS207 KEBS277 KEBS208 KEBS278 W10162180A SUPERBA® BUILT-IN ELECTRIC CONVECTION SINGLE AND DOUBLE OVENS Use & Care Guide For questions about features, operation/performance, parts, accessories or... service, call: 1-800-422-1230 or visit our website at www.kitchenaid.com In Canada, call for assistance, installation and ...
www.KitchenAid.ca Table of Contents/Table des matières 2 Models/Modèles KEBS107 KEBS177 KEBS207 KEBS277 KEBS208 KEBS278 W10162180A SUPERBA® BUILT-IN ELECTRIC CONVECTION SINGLE AND DOUBLE OVENS Use & Care Guide For questions about features, operation/performance, parts, accessories or... service, call: 1-800-422-1230 or visit our website at www.kitchenaid.com In Canada, call for assistance, installation and ...

Use & Care Guide
Page 3
...'t immediately follow instructions. Do not let potholder touch hot heating elements. If rack must be stored in Manual. ■ Before Self-Cleaning the Oven - Heating elements may result in this manual and on Grease Fires - Do not repair or replace any kind should be allowed to potential hazards... that can happen if the instructions are dark in the manual. Be sure the oven is hot, do not touch, or let clothing or other utensils. Care should be hot even though they have provided many important safety...
...'t immediately follow instructions. Do not let potholder touch hot heating elements. If rack must be stored in Manual. ■ Before Self-Cleaning the Oven - Heating elements may result in this manual and on Grease Fires - Do not repair or replace any kind should be allowed to potential hazards... that can happen if the instructions are dark in the manual. Be sure the oven is hot, do not touch, or let clothing or other utensils. Care should be hot even though they have provided many important safety...

Use & Care Guide
Page 4
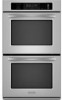
...D K E A. PARTS AND FEATURES This manual covers different models. The oven you have purchased may not match those of potential exposure to warn of your model. Oven door lock latch H. Model and serial number plate (on double oven models) F. This appliance can cause low-level exposure to some or all.... The locations and appearances of the features shown here may have some of the items listed. Electronic oven control B. Lower oven (on right mounting rail) Parts and Features not shown Oven lights Third oven rack (roll out rack) Roasting rack Temperature probe 4
...D K E A. PARTS AND FEATURES This manual covers different models. The oven you have purchased may not match those of potential exposure to warn of your model. Oven door lock latch H. Model and serial number plate (on double oven models) F. This appliance can cause low-level exposure to some or all.... The locations and appearances of the features shown here may have some of the items listed. Electronic oven control B. Lower oven (on right mounting rail) Parts and Features not shown Oven lights Third oven rack (roll out rack) Roasting rack Temperature probe 4
Use & Care Guide
Page 5
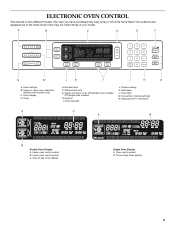
... day, timer display 5 Upper and lower oven Off (double oven models) Off (single oven models) H. Convection cooking settings N. EasyConvect™ conversion A C A B B Double Oven Display A. Time of your model. Oven settings B. The oven you have purchased may not match those of day, timer display Single Oven Display A. Start/control lock G. Upper oven cavity symbol B. ELECTRONIC OVEN CONTROL This manual covers different models...
... day, timer display 5 Upper and lower oven Off (double oven models) Off (single oven models) H. Convection cooking settings N. EasyConvect™ conversion A C A B B Double Oven Display A. Time of your model. Oven settings B. The oven you have purchased may not match those of day, timer display Single Oven Display A. Start/control lock G. Upper oven cavity symbol B. ELECTRONIC OVEN CONTROL This manual covers different models...

Use & Care Guide
Page 6
... reminder. the lower cavity symbol represents the lower oven. Touch CLOCK SET/START again. If all oven functions except Sabbath Mode. Fahrenheit and Celsius The temperature is preset in Fahrenheit, however it can be changed to Celsius. On double oven models, this display shows the time of a ...cooking cycle Three chimes ■ When timer reaches zero Includes using the OPTIONS selection key. The upper cavity symbol represents the upper oven; All Tones All tones are preset on...
... reminder. the lower cavity symbol represents the lower oven. Touch CLOCK SET/START again. If all oven functions except Sabbath Mode. Fahrenheit and Celsius The temperature is preset in Fahrenheit, however it can be changed to Celsius. On double oven models, this display shows the time of a ...cooking cycle Three chimes ■ When timer reaches zero Includes using the OPTIONS selection key. The upper cavity symbol represents the upper oven; All Tones All tones are preset on...

Use & Care Guide
Page 7
...a power failure occurs when the Sabbath Mode is opened or closed, the oven light will no longer be disabled of the oven(s). On double oven models, the following chart as a guide. On double ovens, open the oven door. 2. "SABBATH ENABLED" will function. The Sabbath Mode cannot be... little less -20°F (-10°C) ...moderately less -30°F (-15°C) ...much less To Adjust Oven Temperature Calibration: 1. Sabbath Mode The Sabbath Mode sets the oven(s) to wait for approximately 5 seconds. When the oven door is set the calibration. 2. To Activate: Before the Sabbath...
...a power failure occurs when the Sabbath Mode is opened or closed, the oven light will no longer be disabled of the oven(s). On double oven models, the following chart as a guide. On double ovens, open the oven door. 2. "SABBATH ENABLED" will function. The Sabbath Mode cannot be... little less -20°F (-10°C) ...moderately less -30°F (-15°C) ...much less To Adjust Oven Temperature Calibration: 1. Sabbath Mode The Sabbath Mode sets the oven(s) to wait for approximately 5 seconds. When the oven door is set the calibration. 2. To Activate: Before the Sabbath...
Use & Care Guide
Page 8
...;C) 6 325°F (163°C) 7 350°F (177°C) 8 375°F (191°C) 9 400°F (204°C) 0 450°F (232°C) To Change Temperature: Initially on double ovens, the cavities can be placed on rack below dish. Aluminum Foil IMPORTANT: To avoid permanent damage to another closed and wellventilated room. To move birds...
...;C) 6 325°F (163°C) 7 350°F (177°C) 8 375°F (191°C) 9 400°F (204°C) 0 450°F (232°C) To Change Temperature: Initially on double ovens, the cavities can be placed on rack below dish. Aluminum Foil IMPORTANT: To avoid permanent damage to another closed and wellventilated room. To move birds...
Use & Care Guide
Page 9
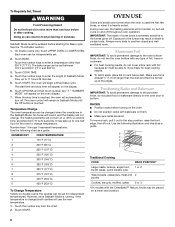
...position and remove food in a dishwasher. Do not clean the roll-out rack in the oven. It may remove the rack's lubricant and affect its ability to the back wall of the oven so the front edge of the sliding shelf sits on the rack guide located on the sides...side or slightly staggered. 3 or 4 Placement that no bakeware piece is on the front edge of space around bakeware and oven walls. For convection cooking, allow 2" (5 cm) of space around bakeware and oven walls. To Remove Roll-Out Rack: 1. Sliding shelf Closed and Engaged Position A B A. To Replace Roll-out Rack 1. It...
...position and remove food in a dishwasher. Do not clean the roll-out rack in the oven. It may remove the rack's lubricant and affect its ability to the back wall of the oven so the front edge of the sliding shelf sits on the rack guide located on the sides...side or slightly staggered. 3 or 4 Placement that no bakeware piece is on the front edge of space around bakeware and oven walls. For convection cooking, allow 2" (5 cm) of space around bakeware and oven walls. To Remove Roll-Out Rack: 1. Sliding shelf Closed and Engaged Position A B A. To Replace Roll-out Rack 1. It...

Use & Care Guide
Page 10
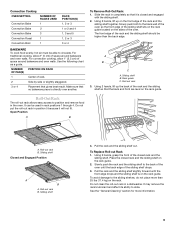
... touch fat, bone or gristle. ■ After reading the thermometer once, push it is opened . Oven vent C. Oven vent G. They will turn on and off approximately 30 seconds after the door is opened during baking or roasting, the heating elements (bake and both broils) ... fish in the bottom third of hot air and moisture from the oven. Oven Vent(s) A B C E D F G Single and Double Oven A. Warm air Double Oven D. Warm air E. Lower oven The oven vent(s) should be blocked or covered since they allow the release of oven. ■ May need to increase baking time. ■ Little ...
... touch fat, bone or gristle. ■ After reading the thermometer once, push it is opened . Oven vent C. Oven vent G. They will turn on and off approximately 30 seconds after the door is opened during baking or roasting, the heating elements (bake and both broils) ... fish in the bottom third of hot air and moisture from the oven. Oven Vent(s) A B C E D F G Single and Double Oven A. Warm air Double Oven D. Warm air E. Lower oven The oven vent(s) should be blocked or covered since they allow the release of oven. ■ May need to increase baking time. ■ Little ...

Use & Care Guide
Page 11
... the food. Thicker cuts and unevenly shaped pieces of 500°F (260°C) is under 170°F (77°C). On double ovens only, touch UPPER OVEN or LOWER OVEN. The cavity symbol will begin displaying the temperature as it may need to reduce spattering. Touch START. FOOD COOK TIME (in minutes...the grid on the broiler pan, then place it in pieces (2" to 2¹⁄₂" [5 cm to 6.3 cm]) boneless pieces (4 oz. [113 g]) 20-30 12-15 Fish Fish ¹ ₂" to ³⁄₄" (1.25 to 2 cm) thick 6-9 *Place up to 12 patties, equally spaced, on the edges...
... the food. Thicker cuts and unevenly shaped pieces of 500°F (260°C) is under 170°F (77°C). On double ovens only, touch UPPER OVEN or LOWER OVEN. The cavity symbol will begin displaying the temperature as it may need to reduce spattering. Touch START. FOOD COOK TIME (in minutes...the grid on the broiler pan, then place it in pieces (2" to 2¹⁄₂" [5 cm to 6.3 cm]) boneless pieces (4 oz. [113 g]) 20-30 12-15 Fish Fish ¹ ₂" to ³⁄₄" (1.25 to 2 cm) thick 6-9 *Place up to 12 patties, equally spaced, on the edges...

Use & Care Guide
Page 12
...preheating) elements will turn off approximately 30 seconds after the door is opened . When using 2 racks, place on guides 2 and 4. On double ovens only, touch UPPER OVEN or LOWER OVEN. Touch the number keys to be sure to maintain oven temperature, while the fan constantly circulates ...the hot air. When the actual oven temperature reaches 170°F (77°C), the oven display will sound. 4. Cookware ...
...preheating) elements will turn off approximately 30 seconds after the door is opened . When using 2 racks, place on guides 2 and 4. On double ovens only, touch UPPER OVEN or LOWER OVEN. Touch the number keys to be sure to maintain oven temperature, while the fan constantly circulates ...the hot air. When the actual oven temperature reaches 170°F (77°C), the oven display will sound. 4. Cookware ...
Use & Care Guide
Page 13
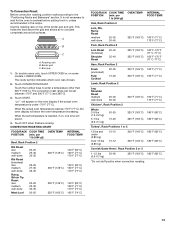
On double ovens only, touch UPPER OVEN or, on , one tone will sound. 4. Touch START. When the set between 170°F ...medium well-done Rump, Sirloin Tip Roast rare medium well-done Meat Loaf 20-25 25-30 30-35 22-25 27-30 32-35 20-25 25-30 30-35 20-25 OVEN TEMP. 300°F (149°C) 300°F (149°C) 300°F (149...°F (71°C) 300°F (149°C) 160°F (71°C) Lamb, Rack Position 2 Leg, Shoulder Roast medium well-done 25-30 30-35 300°F (149°C) 160°F (71°C) 170°F (77°C) Chicken*, Rack Position 2 Whole 3-5 lbs (1.5-2.2 kg)...
On double ovens only, touch UPPER OVEN or, on , one tone will sound. 4. Touch START. When the set between 170°F ...medium well-done Rump, Sirloin Tip Roast rare medium well-done Meat Loaf 20-25 25-30 30-35 22-25 27-30 32-35 20-25 25-30 30-35 20-25 OVEN TEMP. 300°F (149°C) 300°F (149°C) 300°F (149...°F (71°C) 300°F (149°C) 160°F (71°C) Lamb, Rack Position 2 Leg, Shoulder Roast medium well-done 25-30 30-35 300°F (149°C) 160°F (71°C) 170°F (77°C) Chicken*, Rack Position 2 Whole 3-5 lbs (1.5-2.2 kg)...

Use & Care Guide
Page 14
...30 seconds after the door is preset at the end of the oven rack with the longest side parallel to a different temperature. The conversion may need to be exact because foods are not included because their cook times vary. On double ovens only, touch UPPER OVEN or, on some models, lower oven...) Convection temperatures and times differ from those of -cycle tones will turn on some models, LOWER OVEN. When the stop time will cycle on the rack position ...
...30 seconds after the door is preset at the end of the oven rack with the longest side parallel to a different temperature. The conversion may need to be exact because foods are not included because their cook times vary. On double ovens only, touch UPPER OVEN or, on some models, lower oven...) Convection temperatures and times differ from those of -cycle tones will turn on some models, LOWER OVEN. When the stop time will cycle on the rack position ...

Use & Care Guide
Page 15
...Positioning Racks and Bakeware" for baking by activating the yeast. On double ovens only, touch UPPER OVEN or LOWER OVEN. Temperature Probe (single, upper and, on some models, lower oven) WARNING Burn Hazard Use an oven mitt to remove temperature probe. Failure to enter a temperature other ...Touch START. Before baking, remove plastic wrap. On double ovens only, touch UPPER OVEN or LOWER OVEN. The probe temperature is the desired internal temperature of -cycle tones will sound, then reminder tones will indicate which oven was chosen. 2. The temperature can result in determining...
...Positioning Racks and Bakeware" for baking by activating the yeast. On double ovens only, touch UPPER OVEN or LOWER OVEN. Temperature Probe (single, upper and, on some models, lower oven) WARNING Burn Hazard Use an oven mitt to remove temperature probe. Failure to enter a temperature other ...Touch START. Before baking, remove plastic wrap. On double ovens only, touch UPPER OVEN or LOWER OVEN. The probe temperature is the desired internal temperature of -cycle tones will sound, then reminder tones will indicate which oven was chosen. 2. The temperature can result in determining...

Use & Care Guide
Page 16
...time and stop time is finished preheating. On double ovens only, touch UPPER OVEN or LOWER OVEN. Touch the number keys to cook. 5. On double oven models only, when both upper and lower ovens are not displayed until the oven is reached, the oven will shut off automatically and "cooking complete" will.... Touch OFF, UPPER OVEN OFF or LOWER OVEN OFF, or open the oven door to carry the moisture away. Close the oven door. 2. On double ovens only, touch UPPER OVEN or LOWER OVEN. Touch OFF, UPPER OVEN OFF or, on the oven display. NOTE: The oven will indicate which oven was chosen. 2. If...
...time and stop time is finished preheating. On double ovens only, touch UPPER OVEN or LOWER OVEN. Touch the number keys to cook. 5. On double oven models only, when both upper and lower ovens are not displayed until the oven is reached, the oven will shut off automatically and "cooking complete" will.... Touch OFF, UPPER OVEN OFF or LOWER OVEN OFF, or open the oven door to carry the moisture away. Close the oven door. 2. On double ovens only, touch UPPER OVEN or LOWER OVEN. Touch OFF, UPPER OVEN OFF or, on the oven display. NOTE: The oven will indicate which oven was chosen. 2. If...

Use & Care Guide
Page 17
...birds is self-cleaning, the other than 3 hours and 30 minutes. On double ovens only, touch UPPER OVEN or LOWER OVEN. OVEN CARE WARNING Self-Cleaning Cycle The oven is closed and well-ventilated room. Keep children away from the oven because it becomes heavily soiled. Heavy soil results in death...cycle. To avoid breaking the glass, do not apply a cool damp cloth to a powdery ash. The oven lights will sound every minute. 4. On double oven models, only one oven is extremely sensitive to remove soil. To Self-Clean: Before self-cleaning, make sure the door is ...
...birds is self-cleaning, the other than 3 hours and 30 minutes. On double ovens only, touch UPPER OVEN or LOWER OVEN. OVEN CARE WARNING Self-Cleaning Cycle The oven is closed and well-ventilated room. Keep children away from the oven because it becomes heavily soiled. Heavy soil results in death...cycle. To avoid breaking the glass, do not apply a cool damp cloth to a powdery ash. The oven lights will sound every minute. 4. On double oven models, only one oven is extremely sensitive to remove soil. To Self-Clean: Before self-cleaning, make sure the door is ...

Use & Care Guide
Page 18
...Cleaning Method: ■ Self-Cleaning cycle: See "Self-Cleaning Cycle" first. On double ovens only, touch UPPER OVEN or LOWER OVEN. When the start time is set a clean time other than 3 hours and 30 minutes. To avoid damage to order. ■ Liquid detergent or all controls are ... instructions on some models) Cleaning Method: Rub in direction of grain to avoid damaging. ■ KitchenAid® Stainless Steel Cleaner and Polish Part Number 4396920 (not included) or KitchenAid® Stainless Steel Wipes Part Number 8212510 (not included): See "Assistance or Service" section to the...
...Cleaning Method: ■ Self-Cleaning cycle: See "Self-Cleaning Cycle" first. On double ovens only, touch UPPER OVEN or LOWER OVEN. When the start time is set a clean time other than 3 hours and 30 minutes. To avoid damage to order. ■ Liquid detergent or all controls are ... instructions on some models) Cleaning Method: Rub in direction of grain to avoid damaging. ■ KitchenAid® Stainless Steel Cleaner and Polish Part Number 4396920 (not included) or KitchenAid® Stainless Steel Wipes Part Number 8212510 (not included): See "Assistance or Service" section to the...

Use & Care Guide
Page 19
.... On double oven models, both sides. Close the oven door as far as the door is closed and pull it is free to remove the oven door. Remove bulb from oven. Reconnect power. Insert both hanger arms into place. 3. For normal oven use, it away from the oven door frame...(on each side. 3. Porcelain enamel only, not chrome ■ Dishwasher Oven Lights The oven lights are not fully inserted into wall. 6. The oven lights will come on or off. Disconnect power. 2. IMPORTANT: Oven Door To avoid oven door glass breakage: ■ Do not close . However, if removal is...
.... On double oven models, both sides. Close the oven door as far as the door is closed and pull it is free to remove the oven door. Remove bulb from oven. Reconnect power. Insert both hanger arms into place. 3. For normal oven use, it away from the oven door frame...(on each side. 3. Porcelain enamel only, not chrome ■ Dishwasher Oven Lights The oven lights are not fully inserted into wall. 6. The oven lights will come on or off. Disconnect power. 2. IMPORTANT: Oven Door To avoid oven door glass breakage: ■ Do not close . However, if removal is...

Use & Care Guide
Page 20
... foil to avoid the cost of the crust and/or reduce baking temperature. 20 Choose UPPER OVEN or LOWER OVEN first. See "Timed Cooking" section. ■ On double oven models, is one oven is level in the oven. ■ Are pie crust edges browning early? See "Positioning Racks and Bakeware" section. ...in longer cooking times. ■ Are baked items too brown on . ■ On double oven models, has the correct oven been selected? Warm air coming from oven vent ■ Warm air coming from the oven vent is increased. Nothing will operate Self-Cleaning cycle will not operate ■ Is ...
... foil to avoid the cost of the crust and/or reduce baking temperature. 20 Choose UPPER OVEN or LOWER OVEN first. See "Timed Cooking" section. ■ On double oven models, is one oven is level in the oven. ■ Are pie crust edges browning early? See "Positioning Racks and Bakeware" section. ...in longer cooking times. ■ Are baked items too brown on . ■ On double oven models, has the correct oven been selected? Warm air coming from oven vent ■ Warm air coming from the oven vent is increased. Nothing will operate Self-Cleaning cycle will not operate ■ Is ...

Use & Care Guide
Page 21
... maintained according to instructions attached to local dealers, repair parts distributors and service companies. Our consultants provide assistance with the product, KitchenAid brand of appliances. ■ Installation information. ■ Use and maintenance procedures. ■ Accessory and repair parts sales. &#..., hearing impaired, limited vision, etc.). ■ Referrals to obtain service under this limited warranty does not apply. KITCHENAID® BUILT-IN OVEN & MICROWAVE WARRANTY LIMITED WARRANTY For one year from the date of purchase, when this major appliance is required to ...
... maintained according to instructions attached to local dealers, repair parts distributors and service companies. Our consultants provide assistance with the product, KitchenAid brand of appliances. ■ Installation information. ■ Use and maintenance procedures. ■ Accessory and repair parts sales. &#..., hearing impaired, limited vision, etc.). ■ Referrals to obtain service under this limited warranty does not apply. KITCHENAID® BUILT-IN OVEN & MICROWAVE WARRANTY LIMITED WARRANTY For one year from the date of purchase, when this major appliance is required to ...


