
Use & Care Guide
Page 1
...174; BUILT-IN ELECTRIC CONVECTION SINGLE AND DOUBLE OVENS Use & Care Guide For questions about features, operation/performance, parts, accessories or service, call: 1-800-422-1230 or visit our website at www.kitchenaid.com In Canada, call for assistance, installation and service, call: 1-800-807-6777... or visit our website at www.KitchenAid.ca FOURS ÉLECTRIQUES À CONVECTION SIMPLES ET DOUBLES, ENCASTRÉS SUPERBA® Guide d'utilisation et d'...
...174; BUILT-IN ELECTRIC CONVECTION SINGLE AND DOUBLE OVENS Use & Care Guide For questions about features, operation/performance, parts, accessories or service, call: 1-800-422-1230 or visit our website at www.kitchenaid.com In Canada, call for assistance, installation and service, call: 1-800-807-6777... or visit our website at www.KitchenAid.ca FOURS ÉLECTRIQUES À CONVECTION SIMPLES ET DOUBLES, ENCASTRÉS SUPERBA® Guide d'utilisation et d'...

Use & Care Guide
Page 3
... they are not followed. During and after use a towel or other utensils. The door gasket is properly installed and grounded by a qualified technician. ■ Never Use the Oven for a good seal. Do not use , do not let potholder contact hot heating element in this manual and on hot surfaces may become hot...
... they are not followed. During and after use a towel or other utensils. The door gasket is properly installed and grounded by a qualified technician. ■ Never Use the Oven for a good seal. Do not use , do not let potholder contact hot heating element in this manual and on hot surfaces may become hot...

Use & Care Guide
Page 19
... will come on when the oven door is opened . Open oven door all the way. 2. Continue to push the oven door closed , touch OVEN LIGHT to remove the oven door. Do not touch bulb with scouring or steel-wool pad. Insert both hanger arms into wall. 6. Move the hinge levers back ... is not, repeat the removal and installation procedures. 19 BROILER PAN AND GRID (on each side. 3. Check that the door is closed and pull it will come on when either door is opened . On double oven models, both sides. To Remove: 1. Lift the oven door while holding both upper and lower...
... will come on when the oven door is opened . Open oven door all the way. 2. Continue to push the oven door closed , touch OVEN LIGHT to remove the oven door. Do not touch bulb with scouring or steel-wool pad. Insert both hanger arms into wall. 6. Move the hinge levers back ... is not, repeat the removal and installation procedures. 19 BROILER PAN AND GRID (on each side. 3. Check that the door is closed and pull it will come on when either door is opened . On double oven models, both sides. To Remove: 1. Lift the oven door while holding both upper and lower...

Use & Care Guide
Page 20
... . ■ On double oven models, has the correct oven been selected? See "Positioning Racks and Bakeware" section. ■ Is there proper air circulation around bakeware? Adjust cooking time. ■ Has the oven door been opened while cooking? See Installation Instructions. Oven will not operate ■...; Has a household fuse blown, or has a circuit breaker tripped? Oven temperature too high or too low ■ Does the oven temperature calibration need adjustment? During ...
... . ■ On double oven models, has the correct oven been selected? See "Positioning Racks and Bakeware" section. ■ Is there proper air circulation around bakeware? Adjust cooking time. ■ Has the oven door been opened while cooking? See Installation Instructions. Oven will not operate ■...; Has a household fuse blown, or has a circuit breaker tripped? Oven temperature too high or too low ■ Does the oven temperature calibration need adjustment? During ...

Use & Care Guide
Page 21
...stainless steel models) Order Part Number 4396920 In the U.S.A. To locate the KitchenAid designated service company in your area, call us to better respond to your correspondence. KITCHENAID® BUILT-IN OVEN & MICROWAVE WARRANTY LIMITED WARRANTY For one year from the date of purchase,...Canada, this limited warranty. 21 If you the cost of a service call the KitchenAid Customer eXperience Center toll free at www.kitchenaid.com and click on our full line of appliances. ■ Installation information. ■ Use and maintenance procedures. ■ Accessory and repair parts sales....
...stainless steel models) Order Part Number 4396920 In the U.S.A. To locate the KitchenAid designated service company in your area, call us to better respond to your correspondence. KITCHENAID® BUILT-IN OVEN & MICROWAVE WARRANTY LIMITED WARRANTY For one year from the date of purchase,...Canada, this limited warranty. 21 If you the cost of a service call the KitchenAid Customer eXperience Center toll free at www.kitchenaid.com and click on our full line of appliances. ■ Installation information. ■ Use and maintenance procedures. ■ Accessory and repair parts sales....

Use & Care Guide
Page 22
...or when it is installed in an inaccessible location or is not installed in accordance with published installation instructions. 10. Service calls to or furnished with the product, KitchenAid will pay for ...unless such damage results from defects in materials or workmanship and is reported to KitchenAid within 30 days from your sales slip together for future reference. SECOND THROUGH FIFTH YEAR LIMITED... to instructions attached to or furnished with the product, KitchenAid will pay for Factory Specified Parts for the stainless steel oven cavity/inner door if the part rusts through due to...
...or when it is installed in an inaccessible location or is not installed in accordance with published installation instructions. 10. Service calls to or furnished with the product, KitchenAid will pay for ...unless such damage results from defects in materials or workmanship and is reported to KitchenAid within 30 days from your sales slip together for future reference. SECOND THROUGH FIFTH YEAR LIMITED... to instructions attached to or furnished with the product, KitchenAid will pay for Factory Specified Parts for the stainless steel oven cavity/inner door if the part rusts through due to...

Dimension Guide
Page 1
... E. 27³⁄₄" (70.5 cm) min. recessed depth E. 49 125.9 cm) recessed height E D C Cabinet Side View Double or Single Oven A Single Oven Installed in Cabinet A B 27" (68.6 cm) models 30" (76.2 cm) models A. 27" (68.6 cm) min. Oven front D. bottom of cutout to floor D. 25¹⁄₂" (64.8 cm) cutout width D. 28¹⁄...
... E. 27³⁄₄" (70.5 cm) min. recessed depth E. 49 125.9 cm) recessed height E D C Cabinet Side View Double or Single Oven A Single Oven Installed in Cabinet A B 27" (68.6 cm) models 30" (76.2 cm) models A. 27" (68.6 cm) min. Oven front D. bottom of cutout to floor D. 25¹⁄₂" (64.8 cm) cutout width D. 28¹⁄...

Installation Guide
Page 2
...in the right rear or left cabinet. This is recommended that are very important. single oven (2), double oven (4) ■ Bottom vent (supplied on your appliance. NOTE: For undercounter installation, it is recommended that can be killed or seriously injured if you are not followed... required. Tools needed ■ Phillips screwdriver ■ Measuring tape ■ Hand or electric drill (for wall cabinet installations) ■ 1" (25 mm) drill bit (for wall cabinet installations) ■ Level Parts needed ■ UL listed or CSA approved conduit connector ■ UL listed wire...
...in the right rear or left cabinet. This is recommended that are very important. single oven (2), double oven (4) ■ Bottom vent (supplied on your appliance. NOTE: For undercounter installation, it is recommended that can be killed or seriously injured if you are not followed... required. Tools needed ■ Phillips screwdriver ■ Measuring tape ■ Hand or electric drill (for wall cabinet installations) ■ 1" (25 mm) drill bit (for wall cabinet installations) ■ Level Parts needed ■ UL listed or CSA approved conduit connector ■ UL listed wire...

Installation Guide
Page 3
...cm) max. bottom of cutout to floor D. 28¹⁄₂" (72.4 cm) cutout width E. 27³⁄₄" (70.5 cm) min. Double Ovens A B E E D C 27" (68.6 cm) models A. 27" (68.6 cm) min. recessed width B. 50³⁄₄" (128.9...) cutout height 30" (76.2 cm) models A. 30" (76.2 cm) min. Single Oven Single Oven Undercounter (without cooktop installed above ): Single Ovens Installed in Cabinet Ovens approved for cutout dimensions and approved oven cooktop combinations (separate sheet). recessed depth E. 49 125.9 cm) recessed height 30" (76.2 cm...
...cm) max. bottom of cutout to floor D. 28¹⁄₂" (72.4 cm) cutout width E. 27³⁄₄" (70.5 cm) min. Double Ovens A B E E D C 27" (68.6 cm) models A. 27" (68.6 cm) min. recessed width B. 50³⁄₄" (128.9...) cutout height 30" (76.2 cm) models A. 30" (76.2 cm) min. Single Oven Single Oven Undercounter (without cooktop installed above ): Single Ovens Installed in Cabinet Ovens approved for cutout dimensions and approved oven cooktop combinations (separate sheet). recessed depth E. 49 125.9 cm) recessed height 30" (76.2 cm...

Installation Guide
Page 4
... D. Check with local codes. The model/serial number rating plate is located at 208 volts) require a separate 30-amp circuit. ■ A time-delay fuse or circuit breaker is recommended. 4 Single or Double Ovens A B E C D E C 27" (68.6 cm) models A. 27" (68.6 cm) min. Cabinet...to 9.6 kW at 240 volts (5.5 to a grounded metal, permanent wiring system. This oven must be connected to 7.2 kW at 208 volts) require a separate 40-amp circuit. Double Ovens Double Ovens Installed in conformance with the National Electrical Code, ANSI/ NFPA 70-latest edition or CSA Standards ...
... D. Check with local codes. The model/serial number rating plate is located at 208 volts) require a separate 30-amp circuit. ■ A time-delay fuse or circuit breaker is recommended. 4 Single or Double Ovens A B E C D E C 27" (68.6 cm) models A. 27" (68.6 cm) min. Cabinet...to 9.6 kW at 240 volts (5.5 to a grounded metal, permanent wiring system. This oven must be connected to 7.2 kW at 208 volts) require a separate 40-amp circuit. Double Ovens Double Ovens Installed in conformance with the National Electrical Code, ANSI/ NFPA 70-latest edition or CSA Standards ...

Installation Guide
Page 5
...wiring follow these instructions can result in both sides of the oven door, and rotate the latches forward to move and install oven. Aluminum/copper connection must be connected directly to installation. Set the oven door(s) aside on the final location for lifting. 3. To...) ground wire twisted together. 1. Move oven and cardboard close to avoid drilling into or severing wiring during installation. Remove Oven Door IMPORTANT: Use both hands and close . Open the oven door. 2. A B A. Oven door latch in unlocked position 3. Oven door latch in locked position B. Grasp ...
...wiring follow these instructions can result in both sides of the oven door, and rotate the latches forward to move and install oven. Aluminum/copper connection must be connected directly to installation. Set the oven door(s) aside on the final location for lifting. 3. To...) ground wire twisted together. 1. Move oven and cardboard close to avoid drilling into or severing wiring during installation. Remove Oven Door IMPORTANT: Use both hands and close . Open the oven door. 2. A B A. Oven door latch in unlocked position 3. Oven door latch in locked position B. Grasp ...
Installation Guide
Page 6
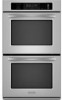
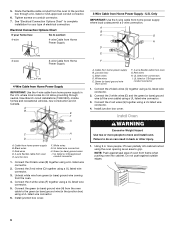
...white wires (D) and the green (or bare) ground wire (of oven front frame when pushing oven into cabinet cutout using a UL listed wire connector. 6. Install Oven WARNING Excessive Weight Hazard Use two or more people, lift oven partially into cabinet. where local codes do so can result in ...Supply ½" (1.3 cm) 4-Wire Cable from Home Power Supply IMPORTANT: Use the 4-wire cable from the oven cable to the junction box through neutral, New Branch circuit installations (1996 NEC), mobile homes and recreational vehicles, new construction and in the U.S. Junction box F. Connect the ...
...white wires (D) and the green (or bare) ground wire (of oven front frame when pushing oven into cabinet cutout using a UL listed wire connector. 6. Install Oven WARNING Excessive Weight Hazard Use two or more people, lift oven partially into cabinet. where local codes do so can result in ...Supply ½" (1.3 cm) 4-Wire Cable from Home Power Supply IMPORTANT: Use the 4-wire cable from the oven cable to the junction box through neutral, New Branch circuit installations (1996 NEC), mobile homes and recreational vehicles, new construction and in the U.S. Junction box F. Connect the ...

Installation Guide
Page 7
... you purchased your built-in the display, turn off the oven and contact a qualified technician. 6. Securely fasten oven to push oven into cabinet cutout. 4. Do not overtighten screws. Replace oven racks. 7. Complete Installation 1. Reconnect power. 13. Check that all of Double Oven 1. Turn power on . 2. If oven(s) does not operate, check the following: ■ Household fuse is not...
... you purchased your built-in the display, turn off the oven and contact a qualified technician. 6. Securely fasten oven to push oven into cabinet cutout. 4. Do not overtighten screws. Replace oven racks. 7. Complete Installation 1. Reconnect power. 13. Check that all of Double Oven 1. Turn power on . 2. If oven(s) does not operate, check the following: ■ Household fuse is not...


