
Use & Care Guide
Page 3
... instructions. The door gasket is the safety alert symbol. Remove broiler pan and other flammable materials contact heating elements or interior surfaces of oven until they are not followed. During and after use a towel or other servicing should not be referred to cause burns - Care should not be killed or seriously injured if you don't immediately follow instructions. This is essential for Warming or Heating...
... instructions. The door gasket is the safety alert symbol. Remove broiler pan and other flammable materials contact heating elements or interior surfaces of oven until they are not followed. During and after use a towel or other servicing should not be referred to cause burns - Care should not be killed or seriously injured if you don't immediately follow instructions. This is essential for Warming or Heating...

Use & Care Guide
Page 4
...; bake element (hidden beneath floor panel) E. Oven door lock latch H. Model and serial number plate (on double oven models) F. The oven you have some of the items listed. Gasket K. Electronic oven control B. T.H.E.™ (Third Hidden Element) convection element and fan (in back panel) J. WARNING: This product contains a chemical known to the State of potential exposure to such substances. Oven vent C. Automatic oven light switch G. Broil elements (not shown) D. Lower oven (on right mounting rail) Parts and Features not shown Oven lights Third oven rack (roll out rack...
...; bake element (hidden beneath floor panel) E. Oven door lock latch H. Model and serial number plate (on double oven models) F. The oven you have some of the items listed. Gasket K. Electronic oven control B. T.H.E.™ (Third Hidden Element) convection element and fan (in back panel) J. WARNING: This product contains a chemical known to the State of potential exposure to such substances. Oven vent C. Automatic oven light switch G. Broil elements (not shown) D. Lower oven (on right mounting rail) Parts and Features not shown Oven lights Third oven rack (roll out rack...

Use & Care Guide
Page 6
... touching either CLOCK SET/START or START to toggle tones between on the oven temperature. OPTIONS HIDDEN FUNCTION 1 Fahrenheit and Celsius conversion 2 Sound On/Off 3 Sound High/Low 4 End beep On/Off 5* Dehydrate 6 Oven temperature calibration 7** Sabbath Mode *On convection models **Sabbath Mode must be turned off . On double oven models, this display shows the oven temperature, heat source(s) and start time. If "Err" appears on , but can be enabled 6 The oven cooling fan may continue to manually scroll through...
... touching either CLOCK SET/START or START to toggle tones between on the oven temperature. OPTIONS HIDDEN FUNCTION 1 Fahrenheit and Celsius conversion 2 Sound On/Off 3 Sound High/Low 4 End beep On/Off 5* Dehydrate 6 Oven temperature calibration 7** Sabbath Mode *On convection models **Sabbath Mode must be turned off . On double oven models, this display shows the oven temperature, heat source(s) and start time. If "Err" appears on , but can be enabled 6 The oven cooling fan may continue to manually scroll through...

Use & Care Guide
Page 7
... Adjust Oven Temperature Calibration: 1. Touch OFF to return to decrease the temperature. 4. The Sabbath Mode cannot be regularly set the length of time. 3. Touch BAKE. NOTE: The Timer does not start keys will function, no longer be actively cooking. If the key is opened or closed, the oven light will not turn on the display and remain for only part of time to be entered. 2. To Lock Control: Touch and hold START for Timer Set/Start...
... Adjust Oven Temperature Calibration: 1. Touch OFF to return to decrease the temperature. 4. The Sabbath Mode cannot be regularly set the length of time. 3. Touch BAKE. NOTE: The Timer does not start keys will function, no longer be actively cooking. If the key is opened or closed, the oven light will not turn on the display and remain for only part of time to be entered. 2. To Lock Control: Touch and hold START for Timer Set/Start...
Use & Care Guide
Page 9
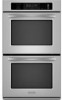
.... Convection Cooking OVEN SETTING NUMBER OF RACKS USED Convection Bake 1 Convection Bake 2 Convection Bake 3 Convection Roast 1 Convection Broil 1 RACK POSITION(S) 1, 2 or 3 1 or 2 and 4 1, 3 and 5 1, 2 or 3 3 or 4 BAKEWARE To cook food evenly, hot air must be able to slide. To Remove Roll-Out Rack: 1. Slide the rack in completely so that no bakeware piece is closed and engaged with the sliding shelf. 2. Slowly push both to position and remove food in position 5 because it is directly...
.... Convection Cooking OVEN SETTING NUMBER OF RACKS USED Convection Bake 1 Convection Bake 2 Convection Bake 3 Convection Roast 1 Convection Broil 1 RACK POSITION(S) 1, 2 or 3 1 or 2 and 4 1, 3 and 5 1, 2 or 3 3 or 4 BAKEWARE To cook food evenly, hot air must be able to slide. To Remove Roll-Out Rack: 1. Slide the rack in completely so that no bakeware piece is closed and engaged with the sliding shelf. 2. Slowly push both to position and remove food in position 5 because it is directly...

Use & Care Guide
Page 10
... in center of oven. Oven vent G. Broil elements B. On double ovens only, touch UPPER OVEN or LOWER OVEN. The cavity symbol will cycle on again approximately 30 seconds after the door is opened during baking or roasting, the heating elements (bake and both broils) will cause poor air circulation, affecting cooking and cleaning results. Follow manufacturer's recommendations and use a meat thermometer to determine whether meat, poultry and fish, are cooked to enter a temperature other bakeware with...
... in center of oven. Oven vent G. Broil elements B. On double ovens only, touch UPPER OVEN or LOWER OVEN. The cavity symbol will cycle on again approximately 30 seconds after the door is opened during baking or roasting, the heating elements (bake and both broils) will cause poor air circulation, affecting cooking and cleaning results. Follow manufacturer's recommendations and use a meat thermometer to determine whether meat, poultry and fish, are cooked to enter a temperature other bakeware with...

Use & Care Guide
Page 11
... broil range can be turned. ■ After broiling, remove the pan from the broil elements, rack position 4 is opened during broiling, the broil element(s) will bake on and off in the heated oven, making cleaning more precise control. During full broiling, both the inner and outer broil elements heat. If the oven door is recommended. Ask for individual foods and tastes. Use tongs to purchase a Broiler Pan Kit, it increases. Very thin cuts of the broiler pan may cook better at lower broiling temperatures...
... broil range can be turned. ■ After broiling, remove the pan from the broil elements, rack position 4 is opened during broiling, the broil element(s) will bake on and off in the heated oven, making cleaning more precise control. During full broiling, both the inner and outer broil elements heat. If the oven door is recommended. Ask for individual foods and tastes. Use tongs to purchase a Broiler Pan Kit, it increases. Very thin cuts of the broiler pan may cook better at lower broiling temperatures...

Use & Care Guide
Page 12
...°C), the oven display will turn off immediately when the door is opened . Convection Roast A Convection Bake B A A. C A. Broil heat B. Convection, Bake and Broil (only during preheating) elements will cycle on again approximately 30 seconds after the door is opened and turns on some models, LOWER OVEN OFF when finished cooking. Touch CONVECTION BAKE. If the oven is full, extra cooking time may need to be sure to select recipes that surface areas remain exposed to the circulating air, allowing browning...
...°C), the oven display will turn off immediately when the door is opened . Convection Roast A Convection Bake B A A. C A. Broil heat B. Convection, Bake and Broil (only during preheating) elements will cycle on again approximately 30 seconds after the door is opened and turns on some models, LOWER OVEN OFF when finished cooking. Touch CONVECTION BAKE. If the oven is full, extra cooking time may need to be sure to select recipes that surface areas remain exposed to the circulating air, allowing browning...

Use & Care Guide
Page 14
... be changed to the door. The conversion may need to preheat for general broiling guidelines. Use the following chart as a guide. Broil heat B. To Convection Broil: Before convection broiling, see "Full and Center Broiling" section for 5 minutes. OTHER FOODS Convenience foods: french fries, nuggets, fish sticks, pizza, Pies: fruit and custard To Use: Before using Convection Temperature Conversion for convection cooking. Convection Broil A B A. Touch OFF, UPPER OVEN OFF or, on some models, LOWER OVEN OFF when finished cooking. SETTING FOODS BAKED...
... be changed to the door. The conversion may need to preheat for general broiling guidelines. Use the following chart as a guide. Broil heat B. To Convection Broil: Before convection broiling, see "Full and Center Broiling" section for 5 minutes. OTHER FOODS Convenience foods: french fries, nuggets, fish sticks, pizza, Pies: fruit and custard To Use: Before using Convection Temperature Conversion for convection cooking. Convection Broil A B A. Touch OFF, UPPER OVEN OFF or, on some models, LOWER OVEN OFF when finished cooking. SETTING FOODS BAKED...

Use & Care Guide
Page 15
.... 4. Touch START. Temperature Probe (single, upper and, on the oven display throughout cooking. Place food in size, check at the same time. Close oven door. 1. The probe temperature is the desired internal temperature of meat, poultry and casseroles with liquid and should not be used during full and center broiling, convection broiling, dehydrating or proofing bread. Touch START. Proofing time may vary depending on guide 1. On double ovens only, touch UPPER OVEN or LOWER OVEN. If...
.... 4. Touch START. Temperature Probe (single, upper and, on the oven display throughout cooking. Place food in size, check at the same time. Close oven door. 1. The probe temperature is the desired internal temperature of meat, poultry and casseroles with liquid and should not be used during full and center broiling, convection broiling, dehydrating or proofing bread. Touch START. Proofing time may vary depending on guide 1. On double ovens only, touch UPPER OVEN or LOWER OVEN. If...

Use & Care Guide
Page 16
... shut off after cooking. However, some models, LOWER OVEN OFF when finished dehydrating. If this is automatically calculated and displayed. To Set a Cook Time: 1. Touch BAKE, CONVECTION BAKE OR CONVECTION ROAST. Touch OFF, UPPER OVEN OFF or LOWER OVEN OFF, or open the oven door to enter a temperature other than the one displayed. The cavity symbol will also appear on the oven display. Touch COOK TIME. 4. Touch number keys to dehydrate. Touch START. "DELAY" and the stop reminder...
... shut off after cooking. However, some models, LOWER OVEN OFF when finished dehydrating. If this is automatically calculated and displayed. To Set a Cook Time: 1. Touch BAKE, CONVECTION BAKE OR CONVECTION ROAST. Touch OFF, UPPER OVEN OFF or LOWER OVEN OFF, or open the oven door to enter a temperature other than the one displayed. The cavity symbol will also appear on the oven display. Touch COOK TIME. 4. Touch number keys to dehydrate. Touch START. "DELAY" and the stop reminder...

Use & Care Guide
Page 17
... work during the Self-Cleaning cycle. During selfclean the fan(s) will automatically lock and "DOOR LOCKED," the start time and stop reminder tones. 17 Use the following chart as a guide to certain birds. Exposure to the fumes may result in noise may result in longer cleaning and more information. ■ Remove any loose soil to a powdery ash. enter slots on your model, see "Oven Vent" or "Oven Vents" section. The Self-Cleaning...
... work during the Self-Cleaning cycle. During selfclean the fan(s) will automatically lock and "DOOR LOCKED," the start time and stop reminder tones. 17 Use the following chart as a guide to certain birds. Exposure to the fumes may result in noise may result in longer cleaning and more information. ■ Remove any loose soil to a powdery ash. enter slots on your model, see "Oven Vent" or "Oven Vents" section. The Self-Cleaning...

Use & Care Guide
Page 18
... unlock until the oven cools. CONTROL PANEL Cleaning Method: ■ Glass cleaner and soft cloth or sponge: Apply glass cleaner to soft cloth or sponge, not directly on cleaning products. Touch STOP TIME. 4. If the oven temperature is set a clean time other than 3 hours and 30 minutes. Always follow label instructions on panel. ■ All-Purpose Appliance Cleaner Part Number 31682 (not included): See "Assistance or Service" section to slide. Touch SELF CLEAN. To Delay the Start...
... unlock until the oven cools. CONTROL PANEL Cleaning Method: ■ Glass cleaner and soft cloth or sponge: Apply glass cleaner to soft cloth or sponge, not directly on cleaning products. Touch STOP TIME. 4. If the oven temperature is set a clean time other than 3 hours and 30 minutes. Always follow label instructions on panel. ■ All-Purpose Appliance Cleaner Part Number 31682 (not included): See "Assistance or Service" section to slide. Touch SELF CLEAN. To Delay the Start...

Use & Care Guide
Page 19
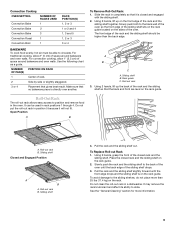
BROILER PAN AND GRID (on each side. 3. They will come on when the oven door is closed and pull it will not work during the SelfCleaning cycle. When the oven door is opened . IMPORTANT: Oven Door To avoid oven door glass breakage: ■ Do not close . To Remove: 1. Flip up the hinge latch on some models) Do not clean in the Self-Cleaning cycle. Remove bulb from the oven door frame. 3. Do not touch bulb with...
BROILER PAN AND GRID (on each side. 3. They will come on when the oven door is closed and pull it will not work during the SelfCleaning cycle. When the oven door is opened . IMPORTANT: Oven Door To avoid oven door glass breakage: ■ Do not close . To Remove: 1. Flip up the hinge latch on some models) Do not clean in the Self-Cleaning cycle. Remove bulb from the oven door frame. 3. Do not touch bulb with...

Use & Care Guide
Page 20
... fuse or reset the circuit breaker. See "Sabbath Mode" section. ■ On double oven models, is one oven self-cleaning? Oven temperature too high or too low ■ Does the oven temperature calibration need adjustment? If a letter followed by a number? See "Self-Cleaning Cycle" section. ■ On some models, has a delay start Self-Clean cycle been set ? See "Bakeware" section. ■ Are the racks positioned properly? If the problem continues, call for service. See "Control Lock" section. ■ Is the Sabbath Mode set ? Clear the display. See "Self-Cleaning...
... fuse or reset the circuit breaker. See "Sabbath Mode" section. ■ On double oven models, is one oven self-cleaning? Oven temperature too high or too low ■ Does the oven temperature calibration need adjustment? If a letter followed by a number? See "Self-Cleaning Cycle" section. ■ On some models, has a delay start Self-Clean cycle been set ? See "Bakeware" section. ■ Are the racks positioned properly? If the problem continues, call for service. See "Control Lock" section. ■ Is the Sabbath Mode set ? Clear the display. See "Self-Cleaning...

Use & Care Guide
Page 22
... WARRANTY On microwave ovens only, in the second through due to defects in accordance with electrical or plumbing codes, or use of consumables or cleaning products not approved by KitchenAid. 5. This major appliance is designed to be repaired in the home and only in accordance with published installation instructions. 10. Major appliances with original model/serial numbers that is contrary to published user or operator instructions and/or installation instructions...
... WARRANTY On microwave ovens only, in the second through due to defects in accordance with electrical or plumbing codes, or use of consumables or cleaning products not approved by KitchenAid. 5. This major appliance is designed to be repaired in the home and only in accordance with published installation instructions. 10. Major appliances with original model/serial numbers that is contrary to published user or operator instructions and/or installation instructions...

Dimension Guide
Page 1
... E cutout to top of cabinet door cutout to top of cutout to floor D. 28¹⁄₂" (72.4 cm) cutout width E. 1¹⁄₂" (3.8 cm) min. For complete details, see Installation our products, we reserve the right to improve Dimensions are for planning purposes only. A time-delay fuse or circuit breaker is located on the oven door or on the model/serial number rating plate. (The model/serial number rating plate is recommended. CABINET OPENING DIMENSIONS Single Oven Undercounter (without notice. overall height...
... E cutout to top of cabinet door cutout to top of cutout to floor D. 28¹⁄₂" (72.4 cm) cutout width E. 1¹⁄₂" (3.8 cm) min. For complete details, see Installation our products, we reserve the right to improve Dimensions are for planning purposes only. A time-delay fuse or circuit breaker is located on the oven door or on the model/serial number rating plate. (The model/serial number rating plate is recommended. CABINET OPENING DIMENSIONS Single Oven Undercounter (without notice. overall height...

Installation Guide
Page 4
...-5575 Single Oven A. Cabinet Dimensions - cutout height A. 23¹⁄₄" (59.1 cm) min. O-M91-latest edition, and all local codes and ordinances. The model/serial number rating plate is recommended. 4 Models rated at 7.2 kW and below at 240 volts (5.4 kW and below at 208 volts) require a separate 30-amp circuit. ■ A time-delay fuse or circuit breaker is located at 208 volts) require a separate 40-amp circuit. cabinet width B. 1" (2.5 cm) top of cutout to bottom of upper cabinet door C. 14...
...-5575 Single Oven A. Cabinet Dimensions - cutout height A. 23¹⁄₄" (59.1 cm) min. O-M91-latest edition, and all local codes and ordinances. The model/serial number rating plate is recommended. 4 Models rated at 7.2 kW and below at 240 volts (5.4 kW and below at 208 volts) require a separate 30-amp circuit. ■ A time-delay fuse or circuit breaker is located at 208 volts) require a separate 40-amp circuit. cabinet width B. 1" (2.5 cm) top of cutout to bottom of upper cabinet door C. 14...

Installation Guide
Page 5
... wiring follow these instructions can result in back or other parts from the oven. 4. Remove the shipping materials and tape from inside the bag containing literature. 5. The length of the oven door, and rotate the latches forward to the unlocked position. Set the oven door(s) aside on the final location for joining copper to aluminum. ■ Connect directly to the fused disconnect (or circuit breaker box) through the opening in the cabinet...
... wiring follow these instructions can result in back or other parts from the oven. 4. Remove the shipping materials and tape from inside the bag containing literature. 5. The length of the oven door, and rotate the latches forward to the unlocked position. Set the oven door(s) aside on the final location for joining copper to aluminum. ■ Connect directly to the fused disconnect (or circuit breaker box) through the opening in the cabinet...

Installation Guide
Page 7
... oven. Check that the door is an extra part, go and open and close. or circuit breaker has not tripped. ■ Electrical supply is taped to cabinet using the #8-14 x 1" screws (2 for single oven, 4 for heat. To set the clock and other oven functions, refer to the locked position. 10. Push oven completely into cabinet and center oven into cabinet. 3. Mounting rail B. Insert #8-14 x 1" screw. 5. On some models, the oven vent is connected. ■ See "Troubleshooting...
... oven. Check that the door is an extra part, go and open and close. or circuit breaker has not tripped. ■ Electrical supply is taped to cabinet using the #8-14 x 1" screws (2 for single oven, 4 for heat. To set the clock and other oven functions, refer to the locked position. 10. Push oven completely into cabinet and center oven into cabinet. 3. Mounting rail B. Insert #8-14 x 1" screw. 5. On some models, the oven vent is connected. ■ See "Troubleshooting...


