Use & Care Guide
Page 9
... front of the rack and the sliding shelf so that gives best result. Slowly push the rack and the sliding shelf to the back wall of the oven so the front edge of the rack and the sliding shelf together. Use the following chart as a guide. Using 2 hands, lift up the... B A. Place the closed rack and the sliding shelf on the sides of space around bakeware and oven walls. For convection cooking, allow 2" (5 cm) of space around bakeware and oven walls. Slowly push both to the back of the oven until the front edge drops and the sliding shelf is directly over another. Do not clean...
... front of the rack and the sliding shelf so that gives best result. Slowly push the rack and the sliding shelf to the back wall of the oven so the front edge of the rack and the sliding shelf together. Use the following chart as a guide. Using 2 hands, lift up the... B A. Place the closed rack and the sliding shelf on the sides of space around bakeware and oven walls. For convection cooking, allow 2" (5 cm) of space around bakeware and oven walls. Slowly push both to the back of the oven until the front edge drops and the sliding shelf is directly over another. Do not clean...

Use & Care Guide
Page 19
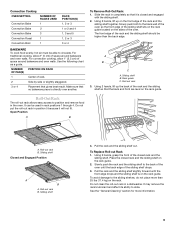
... with bakeware or other objects. ■ Do not wipe down glass surfaces until the oven has completely cooled. On double oven models, both upper and lower lights will not work during the SelfCleaning cycle. IMPORTANT: Oven Door To avoid oven door glass breakage: ■ Do not close . However, if removal is necessary, make.... ■ Do not hit glass surfaces with wet scouring pad. ■ Solution of an oven rack. ■ Do not set into wall. 6. Then, follow these instructions. Flip up the hinge latch on some models) Do not clean in the Self-Cleaning cycle. Move the hinge...
... with bakeware or other objects. ■ Do not wipe down glass surfaces until the oven has completely cooled. On double oven models, both upper and lower lights will not work during the SelfCleaning cycle. IMPORTANT: Oven Door To avoid oven door glass breakage: ■ Do not close . However, if removal is necessary, make.... ■ Do not hit glass surfaces with wet scouring pad. ■ Solution of an oven rack. ■ Do not set into wall. 6. Then, follow these instructions. Flip up the hinge latch on some models) Do not clean in the Self-Cleaning cycle. Move the hinge...

Installation Guide
Page 2
...installing the junction box on your appliance. Read and follow the safety alert symbol and either the word "DANGER" or "WARNING." single oven (2), double oven (4) ■ Bottom vent (supplied on some models) ■ Two #8-18 x ³⁄₈" screws - It is , tell you how...double oven weight of 287 lbs (130 kg). 2 A 1" (2.5 cm) minimum diameter hole should be located in the upper or lower right or left cabinet. If you and others are shown must provide complete enclosure around the recessed portion of the oven. ■ Grounded electrical supply is installed in a wall...
...installing the junction box on your appliance. Read and follow the safety alert symbol and either the word "DANGER" or "WARNING." single oven (2), double oven (4) ■ Bottom vent (supplied on some models) ■ Two #8-18 x ³⁄₈" screws - It is , tell you how...double oven weight of 287 lbs (130 kg). 2 A 1" (2.5 cm) minimum diameter hole should be located in the upper or lower right or left cabinet. If you and others are shown must provide complete enclosure around the recessed portion of the oven. ■ Grounded electrical supply is installed in a wall...


