Use & Care Guide
Page 3
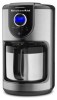
... following: ■ Read all safety messages. Use handles or knobs. ■ To protect against electrical shock, do not immerse cord, plugs, or coffee maker in water or other than intended use. ■ Do not use and before putting on or taking off parts. ■ Do not operate any ... Authorized Service Facility for examination, repair or adjustment. ■ The use of accessory attachments not recommended by or near children. ■ Unplug coffee maker from outlet when not in use appliance without lid properly placed on or near a hot gas or electric burner, or in any manner. Return...
... following: ■ Read all safety messages. Use handles or knobs. ■ To protect against electrical shock, do not immerse cord, plugs, or coffee maker in water or other than intended use. ■ Do not use and before putting on or taking off parts. ■ Do not operate any ... Authorized Service Facility for examination, repair or adjustment. ■ The use of accessory attachments not recommended by or near children. ■ Unplug coffee maker from outlet when not in use appliance without lid properly placed on or near a hot gas or electric burner, or in any manner. Return...
Use & Care Guide
Page 4
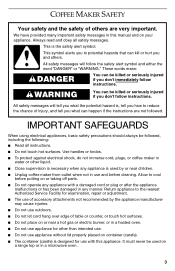
... extension cord. Do not use an extension cord. Failure to reduce the risk resulting from becoming entangled in an outlet only one way. NOTE: This coffee maker has a 3-prong grounded plug. Do not modify the plug in death, fire, or electrical shock. Volts: 120 volts AC only Hertz: 60 Hz If the...
... extension cord. Do not use an extension cord. Failure to reduce the risk resulting from becoming entangled in an outlet only one way. NOTE: This coffee maker has a 3-prong grounded plug. Do not modify the plug in death, fire, or electrical shock. Volts: 120 volts AC only Hertz: 60 Hz If the...
Use & Care Guide
Page 5
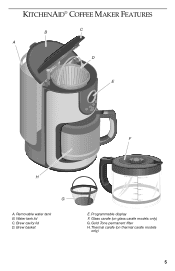
Brew basket E. Programmable display F. Water tank lid C. Glass carafe (on thermal carafe models only) 5 Gold Tone permanent filter H. KITCHENAID® COFFEE MAKER FEATURES B C A D E F H G A. Thermal carafe (on glass carafe models only) G. Removable water tank B. Brew cavity lid D.
Brew basket E. Programmable display F. Water tank lid C. Glass carafe (on thermal carafe models only) 5 Gold Tone permanent filter H. KITCHENAID® COFFEE MAKER FEATURES B C A D E F H G A. Thermal carafe (on glass carafe models only) G. Removable water tank B. Brew cavity lid D.
Use & Care Guide
Page 6
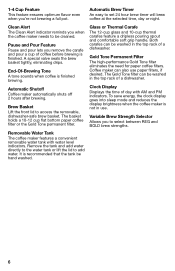
... BOLD brew strengths. Glass or Thermal Carafe The 12-cup glass and 10-cup thermal carafes feature a dripless pouring spout and comfortable soft grip handle. Coffee maker can also use . To save energy, the clock display goes into sleep mode and reduces the display brightness when the... not in use paper filters, if desired. 1-4 Cup Feature This feature ensures optimum flavor even when you when the coffee maker needs to be cleaned. End-Of-Brewing Tone A tone sounds when coffee is recommended that the tank be hand washed. 6 Automatic Brew Timer An easy to set 24 hour brew timer will...
... BOLD brew strengths. Glass or Thermal Carafe The 12-cup glass and 10-cup thermal carafes feature a dripless pouring spout and comfortable soft grip handle. Coffee maker can also use . To save energy, the clock display goes into sleep mode and reduces the display brightness when the... not in use paper filters, if desired. 1-4 Cup Feature This feature ensures optimum flavor even when you when the coffee maker needs to be cleaned. End-Of-Brewing Tone A tone sounds when coffee is recommended that the tank be hand washed. 6 Automatic Brew Timer An easy to set 24 hour brew timer will...
Use & Care Guide
Page 7
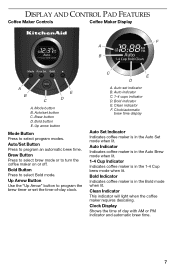
... or to select program modes. Auto set button C. Clean indicator F. Auto Indicator Indicates coffee maker is in the Auto Brew mode when lit. 1-4 Cup Indicator Indicates coffee maker is in the Auto Set mode when lit. DISPLAY AND CONTROL PAD FEATURES Coffee Maker Controls Coffee Maker Display F A B A B E C D A. Auto/set indicator B. Clock/automatic brew time display Auto Set Indicator...
... or to select program modes. Auto set button C. Clean indicator F. Auto Indicator Indicates coffee maker is in the Auto Brew mode when lit. 1-4 Cup Indicator Indicates coffee maker is in the Auto Set mode when lit. DISPLAY AND CONTROL PAD FEATURES Coffee Maker Controls Coffee Maker Display F A B A B E C D A. Auto/set indicator B. Clock/automatic brew time display Auto Set Indicator...
Use & Care Guide
Page 8
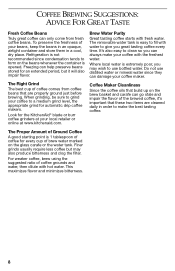
...carafe can always make the best tasting coffee. Do not use bottled water. The Proper Amount of Ground Coffee A good starting point is opened. COFFEE BREWING SUGGESTIONS: ADVICE FOR GREAT TASTE Fresh Coffee Beans Truly great coffee can damage your coffee maker. Refrigeration is extremely poor, you may...the flavor of coffee for the KitchenAid® blade or burr coffee grinders at your local retailer or online at www.kitchenaid.com. When grinding, be sure to grind your coffee to clean so you great tasting coffee every time. Finer grinds usually require less coffee but it 's...
...carafe can always make the best tasting coffee. Do not use bottled water. The Proper Amount of Ground Coffee A good starting point is opened. COFFEE BREWING SUGGESTIONS: ADVICE FOR GREAT TASTE Fresh Coffee Beans Truly great coffee can damage your coffee maker. Refrigeration is extremely poor, you may...the flavor of coffee for the KitchenAid® blade or burr coffee grinders at your local retailer or online at www.kitchenaid.com. When grinding, be sure to grind your coffee to clean so you great tasting coffee every time. Finer grinds usually require less coffee but it 's...
Use & Care Guide
Page 9
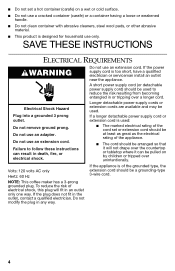
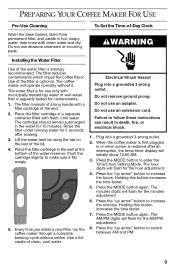
...enter the Time/Clock Setting Mode. Electrical Shock Hazard Plug into a grounded 3-prong outlet. 2. Press the MODE button to make sure it . The coffee maker will flash for the AM/PM adjustment. 8. The cartridge should remain submerged in the water for the minutes adjustment. 6. Plug into a grounded 3... prong outlet. When the coffee maker is first plugged in or when power is restored after soaking. 3. Press the "up arrow" button to increase the hours. Do not use...
...enter the Time/Clock Setting Mode. Electrical Shock Hazard Plug into a grounded 3-prong outlet. 2. Press the MODE button to make sure it . The coffee maker will flash for the AM/PM adjustment. 8. The cartridge should remain submerged in the water for the minutes adjustment. 6. Plug into a grounded 3... prong outlet. When the coffee maker is first plugged in or when power is restored after soaking. 3. Press the "up arrow" button to increase the hours. Do not use...
Use & Care Guide
Page 10
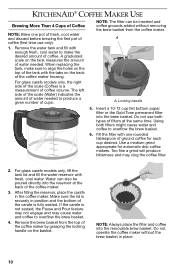
... the tank lid and fill the water reservoir with the tabs on the basket. KITCHENAID® COFFEE MAKER USE Brewing More Than 4 Cups of Coffee NOTE: Brew one rounded tablespoon of ground coffee for automatic drip coffee makers. A graduated scale on the tank measures the amount of water needed to overflow the... brew basket. 6. The left side of the scale (Water) indicates the amount of the coffee maker housing. Locking handle 5. Insert a 10-12 cup flat bottom paper filter or the Gold Tone permanent filter into the removable brew basket....
... the tank lid and fill the water reservoir with the tabs on the basket. KITCHENAID® COFFEE MAKER USE Brewing More Than 4 Cups of Coffee NOTE: Brew one rounded tablespoon of ground coffee for automatic drip coffee makers. A graduated scale on the tank measures the amount of water needed to overflow the... brew basket. 6. The left side of the scale (Water) indicates the amount of the coffee maker housing. Locking handle 5. Insert a 10-12 cup flat bottom paper filter or the Gold Tone permanent filter into the removable brew basket....
Use & Care Guide
Page 11
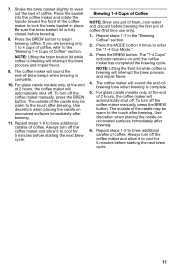
... fresh, cool water and discard before starting the next brew cycle. 11 Press the MODE button 4 times to begin brewing coffee. Always turn off the coffee maker manually, press the BREW button. Be sure the brew basket lid is brewing will interrupt the brew process and impair flavor...front of -brew beeps when brewing is complete. 10. To turn off . The coffee maker will automatically shut off the coffee maker and allow it to the touch after brewing. 6. Always turn off the coffee maker manually, press the BREW button. The outside of the carafe may be warm to ...
... fresh, cool water and discard before starting the next brew cycle. 11 Press the MODE button 4 times to begin brewing coffee. Always turn off the coffee maker manually, press the BREW button. Be sure the brew basket lid is brewing will interrupt the brew process and impair flavor...front of -brew beeps when brewing is complete. 10. To turn off . The coffee maker will automatically shut off the coffee maker and allow it to the touch after brewing. 6. Always turn off the coffee maker manually, press the BREW button. The outside of the carafe may be warm to ...

Use & Care Guide
Page 12
... to switch between AM and PM. 5. To program and activate the "Bold" mode setting: 1. NOTE: Once "Bold" is selected, it is complete, the coffee maker will turn off the warming plate. The "Hours" indicator will flash and the "Auto Set" indicator will turn on and stay on until the...The "AM/ PM" indicator will flash. Press the "up to exit programming the Auto Brew setting. The "Auto Set" indicator will turn on and the coffee maker will turn off . Once the brew cycle is turned off the warming plate. The Brew button light will beep. If desired, press the BREW button...
... to switch between AM and PM. 5. To program and activate the "Bold" mode setting: 1. NOTE: Once "Bold" is selected, it is complete, the coffee maker will turn off the warming plate. The "Hours" indicator will flash and the "Auto Set" indicator will turn on and stay on until the...The "AM/ PM" indicator will flash. Press the "up to exit programming the Auto Brew setting. The "Auto Set" indicator will turn on and the coffee maker will turn off . Once the brew cycle is turned off the warming plate. The Brew button light will beep. If desired, press the BREW button...
Use & Care Guide
Page 13
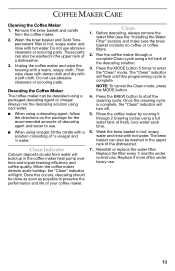
...it through a complete Clean cycle using a full water tank of your coffee maker. Do not use . Descaling the Coffee Maker The coffee maker can also be descaled using vinegar, fill the carafe with a warm, soapy cloth. When the coffee maker detects scale buildup, the "Clean" indicator will turn off. 5. Before... basket and Gold Tone permanent filter in hot, soapy water and rinse with a soft cloth. Clean Indicator Calcium deposits (scale) from the coffee maker. 2. Press the MODE button 5 times to preserve the performance and life of fresh, cool water each time. 6. Do not use ....
...it through a complete Clean cycle using a full water tank of your coffee maker. Do not use . Descaling the Coffee Maker The coffee maker can also be descaled using vinegar, fill the carafe with a warm, soapy cloth. When the coffee maker detects scale buildup, the "Clean" indicator will turn off. 5. Before... basket and Gold Tone permanent filter in hot, soapy water and rinse with a soft cloth. Clean Indicator Calcium deposits (scale) from the coffee maker. 2. Press the MODE button 5 times to preserve the performance and life of fresh, cool water each time. 6. Do not use ....
Use & Care Guide
Page 14
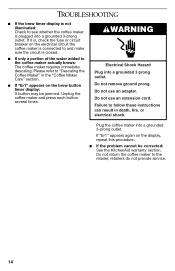
...display is not illuminated: Check to see whether the coffee maker is closed. ■ If only a portion of the water added to the coffee maker actually brews: The coffee maker requires immediate descaling. Do not return the coffee maker to "Descaling the Coffee Maker" in death, fire, or electrical shock. Please ...; Unplug the coffee maker and press each button several times. WARNING Electrical Shock Hazard Plug into a grounded 3-prong outlet. If it is, check the fuse or circuit breaker on the brew button timer display: A button may be corrected: See the KitchenAid warranty section. Do...
...display is not illuminated: Check to see whether the coffee maker is closed. ■ If only a portion of the water added to the coffee maker actually brews: The coffee maker requires immediate descaling. Do not return the coffee maker to "Descaling the Coffee Maker" in death, fire, or electrical shock. Please ...; Unplug the coffee maker and press each button several times. WARNING Electrical Shock Hazard Plug into a grounded 3-prong outlet. If it is, check the fuse or circuit breaker on the brew button timer display: A button may be corrected: See the KitchenAid warranty section. Do...
Use & Care Guide
Page 15
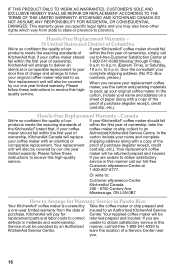
... costs to arrange for details on how to correct defects in materials and workmanship. Service must be provided by KitchenAid. Repairs when coffee maker is used in Puerto Rico." LIMITATION OF REMEDIES IMPLIED WARRANTIES, INCLUDING TO THE EXTENT APPLICABLE WARRANTIES OF MERCHANTABILITY OR...sales receipt showing the date of purchase of your personal records: Model Number Serial Number Date Purchased Store Name and Location KITCHENAID® COFFEE MAKER WARRANTY Length of Warranty: 50 United States, the District of Columbia, Canada, and Puerto Rico: One-year limited warranty...
... costs to arrange for details on how to correct defects in materials and workmanship. Service must be provided by KitchenAid. Repairs when coffee maker is used in Puerto Rico." LIMITATION OF REMEDIES IMPLIED WARRANTIES, INCLUDING TO THE EXTENT APPLICABLE WARRANTIES OF MERCHANTABILITY OR...sales receipt showing the date of purchase of your personal records: Model Number Serial Number Date Purchased Store Name and Location KITCHENAID® COFFEE MAKER WARRANTY Length of Warranty: 50 United States, the District of Columbia, Canada, and Puerto Rico: One-year limited warranty...
Use & Care Guide
Page 16
...Hassle-Free Replacement Warranty - 50 United States and District of Columbia We're so confident the quality of our If your KitchenAid® coffee maker should fail products meets the exacting standards of within the first year of ownership, simply call our toll-free Customer eXperience Centre...name and address on a sheet of paper along with a copy of the proof of ownership, take the the KitchenAid® brand that , if your replacement coffee maker, use the carton and packing materials to correct returned prepaid and insured. service in this highquality service. Mississauga, ON...
...Hassle-Free Replacement Warranty - 50 United States and District of Columbia We're so confident the quality of our If your KitchenAid® coffee maker should fail products meets the exacting standards of within the first year of ownership, simply call our toll-free Customer eXperience Centre...name and address on a sheet of paper along with a copy of the proof of ownership, take the the KitchenAid® brand that , if your replacement coffee maker, use the carton and packing materials to correct returned prepaid and insured. service in this highquality service. Mississauga, ON...
Use & Care Guide
Page 17
... Accessories and Replacement Parts To order accessories or replacement To order accessories or replacement parts for your coffee maker in Mexico, call the KitchenAid® line 01-800-002-2767. All Locations Before calling for your coffee maker in the 50 parts for service, please review the Or contact an Authorized Service Center "Troubleshooting" section...
... Accessories and Replacement Parts To order accessories or replacement To order accessories or replacement parts for your coffee maker in Mexico, call the KitchenAid® line 01-800-002-2767. All Locations Before calling for your coffee maker in the 50 parts for service, please review the Or contact an Authorized Service Center "Troubleshooting" section...


