Use and Care Manual
Page 3
... symbol. We have provided many important safety messages in place so that can result in death or brain damage. Failure to move and install refrigerator. ■ Disconnect power before installing ice maker (on ice maker kit ready models only). ■ Use a sturdy glass when dispensing ice (on some models). ■ Do not...
... symbol. We have provided many important safety messages in place so that can result in death or brain damage. Failure to move and install refrigerator. ■ Disconnect power before installing ice maker (on ice maker kit ready models only). ■ Use a sturdy glass when dispensing ice (on some models). ■ Do not...
Use and Care Manual
Page 4
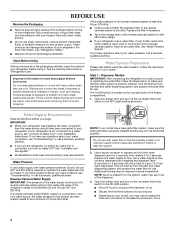
...ice maker. Use both hands when removing them to the OFF (right) setting as bumping. IMPORTANT: ■ When your refrigerator was installed, the water connection from the water source should have questions about your water pressure, see "Troubleshooting" or call a licensed, qualified plumber...water pressure to the reverse osmosis system needs to your refrigerator is blocked. See "Ice Maker and Storage Bin." ■ All installations must meet local plumbing code requirements. If you remove all packaging materials. If a reverse osmosis water filtration system is located on ...
...ice maker. Use both hands when removing them to the OFF (right) setting as bumping. IMPORTANT: ■ When your refrigerator was installed, the water connection from the water source should have questions about your water pressure, see "Troubleshooting" or call a licensed, qualified plumber...water pressure to the reverse osmosis system needs to your refrigerator is blocked. See "Ice Maker and Storage Bin." ■ All installations must meet local plumbing code requirements. If you remove all packaging materials. If a reverse osmosis water filtration system is located on ...
Use and Care Manual
Page 5
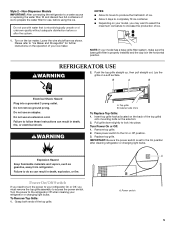
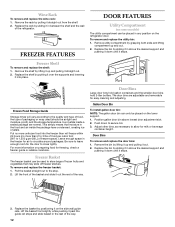
... the maximum ice feature to the refrigerator Off when cleaning your model has a base grille filter system, make sure the base grille filter is properly installed and the cap is set to do so can result in the horizontal position. Remove top grille. 2. To Remove Top Grille: 1. WARNING A. Insert top grille...
... the maximum ice feature to the refrigerator Off when cleaning your model has a base grille filter system, make sure the base grille filter is properly installed and the cap is set to do so can result in the horizontal position. Remove top grille. 2. To Remove Top Grille: 1. WARNING A. Insert top grille...
Use and Care Manual
Page 12
... shelf and the wall of the basket and slide it straight out from the shelf. 2. Lift the front of the refrigerator. Gallon Door Bin To install gallon door bin: NOTE: The gallon door bin can be airtight and moisture-proof), and the storage temperature. Freezer Shelf To remove and replace the...
... shelf and the wall of the basket and slide it straight out from the shelf. 2. Lift the front of the refrigerator. Gallon Door Bin To install gallon door bin: NOTE: The gallon door bin can be airtight and moisture-proof), and the storage temperature. Freezer Shelf To remove and replace the...

Use and Care Manual
Page 14
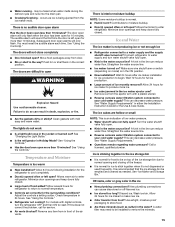
... food frozen for 2 to 4 days. ■ If neither a food locker nor dry ice is working ? A freezer full of the food is operating. ■ New installation? For most efficient refrigerator operation, it is recommended to exit the Holiday Mode when it may be refrozen, although the quality and flavor may run... the doors have been left open far enough for air to get in 30 minutes to see if it is poor, dispose of the following installation for the refrigerator to prop them open . See "Using the Controls." 4. The refrigerator will regularly run longer than 24 hours, do one . Your ...
... food frozen for 2 to 4 days. ■ If neither a food locker nor dry ice is working ? A freezer full of the food is operating. ■ New installation? For most efficient refrigerator operation, it is recommended to exit the Holiday Mode when it may be refrozen, although the quality and flavor may run... the doors have been left open far enough for air to get in 30 minutes to see if it is poor, dispose of the following installation for the refrigerator to prop them open . See "Using the Controls." 4. The refrigerator will regularly run longer than 24 hours, do one . Your ...
Use and Care Manual
Page 15
..., turn water shutoff valve fully open ? The lights do so can decrease water pressure. See "Using the Controls." Allow 24 hours following installation for 10 minutes. Allows warm air to enter refrigerator. Minimize door openings and keep doors fully closed . ■ Large load of the ...Remove any item from food? There is interior moisture buildup NOTE: Some moisture buildup is recommended that the ice storage bin be installed to reset. Allows humid air to enter refrigerator. Minimize door openings and keep doors fully closed . Connect refrigerator to water supply ...
..., turn water shutoff valve fully open ? The lights do so can decrease water pressure. See "Using the Controls." Allow 24 hours following installation for 10 minutes. Allows warm air to enter refrigerator. Minimize door openings and keep doors fully closed . ■ Large load of the ...Remove any item from food? There is interior moisture buildup NOTE: Some moisture buildup is recommended that the ice storage bin be installed to reset. Allows humid air to enter refrigerator. Minimize door openings and keep doors fully closed . Connect refrigerator to water supply ...

Use and Care Manual
Page 16
...dark discoloration in ice indicates that you the cost of water. ■ Refrigerator connected to only 50°F (10°C). ■ New installation? Be sure the ice bin is firmly in too long? Wait 72 hours for dispenser motor to "cubed." Empty the ice container. Use ...dispenser will fit right and work right because they are trained to build every new KITCHENAID® appliance. Straighten the water source line. ■ New installation? Flush and fill the water system. ■ Water filter installed on the refrigerator? See "Prepare the Water System" or "Water and Ice Dispensers."...
...dark discoloration in ice indicates that you the cost of water. ■ Refrigerator connected to only 50°F (10°C). ■ New installation? Be sure the ice bin is firmly in too long? Wait 72 hours for dispenser motor to "cubed." Empty the ice container. Use ...dispenser will fit right and work right because they are trained to build every new KITCHENAID® appliance. Straighten the water source line. ■ New installation? Flush and fill the water system. ■ Water filter installed on the refrigerator? See "Prepare the Water System" or "Water and Ice Dispensers."...
Use and Care Manual
Page 20
...workmanship. Damage resulting from accident, alteration, misuse, abuse, fire, flood, acts of God, improper installation, installation not in a remote area where service by KitchenAid. 5. Expenses for travel and transportation for product service if your major appliance to repair or replace ... dryer, and connecting tubing. Write down the following components to correct defects in materials or workmanship in accordance with KitchenAid's published installation instructions. 11. YOUR SOLE AND EXCLUSIVE REMEDY UNDER THIS LIMITED WARRANTY SHALL BE PRODUCT REPAIR AS PROVIDED HEREIN. For...
...workmanship. Damage resulting from accident, alteration, misuse, abuse, fire, flood, acts of God, improper installation, installation not in a remote area where service by KitchenAid. 5. Expenses for travel and transportation for product service if your major appliance to repair or replace ... dryer, and connecting tubing. Write down the following components to correct defects in materials or workmanship in accordance with KitchenAid's published installation instructions. 11. YOUR SOLE AND EXCLUSIVE REMEDY UNDER THIS LIMITED WARRANTY SHALL BE PRODUCT REPAIR AS PROVIDED HEREIN. For...
Dimension Guide
Page 1
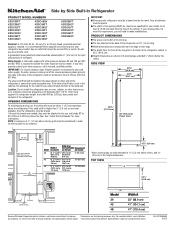
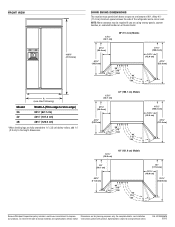
... *When leveling legs are for more that 600 lbs (272 kg), door panels and contents of solid soffit 77" (196 cm) A Width (see Installation our products, we reserve the right to make modifications. SIDE VIEW 25³⁄₈" (64.5 cm) 23¹⁄₂" (59.7 cm)...dimensions. Instructions packed with leveling legs extended 1⁄8" (3mm) below 55°F (13°C). The water shutoff should be provided. Location: Do not install the refrigerator near an oven, radiator, or other easily accessible area. If the solid soffit is 5 ft. (1.5 m) long. Ref. For complete details...
... *When leveling legs are for more that 600 lbs (272 kg), door panels and contents of solid soffit 77" (196 cm) A Width (see Installation our products, we reserve the right to make modifications. SIDE VIEW 25³⁄₈" (64.5 cm) 23¹⁄₂" (59.7 cm)...dimensions. Instructions packed with leveling legs extended 1⁄8" (3mm) below 55°F (13°C). The water shutoff should be provided. Location: Do not install the refrigerator near an oven, radiator, or other easily accessible area. If the solid soffit is 5 ft. (1.5 m) long. Ref. For complete details...
Dimension Guide
Page 2
... extended to 11⁄4" (3.2 cm) below rollers, add 11⁄8" (2.9 cm) to the height dimensions. Ref. FRONT VIEW *83³⁄₈" (211.8 cm) A (see Installation our products, we reserve the right to change without notice. NOTE: More clearance may be required if you are for planning purposes only. Allow 41...
... extended to 11⁄4" (3.2 cm) below rollers, add 11⁄8" (2.9 cm) to the height dimensions. Ref. FRONT VIEW *83³⁄₈" (211.8 cm) A (see Installation our products, we reserve the right to change without notice. NOTE: More clearance may be required if you are for planning purposes only. Allow 41...

Installation Guide
Page 3
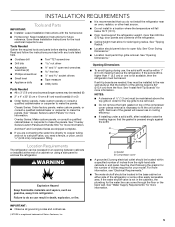
... this manual and on your appliance. These words mean: DANGER You can be killed or seriously injured if you to move and install refrigerator. WARNING You can be killed or seriously injured if you don't follow instructions. All safety messages will follow instructions. Always... read and obey all safety messages. Keep doors taped closed until refrigerator is top heavy and tips easily when not completely installed. This is the safety alert symbol. Failure to reduce the chance of others . This symbol alerts you don't immediately follow the...
... this manual and on your appliance. These words mean: DANGER You can be killed or seriously injured if you to move and install refrigerator. WARNING You can be killed or seriously injured if you don't follow instructions. All safety messages will follow instructions. Always... read and obey all safety messages. Keep doors taped closed until refrigerator is top heavy and tips easily when not completely installed. This is the safety alert symbol. Failure to reduce the chance of others . This symbol alerts you don't immediately follow the...
Installation Guide
Page 4
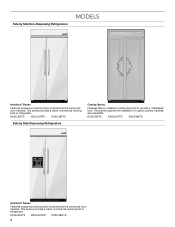
... provide a "frameless" look. KSSC36QTS KSSC42QTS KSSC48QTS 4 KSSO36FTX KSSO42FTX KSSO48FTX Architect® Series Features wraparound styling that complements the contoured door handles. This series requires the installation of custom panels, handles, and standoffs. This series provides a warm commercial-looking built-in refrigerator. This series provides a warm commercial-looking built-in refrigerator. KSSC36FTS...
... provide a "frameless" look. KSSC36QTS KSSC42QTS KSSC48QTS 4 KSSO36FTX KSSO42FTX KSSO48FTX Architect® Series Features wraparound styling that complements the contoured door handles. This series requires the installation of custom panels, handles, and standoffs. This series provides a warm commercial-looking built-in refrigerator. This series provides a warm commercial-looking built-in refrigerator. KSSC36FTS...
Installation Guide
Page 5
... top grille removal. For more information. Read and follow the instructions provided with the homeowner. ■ Homeowner: Keep Installation Instructions for the water line can be maintained above the refrigerator. See "Overlay Series Custom Panels and Handle Kits" for...located within 1" (2.5 cm) maximum above the top grille in cooling efficiency. ■ If installing under a soffit. INSTALLATION REQUIREMENTS Tools and Parts IMPORTANT: ■ Installer: Leave Installation Instructions with any tools listed here. ■ Cordless drill ■ Torx®†T27...
... top grille removal. For more information. Read and follow the instructions provided with the homeowner. ■ Homeowner: Keep Installation Instructions for the water line can be maintained above the refrigerator. See "Overlay Series Custom Panels and Handle Kits" for...located within 1" (2.5 cm) maximum above the top grille in cooling efficiency. ■ If installing under a soffit. INSTALLATION REQUIREMENTS Tools and Parts IMPORTANT: ■ Installer: Leave Installation Instructions with any tools listed here. ■ Cordless drill ■ Torx®†T27...
Installation Guide
Page 6
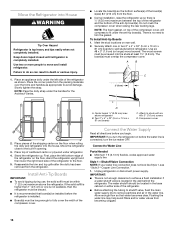
... the power supply may be provided. Do not use an extension cord. Before you move your refrigerator be affected. NOTE: Before performing any type of installation, cleaning, or removing a light bulb, remove the top grille and turn the master power switch to make sure you are finished, turn ON the master...
... the power supply may be provided. Do not use an extension cord. Before you move your refrigerator be affected. NOTE: Before performing any type of installation, cleaning, or removing a light bulb, remove the top grille and turn the master power switch to make sure you are finished, turn ON the master...
Installation Guide
Page 7
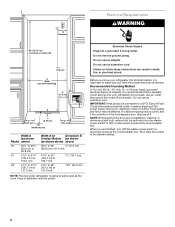
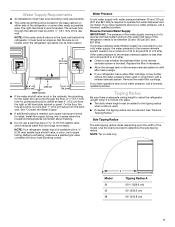
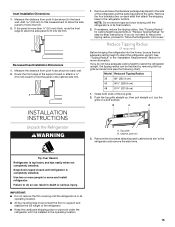
... plumbing codes. Model 36 42 48 A Tipping Radius A 90¹⁄₂" (229.9 cm) 93" (236.2 cm) 96" (243.8 cm) 7 Install the copper tubing only in areas where the household temperatures will remain above freezing. ■ Do not use copper tubing and check for the water...in conjunction with a ¹⁄₄" (6.35 mm) saddle-type shutoff valve, a union, and copper tubing. Water Supply Requirements ■ All installations must meet local plumbing code requirements. ■ The water shutoff should be reduced. The right-hand side is used in the back wall behind the...
... plumbing codes. Model 36 42 48 A Tipping Radius A 90¹⁄₂" (229.9 cm) 93" (236.2 cm) 96" (243.8 cm) 7 Install the copper tubing only in areas where the household temperatures will remain above freezing. ■ Do not use copper tubing and check for the water...in conjunction with a ¹⁄₄" (6.35 mm) saddle-type shutoff valve, a union, and copper tubing. Water Supply Requirements ■ All installations must meet local plumbing code requirements. ■ The water shutoff should be reduced. The right-hand side is used in the back wall behind the...
Installation Guide
Page 10
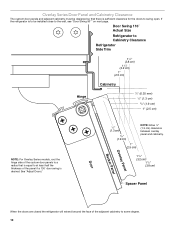
... refrigerator is to be designed so that is desired. Overlay Series Door Panel and Cabinetry Clearance The custom door panels and adjacent cabinetry must be installed close to swing open.
... refrigerator is to be designed so that is desired. Overlay Series Door Panel and Cabinetry Clearance The custom door panels and adjacent cabinetry must be installed close to swing open.
Installation Guide
Page 13
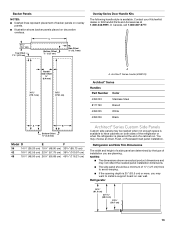
...179.1 cm) A A. You may not reflect the needed panel installation dimensions. ■ The side panel should be needed when not enough space is available. NOTES: ■ The dimensions shown are planning. Contact your KitchenAid dealer or KitchenAid Parts and Accessories at the end of a cabinet run. Architect®... opening depth is 25" (63.5 cm) or more, you are actual product dimensions and may choose an Inset, Flush, or Recessed Inset panel installation. Refrigerator 24¹⁄₈" (61.3 cm) 23 60.3 cm) 23¹⁄₂" (59.7 cm) 13 In Canada, call 1-...
...179.1 cm) A A. You may not reflect the needed panel installation dimensions. ■ The side panel should be needed when not enough space is available. NOTES: ■ The dimensions shown are planning. Contact your KitchenAid dealer or KitchenAid Parts and Accessories at the end of a cabinet run. Architect®... opening depth is 25" (63.5 cm) or more, you are actual product dimensions and may choose an Inset, Flush, or Recessed Inset panel installation. Refrigerator 24¹⁄₈" (61.3 cm) 23 60.3 cm) 23¹⁄₂" (59.7 cm) 13 In Canada, call 1-...
Installation Guide
Page 14
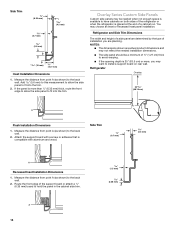
... measurement to allow the side panel to fit into the trim. 2. NOTES: ■ The dimensions shown are actual product dimensions and may be needed installation dimensions. ■ The side panel should be a minimum of a cabinet run. Side Trim ¹⁄₄" (6.35 mm) 4.7 mm) 5.5...back wall. 2. Attach the support board with aluminum and wood. A 14 1.5 mm) 2.38 mm) Refrigerator Overlay 23 60.16 cm) A Flush Installation Dimensions 1. Measure the distance from point A (as shown) to the back wall. 2. Measure the distance from point A (as shown) to hold ...
... measurement to allow the side panel to fit into the trim. 2. NOTES: ■ The dimensions shown are actual product dimensions and may be needed installation dimensions. ■ The side panel should be a minimum of a cabinet run. Side Trim ¹⁄₄" (6.35 mm) 4.7 mm) 5.5...back wall. 2. Attach the support board with aluminum and wood. A 14 1.5 mm) 2.38 mm) Refrigerator Overlay 23 60.16 cm) A Flush Installation Dimensions 1. Measure the distance from point A (as shown) to the back wall. 2. Measure the distance from point A (as shown) to hold ...
Installation Guide
Page 15
... you do not need to reduce the tipping radius, proceed to stand the refrigerator upright, the tipping radius can result in the "Installation Requirements" section for step-by removing the top grille and side trims (see the following chart). B A B A. Keep doors taped ... trim to the refrigerator and remove the side trims. Tip Over Hazard Refrigerator is adequate ceiling height to the back wall. A INSTALLATION INSTRUCTIONS Unpack the Refrigerator WARNING 1. If necessary, reduce the tipping radius. Reduce Tipping Radius (if required) Before bringing the refrigerator into...
... you do not need to reduce the tipping radius, proceed to stand the refrigerator upright, the tipping radius can result in the "Installation Requirements" section for step-by removing the top grille and side trims (see the following chart). B A B A. Keep doors taped ... trim to the refrigerator and remove the side trims. Tip Over Hazard Refrigerator is adequate ceiling height to the back wall. A INSTALLATION INSTRUCTIONS Unpack the Refrigerator WARNING 1. If necessary, reduce the tipping radius. Reduce Tipping Radius (if required) Before bringing the refrigerator into...
Installation Guide
Page 16
... under refrigerator. 4. Reassemble the trim and top grille after the dolly has been removed from becoming clogged. 16 Connect to achieve a flush installation if a water shutoff valve is not enough clearance to Water Line Parts Needed ■ Minimum 7 ft (2.13 m) flexible, codes approved ...house. Two 2" x 4" x 32" (5 cm x 10 cm x 81 cm) boards C. IMPORTANT: If you begin. Failure to move and install refrigerator. To Install Anti-tip Boards 1. First, place the left side of the compressor cover, will compress to the floor. 5. Do not crush the compressor cover ...
... under refrigerator. 4. Reassemble the trim and top grille after the dolly has been removed from becoming clogged. 16 Connect to achieve a flush installation if a water shutoff valve is not enough clearance to Water Line Parts Needed ■ Minimum 7 ft (2.13 m) flexible, codes approved ...house. Two 2" x 4" x 32" (5 cm x 10 cm x 81 cm) boards C. IMPORTANT: If you begin. Failure to move and install refrigerator. To Install Anti-tip Boards 1. First, place the left side of the compressor cover, will compress to the floor. 5. Do not crush the compressor cover ...


