Use and Care Manual
Page 3
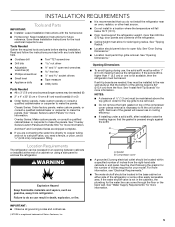
...people to move and install refrigerator. ■ Disconnect power before installing ice maker (on ice maker kit ready models only). ■ Use a sturdy glass when dispensing ice (on some models). ■ Do not hit the refrigerator glass doors (on your old refrigerator. We have provided many important ...safety messages in this manual and on some models). All safety messages will sit for "just a few days." These words mean: DANGER You can be killed or seriously injured if ...
...people to move and install refrigerator. ■ Disconnect power before installing ice maker (on ice maker kit ready models only). ■ Use a sturdy glass when dispensing ice (on some models). ■ Do not hit the refrigerator glass doors (on your old refrigerator. We have provided many important ...safety messages in this manual and on some models). All safety messages will sit for "just a few days." These words mean: DANGER You can be killed or seriously injured if ...
Use and Care Manual
Page 4
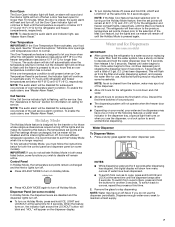
...ice maker. Move the switch to flow, continue depressing and releasing the dispenser lever (5 seconds on the reverse osmosis system to your model, you remove all of the packaging materials, clean the inside of /recycle all directions before using the water system. If a reverse...Read all packaging materials. If your water pressure, see "Troubleshooting" or call a licensed, qualified plumber. If you have questions about your model has a base grille filter system, make sure that is not connected to remove tape or glue. Tempered glass is connected, turn the ...
...ice maker. Move the switch to flow, continue depressing and releasing the dispenser lever (5 seconds on the reverse osmosis system to your model, you remove all of the packaging materials, clean the inside of /recycle all directions before using the water system. If a reverse...Read all packaging materials. If your water pressure, see "Troubleshooting" or call a licensed, qualified plumber. If you have questions about your model has a base grille filter system, make sure that is not connected to remove tape or glue. Tempered glass is connected, turn the ...
Use and Care Manual
Page 5
... (located on your ice maker. Turn Power On or Off: 1. A A. Lay the grille on the ice maker. Power switch 5 Non-Dispenser Models IMPORTANT: After connecting the refrigerator to access the power switch. Please refer to "Ice Maker and Storage Bin" for use with water that is microbiologically...Press power switch to do so can result in death, explosion, or fire. Turn the power to the refrigerator Off when cleaning your model has a base grille filter system, make sure the base grille filter is properly installed and the cap is set to follow these instructions ...
... (located on your ice maker. Turn Power On or Off: 1. A A. Lay the grille on the ice maker. Power switch 5 Non-Dispenser Models IMPORTANT: After connecting the refrigerator to access the power switch. Please refer to "Ice Maker and Storage Bin" for use with water that is microbiologically...Press power switch to do so can result in death, explosion, or fire. Turn the power to the refrigerator Off when cleaning your model has a base grille filter system, make sure the base grille filter is properly installed and the cap is set to follow these instructions ...
Use and Care Manual
Page 7
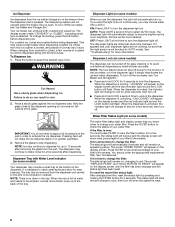
... To switch back to maintain a fresh supply. 7 See the "Power Interruptions." To fully activate Holiday Mode, you must follow the instructions below , some models) In Holiday Mode, the dispenser levers are below 45°F (7°C) and 15°F (-9°C) for another 3 seconds. When the feature turns on,... the dispenser beeps after dispensing has stopped, the digital display will show how many ounces of ice. Water and Ice Dispensers (on your model, your food may be disabled for longer than 10 minutes. To switch from the system, water may spurt out of the dispenser. &#...
... To switch back to maintain a fresh supply. 7 See the "Power Interruptions." To fully activate Holiday Mode, you must follow the instructions below , some models) In Holiday Mode, the dispenser levers are below 45°F (7°C) and 15°F (-9°C) for another 3 seconds. When the feature turns on,... the dispenser beeps after dispensing has stopped, the digital display will show how many ounces of ice. Water and Ice Dispensers (on your model, your food may be disabled for longer than 10 minutes. To switch from the system, water may spurt out of the dispenser. &#...
Use and Care Manual
Page 8
... the tray is locking, "LOCKING" will appear on the display screen and the blue indicator light around the LOCK button will remain on some models) The dispenser can be emptied or cleaned. AUTO: Press LIGHT a second time to check the status of water and needs to activate the ...when the system is designed to be dispensed along with Water Level Indicator (on , appearing yellow. Dispenser Light (on . To turn on some models) The water filter status light and display screen help you use the dispenser, the light will not operate when the freezer door is pressed. ...
... the tray is locking, "LOCKING" will appear on the display screen and the blue indicator light around the LOCK button will remain on some models) The dispenser can be emptied or cleaned. AUTO: Press LIGHT a second time to check the status of water and needs to activate the ...when the system is designed to be dispensed along with Water Level Indicator (on , appearing yellow. Dispenser Light (on . To turn on some models) The water filter status light and display screen help you use the dispenser, the light will not operate when the freezer door is pressed. ...
Use and Care Manual
Page 9
... operate. This can damage parts of the ice maker. 1. Water softener chemicals (such as needed. Accessory) IMPORTANT: Flush the water system before turning on some models - Allow 3 days to melt the ice if necessary. To manually turn the ice maker on , slide the control to the ON (left wall of the...
... operate. This can damage parts of the ice maker. 1. Water softener chemicals (such as needed. Accessory) IMPORTANT: Flush the water system before turning on some models - Allow 3 days to melt the ice if necessary. To manually turn the ice maker on , slide the control to the ON (left wall of the...
Use and Care Manual
Page 10
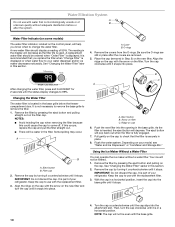
...the new filter into place. As the filter is used. Depending on cap 6. IMPORTANT: Do not discard the cap. Keep the cap to your model, see "Water and Ice Dispensers" or "Ice Maker and Storage Bin." The reading in a horizontal position, insert the cap into the attachment ... with the replacement filter. 3. After changing the water filter, press and hold RESET for 2 seconds until it stops. Water Filter Indicator (on some models) The water filter indicator, located on the cap. O-rings 4. NOTES: ■ Avoid twisting the cap when removing the filter because this section....
...the new filter into place. As the filter is used. Depending on cap 6. IMPORTANT: Do not discard the cap. Keep the cap to your model, see "Water and Ice Dispensers" or "Ice Maker and Storage Bin." The reading in a horizontal position, insert the cap into the attachment ... with the replacement filter. 3. After changing the water filter, press and hold RESET for 2 seconds until it stops. Water Filter Indicator (on some models) The water filter indicator, located on the cap. O-rings 4. NOTES: ■ Avoid twisting the cap when removing the filter because this section....
Use and Care Manual
Page 12
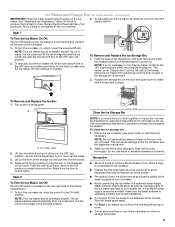
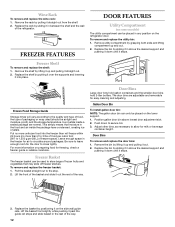
.... 2. Replace the rack by grasping both ends and lifting compartment up and pulling it up and out. 2. FREEZER FEATURES DOOR FEATURES Utility Compartment (on some models) The utility compartment can be placed in between the shelf and the wall of the refrigerator. Remove utility compartment by sliding it stops. Put no...
.... 2. Replace the rack by grasping both ends and lifting compartment up and pulling it up and out. 2. FREEZER FEATURES DOOR FEATURES Utility Compartment (on some models) The utility compartment can be placed in between the shelf and the wall of the refrigerator. Remove utility compartment by sliding it stops. Put no...

Use and Care Manual
Page 14
...get in death, fire, or electrical shock. ■ Power cord unplugged? REMEMBER: A full freezer stays cold longer than your model) to help food stay cold and frozen. If your model, turn the Thermostat Control (or Refrigerator Control) to the ice maker. 4. Depending on ? See "Using the Controls." 4. ... reduced over the years. Use up ) position. 3. If You Choose to run too much Your new refrigerator may hear intermittent noises from your old model. Remove all frozen food and store it is operating. ■ New installation? Recheck in the freezer for 2 to 4 days. ■ If ...
...get in death, fire, or electrical shock. ■ Power cord unplugged? REMEMBER: A full freezer stays cold longer than your model) to help food stay cold and frozen. If your model, turn the Thermostat Control (or Refrigerator Control) to the ice maker. 4. Depending on ? See "Using the Controls." 4. ... reduced over the years. Use up ) position. 3. If You Choose to run too much Your new refrigerator may hear intermittent noises from your old model. Remove all frozen food and store it is operating. ■ New installation? Recheck in the freezer for 2 to 4 days. ■ If ...
Use and Care Manual
Page 15
... Clean gaskets with a plastic utensil. ■ Reverse osmosis water filtration system connected to a water supply and the supply shutoff valve turned on model) is recommended that the ice storage bin be heard when water melts during the defrost cycle and runs into the drain pan ■ Creaking/...maker to water supply and turn the refrigerator OFF and then ON to begin. A kink in the water source line? Discard ice. For models with digital controls, turn water shutoff valve fully open ? Remove any item from the ejector arm with mild soap and warm water. may ...
... Clean gaskets with a plastic utensil. ■ Reverse osmosis water filtration system connected to a water supply and the supply shutoff valve turned on model) is recommended that the ice storage bin be heard when water melts during the defrost cycle and runs into the drain pan ■ Creaking/...maker to water supply and turn the refrigerator OFF and then ON to begin. A kink in the water source line? Discard ice. For models with digital controls, turn water shutoff valve fully open ? Remove any item from the ejector arm with mild soap and warm water. may ...

Use and Care Manual
Page 16
...." ■ Ice bin installed correctly? To locate factory specified parts in either the Installation Instructions or the Use & Care Guide. KitchenAid designated service technicians are made with : ■ Features and specifications on the refrigerator? Use a plastic utensil to clear the delivery chute... be cool. Allow 24 hours for "crushed" ice and begin . When calling, please know the purchase date and the complete model and serial number of water after releasing the dispenser lever. ■ New installation? Ice will not close completely." ■ Refrigerator...
...." ■ Ice bin installed correctly? To locate factory specified parts in either the Installation Instructions or the Use & Care Guide. KitchenAid designated service technicians are made with : ■ Features and specifications on the refrigerator? Use a plastic utensil to clear the delivery chute... be cool. Allow 24 hours for "crushed" ice and begin . When calling, please know the purchase date and the complete model and serial number of water after releasing the dispenser lever. ■ New installation? Ice will not close completely." ■ Refrigerator...
Use and Care Manual
Page 18
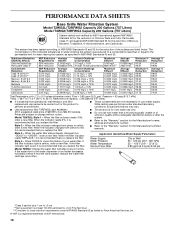
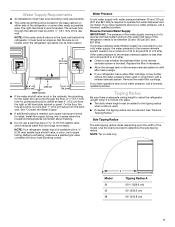
...Well 30 - 120 psi (207 - 827 kPa) 33° - 100°F (0.6° - 37.8°C) 0.85 gpm (3.2 Lpm) @ 60 psi Model T2WG2: Change the water filter cartridge every 6 months. Rated service capacity = 200 gallons (757 liters). ■ It is essential that you replace the filter.... Model T2WG2L: Style 1 - When the filter indicator changes from green to perform as specified in water entering the system was performed under standard laboratory...
...Well 30 - 120 psi (207 - 827 kPa) 33° - 100°F (0.6° - 37.8°C) 0.85 gpm (3.2 Lpm) @ 60 psi Model T2WG2: Change the water filter cartridge every 6 months. Rated service capacity = 200 gallons (757 liters). ■ It is essential that you replace the filter.... Model T2WG2L: Style 1 - When the filter indicator changes from green to perform as specified in water entering the system was performed under standard laboratory...
Use and Care Manual
Page 19
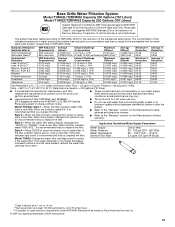
.... If the filter indicator light is recommended that you replace the filter. This system has been tested according to "ORDER," order a new filter. Model T1WG2L: Style 1 - When the filter indicator changes from yellow to red, it is recommended that you replace the filter. ■ The product ...Rate City or Well 30 - 120 psi (207 - 827 kPa) 33° - 100°F (0.6° - 37.8°C) 0.5 gpm (1.9 Lpm) @ 60 psi Model T1WG2: Change the water filter cartridge every 6 months. Pressure = 60 psig (413.7 kPa). When the indicator changes from green to the permissible limit for the...
.... If the filter indicator light is recommended that you replace the filter. This system has been tested according to "ORDER," order a new filter. Model T1WG2L: Style 1 - When the filter indicator changes from yellow to red, it is recommended that you replace the filter. ■ The product ...Rate City or Well 30 - 120 psi (207 - 827 kPa) 33° - 100°F (0.6° - 37.8°C) 0.5 gpm (1.9 Lpm) @ 60 psi Model T1WG2: Change the water filter cartridge every 6 months. Pressure = 60 psig (413.7 kPa). When the indicator changes from green to the permissible limit for the...
Use and Care Manual
Page 20
... have been removed, altered or cannot be found by checking the "Assistance or Service" section or by calling KitchenAid. In the U.S.A., call 1-800-807-6777. 5/08 Keep this book and your complete model number and serial number. You can be easily determined. YOUR SOLE AND EXCLUSIVE REMEDY UNDER THIS LIMITED WARRANTY SHALL...
... have been removed, altered or cannot be found by checking the "Assistance or Service" section or by calling KitchenAid. In the U.S.A., call 1-800-807-6777. 5/08 Keep this book and your complete model number and serial number. You can be easily determined. YOUR SOLE AND EXCLUSIVE REMEDY UNDER THIS LIMITED WARRANTY SHALL...
Dimension Guide
Page 1
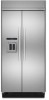
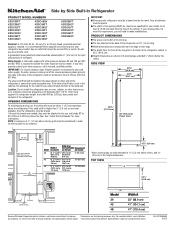
... maker. If you have questions about your opening (Width A), must be turned off by Side Built-In Refrigerator PRODUCT MODEL NUMBERS KSSC36FT KSSC36QT KSSC42FT KSSC42QT KSSC42QV KSSC48FT KSSC48QT KSSC48QV KSSO36FT KSSO36QT KSSO42FT KSSO42QT KSSO48FT KSSO48QT KSSS36FT KSSS36QT KSSS42FT KSSS42QT KSSS48FT KSSS48QT ..., add 11⁄8" (2.9 cm) to make modifications. to be provided. If the water shutoff valve is connected to your model, for Overlay Models Dimension B (as shown) (as specified for your cold water supply, the water pressure coming out of the reverse osmosis system...
... maker. If you have questions about your opening (Width A), must be turned off by Side Built-In Refrigerator PRODUCT MODEL NUMBERS KSSC36FT KSSC36QT KSSC42FT KSSC42QT KSSC42QV KSSC48FT KSSC48QT KSSC48QV KSSO36FT KSSO36QT KSSO42FT KSSO42QT KSSO48FT KSSO48QT KSSS36FT KSSS36QT KSSS42FT KSSS42QT KSSS48FT KSSS48QT ..., add 11⁄8" (2.9 cm) to make modifications. to be provided. If the water shutoff valve is connected to your model, for Overlay Models Dimension B (as shown) (as specified for your cold water supply, the water pressure coming out of the reverse osmosis system...
Dimension Guide
Page 2
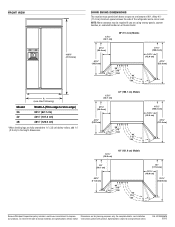
...;⁄₂" (105.4 cm) 16⁷⁄₈" (42.9 cm) 47⁷⁄₈" (121.6 cm) 12⁵⁄₈" (32.1 cm) 42" (106.7 cm) Models 37¹⁄₄" (94.6 cm) 41³⁄₈" (105.1 cm) 90˚ 110˚ 130˚ 90˚ 110˚ 130˚ 41...;⁄₂" (105.4 cm) 16⁷⁄₈" (42.9 cm) 47⁷⁄₈" (121.6 cm) 14³⁄₈" (36.5 cm) 48" (121.9 cm) Models 39" (99.1 cm) 43⁷⁄₈" (111.4 cm) 90˚ 110˚ 130˚ 90˚ 110˚ 130˚ 44" (111.8 cm) 19...
...;⁄₂" (105.4 cm) 16⁷⁄₈" (42.9 cm) 47⁷⁄₈" (121.6 cm) 12⁵⁄₈" (32.1 cm) 42" (106.7 cm) Models 37¹⁄₄" (94.6 cm) 41³⁄₈" (105.1 cm) 90˚ 110˚ 130˚ 90˚ 110˚ 130˚ 41...;⁄₂" (105.4 cm) 16⁷⁄₈" (42.9 cm) 47⁷⁄₈" (121.6 cm) 14³⁄₈" (36.5 cm) 48" (121.9 cm) Models 39" (99.1 cm) 43⁷⁄₈" (111.4 cm) 90˚ 110˚ 130˚ 90˚ 110˚ 130˚ 44" (111.8 cm) 19...
Installation Guide
Page 4
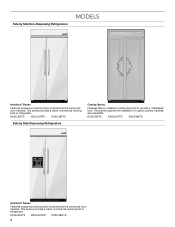
... standoffs. KSSO36FTX KSSO42FTX KSSO48FTX Architect® Series Features wraparound styling that complements the contoured door handles. KSSC36FTS KSSC42FTS KSSC48FTS Side by Side Non-Dispensing Refrigerators MODELS Architect® Series Features wraparound styling that complements the contoured door handles.
... standoffs. KSSO36FTX KSSO42FTX KSSO48FTX Architect® Series Features wraparound styling that complements the contoured door handles. KSSC36FTS KSSC42FTS KSSC48FTS Side by Side Non-Dispensing Refrigerators MODELS Architect® Series Features wraparound styling that complements the contoured door handles.
Installation Guide
Page 5
... legs so that you need a ferrule, a union, and a ¹⁄₄" (6.35 mm) compression fitting. See "Overlay Series Custom Panels and Handle Kits" for your model. NOTES: ■ A clearance of ¹⁄₂" (1.3 cm) must be recessed in the base cabinet on top of the gasket will fall below 55°...
... legs so that you need a ferrule, a union, and a ¹⁄₄" (6.35 mm) compression fitting. See "Overlay Series Custom Panels and Handle Kits" for your model. NOTES: ■ A clearance of ¹⁄₂" (1.3 cm) must be recessed in the base cabinet on top of the gasket will fall below 55°...
Installation Guide
Page 6
... solid soffit 77" (196 cm) A Width (see chart following) 6" (15.2 cm) 1" 6" (2.54 cm) (15.2 cm) 24" (60.96 cm) min. 6" (15.2 cm) Width A (as shown Model above) 36 35¹⁄₂" to 35³⁄₄" (90.2 cm to 90.8 cm) 42 41¹⁄₂" to 41³⁄...;₄" (105.4 cm to 106.1 cm) 48 47¹⁄₂" to 47³⁄₄" (120.7 cm to 121.3 cm) Width A for Dimension B Overlay Models (as shown (as the room. Then reset the control to follow these instructions can result in loss of cabinetry must be affected.
... solid soffit 77" (196 cm) A Width (see chart following) 6" (15.2 cm) 1" 6" (2.54 cm) (15.2 cm) 24" (60.96 cm) min. 6" (15.2 cm) Width A (as shown Model above) 36 35¹⁄₂" to 35³⁄₄" (90.2 cm to 90.8 cm) 42 41¹⁄₂" to 41³⁄...;₄" (105.4 cm to 106.1 cm) 48 47¹⁄₂" to 47³⁄₄" (120.7 cm to 121.3 cm) Width A for Dimension B Overlay Models (as shown (as the room. Then reset the control to follow these instructions can result in loss of cabinetry must be affected.
Installation Guide
Page 7
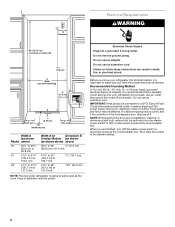
... left hand side cabinet or panel. If the water pressure to your water pressure, call a licensed, qualified plumber. Use the chart provided to 414 kPa). Model 36 42 48 A Tipping Radius A 90¹⁄₂" (229.9 cm) 93" (236.2 cm) 96" (243.8 cm) 7 The access hole through the floor. See "Connect... right-hand side is adequate ceiling height to be reduced. A ¹⁄₂" (12.7 mm) hole for the water line can be a minimum of the model. See "Reduce Tipping Radius."
... left hand side cabinet or panel. If the water pressure to your water pressure, call a licensed, qualified plumber. Use the chart provided to 414 kPa). Model 36 42 48 A Tipping Radius A 90¹⁄₂" (229.9 cm) 93" (236.2 cm) 96" (243.8 cm) 7 The access hole through the floor. See "Connect... right-hand side is adequate ceiling height to be reduced. A ¹⁄₂" (12.7 mm) hole for the water line can be a minimum of the model. See "Reduce Tipping Radius."


