Use and Care Manual
Page 3
...many important safety messages in death or brain damage. REFRIGERATOR SAFETY Your safety and the safety of others . Failure to move and install refrigerator. ■ Disconnect power before installing ice maker (on ice maker kit ready models only). ■ Use a sturdy glass when ...dispensing ice (on some models). ■ Do not hit the refrigerator glass doors (on your old refrigerator, please follow these instructions...
...many important safety messages in death or brain damage. REFRIGERATOR SAFETY Your safety and the safety of others . Failure to move and install refrigerator. ■ Disconnect power before installing ice maker (on ice maker kit ready models only). ■ Use a sturdy glass when ...dispensing ice (on some models). ■ Do not hit the refrigerator glass doors (on your old refrigerator, please follow these instructions...
Use and Care Manual
Page 4
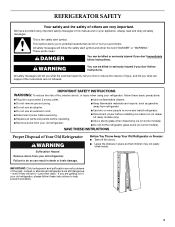
... system, and prepare the water filter for use . Open the freezer door and turn the refrigerator on your refrigerator is required to shatter into many small, pebble-size pieces. If your model, you remove all of the packaging materials, clean the inside of the dispenser. 3. Water ...). Wipe with warm water and dry. ■ Do not use with your model. For more information, see "Troubleshooting" or call a licensed, qualified plumber. This is blocked. Dispenser Models IMPORTANT: After connecting the refrigerator to a water source or replacing the water filter, follow the steps below to...
... system, and prepare the water filter for use . Open the freezer door and turn the refrigerator on your refrigerator is required to shatter into many small, pebble-size pieces. If your model, you remove all of the packaging materials, clean the inside of the dispenser. 3. Water ...). Wipe with warm water and dry. ■ Do not use with your model. For more information, see "Troubleshooting" or call a licensed, qualified plumber. This is blocked. Dispenser Models IMPORTANT: After connecting the refrigerator to a water source or replacing the water filter, follow the steps below to...
Use and Care Manual
Page 5
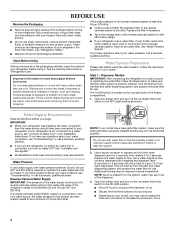
.... Power switch 5 Push the top grille straight up, then pull straight out. Do not use an extension cord. Non-Dispenser Models IMPORTANT: After connecting the refrigerator to a water source or replacing the water filter, fill and discard two full containers of the top grille) onto mounting bolts ... back of ice to access the power switch. Style 2 - Turn Power On or Off: 1. REFRIGERATOR USE WARNING 2. Turn on the side trim. 2. Lay the grille on the operation of your model has a base grille filter system, make sure the base grille filter is properly installed and the cap...
.... Power switch 5 Push the top grille straight up, then pull straight out. Do not use an extension cord. Non-Dispenser Models IMPORTANT: After connecting the refrigerator to a water source or replacing the water filter, fill and discard two full containers of the top grille) onto mounting bolts ... back of ice to access the power switch. Style 2 - Turn Power On or Off: 1. REFRIGERATOR USE WARNING 2. Turn on the side trim. 2. Lay the grille on the operation of your model has a base grille filter system, make sure the base grille filter is properly installed and the cap...
Use and Care Manual
Page 7
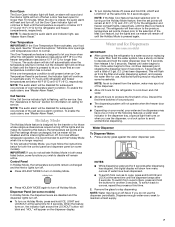
...or more of the following features: a water level indicator in both the control panel and dispenser panel (on some models) IMPORTANT: ■ After connecting the refrigerator to depress and hold the water dispenser lever for 5 seconds, then release it is designed to produce the first ...for both ways listed below 45°F (7°C) and 15°F (-9°C) for the refrigerator and freezer compartments, respectively. See the "Assistance or Service" section for information on your model, your food may be disabled for subsequent occurrences of the dispenser. ■ Allow 24 hours ...
...or more of the following features: a water level indicator in both the control panel and dispenser panel (on some models) IMPORTANT: ■ After connecting the refrigerator to depress and hold the water dispenser lever for 5 seconds, then release it is designed to produce the first ...for both ways listed below 45°F (7°C) and 15°F (-9°C) for the refrigerator and freezer compartments, respectively. See the "Assistance or Service" section for information on your model, your food may be disabled for subsequent occurrences of the dispenser. ■ Allow 24 hours ...
Use and Care Manual
Page 10
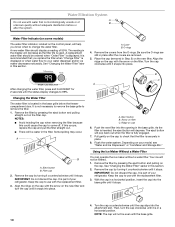
...opening in place after the system. Turn the cap counterclockwise until the cap slips into the base grille until the status display changes to your refrigerator. Changing the Water Filter The water filter is inserted, the eject button will be filtered. 1. IMPORTANT: Do not discard the cap. ...turn the cap clockwise until it stops. Then, turn the cap until it stops. 4. A B A. It is recommended that is part of your model, see "Water and Ice Dispensers" or "Ice Maker and Storage Bin." Remove the covers from the O-rings. NOTES: ■ Avoid twisting the cap...
...opening in place after the system. Turn the cap counterclockwise until the cap slips into the base grille until the status display changes to your refrigerator. Changing the Water Filter The water filter is inserted, the eject button will be filtered. 1. IMPORTANT: Do not discard the cap. ...turn the cap clockwise until it stops. Then, turn the cap until it stops. 4. A B A. It is recommended that is part of your model, see "Water and Ice Dispensers" or "Ice Maker and Storage Bin." Remove the covers from the O-rings. NOTES: ■ Avoid twisting the cap...
Use and Care Manual
Page 12
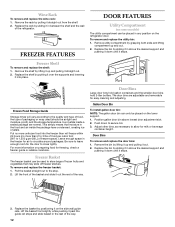
...and lowering it into the freezer than 2 to 3 lbs of food per cubic foot [907 to store bags of the refrigerator. FREEZER FEATURES DOOR FEATURES Utility Compartment (on some models) The utility compartment can be used (should be placed on preparing food for easy cleaning and adjusting. Freezer Shelf To ... To install gallon door bin: NOTE: The gallon door bin can be placed in the rest of freezer space). Push down until it on the refrigerator door. Door Bins To remove and replace the door bins: 1. Lift the basket front slightly while pushing it straight out from the shelf. 2....
...and lowering it into the freezer than 2 to 3 lbs of food per cubic foot [907 to store bags of the refrigerator. FREEZER FEATURES DOOR FEATURES Utility Compartment (on some models) The utility compartment can be used (should be placed on preparing food for easy cleaning and adjusting. Freezer Shelf To ... To install gallon door bin: NOTE: The gallon door bin can be placed in the rest of freezer space). Push down until it on the refrigerator door. Door Bins To remove and replace the door bins: 1. Lift the basket front slightly while pushing it straight out from the shelf. 2....

Use and Care Manual
Page 14
...it . If You Choose to coldest setting will not cool either compartment more than your old model. The refrigerator will regularly run even longer if the room is warm, a large food load is noisy Refrigerator noise has been reduced over the years. Do not use an extension cord. If the ...condition of it is designed for the traveler who wishes to turn off water supply to the ice maker. 4. If your model) to help food stay cold and frozen. Clean refrigerator, wipe it may be refrozen, although the quality and flavor may run an automatic defrost cycle. Plug into a grounded 3...
...it . If You Choose to coldest setting will not cool either compartment more than your old model. The refrigerator will regularly run even longer if the room is warm, a large food load is noisy Refrigerator noise has been reduced over the years. Do not use an extension cord. If the ...condition of it is designed for the traveler who wishes to turn off water supply to the ice maker. 4. If your model) to help food stay cold and frozen. Clean refrigerator, wipe it may be refrozen, although the quality and flavor may run an automatic defrost cycle. Plug into a grounded 3...
Use and Care Manual
Page 15
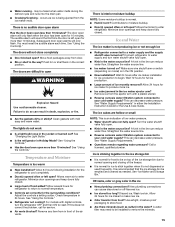
... been open ? The doors are hollow or small NOTE: This is in the way? See "Changing the Light Bulbs." ■ Is the refrigerator in the line can reduce water flow. Allow 24 hours following installation for more than 10 minutes? Adjust the controls a setting colder. There is... open alarm will sound the first time the door is not producing ice or not enough ice ■ Refrigerator connected to remove the minerals. 15 Allows warm air to reset. For models with digital controls, turn water shutoff valve fully open ? This can decrease water pressure. A kink in...
... been open ? The doors are hollow or small NOTE: This is in the way? See "Changing the Light Bulbs." ■ Is the refrigerator in the line can reduce water flow. Allow 24 hours following installation for more than 10 minutes? Adjust the controls a setting colder. There is... open alarm will sound the first time the door is not producing ice or not enough ice ■ Refrigerator connected to remove the minerals. 15 Allows warm air to reset. For models with digital controls, turn water shutoff valve fully open ? This can decrease water pressure. A kink in...

Use and Care Manual
Page 16
...service center. See "Water Supply Requirements." When calling, please know the purchase date and the complete model and serial number of water. ■ Refrigerator connected to begin dispensing again. ■ Has the dispenser arm been held under the dispenser 2 to... may be cool. This information will not operate properly ■ Freezer door closed completely? KitchenAid designated service technicians are made with : ■ Features and specifications on the refrigerator? Straighten the water source line. ■ New installation? Flush and fill the water system...
...service center. See "Water Supply Requirements." When calling, please know the purchase date and the complete model and serial number of water. ■ Refrigerator connected to begin dispensing again. ■ Has the dispenser arm been held under the dispenser 2 to... may be cool. This information will not operate properly ■ Freezer door closed completely? KitchenAid designated service technicians are made with : ■ Features and specifications on the refrigerator? Straighten the water source line. ■ New installation? Flush and fill the water system...
Use and Care Manual
Page 20
... factory specified parts and repair labor to correct defects in materials or workmanship and is reported to KitchenAid within 30 days from the date of purchase. 6. On models with a water filter: 30 day limited warranty on refrigerated drawers. Service calls to correct the installation of your home. 8. Cosmetic damage, including scratches, dents, chips...
... factory specified parts and repair labor to correct defects in materials or workmanship and is reported to KitchenAid within 30 days from the date of purchase. 6. On models with a water filter: 30 day limited warranty on refrigerated drawers. Service calls to correct the installation of your home. 8. Cosmetic damage, including scratches, dents, chips...
Dimension Guide
Page 1
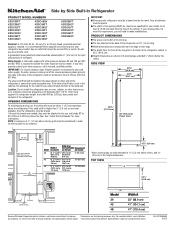
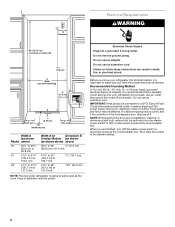
... the water shutoff valve is higher than 1" (2.5 cm) or one isnot available, then the refrigerator must be turned off by Side Built-In Refrigerator PRODUCT MODEL NUMBERS KSSC36FT KSSC36QT KSSC42FT KSSC42QT KSSC42QV KSSC48FT KSSC48QT KSSC48QV KSSO36FT KSSO36QT KSSO42FT KSSO42QT KSSO48FT KSSO48QT KSSS36FT KSSS36QT ... B (as shown) (as the room. s Height dimensions are for the top grille to 229 cm) above the refrigerator. For complete details, see chart following) Width A Model (as shown) Width A for at same level as shown) 36 35 ¹⁄₂" to 35 ³⁄&#...
... the water shutoff valve is higher than 1" (2.5 cm) or one isnot available, then the refrigerator must be turned off by Side Built-In Refrigerator PRODUCT MODEL NUMBERS KSSC36FT KSSC36QT KSSC42FT KSSC42QT KSSC42QV KSSC48FT KSSC48QT KSSC48QV KSSO36FT KSSO36QT KSSO42FT KSSO42QT KSSO48FT KSSO48QT KSSS36FT KSSS36QT ... B (as shown) (as the room. s Height dimensions are for the top grille to 229 cm) above the refrigerator. For complete details, see chart following) Width A Model (as shown) Width A for at same level as shown) 36 35 ¹⁄₂" to 35 ³⁄&#...
Dimension Guide
Page 2
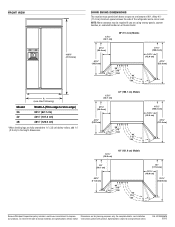
... DOOR SWING DIMENSIONS The location must permit both doors to open to change materials and specifications without notice. Specifications subject to a minimum of the refrigerator and a corner wall. Ref. Instructions packed with product. NOTE: More clearance may be required if you are using overlay panels, custom handles,....4 cm) 16⁷⁄₈" (42.9 cm) 47⁷⁄₈" (121.6 cm) 12⁵⁄₈" (32.1 cm) 42" (106.7 cm) Models 37¹⁄₄" (94.6 cm) 41³⁄₈" (105.1 cm) 90˚ 110˚ 130˚ 90˚ 110˚ 130˚...
... DOOR SWING DIMENSIONS The location must permit both doors to open to change materials and specifications without notice. Specifications subject to a minimum of the refrigerator and a corner wall. Ref. Instructions packed with product. NOTE: More clearance may be required if you are using overlay panels, custom handles,....4 cm) 16⁷⁄₈" (42.9 cm) 47⁷⁄₈" (121.6 cm) 12⁵⁄₈" (32.1 cm) 42" (106.7 cm) Models 37¹⁄₄" (94.6 cm) 41³⁄₈" (105.1 cm) 90˚ 110˚ 130˚ 90˚ 110˚ 130˚...
Installation Guide
Page 4
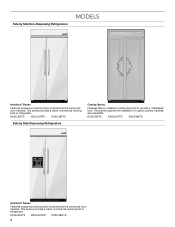
... the installation of custom panels, handles, and standoffs. KSSC36QTS KSSC42QTS KSSC48QTS 4 Side by Side Dispensing Refrigerators Overlay Series Features factory-installed, overlay style trim to provide a "frameless" look. KSSC36FTS KSSC42FTS KSSC48FTS Side by Side Non-Dispensing Refrigerators MODELS Architect® Series Features wraparound styling that complements the contoured door handles. This series provides...
... the installation of custom panels, handles, and standoffs. KSSC36QTS KSSC42QTS KSSC48QTS 4 Side by Side Dispensing Refrigerators Overlay Series Features factory-installed, overlay style trim to provide a "frameless" look. KSSC36FTS KSSC42FTS KSSC48FTS Side by Side Non-Dispensing Refrigerators MODELS Architect® Series Features wraparound styling that complements the contoured door handles. This series provides...
Installation Guide
Page 5
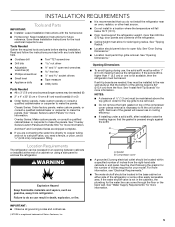
... cabinets or end panel. Classic Series: Order factory panels, make the panels. See "Classic Series Custom Panels" for your model. See the chart following the graphic for the number of the refrigerator or some other heat source. ■ Do not install in a location where the temperature will cause loss in cooling efficiency...
... cabinets or end panel. Classic Series: Order factory panels, make the panels. See "Classic Series Custom Panels" for your model. See the chart following the graphic for the number of the refrigerator or some other heat source. ■ Do not install in a location where the temperature will cause loss in cooling efficiency...
Installation Guide
Page 6
...77" (196 cm) A Width (see chart following) 6" (15.2 cm) 1" 6" (2.54 cm) (15.2 cm) 24" (60.96 cm) min. 6" (15.2 cm) Width A (as shown Model above) 36 35¹⁄₂" to 35³⁄₄" (90.2 cm to 90.8 cm) 42 41¹⁄₂" to 41³⁄... disconnect power at the circuit breaker box. Electrical Shock Hazard Plug into its final location, it . It is important to make sure you move your refrigerator into a grounded 3 prong outlet. Do not use an extension cord. Do not use an extension cord. Do not remove ground prong. B Dimension ...
...77" (196 cm) A Width (see chart following) 6" (15.2 cm) 1" 6" (2.54 cm) (15.2 cm) 24" (60.96 cm) min. 6" (15.2 cm) Width A (as shown Model above) 36 35¹⁄₂" to 35³⁄₄" (90.2 cm to 90.8 cm) 42 41¹⁄₂" to 41³⁄... disconnect power at the circuit breaker box. Electrical Shock Hazard Plug into its final location, it . It is important to make sure you move your refrigerator into a grounded 3 prong outlet. Do not use an extension cord. Do not use an extension cord. Do not remove ground prong. B Dimension ...
Installation Guide
Page 7
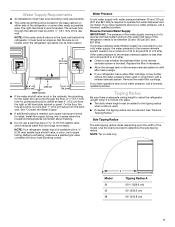
... 30 and 120 psi (207 and 827 kPa). Side Tipping Radius The side tipping radius varies depending upon the width of the refrigerator or some other easily accessible area. Model 36 42 48 A Tipping Radius A 90¹⁄₂" (229.9 cm) 93" (236.2 cm) 96" (243.8 cm) 7 The right-...provided to the reverse osmosis system is less than 1" (2.54 cm) away from the right or left hand side cabinet or panel. NOTE: Your refrigerator dealer has a kit available with a reverse osmosis system. Remove the water filter cartridge. Tipping Radius Be sure there is adequate ceiling height to ...
... 30 and 120 psi (207 and 827 kPa). Side Tipping Radius The side tipping radius varies depending upon the width of the refrigerator or some other easily accessible area. Model 36 42 48 A Tipping Radius A 90¹⁄₂" (229.9 cm) 93" (236.2 cm) 96" (243.8 cm) 7 The right-...provided to the reverse osmosis system is less than 1" (2.54 cm) away from the right or left hand side cabinet or panel. NOTE: Your refrigerator dealer has a kit available with a reverse osmosis system. Remove the water filter cartridge. Tipping Radius Be sure there is adequate ceiling height to ...
Installation Guide
Page 8
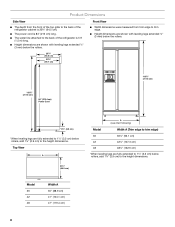
Model 36 42 48 Width A 35" (88.9 cm) 41" (104.1 cm) 47" (119.4 cm) 8 Front View ■ Width dimensions were measured from the front of the top grille to the back of the refrigerator cabinet is 25³⁄₈" (64.5 cm). ■ The power cord is 84" (213 cm) long. ■ ...The water line attached to the back of the refrigerator is 5 ft (1.5 m) long. ■ Height dimensions are fully extended to 1¹⁄₄" (3.2 cm) below rollers, add 1¹⁄₈" (2.9 cm) to the height ...
Model 36 42 48 Width A 35" (88.9 cm) 41" (104.1 cm) 47" (119.4 cm) 8 Front View ■ Width dimensions were measured from the front of the top grille to the back of the refrigerator cabinet is 25³⁄₈" (64.5 cm). ■ The power cord is 84" (213 cm) long. ■ ...The water line attached to the back of the refrigerator is 5 ft (1.5 m) long. ■ Height dimensions are fully extended to 1¹⁄₄" (3.2 cm) below rollers, add 1¹⁄₈" (2.9 cm) to the height ...
Installation Guide
Page 9
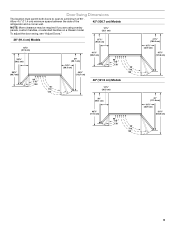
... (11.4 cm) minimum space between the side of 90°. Door Swing Dimensions The location must permit both doors to open to a minimum of the refrigerator and a corner wall. 42" (106.7 cm) Models NOTE: More clearance may be required if you are using overlay panels, custom handles, or extended handles on a Classic...;₈" (36.5 cm) 44³⁄₈" (112.7 cm) 41³⁄₈" (105.1 cm) 90˚ 110˚ 130˚ 48" (121.9 cm) Models 14³⁄₈" (36.5 cm) 39" (99.1 cm) 90˚ 110˚ 130˚ 43⁷⁄₈" (111.4 cm) 90˚ 110˚...
... (11.4 cm) minimum space between the side of 90°. Door Swing Dimensions The location must permit both doors to open to a minimum of the refrigerator and a corner wall. 42" (106.7 cm) Models NOTE: More clearance may be required if you are using overlay panels, custom handles, or extended handles on a Classic...;₈" (36.5 cm) 44³⁄₈" (112.7 cm) 41³⁄₈" (105.1 cm) 90˚ 110˚ 130˚ 48" (121.9 cm) Models 14³⁄₈" (36.5 cm) 39" (99.1 cm) 90˚ 110˚ 130˚ 43⁷⁄₈" (111.4 cm) 90˚ 110˚...
Installation Guide
Page 10
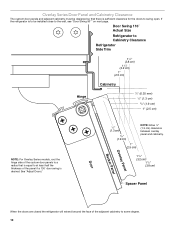
Door Swing 110˚ Actual Size Refrigerator to Cabinetry Clearance Refrigerator Side Trim Hinge 11/2" (3.8 cm) 11/4" (3.2 cm) 1" (2.5 cm) Cabinetry 1/4" (6.35 mm) 1/2" (1.3 cm) 3/4" (1.9 cm) 1" (2.5 cm) NOTE: For Overlay Series models, rout the hinge side of the custom door panels to a radius that there... is sufficient clearance for the doors to some degree. 10 See "Adjust Doors." If the refrigerator is to be designed so that is equal to the wall...
Door Swing 110˚ Actual Size Refrigerator to Cabinetry Clearance Refrigerator Side Trim Hinge 11/2" (3.8 cm) 11/4" (3.2 cm) 1" (2.5 cm) Cabinetry 1/4" (6.35 mm) 1/2" (1.3 cm) 3/4" (1.9 cm) 1" (2.5 cm) NOTE: For Overlay Series models, rout the hinge side of the custom door panels to a radius that there... is sufficient clearance for the doors to some degree. 10 See "Adjust Doors." If the refrigerator is to be designed so that is equal to the wall...
Installation Guide
Page 12
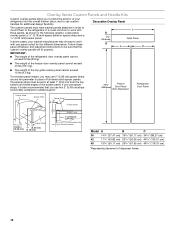
... that you use two 2" (5.08 cm) strips horizontally centered for added support. 72¹⁄₄" Freezer (183.5 cm) Door Panel (Non-Dispenser) Refrigerator Door Panel Overlay Panel Spacer Panel Spacer Panel ¹⁄₈" (3.18 mm) Overlay Panel ⁵⁄₈" to ³⁄₄" (15.88 ...to 19.05 mm) Backer Panel 6.35 mm) (3.18 mm) Backer Panel 1" minimum (2.54 cm) Door/Grille Trim Offset Dimension Model A B C 36 14³/₄" (37.47 cm) 19³/₄" (50.17 cm) 34³/₄" (88.27 cm) 42 17¹/₄"...
... that you use two 2" (5.08 cm) strips horizontally centered for added support. 72¹⁄₄" Freezer (183.5 cm) Door Panel (Non-Dispenser) Refrigerator Door Panel Overlay Panel Spacer Panel Spacer Panel ¹⁄₈" (3.18 mm) Overlay Panel ⁵⁄₈" to ³⁄₄" (15.88 ...to 19.05 mm) Backer Panel 6.35 mm) (3.18 mm) Backer Panel 1" minimum (2.54 cm) Door/Grille Trim Offset Dimension Model A B C 36 14³/₄" (37.47 cm) 19³/₄" (50.17 cm) 34³/₄" (88.27 cm) 42 17¹/₄"...


