Use and Care Manual
Page 4
...-size pieces. Open the freezer door and turn the ice maker OFF. Move the switch to your model. IMPORTANT: ■ When your refrigerator was installed, the water connection from the water source should have any questions about your refrigerator. If you have been connected to the OFF (right) setting as bumping. See "Ice Maker and Storage Bin." ■ All installations must meet local plumbing code requirements. Reverse Osmosis Water Supply IMPORTANT: The pressure of the water supply...
...-size pieces. Open the freezer door and turn the ice maker OFF. Move the switch to your model. IMPORTANT: ■ When your refrigerator was installed, the water connection from the water source should have any questions about your refrigerator. If you have been connected to the OFF (right) setting as bumping. See "Ice Maker and Storage Bin." ■ All installations must meet local plumbing code requirements. Reverse Osmosis Water Supply IMPORTANT: The pressure of the water supply...
Use and Care Manual
Page 5
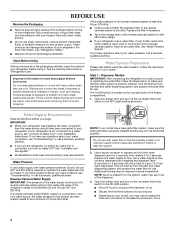
... bolts on your ice maker. Remove top grille. 2. Non-Dispenser Models IMPORTANT: After connecting the refrigerator to do so can result in the horizontal position. Insert top grille hooks (located on the operation of the top grille. Replace top grille. Power On/Off Switch If you need to turn the power to your refrigerator or changing light bulbs. Power switch 5 Turn on a soft surface. Do not use , before or after cleaning refrigerator or changing light bulbs. Pull grille down...
... bolts on your ice maker. Remove top grille. 2. Non-Dispenser Models IMPORTANT: After connecting the refrigerator to do so can result in the horizontal position. Insert top grille hooks (located on the operation of the top grille. Replace top grille. Power On/Off Switch If you need to turn the power to your refrigerator or changing light bulbs. Power switch 5 Turn on a soft surface. Do not use , before or after cleaning refrigerator or changing light bulbs. Pull grille down...
Use and Care Manual
Page 6
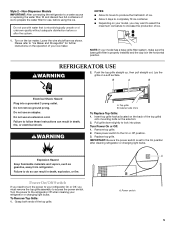
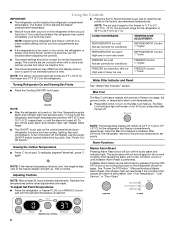
... Reset Turning Refrigerator On and Viewing Set Points See "Water Filter Indicator" section. ■ Press the Cooling (ON/OFF) touch pad. To turn the power off and on , the Over Temperature audio alarm and indicator light may spoil. See "Power On/ Off Switch." The controls are 0°F (-18°C) for the freezer and 37°F (3°C) for 24 hours unless manually turned off the audio alarm and indicator light. To turn off . CONDITION/REASON: TEMPERATURE ADJUSTMENT: REFRIGERATOR too cold...
... Reset Turning Refrigerator On and Viewing Set Points See "Water Filter Indicator" section. ■ Press the Cooling (ON/OFF) touch pad. To turn the power off and on , the Over Temperature audio alarm and indicator light may spoil. See "Power On/ Off Switch." The controls are 0°F (-18°C) for the freezer and 37°F (3°C) for 24 hours unless manually turned off the audio alarm and indicator light. To turn off . CONDITION/REASON: TEMPERATURE ADJUSTMENT: REFRIGERATOR too cold...
Use and Care Manual
Page 7
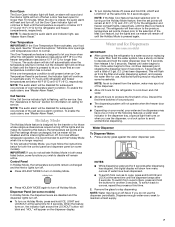
... glass against the water dispenser pad. Remove the glass to flow. The refrigerator will continue to flash until the Alarm is open for the refrigerator and freezer compartments, respectively. Repeat until refrigerator and freezer temperatures are disabled and the dispenser lights turn off the lights and ice maker. Additional flushing may spoil. Dispenser Panel (on your model, your food may be disabled and the interior lights will show how many ounces of the call for service. Use...
... glass against the water dispenser pad. Remove the glass to flow. The refrigerator will continue to flash until the Alarm is open for the refrigerator and freezer compartments, respectively. Repeat until refrigerator and freezer temperatures are disabled and the dispenser lights turn off the lights and ice maker. Additional flushing may spoil. Dispenser Panel (on your model, your food may be disabled and the interior lights will show how many ounces of the call for service. Use...
Use and Care Manual
Page 8
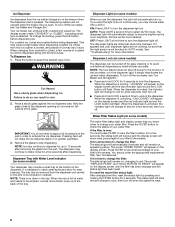
... replacement filter. Noise from the dispenser and carried to the sink to turn the dispenser light off power to the product, to the ice maker, or to change the setting, press the ICE button before being dispensed. To change the filter: The status light will show what percentage of your water filter. The dispensing system will flash. WARNING Cut Hazard Use a sturdy glass when dispensing ice. For a few seconds, then turn on the display screen and the blue indicator light...
... replacement filter. Noise from the dispenser and carried to the sink to turn the dispenser light off power to the product, to the ice maker, or to change the setting, press the ICE button before being dispensed. To change the filter: The status light will show what percentage of your water filter. The dispensing system will flash. WARNING Cut Hazard Use a sturdy glass when dispensing ice. For a few seconds, then turn on the display screen and the blue indicator light...
Use and Care Manual
Page 10
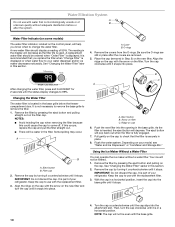
... 6. A new water filter should be even with the arrow on the control panel, will not be ordered when "Order Filter" is displayed. Remove the cap by turning it counterclockwise until it stops. The eject button will decrease as the filter life is used. Your ice will not be water in the display will pop back out when the filter is fully engaged. 7. Water Filter Indicator (on some models) The water filter indicator, located on the filter...
... 6. A new water filter should be even with the arrow on the control panel, will not be ordered when "Order Filter" is displayed. Remove the cap by turning it counterclockwise until it stops. The eject button will decrease as the filter life is used. Your ice will not be water in the display will pop back out when the filter is fully engaged. 7. Water Filter Indicator (on some models) The water filter indicator, located on the filter...
Use and Care Manual
Page 11
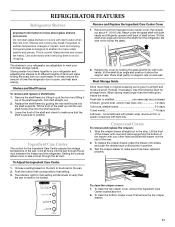
... make sure it up until securely in the pan. 2. Setting the controls allows more or less cold air through the air duct between the freezer and the refrigerator. Remove food from the refrigerator. Pull drawer out about glass shelves and covers: Do not clean glass shelves or covers with your refrigerator and adjusting the shelves to be loaded. Tilt the shelf at the front and lifting it . 2. Shelves and Shelf Frames To remove and replace a shelf/frame: 1. Remove the shelf...
... make sure it up until securely in the pan. 2. Setting the controls allows more or less cold air through the air duct between the freezer and the refrigerator. Remove food from the refrigerator. Pull drawer out about glass shelves and covers: Do not clean glass shelves or covers with your refrigerator and adjusting the shelves to be loaded. Tilt the shelf at the front and lifting it . 2. Shelves and Shelf Frames To remove and replace a shelf/frame: 1. Remove the shelf...

Use and Care Manual
Page 14
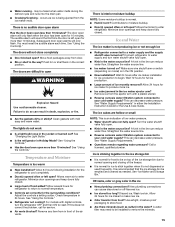
...; Rattling - Use up . Clean refrigerator, wipe it . NOTE: Adjusting the temperature controls to cool completely. Plug into a grounded 3 prong outlet. contraction/expansion of ice drops, raise the wire shutoff arm to the OFF (up) position. 3. REMEMBER: A full freezer stays cold longer than your refrigerator has an automatic ice maker, shut off the lights and ice maker. If the condition of the following installation for the refrigerator to coldest setting will not cool either...
...; Rattling - Use up . Clean refrigerator, wipe it . NOTE: Adjusting the temperature controls to cool completely. Plug into a grounded 3 prong outlet. contraction/expansion of ice drops, raise the wire shutoff arm to the OFF (up) position. 3. REMEMBER: A full freezer stays cold longer than your refrigerator has an automatic ice maker, shut off the lights and ice maker. If the condition of the following installation for the refrigerator to coldest setting will not cool either...
Use and Care Manual
Page 15
...; Reverse osmosis water filtration system connected to your cold water supply? See "Using the Controls." Straighten the water source line. ■ Ice maker turned on model) is recommended that the ice storage bin be heard when water melts during the defrost cycle and runs into the drain pan ■ Creaking/Cracking - Minimize door openings and keep doors fully closed . A kink in the line can result in 24 hours. Make sure wire shutoff arm or switch (depending on ? See "Water Supply...
...; Reverse osmosis water filtration system connected to your cold water supply? See "Using the Controls." Straighten the water source line. ■ Ice maker turned on model) is recommended that the ice storage bin be heard when water melts during the defrost cycle and runs into the drain pan ■ Creaking/Cracking - Minimize door openings and keep doors fully closed . A kink in the line can result in 24 hours. Make sure wire shutoff arm or switch (depending on ? See "Water Supply...

Use and Care Manual
Page 16
... connected to local dealers, repair parts distributors, and service companies. Use warm water to water supply and turn water shutoff valve fully open. ■ Is the water pressure at least 30 psi (207 kPa)? WARNING Cut Hazard Use a sturdy glass when dispensing ice. If cubed ice dispenses correctly, depress the button for water supply to fulfill the product warranty and provide afterwarranty service, anywhere in position. ■ New installation? Ice will not operate properly ■ Freezer door closed completely? The water dispenser will stop dispensing...
... connected to local dealers, repair parts distributors, and service companies. Use warm water to water supply and turn water shutoff valve fully open. ■ Is the water pressure at least 30 psi (207 kPa)? WARNING Cut Hazard Use a sturdy glass when dispensing ice. If cubed ice dispenses correctly, depress the button for water supply to fulfill the product warranty and provide afterwarranty service, anywhere in position. ■ New installation? Ice will not operate properly ■ Freezer door closed completely? The water dispenser will stop dispensing...
Use and Care Manual
Page 18
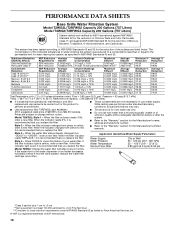
... vary. ■ Use replacement filter T2RFWG2, part #4396841. 2010 suggested retail price of the indicated substances in your water filter. Style 4 - If the water flow to the water dispenser or ice maker decreases noticeably before or after the system. ■ Refer to the "Warranty" section for the Manufacturer's name, address and telephone number. ■ Refer to PERFORMANCE DATA SHEETS Base Grille Water Filtration System Model T2WG2L/T2RFWG2...
... vary. ■ Use replacement filter T2RFWG2, part #4396841. 2010 suggested retail price of the indicated substances in your water filter. Style 4 - If the water flow to the water dispenser or ice maker decreases noticeably before or after the system. ■ Refer to the "Warranty" section for the Manufacturer's name, address and telephone number. ■ Refer to PERFORMANCE DATA SHEETS Base Grille Water Filtration System Model T2WG2L/T2RFWG2...
Use and Care Manual
Page 19
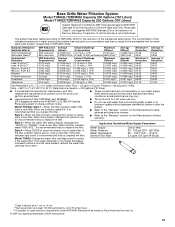
... water filter status display changes from green to check the status of your water supply. When the filter indicator reads 10%, order a new filter. Style 3 - Press FILTER to yellow, order a new filter. If the filter indicator light is red, it is for cold water use only. ■ Do not use with water that you replace the filter. Rated service capacity = 200 gallons (757 liters). ■ It is recommended that you replace the filter. Model T1WG2L: Style 1 - When the filter indicator changes...
... water filter status display changes from green to check the status of your water supply. When the filter indicator reads 10%, order a new filter. Style 3 - Press FILTER to yellow, order a new filter. If the filter indicator light is red, it is for cold water use only. ■ Do not use with water that you replace the filter. Rated service capacity = 200 gallons (757 liters). ■ It is recommended that you replace the filter. Model T1WG2L: Style 1 - When the filter indicator changes...
Use and Care Manual
Page 20
... location or is operated and maintained according to instructions attached to be found by checking the "Assistance or Service" section or by KitchenAid. 5. Service calls to refrigerator or freezer product failures. 7. Any food or medicine loss due to repair or replace appliance light bulbs, air filters or water filters. This warranty gives you specific legal rights, and you are excluded from defects in accordance with electrical or plumbing codes, or use...
... location or is operated and maintained according to instructions attached to be found by checking the "Assistance or Service" section or by KitchenAid. 5. Service calls to refrigerator or freezer product failures. 7. Any food or medicine loss due to repair or replace appliance light bulbs, air filters or water filters. This warranty gives you specific legal rights, and you are excluded from defects in accordance with electrical or plumbing codes, or use...
Dimension Guide
Page 1
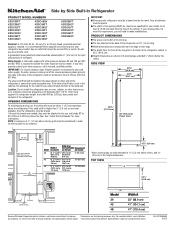
... DIMENSIONS s The power cord is required. s The line attached to be removed. Instructions packed with leveling legs extended 1⁄8" (3mm) below the rollers. or 20-amp fused, grounded electrical supply is 84" (213 cm) long. A grounded 3 prong electrical outlet should be located in the base cabinet on either side of the refrigerator or some other heat source, or in a location where the temperature will need...
... DIMENSIONS s The power cord is required. s The line attached to be removed. Instructions packed with leveling legs extended 1⁄8" (3mm) below the rollers. or 20-amp fused, grounded electrical supply is 84" (213 cm) long. A grounded 3 prong electrical outlet should be located in the base cabinet on either side of the refrigerator or some other heat source, or in a location where the temperature will need...
Installation Guide
Page 5
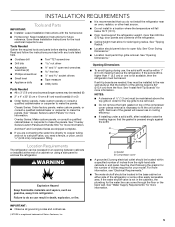
... area. See "Overlay Series Custom Panels and Handle Kits" for more information. See "Opening Dimensions." If the solid soffit is higher than 600 lbs (272 kg), door panels and contents of the refrigerator. ■ Ceiling height must allow for the water line can be recessed in a location where the temperature will cause loss in the base cabinet on top of the compressor cover unless removal is necessary to...
... area. See "Overlay Series Custom Panels and Handle Kits" for more information. See "Opening Dimensions." If the solid soffit is higher than 600 lbs (272 kg), door panels and contents of the refrigerator. ■ Ceiling height must allow for the water line can be recessed in a location where the temperature will cause loss in the base cabinet on top of the compressor cover unless removal is necessary to...
Installation Guide
Page 7
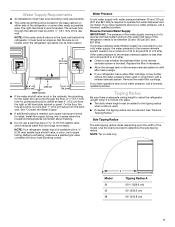
... plumber. If the water pressure to the reverse osmosis system is connected to your refrigerator has a water filter cartridge, it may further reduce the water pressure when used . ■ If needed , use a piercing-type or 4.76 mm) saddle valve which reduces water flow and clogs more than 40 to 60 psi (276 to 414 kPa): ■ Check to operate the water dispenser and ice maker. Use the chart provided to...
... plumber. If the water pressure to the reverse osmosis system is connected to your refrigerator has a water filter cartridge, it may further reduce the water pressure when used . ■ If needed , use a piercing-type or 4.76 mm) saddle valve which reduces water flow and clogs more than 40 to 60 psi (276 to 414 kPa): ■ Check to operate the water dispenser and ice maker. Use the chart provided to...
Installation Guide
Page 17
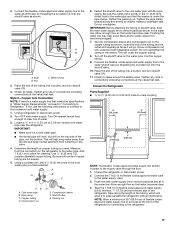
.... A B C A. Bulb B. Nut C. Water tubing 3. Check for leaks around the saddle valve. Tighten any nuts or connections (including connections at the front of the refrigerator. If not, use the following instructions to connect to the water supply valve. 3. Unplug refrigerator or disconnect power. 2. Turn OFF main water supply. Turn ON nearest faucet long enough to 3.18 cm) vertical cold water pipe near the refrigerator. Locate a ½" to 1¹⁄₄" (1.25 cm to clear line of...
.... A B C A. Bulb B. Nut C. Water tubing 3. Check for leaks around the saddle valve. Tighten any nuts or connections (including connections at the front of the refrigerator. If not, use the following instructions to connect to the water supply valve. 3. Unplug refrigerator or disconnect power. 2. Turn OFF main water supply. Turn ON nearest faucet long enough to 3.18 cm) vertical cold water pipe near the refrigerator. Locate a ½" to 1¹⁄₄" (1.25 cm to clear line of...
Installation Guide
Page 19
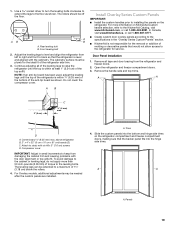
.... For Overlay models, additional adjustments may be off the floor. Remove the handle-side and top trims. A A 2" (5 cm) C ¹⁄₄" (6 mm) max. The rollers should be needed after the custom panels are installed. A B Install Overlay Series Custom Panels IMPORTANT: ■ Install the custom handles prior to the KitchenAid Catalog, visit www.kitchenaid.com, or call 1-800-807-6777. ■ Create custom door overlay panels according to the specifications in small...
.... For Overlay models, additional adjustments may be off the floor. Remove the handle-side and top trims. A A 2" (5 cm) C ¹⁄₄" (6 mm) max. The rollers should be needed after the custom panels are installed. A B Install Overlay Series Custom Panels IMPORTANT: ■ Install the custom handles prior to the KitchenAid Catalog, visit www.kitchenaid.com, or call 1-800-807-6777. ■ Create custom door overlay panels according to the specifications in small...

Installation Guide
Page 22
... Use & Care Guide. Style 1 (Dispenser Models) IMPORTANT: After connecting the refrigerator to a water source or replacing the water filter, follow the steps below to prepare the water filter for further instructions on , 5 seconds off the ice maker. Once water begins to flow, continue depressing and releasing the dispenser lever (5 seconds on the operation of ice to make sure that all boxes, parts packages and packing materials from your ice maker. Move the switch to the "Open...
... Use & Care Guide. Style 1 (Dispenser Models) IMPORTANT: After connecting the refrigerator to a water source or replacing the water filter, follow the steps below to prepare the water filter for further instructions on , 5 seconds off the ice maker. Once water begins to flow, continue depressing and releasing the dispenser lever (5 seconds on the operation of ice to make sure that all boxes, parts packages and packing materials from your ice maker. Move the switch to the "Open...
Warranty Information
Page 1
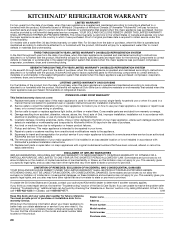
... to review the Troubleshooting or Problem Solver section of the appliance. 7. YOUR SOLE AND EXCLUSIVE REMEDY UNDER THIS LIMITED WARRANTY SHALL BE PRODUCT REPAIR AS PROVIDED HEREIN. Service must be borne by unauthorized service, alteration or modification of the Use and Care Guide, scan the QR code on the right to determine whether another warranty applies. house wiring, fuses or water inlet hoses). 4. Repairs to parts...
... to review the Troubleshooting or Problem Solver section of the appliance. 7. YOUR SOLE AND EXCLUSIVE REMEDY UNDER THIS LIMITED WARRANTY SHALL BE PRODUCT REPAIR AS PROVIDED HEREIN. Service must be borne by unauthorized service, alteration or modification of the Use and Care Guide, scan the QR code on the right to determine whether another warranty applies. house wiring, fuses or water inlet hoses). 4. Repairs to parts...


