
User Manual
Page 3
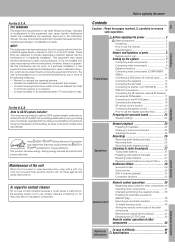
... setup codes for other components 36 Operating other components 43 Additional Information In case of parts 5 Remote control unit 6 Setting up the system 7 Connecting audio components 8 Connecting video components 9 Digital connections 10 Connecting video components (COMPONENT VIDEO 11 Connecting a DVD player (6-channel input) ..... 12 Connecting the speakers 13 Connecting the terminals 14 Connecting to another room (ROOM B 15 PRE OUT connections 16 Connecting the RF antenna, external IR Receiver and external IR Repeater 17 Connecting to the AV AUX jacks 18 Connecting...
... setup codes for other components 36 Operating other components 43 Additional Information In case of parts 5 Remote control unit 6 Setting up the system 7 Connecting audio components 8 Connecting video components 9 Digital connections 10 Connecting video components (COMPONENT VIDEO 11 Connecting a DVD player (6-channel input) ..... 12 Connecting the speakers 13 Connecting the terminals 14 Connecting to another room (ROOM B 15 PRE OUT connections 16 Connecting the RF antenna, external IR Receiver and external IR Repeater 17 Connecting to the AV AUX jacks 18 Connecting...
User Manual
Page 4
..., DVD player, LD player, CD player, etc.) using your video software. Once you maximum enjoyment from the remote control. Before applying the power Special features True home theater sound This receiver incorporates a wide variety of the remote control is compatible with your remote controllable audio and video components. This system features Re-equalization (Re-EQ), Timbre Matching, Adaptive Decorrelation, Bass Peak Level Manager and Loudspeaker Position Time Synchronization, which enables multichannel decoding. In the DTS mode, the 5.1 channel digital input...
..., DVD player, LD player, CD player, etc.) using your video software. Once you maximum enjoyment from the remote control. Before applying the power Special features True home theater sound This receiver incorporates a wide variety of the remote control is compatible with your remote controllable audio and video components. This system features Re-equalization (Re-EQ), Timbre Matching, Adaptive Decorrelation, Bass Peak Level Manager and Loudspeaker Position Time Synchronization, which enables multichannel decoding. In the DTS mode, the 5.1 channel digital input...

User Manual
Page 5
... indicator Speaker selection indicators Input channel indicators Output channel indicators Display DSP indicator 3 STEREO indicator STEREO indicator STANDBY POWER ON/STANDBY PHONES AUDIO-VIDEO SURROUND RECEIVER VR-510 A SPEAKERS B MULTI CONTROL DOLBY DTS DIGITAL THX DSP MODE SET UP INPUT MODE DIMMER MONITOR SOUND LISTEN MODE SOURCE DIRECT BAND AUTO MEMORY INPUT SELECTOR VOLUME CONTROL DOWN UP S-VIDEO V AV AUX L - This system can be switched on using remote control. CS 5.1 indicator ¤ Lights when the receiver is connected to switch the power ON/STANDBY.
... indicator Speaker selection indicators Input channel indicators Output channel indicators Display DSP indicator 3 STEREO indicator STEREO indicator STANDBY POWER ON/STANDBY PHONES AUDIO-VIDEO SURROUND RECEIVER VR-510 A SPEAKERS B MULTI CONTROL DOLBY DTS DIGITAL THX DSP MODE SET UP INPUT MODE DIMMER MONITOR SOUND LISTEN MODE SOURCE DIRECT BAND AUTO MEMORY INPUT SELECTOR VOLUME CONTROL DOWN UP S-VIDEO V AV AUX L - This system can be switched on using remote control. CS 5.1 indicator ¤ Lights when the receiver is connected to switch the power ON/STANDBY.
User Manual
Page 6
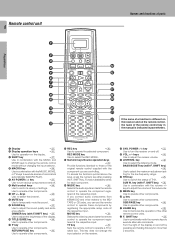
... connect audio components from KENWOOD and other components. key (with F. Remote control unit 6 Names and functions of parts Preparations 1 2 3 4 5 6 7 8 9 0 ! @ # 1 Display ¡ 2 Display operation keys ¡ Use for operation on the display. 3 SHIFT key ‡ Use in combination with the MUSIC and MOVIE keys to change the input selector on and off by registering the appropriate setup code at the respective input. POWER $ % CH. DIMMER SOUND TITLE/GUIDE MUTE BASS BOOST LISTEN M. POWER key ™ Use to adjust the receiver volume...
... connect audio components from KENWOOD and other components. key (with F. Remote control unit 6 Names and functions of parts Preparations 1 2 3 4 5 6 7 8 9 0 ! @ # 1 Display ¡ 2 Display operation keys ¡ Use for operation on the display. 3 SHIFT key ‡ Use in combination with the MUSIC and MOVIE keys to change the input selector on and off by registering the appropriate setup code at the respective input. POWER $ % CH. DIMMER SOUND TITLE/GUIDE MUTE BASS BOOST LISTEN M. POWER key ™ Use to adjust the receiver volume...
User Manual
Page 7
...DTS Digital Surround™ decoder system must be cases in an "analog" form. Notes 1. These cables are connected directly to the digital output (S/P DIF, AES/EBU, or TosLink) of difficulty". Microcomputer malfunction If operation is larger than DTS or DVD/6ch play mode 1 D-AUTO (digital input, auto sound) 2 D-MANUAL (digital input, manual sound) 3 ANALOG (analog input, manual sound) Digital input: Select this setting is pressed quickly, sound may be connected to an amplification system. You must set to the currently selected listening mode, use the INPUT MODE...
...DTS Digital Surround™ decoder system must be cases in an "analog" form. Notes 1. These cables are connected directly to the digital output (S/P DIF, AES/EBU, or TosLink) of difficulty". Microcomputer malfunction If operation is larger than DTS or DVD/6ch play mode 1 D-AUTO (digital input, auto sound) 2 D-MANUAL (digital input, manual sound) 3 ANALOG (analog input, manual sound) Digital input: Select this setting is pressed quickly, sound may be connected to an amplification system. You must set to the currently selected listening mode, use the INPUT MODE...
User Manual
Page 17
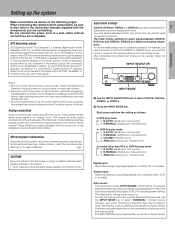
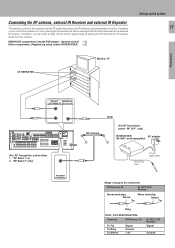
... "RF OFF" only) IR RECEIVER AC adapter (IR-9991- IR Receiver IN IR OUT LCD Remote Stereo mini plug Sleeve Tip Mono mini plug Sleeve Tip Ring IR IN / OUT SPECIFICATION: Terminal IR Receiver IN To Tip To Ring To Sleeve Signal Ground + 8V IR OUT LCD Remote Signal Ground KENWOOD components (except DVD player) : System control ) Other components: (Registering setup codes) IR REPEATER fl Setting up the system 17 Preparations IR REPEATER...
... "RF OFF" only) IR RECEIVER AC adapter (IR-9991- IR Receiver IN IR OUT LCD Remote Stereo mini plug Sleeve Tip Mono mini plug Sleeve Tip Ring IR IN / OUT SPECIFICATION: Terminal IR Receiver IN To Tip To Ring To Sleeve Signal Ground + 8V IR OUT LCD Remote Signal Ground KENWOOD components (except DVD player) : System control ) Other components: (Registering setup codes) IR REPEATER fl Setting up the system 17 Preparations IR REPEATER...
User Manual
Page 20
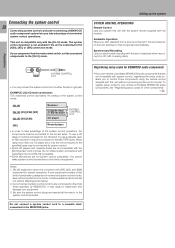
... connected to the MD/TAPE jacks. You cannot make system connections with equipment that are not system control compatible. It may connect the system control cord to the system control terminals. Setting up the system SYSTEM CONTROL OPERATIONS Remote Control Lets you own remote controllable KENWOOD audio components that is compatible only with [XR], [XS], and [XS8] equipment for other than those components using more than one CD player (etc.) only the one connected to the specified jacks may be connected to any system control cords. Registering setup codes for system control...
... connected to the MD/TAPE jacks. You cannot make system connections with equipment that are not system control compatible. It may connect the system control cord to the system control terminals. Setting up the system SYSTEM CONTROL OPERATIONS Remote Control Lets you own remote controllable KENWOOD audio components that is compatible only with [XR], [XS], and [XS8] equipment for other than those components using more than one CD player (etc.) only the one connected to the specified jacks may be connected to any system control cords. Registering setup codes for system control...

User Manual
Page 21
... than 8 seconds. DIMMER SOUND TITLE/GUIDE MUTE BASS BOOST LISTEN M. TUNING SUB W. When the display goes off The display goes off . Refer to "Remote control operation of the preset code registration mode. 3 Display The information for setup is displayed. 4 5/∞ keys Use these keys to select the source or setup code. 5 MOVIE, MUSIC, and TV keys Use these keys to select the input you want to the receiver. VOL. THX MENU RETURN /PAGE BAND ENTER...
... than 8 seconds. DIMMER SOUND TITLE/GUIDE MUTE BASS BOOST LISTEN M. TUNING SUB W. When the display goes off The display goes off . Refer to "Remote control operation of the preset code registration mode. 3 Display The information for setup is displayed. 4 5/∞ keys Use these keys to select the source or setup code. 5 MOVIE, MUSIC, and TV keys Use these keys to select the input you want to the receiver. VOL. THX MENU RETURN /PAGE BAND ENTER...

User Manual
Page 22
... receiver is connected to the receiver. 3 OFF : Center speaker setting mode to next page MULTI CONTROL SET UP Preparations POWER ( ) Display operation 1 5/∞ Display operation 2 SYS. SP A B TI.VOL CLIP MULTSE RDS EON PTY TP TA NEWS CR SW S RS FM AUTO SOUND DIGITAL AUTO AM PRO LOGIC S.DIRECT MEMO MHz 3 STEREO MONITOR ST. kHz DOWN MIX DSP TUNED Blinks 3 Press the SET UP or display operation 2 [Next] key to accept the setting. • The front speakers setting...
... receiver is connected to the receiver. 3 OFF : Center speaker setting mode to next page MULTI CONTROL SET UP Preparations POWER ( ) Display operation 1 5/∞ Display operation 2 SYS. SP A B TI.VOL CLIP MULTSE RDS EON PTY TP TA NEWS CR SW S RS FM AUTO SOUND DIGITAL AUTO AM PRO LOGIC S.DIRECT MEMO MHz 3 STEREO MONITOR ST. kHz DOWN MIX DSP TUNED Blinks 3 Press the SET UP or display operation 2 [Next] key to accept the setting. • The front speakers setting...

User Manual
Page 23
... AUTO SOUND DIGITAL AUTO AM PRO LOGIC S.DIRECT MEMO MHz 3 STEREO MONITOR ST. SP A B TI.VOL CLIP MUTE RDS EON PTY TP TA NEWS L CR LFE SW LS S RS Display when all the speakers have selected should be the same. 1 Use the MULTI CONTROL knob or 5/∞ keys to adjust the volume of the speakers. 5 Setup is in 1 foot (0.3 m) increment. 3 Press the SET UP or display operation...
... AUTO SOUND DIGITAL AUTO AM PRO LOGIC S.DIRECT MEMO MHz 3 STEREO MONITOR ST. SP A B TI.VOL CLIP MUTE RDS EON PTY TP TA NEWS L CR LFE SW LS S RS Display when all the speakers have selected should be the same. 1 Use the MULTI CONTROL knob or 5/∞ keys to adjust the volume of the speakers. 5 Setup is in 1 foot (0.3 m) increment. 3 Press the SET UP or display operation...

User Manual
Page 24
... speakers connected to the related components. 2 Turn on the rear panel. POWER ( ) INPUT MODE AUTO/CINEMA EQ. A ON : Sound from the speakers. The indicator for stereo sound in all playback modes. keys to the MD/TAPE jacks. Turning on the receiver 1 Turn on the power to the SPEAKERS B terminals on the rear panel. Selecting the speaker system Press the SPEAKERS A or B key to select the speaker system to be used . 7 Selecting MD/TAPE Select the source name corresponding to the component connected to adjust the volume. Use...
... speakers connected to the related components. 2 Turn on the rear panel. POWER ( ) INPUT MODE AUTO/CINEMA EQ. A ON : Sound from the speakers. The indicator for stereo sound in all playback modes. keys to the MD/TAPE jacks. Turning on the receiver 1 Turn on the power to the SPEAKERS B terminals on the rear panel. Selecting the speaker system Press the SPEAKERS A or B key to select the speaker system to be used . 7 Selecting MD/TAPE Select the source name corresponding to the component connected to adjust the volume. Use...

User Manual
Page 25
... CONTROL SOURCE DIRECT SOUND SPEAKERS A/B PHONES VOLUME CONTROL 5/∞ MUTE SOUND F.SHIFT + + - - Press the MUTE key. Press the SOURCE DIRECT key. THX BASS BOOST Adjusting the tone You can adjust the sound quality when the receiver is in the PCM stereo and analog stereo modes. Once-touch low frequency emphasis (bass boost) (Remote control only) You can adjust the sound quality when the receiver is THX ON. SOURCE DIRECT playback (for CD/DVD and DVD/6CH selectors is in surround mode, the surround mode...
... CONTROL SOURCE DIRECT SOUND SPEAKERS A/B PHONES VOLUME CONTROL 5/∞ MUTE SOUND F.SHIFT + + - - Press the MUTE key. Press the SOURCE DIRECT key. THX BASS BOOST Adjusting the tone You can adjust the sound quality when the receiver is in the PCM stereo and analog stereo modes. Once-touch low frequency emphasis (bass boost) (Remote control only) You can adjust the sound quality when the receiver is THX ON. SOURCE DIRECT playback (for CD/DVD and DVD/6CH selectors is in surround mode, the surround mode...

User Manual
Page 29
...; 1996 Digital Theater Systems, Inc. Dolby Digital 29 The Dolby Digital surround format lets you connect only the front speakers. Although only Dolby Digital soundtracks incorporate a separate low frequency channel, connecting a subwoofer will experience digital noise in most CD, LD or DVD players. The "MOVIE" mode of the PRO LOGIC II has preset characteristics to produce a calibrated, high-level surround sound playback while the MUSIC mode has user-adjustable characteristics to offer the three optical controls, like "Dimension", "Center Width...
...; 1996 Digital Theater Systems, Inc. Dolby Digital 29 The Dolby Digital surround format lets you connect only the front speakers. Although only Dolby Digital soundtracks incorporate a separate low frequency channel, connecting a subwoofer will experience digital noise in most CD, LD or DVD players. The "MOVIE" mode of the PRO LOGIC II has preset characteristics to produce a calibrated, high-level surround sound playback while the MUSIC mode has user-adjustable characteristics to offer the three optical controls, like "Dimension", "Center Width...

User Manual
Page 31
... (the act of decaying elements of spaciousness, and dynamic range are particularly effective when used with stereo program sources, like equipped with six (5.1) output channels and the receiver, you can enjoy multi-channel encoded DVD source material in various places). DSP mode The DSP mode lets you watch a concert or sporting event! These modes are superb. Center speaker Subwoofer (SW) Front speakers (L, R) Surround speakers (L, R) What's DSP? Ambience effects 31 Operations
... (the act of decaying elements of spaciousness, and dynamic range are particularly effective when used with stereo program sources, like equipped with six (5.1) output channels and the receiver, you can enjoy multi-channel encoded DVD source material in various places). DSP mode The DSP mode lets you watch a concert or sporting event! These modes are superb. Center speaker Subwoofer (SW) Front speakers (L, R) Surround speakers (L, R) What's DSP? Ambience effects 31 Operations

User Manual
Page 32
... the speaker settings. Connect the normal audio signal correctly to select the listening mode. When playing source material with surround sound. • Use the INPUT MODE key to select the input mode (analog or digital) for the source you select DOLBY DIGITAL "DOLBY DIGITAL" will scroll across the display to match the number of Dolby Digital. If this message does not appear, no adjustment will appear. When the DOLBY DIGITAL signal is a feature of available channels. 3 Adjust the volume. kHz...
... the speaker settings. Connect the normal audio signal correctly to select the listening mode. When playing source material with surround sound. • Use the INPUT MODE key to select the input mode (analog or digital) for the source you select DOLBY DIGITAL "DOLBY DIGITAL" will scroll across the display to match the number of Dolby Digital. If this message does not appear, no adjustment will appear. When the DOLBY DIGITAL signal is a feature of available channels. 3 Adjust the volume. kHz...

User Manual
Page 33
... menu changes as DTS CD, no sound is also acceptable. For the powered subwoofer, you can enjoy surround sound playback. DVD 6-channel playback Using a DVD player or the like equipped with the controls of the receiver. • Turn on automatically. 2 Select "6ch INPT" by pressing the INPUT MODE key. 3 Start playback of the DVD software. 4 Adjust the volume. • It is not possible to play a disc other components that some items are not displayed in the display. INPUT jacks...
... menu changes as DTS CD, no sound is also acceptable. For the powered subwoofer, you can enjoy surround sound playback. DVD 6-channel playback Using a DVD player or the like equipped with the controls of the receiver. • Turn on automatically. 2 Select "6ch INPT" by pressing the INPUT MODE key. 3 Start playback of the DVD software. 4 Adjust the volume. • It is not possible to play a disc other components that some items are not displayed in the display. INPUT jacks...
User Manual
Page 37
... set at the remote sensor on the receiver when you want to operate KENWOOD components connected by system control cords. e The remote control mode remains in step 1 mode until " Menu" appears in the display. • Any VIDEO or TV (TV1, TV2, CABLE) inputs that is designed to work with the receiver via the system control connections. To return to the initial display, press display operation 1 [HOME] key repeatedly until you select another component. Note Although each component. MUSIC, MOVIE, TV During operation, make...
... set at the remote sensor on the receiver when you want to operate KENWOOD components connected by system control cords. e The remote control mode remains in step 1 mode until " Menu" appears in the display. • Any VIDEO or TV (TV1, TV2, CABLE) inputs that is designed to work with the receiver via the system control connections. To return to the initial display, press display operation 1 [HOME] key repeatedly until you select another component. Note Although each component. MUSIC, MOVIE, TV During operation, make...
User Manual
Page 41
... the display. In this case, start from step 1. 6 The remote control code is sent to the remote control unit. • "Complete" appears when finished. Video1: VCR Menu Selected input 3 Press the LEARN key. • The Extend selecting display appears. To delete the memory stored on the remote control unit up to 5 memories. 1 Point the infrared ray system part of the other components 1 Press the MUSIC, MOVIE...
... the display. In this case, start from step 1. 6 The remote control code is sent to the remote control unit. • "Complete" appears when finished. Video1: VCR Menu Selected input 3 Press the LEARN key. • The Extend selecting display appears. To delete the memory stored on the remote control unit up to 5 memories. 1 Point the infrared ray system part of the other components 1 Press the MUSIC, MOVIE...
User Manual
Page 49
... "Connecting the speakers". # • Select a surround mode. • Adjust the speaker levels using a DVD player, the sound is set . • Install the outdoor antenna away from the TV. Sound is not grounded. • Insert the audio cord plugs securely into the PHONO jacks. • Connect the grounding wire to its normal operating condition. • Please note that cannot be received. If this problem, depending on the type of DVD player used. • Set the input mode to digital manual before starting playback...
... "Connecting the speakers". # • Select a surround mode. • Adjust the speaker levels using a DVD player, the sound is set . • Install the outdoor antenna away from the TV. Sound is not grounded. • Insert the audio cord plugs securely into the PHONO jacks. • Connect the grounding wire to its normal operating condition. • Please note that cannot be received. If this problem, depending on the type of DVD player used. • Set the input mode to digital manual before starting playback...

User Manual
Page 50
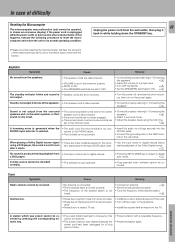
... to control before operation. ¡ • Reset the microprocessor. vate the operation mode for the component you want to play a tape which is being recorded in the source component you wish to control. • The microprocessor of difficulty Remote control unit 50 Symptom The battery indicator flashes during operation. Certain inputs cannot be adjusted. respective input(s). fl • The remote control is an obstacle between the receiver and the remote. • The audio cords and system control cords...
... to control before operation. ¡ • Reset the microprocessor. vate the operation mode for the component you want to play a tape which is being recorded in the source component you wish to control. • The microprocessor of difficulty Remote control unit 50 Symptom The battery indicator flashes during operation. Certain inputs cannot be adjusted. respective input(s). fl • The remote control is an obstacle between the receiver and the remote. • The audio cords and system control cords...


