Instruction Manual
Page 2
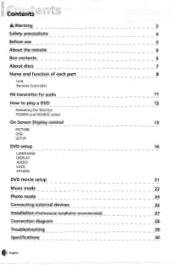
Contents A Warning 3 Safety precautions 4 Before use 5 About the remote 6 Box contents 6 About discs 7 Name and function of each part 8 Unit Remote Controller FM transmitter for audio 11 How to play a DVD 12 Releasing the Monitor POWER and SOURCE select On Screen Display control 13 PICTURE OSD SETUP DVD setup 16 LANGUAGE DISPLAY AUDIO LOCK OTHERS DVD movie setup 21 Music mode 22 Photo mode 24 Connecting external devices 26 Installation (Professional installation recommended) 27 Connection diagram 28 Troubleshooting 29 Specifications 30 42 English
Contents A Warning 3 Safety precautions 4 Before use 5 About the remote 6 Box contents 6 About discs 7 Name and function of each part 8 Unit Remote Controller FM transmitter for audio 11 How to play a DVD 12 Releasing the Monitor POWER and SOURCE select On Screen Display control 13 PICTURE OSD SETUP DVD setup 16 LANGUAGE DISPLAY AUDIO LOCK OTHERS DVD movie setup 21 Music mode 22 Photo mode 24 Connecting external devices 26 Installation (Professional installation recommended) 27 Connection diagram 28 Troubleshooting 29 Specifications 30 42 English
Instruction Manual
Page 3
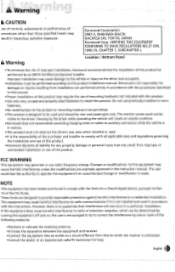
...8226; No modifications to the product or mounting hardware are expressly approved in this manual. •Proper installation of improper installation, Kenwood recommends that may result from installation not performed strictly in accordance with this product. • Use only new, unused and ...procedures described in the instruction manual. A Warning Location : Bottom Panel •To minimize the risk of this product. The monitor screen must not obstruct the driver's rear view when installed or used and viewed by an MECP-Certified professional installer. FCC WARNING This...
...8226; No modifications to the product or mounting hardware are expressly approved in this manual. •Proper installation of improper installation, Kenwood recommends that may result from installation not performed strictly in accordance with this product. • Use only new, unused and ...procedures described in the instruction manual. A Warning Location : Bottom Panel •To minimize the risk of this product. The monitor screen must not obstruct the driver's rear view when installed or used and viewed by an MECP-Certified professional installer. FCC WARNING This...
Instruction Manual
Page 9
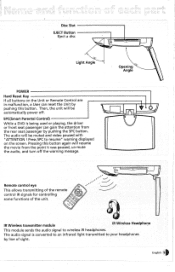
Disc Slot EJECT Button Eject a disc so Light Angle Opening Angle POWER Hard Reset Key If all buttons on the screen. Remote control eye This allows transmitting of the remote control IR signals for controlling some functions of sight. English 4 The audio will ...rear seat passenger by line of the unit. Then, the unit will be automatically power off the warning message. SPC(Smart Parental Control) While a DVD is converted to an infrared light transmitted to wireless IR headphones. cJ000c,),,, or A 0 IR Wireless transmitter module IR Wireless Headphone This module sends ...
Disc Slot EJECT Button Eject a disc so Light Angle Opening Angle POWER Hard Reset Key If all buttons on the screen. Remote control eye This allows transmitting of the remote control IR signals for controlling some functions of sight. English 4 The audio will ...rear seat passenger by line of the unit. Then, the unit will be automatically power off the warning message. SPC(Smart Parental Control) While a DVD is converted to an infrared light transmitted to wireless IR headphones. cJ000c,),,, or A 0 IR Wireless transmitter module IR Wireless Headphone This module sends ...

Instruction Manual
Page 10
POWER CI* sFTGp CD O CD CD CD CD CD CD CD KENWOOD RC-100 DM(DVD MENU) Display the title menu of the loaded DVD disc PBC On/Off Display or skip a title menu of the loaded Video CD disc Shift Key Shift the Modes between Music, Photo & Movie Mode ...if it is changing the value & level on the menu screen X Special Tip ENT These arrow keys are not available in auxiliary mode. Remote Controller POWER Power On/OFF M (Menu) Monitor Setup PREV / Move to the next chapter or track SOURCE DVD, AV1, AV2 PLAY / PAUSE Play/Pause disc play STOP Stop...
POWER CI* sFTGp CD O CD CD CD CD CD CD CD KENWOOD RC-100 DM(DVD MENU) Display the title menu of the loaded DVD disc PBC On/Off Display or skip a title menu of the loaded Video CD disc Shift Key Shift the Modes between Music, Photo & Movie Mode ...if it is changing the value & level on the menu screen X Special Tip ENT These arrow keys are not available in auxiliary mode. Remote Controller POWER Power On/OFF M (Menu) Monitor Setup PREV / Move to the next chapter or track SOURCE DVD, AV1, AV2 PLAY / PAUSE Play/Pause disc play STOP Stop...

Instruction Manual
Page 11
... frequency are FM 88.0MHz - 89.5MHz (Tuning By interval of the unit. 2. Press this button NEXT-'N 4t • NU PREY -J D DVD MENU 1. FM transmitter for FM transmitter on the screen of 100KHz) FM 88.0MHz POWER ON English Press the • (dot) button for 1.5 sec to bring out the control menu...
... frequency are FM 88.0MHz - 89.5MHz (Tuning By interval of the unit. 2. Press this button NEXT-'N 4t • NU PREY -J D DVD MENU 1. FM transmitter for FM transmitter on the screen of 100KHz) FM 88.0MHz POWER ON English Press the • (dot) button for 1.5 sec to bring out the control menu...

Instruction Manual
Page 12
... on the unit to select a desired auxiliary mode(AV1, AV2) or DVD mode. Press the same PWR(Power) button to turn your screen) and open the monitor to open button (located at the front of your power off. Insert a DVD Disc Load a disc in the disc loading slot with the label O0... it will be played automatically. Insert It English You can also adjust the swivel angle. 0 O Push to the desired level. DVD AV1 AV2 3. How to play,a DVD Releasing the Monitor Push the open 225° 90° PWR(Power) and SRC(Source) select 1. Press the SRC(Source) button on the remote...
... on the unit to select a desired auxiliary mode(AV1, AV2) or DVD mode. Press the same PWR(Power) button to turn your screen) and open the monitor to open button (located at the front of your power off. Insert a DVD Disc Load a disc in the disc loading slot with the label O0... it will be played automatically. Insert It English You can also adjust the swivel angle. 0 O Push to the desired level. DVD AV1 AV2 3. How to play,a DVD Releasing the Monitor Push the open 225° 90° PWR(Power) and SRC(Source) select 1. Press the SRC(Source) button on the remote...
Instruction Manual
Page 13
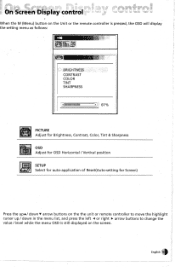
...% PICTURE Adjust for Brightness, Contrast, Color, Tint & Sharpness OSD Adjust for OSD Horizontal / Vertical position SETUP Select for auto-application of Reset(Auto-setting for Screen) Press the up,&/ down in the menu list, and press the left 1 or right ► arrow buttons to move the highlight cursor up / down V. 1141...
...% PICTURE Adjust for Brightness, Contrast, Color, Tint & Sharpness OSD Adjust for OSD Horizontal / Vertical position SETUP Select for auto-application of Reset(Auto-setting for Screen) Press the up,&/ down in the menu list, and press the left 1 or right ► arrow buttons to move the highlight cursor up / down V. 1141...

Instruction Manual
Page 16
... controller is pressed, the DVD OSD will display the DVD setup as follows: Menu Language Disc Audio Disc Subtly Disc Men •.'°h„ LANGUAGE `sy fngli 16:4i Language Select Language in OSD Menu, Disc Audio, Subtitle & Disc Menu Display Select Display mode(Screen frame) & TV Output(...AUTO/PAUNTSC) Audio Select Audio format(Dolby Digital), Sample frequency & Digital output On/Off Lock Input Rating & Password Others Select Load Default & Screen Saver Press the up• / down • arrow buttons on the remote controller to move the highlight cursor up/down in the menu list...
... controller is pressed, the DVD OSD will display the DVD setup as follows: Menu Language Disc Audio Disc Subtly Disc Men •.'°h„ LANGUAGE `sy fngli 16:4i Language Select Language in OSD Menu, Disc Audio, Subtitle & Disc Menu Display Select Display mode(Screen frame) & TV Output(...AUTO/PAUNTSC) Audio Select Audio format(Dolby Digital), Sample frequency & Digital output On/Off Lock Input Rating & Password Others Select Load Default & Screen Saver Press the up• / down • arrow buttons on the remote controller to move the highlight cursor up/down in the menu list...
Instruction Manual
Page 19
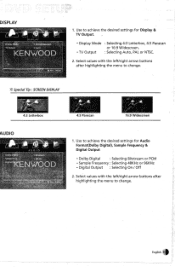
Special Tip : SCREEN DISPLAY 4:3 Letterbox AUDIO 4:3 Panscan 16:9 Widescreen 1. Use to achieve the desired settings for Audio Format(Dolby Digital), Sample Frequency & Digital Output • Dolby Digital : Selecting ...
Special Tip : SCREEN DISPLAY 4:3 Letterbox AUDIO 4:3 Panscan 16:9 Widescreen 1. Use to achieve the desired settings for Audio Format(Dolby Digital), Sample Frequency & Digital Output • Dolby Digital : Selecting ...

Instruction Manual
Page 20
... blocking.(The factory default is a rating limit system for re-setting system. • Screen Saver : Selecting Enable/Disable of Screen saver. A user can decide which ratings can register a password with DVD discs that have been assigned a rating. It only displays 'New'. Select values with the... /right arrow buttons after highlighting the menu to achieve the desired settings for Load Default & La Screen Saver. • Load Default : Loading the factory default for DVD movies. Use to change . Determining how the unit re-acts to a movie disc according to achieve...
... blocking.(The factory default is a rating limit system for re-setting system. • Screen Saver : Selecting Enable/Disable of Screen saver. A user can decide which ratings can register a password with DVD discs that have been assigned a rating. It only displays 'New'. Select values with the... /right arrow buttons after highlighting the menu to achieve the desired settings for Load Default & La Screen Saver. • Load Default : Loading the factory default for DVD movies. Use to change . Determining how the unit re-acts to a movie disc according to achieve...

Instruction Manual
Page 22
... contoller or the unit and select a song or a folder. ADD All Add all songs from the Program. Music mode When a user inserts Music Disc, the screen will show the belows. Press the up A / down ♦ arrow buttons on the remote controller, and moves the highlight cursor upA/ downy on the List...
... contoller or the unit and select a song or a folder. ADD All Add all songs from the Program. Music mode When a user inserts Music Disc, the screen will show the belows. Press the up A / down ♦ arrow buttons on the remote controller, and moves the highlight cursor upA/ downy on the List...

Instruction Manual
Page 24
...the highlight cursor up A/down v in speed. During the full screen mode if a user wants to escape, press the STOP button on the full screen. Photo mode When a user inserts Photo Disc, the screen will show . Manual change the screen to change of Slideshow. >>> is a non-auto-sliding mode. ... remote controller VOL A 90° VOL v *) 90° - In this mode, a user can rotate the photo on the full screen mode by the previev screen or slideshow the selected photo on the remote controller or the unit. J1/8 8.iP9 > > > Start Slideshow Press Slideshow button to be entire...
...the highlight cursor up A/down v in speed. During the full screen mode if a user wants to escape, press the STOP button on the full screen. Photo mode When a user inserts Photo Disc, the screen will show . Manual change the screen to change of Slideshow. >>> is a non-auto-sliding mode. ... remote controller VOL A 90° VOL v *) 90° - In this mode, a user can rotate the photo on the full screen mode by the previev screen or slideshow the selected photo on the remote controller or the unit. J1/8 8.iP9 > > > Start Slideshow Press Slideshow button to be entire...
Instruction Manual
Page 27
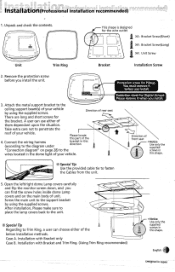
... seat Notice Use only the supplied screws in this shape. 5. Direction of your vehicle. Open the left/right dome Lamp covers carefully and flip the monitor screen down, and you install the unit. Please locate 4. Screw the main unit to the unit. Installation with Bracket and Trim Ring. (Using Trim Ring recommended...
... seat Notice Use only the supplied screws in this shape. 5. Direction of your vehicle. Open the left/right dome Lamp covers carefully and flip the monitor screen down, and you install the unit. Please locate 4. Screw the main unit to the unit. Installation with Bracket and Trim Ring. (Using Trim Ring recommended...

Instruction Manual
Page 29
...that the monitor is turned on the I + 1. Remove the disc from a cold environment to insert Disc y 1. Remove the burned-out bulb. 3. No color The remote control doesn't work properly. Check in Japan Changing the Dome Lamp Bulbs 1. The playback picture is brought from the DVD player. 2. Clean...life. m0. Remove any obstacles between the remote controller and remote control sensor of each Part) Check Point When a disc is poor. screen. 1. Unable to a hot one of the disc, or water will affect the play. 1. Check if the protection screw was removed ...
...that the monitor is turned on the I + 1. Remove the disc from a cold environment to insert Disc y 1. Remove the burned-out bulb. 3. No color The remote control doesn't work properly. Check in Japan Changing the Dome Lamp Bulbs 1. The playback picture is brought from the DVD player. 2. Clean...life. m0. Remove any obstacles between the remote controller and remote control sensor of each Part) Check Point When a disc is poor. screen. 1. Unable to a hot one of the disc, or water will affect the play. 1. Check if the protection screw was removed ...
Instruction Manual
Page 30
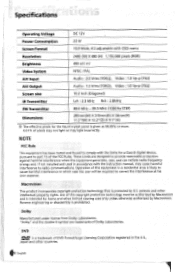
..., if not installed and used in the U.S., Id Japan and other intellectual property rights. patents and other countries. Use of DVD Format/Logo Licensing Corporation registered in accordance with OSD menu Resolution 2400 (W) X 480 (H) 1,152,000 pixels (RGB) Brightness...NTSC / PAL A/V Input Audio : 2.0 Vrms (10m, Video : 1.0 Vp-p (75O) A/V Output Audio : 1.2 Vrms (10KO), Video : 1.0 Vp-p (7552) Screen size 10.2 Inch (Diagonal) h I IR Transmitter Lch : 2.3 MHz Rch : 2.8MHz I I This product incorporates copyright protection technology that is protected by Macrovision II ...
..., if not installed and used in the U.S., Id Japan and other intellectual property rights. patents and other countries. Use of DVD Format/Logo Licensing Corporation registered in accordance with OSD menu Resolution 2400 (W) X 480 (H) 1,152,000 pixels (RGB) Brightness...NTSC / PAL A/V Input Audio : 2.0 Vrms (10m, Video : 1.0 Vp-p (75O) A/V Output Audio : 1.2 Vrms (10KO), Video : 1.0 Vp-p (7552) Screen size 10.2 Inch (Diagonal) h I IR Transmitter Lch : 2.3 MHz Rch : 2.8MHz I I This product incorporates copyright protection technology that is protected by Macrovision II ...


