Instruction Manual
Page 5
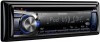
... knob to enter [FUNCTION] mode. 2 Turn the volume knob to select [SETTINGS], then press to enter. 3 Turn the volume knob to select [CLOCK], then press to enter. 4 Turn the volume knob to select [CLOCK ADJUST], then press to update the firmware, see: www.kenwood.com/cs/ce/ English 5 Clock hour ...flashes on the power (or after you turn the volume knob to select [NO] in step 2, [DEMO MODE] appears and the display demonstration starts. CD READ 1*: Automatically ...
... knob to enter [FUNCTION] mode. 2 Turn the volume knob to select [SETTINGS], then press to enter. 3 Turn the volume knob to select [CLOCK], then press to enter. 4 Turn the volume knob to select [CLOCK ADJUST], then press to update the firmware, see: www.kenwood.com/cs/ce/ English 5 Clock hour ...flashes on the power (or after you turn the volume knob to select [NO] in step 2, [DEMO MODE] appears and the display demonstration starts. CD READ 1*: Automatically ...

Instruction Manual
Page 6
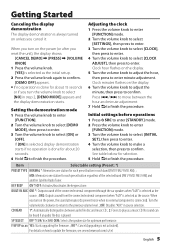
TI: Traffic Information function is received. The illustration and button names used for the difference: KDC-BT648U/ KDC-X695 KDC-X395/ KDC-348U Display window USB terminal Auxiliary input jack Slide open the cover 6 English ST: A stereo broadcast is turned on. EQ: [SYSTEM Q] is set to an EQ mode other than [NATURAL]. (page 28) B.BOOST: [BASS BOOST...
TI: Traffic Information function is received. The illustration and button names used for the difference: KDC-BT648U/ KDC-X695 KDC-X395/ KDC-348U Display window USB terminal Auxiliary input jack Slide open the cover 6 English ST: A stereo broadcast is turned on. EQ: [SYSTEM Q] is set to an EQ mode other than [NATURAL]. (page 28) B.BOOST: [BASS BOOST...
Instruction Manual
Page 7
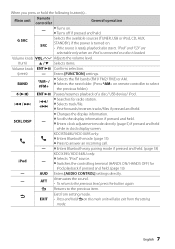
... if pressed and held . (page 13) - Main unit Remote controller General operation - ■ Turns on remote controller to answer an incoming call. - ■ Enters Bluetooth easy pairing mode if pressed and held. (page 18) KDC-X395/ KDC-348U only: iPod - ■ Selects "iPod" source. ■ Switches the controlling terminal (HANDS ON/ HANDS OFF) for...
... if pressed and held . (page 13) - Main unit Remote controller General operation - ■ Turns on remote controller to answer an incoming call. - ■ Enters Bluetooth easy pairing mode if pressed and held. (page 18) KDC-X395/ KDC-348U only: iPod - ■ Selects "iPod" source. ■ Switches the controlling terminal (HANDS ON/ HANDS OFF) for...
Instruction Manual
Page 8
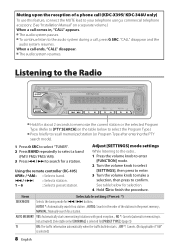
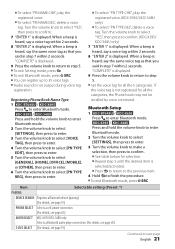
...[SETTINGS] mode settings While listening to the radio... 1 Press the volume knob to enter [FUNCTION] mode. 2 Turn the volume knob to select [SETTINGS], then press to enter. 3 Turn the volume knob to make a selection, then press to finish the procedure. Item Selectable setting (Preset: *) SEEK... a phone call ends, "CALL" disappear. ■ The audio system resumes. "CALL" disappear and the audio system resumes. When a call (KDC-X395/ KDC-348U only) To use this feature, connect the MUTE lead to your telephone using a commercial telephone accessory. (See "Installation Manual" on the table...
...[SETTINGS] mode settings While listening to the radio... 1 Press the volume knob to enter [FUNCTION] mode. 2 Turn the volume knob to select [SETTINGS], then press to enter. 3 Turn the volume knob to make a selection, then press to finish the procedure. Item Selectable setting (Preset: *) SEEK... a phone call ends, "CALL" disappear. ■ The audio system resumes. "CALL" disappear and the audio system resumes. When a call (KDC-X395/ KDC-348U only) To use this feature, connect the MUTE lead to your telephone using a commercial telephone accessory. (See "Installation Manual" on the table...

Instruction Manual
Page 9
...setting (Preset: *) ON: Improves the FM reception (but the stereo effect may be applied the next time Traffic Information function is turned on the external component and start searching. ■ [TI] is selectable only when the source is "FM". Selects the available Program... Type (page 9). Then, press 4 / ¢ to start playing. 3 Turn the volume knob to select "AUX". 2 Turn on . INFORM; SPORTS; SOFT; REL (religious) TALK; MUSIC; CLS (classic) ROCK; COUNTRY; SOFT R&B; LANGUAGE; Portable audio device (...
...setting (Preset: *) ON: Improves the FM reception (but the stereo effect may be applied the next time Traffic Information function is turned on the external component and start searching. ■ [TI] is selectable only when the source is "FM". Selects the available Program... Type (page 9). Then, press 4 / ¢ to start playing. 3 Turn the volume knob to select "AUX". 2 Turn on . INFORM; SPORTS; SOFT; REL (religious) TALK; MUSIC; CLS (classic) ROCK; COUNTRY; SOFT R&B; LANGUAGE; Portable audio device (...

Instruction Manual
Page 10
Press again to select a source other than "USB" or "iPod". 2 Remove the USB device or iPod. Start playing a disc 1 Press SRC to turn on the power. 2 Press SRC to select "CD CHANGER". 10 English Playback starts automatically. USB device (commercially available) CA-U1EX (optional accessory) Apple...the USB device or iPod 1 Press SRC to resume playback. Start playing the disc changer 1 Press SRC to turn on the power. 2 Slide open the cover. 3 Connect a USB device or iPod to turn on the power. 2 Insert a disc into the loading slot. The source automatically switches, and playback starts. ...
Press again to select a source other than "USB" or "iPod". 2 Remove the USB device or iPod. Start playing a disc 1 Press SRC to turn on the power. 2 Press SRC to select "CD CHANGER". 10 English Playback starts automatically. USB device (commercially available) CA-U1EX (optional accessory) Apple...the USB device or iPod 1 Press SRC to resume playback. Start playing the disc changer 1 Press SRC to turn on the power. 2 Slide open the cover. 3 Connect a USB device or iPod to turn on the power. 2 Insert a disc into the loading slot. The source automatically switches, and playback starts. ...
Instruction Manual
Page 11
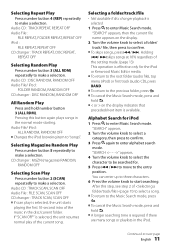
.... 1 Press to confirm. ■ To skips songs, press 4/ ¢. Alphabet Search for . 5 Press 4 / ¢ to move to the entry position. "SEARCH" appears. 2 Turn the volume knob to select a category, then press to confirm. 3 Press again to "songs". Continued to start searching. "SEARCH " appears... current song. "SEARCH" appears, then the current file name appears on the display indicates that preceded/next item is effective only for the iPod or Kenwood Music Editor media. ■ To return to the root folder (audio file), top menu (iPod) or first track (audio CD), press BAND. ■...
.... 1 Press to confirm. ■ To skips songs, press 4/ ¢. Alphabet Search for . 5 Press 4 / ¢ to move to the entry position. "SEARCH" appears. 2 Turn the volume knob to select a category, then press to confirm. 3 Press again to "songs". Continued to start searching. "SEARCH " appears... current song. "SEARCH" appears, then the current file name appears on the display indicates that preceded/next item is effective only for the iPod or Kenwood Music Editor media. ■ To return to the root folder (audio file), top menu (iPod) or first track (audio CD), press BAND. ■...
Instruction Manual
Page 12
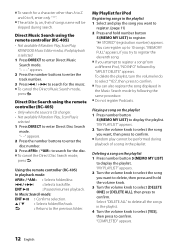
...available if Random Play, Scan Play, KENWOOD Music Editor media, iPod playback is selected. 1 Press DIRECT to enter Direct Disc Search mode. to search for the music. ■ To cancel the Direct Music Search mode, press . "MY PLAYLIST" appears. 2 Turn the volume knob to select the song... controller (RC-405) In playback mode: #FM+ / *AM- : Selects folder/disc. 4 / +¢ : Selects track/file. "MY PLAYLIST" appears. 2 Turn the volume knob to select the song you attempt to register a song from a different iPod, "NO INFO" followed by following the same procedure. ■ Do...
...available if Random Play, Scan Play, KENWOOD Music Editor media, iPod playback is selected. 1 Press DIRECT to enter Direct Disc Search mode. to search for the music. ■ To cancel the Direct Music Search mode, press . "MY PLAYLIST" appears. 2 Turn the volume knob to select the song... controller (RC-405) In playback mode: #FM+ / *AM- : Selects folder/disc. 4 / +¢ : Selects track/file. "MY PLAYLIST" appears. 2 Turn the volume knob to select the song you attempt to register a song from a different iPod, "NO INFO" followed by following the same procedure. ■ Do...
Instruction Manual
Page 13
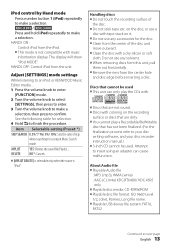
KDC-X395 / KDC-348U Press and hold iPod repeatedly to make a selection, then press to confirm. Discs that cannot be used ■ This unit can cause malfunction. See ... to finish the procedure. Adjust [SETTINGS] mode settings While listening to an iPod or KENWOOD Music Editor media ... 1 Press the volume knob to enter [FUNCTION] mode. 2 Turn the volume knob to select [SETTINGS], then press to enter. 3 Turn the volume knob to your disc writing software, and your disc recorder instruction manual.) ■...
KDC-X395 / KDC-348U Press and hold iPod repeatedly to make a selection, then press to confirm. Discs that cannot be used ■ This unit can cause malfunction. See ... to finish the procedure. Adjust [SETTINGS] mode settings While listening to an iPod or KENWOOD Music Editor media ... 1 Press the volume knob to enter [FUNCTION] mode. 2 Turn the volume knob to select [SETTINGS], then press to enter. 3 Turn the volume knob to your disc writing software, and your disc recorder instruction manual.) ■...
Instruction Manual
Page 15
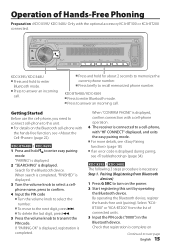
.... By operating the Bluetooth device, register the hands-free unit (pairing). Pairing (Registering from the list of Hands-Free Phoning Preparation : KDC-X395/ KDC-348U: Only with the optional accessory KCA-BT300 or KCA-BT200 connected. Select "KCABT300" or "KCA-BT200" from Bluetooth devices) 1 Press... with a cell-phone operation. 6 The receiver is displayed during paring, see (page 22). Check that registration is complete on Continued to turn on the power. 2 Start registering this unit. ■ For details on the Bluetooth cell-phone with "HF CONNECT" displayed, and exits...
.... By operating the Bluetooth device, register the hands-free unit (pairing). Pairing (Registering from the list of Hands-Free Phoning Preparation : KDC-X395/ KDC-348U: Only with the optional accessory KCA-BT300 or KCA-BT200 connected. Select "KCABT300" or "KCA-BT200" from Bluetooth devices) 1 Press... with a cell-phone operation. 6 The receiver is displayed during paring, see (page 22). Check that registration is complete on Continued to turn on the power. 2 Start registering this unit. ■ For details on the Bluetooth cell-phone with "HF CONNECT" displayed, and exits...
Instruction Manual
Page 16
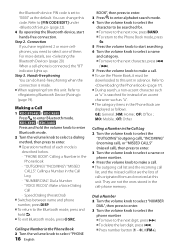
... search mode. 4 Turn the volume knob to select the character to be downloaded to select one of calls originated from this code. Connection If you have registered 2 or more details, see (page 20). For more cellphones, you need to this unit. Step 3. Calling a Number in advance. MO: Mobile ; KDC-X395 / KDC-348U Press and...
... search mode. 4 Turn the volume knob to select the character to be downloaded to select one of calls originated from this code. Connection If you have registered 2 or more details, see (page 20). For more cellphones, you need to this unit. Step 3. Calling a Number in advance. MO: Mobile ; KDC-X395 / KDC-348U Press and...
Instruction Manual
Page 17
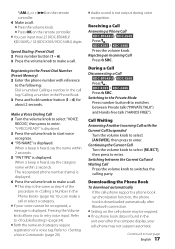
... displayed. 6 Press the volume knob to switches the calling party. KDC-X395 / KDC-348U Press the volume knob. KDC-X395 / KDC-348U Press SRC. When a beep is displayed. You can input max 25 (KDC-BT648U/ KDC-X695) / 32 (KDC-X395/ KDC-348U) digits. Pressing the Volume knob allows you to enter. Switching... recognized, a message is displayed. Registering to the Preset Dial Number (Preset Memory) 2 Enter the phone number with the Current Call Suspended Turn the volume knob to select [ANSWER], then press to start voice recognize. 4 "PB NAME" is displayed. "V-RECG READY" is displayed....
... displayed. 6 Press the volume knob to switches the calling party. KDC-X395 / KDC-348U Press the volume knob. KDC-X395 / KDC-348U Press SRC. When a beep is displayed. You can input max 25 (KDC-BT648U/ KDC-X695) / 32 (KDC-X395/ KDC-348U) digits. Pressing the Volume knob allows you to enter. Switching... recognized, a message is displayed. Registering to the Preset Dial Number (Preset Memory) 2 Enter the phone number with the Current Call Suspended Turn the volume knob to select [ANSWER], then press to start voice recognize. 4 "PB NAME" is displayed. "V-RECG READY" is displayed....

Instruction Manual
Page 18
... be registered for each registered cell-phone. ■ Up to 25 (KDC-BT648U/ KDC-X695)/ 32 (KDC-X395/ KDC-348U) digits can be registered for the first time, registering a cell-phone 2 "SEARCHING" is displayed. 3 Turn the volume knob to select a cellphone name, press to this case, try...five cell-phones have already been registered. Fewer characters can be input depending on cell-phone registration condition: - Bluetooth Setup Preparation : KDC-X395/ KDC-348U: Only with the Current Call Suspended. When search is completed, "FINISHED" is displayed. ENT 38 : Switch between the private ...
... be registered for each registered cell-phone. ■ Up to 25 (KDC-BT648U/ KDC-X695)/ 32 (KDC-X395/ KDC-348U) digits can be registered for the first time, registering a cell-phone 2 "SEARCHING" is displayed. 3 Turn the volume knob to select a cellphone name, press to this case, try...five cell-phones have already been registered. Fewer characters can be input depending on cell-phone registration condition: - Bluetooth Setup Preparation : KDC-X395/ KDC-348U: Only with the Current Call Suspended. When search is completed, "FINISHED" is displayed. ENT 38 : Switch between the private ...
Instruction Manual
Page 19
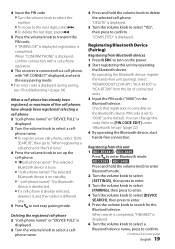
...PIN code is displayed. 3 Turn the volume knob to "0000" as the default. Deleting the registered cell-phone 2 "(cell-phone name)" or "DEVICE FULL" is displayed. 5 Turn the volume knob to select "YES", then press to delete the selected cell-phone. KDC-X395 / KDC-348U Press and hold the... volume knob to confirm. "DELETE" is displayed. 3 Turn the volume knob to next page English 19 Continued to select a cell- "COMPLETED" is completed. Select "KENWOOD BT CD/R-3P1", "KCA-BT300" or "KCA-...
...PIN code is displayed. 3 Turn the volume knob to "0000" as the default. Deleting the registered cell-phone 2 "(cell-phone name)" or "DEVICE FULL" is displayed. 5 Turn the volume knob to select "YES", then press to delete the selected cell-phone. KDC-X395 / KDC-348U Press and hold the... volume knob to confirm. "DELETE" is displayed. 3 Turn the volume knob to next page English 19 Continued to select a cell- "COMPLETED" is completed. Select "KENWOOD BT CD/R-3P1", "KCA-BT300" or "KCA-...
Instruction Manual
Page 20
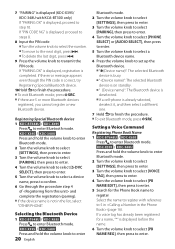
... Bluetooth mode. Setting a Voice Command Registering Phone Book Name 1 KDC-BT648U / KDC-X695 Press to finish the procedure. ■ To exit Bluetooth mode, press SRC. KDC-X395 / KDC-348U Press and hold the volume knob to enter Bluetooth mode. 2 Turn the volume knob to select [SETTINGS], then press to enter.... 3 Turn the volume knob to select [PAIRING], then press to enter. 4 Turn the volume knob to select [S-DVC SELECT...
... Bluetooth mode. Setting a Voice Command Registering Phone Book Name 1 KDC-BT648U / KDC-X695 Press to finish the procedure. ■ To exit Bluetooth mode, press SRC. KDC-X395 / KDC-348U Press and hold the volume knob to enter Bluetooth mode. 2 Turn the volume knob to select [SETTINGS], then press to enter.... 3 Turn the volume knob to select [PAIRING], then press to enter. 4 Turn the volume knob to select [S-DVC SELECT...
Instruction Manual
Page 21
...ENTER 2" is not output during voice tag registration. ■ To select "PB NAME CHK", play the registered voice. (KDC-X395/ KDC-348U only) ■ To select "PN TYPE DEL", delete a voice tag. Turn the volume knob to select "YES", then press to finish the procedure. ■ To exit Bluetooth mode, press SRC.... not be recalled by voice command. KDC-X395 / KDC-348U Press and hold the volume knob to enter Bluetooth mode. 2 Turn the volume knob to select [SETTINGS], then press to enter. 3 Turn the volume knob to select [VOICE TAG], then press to enter. 4 Turn the volume knob to select [PN TYPE...
...ENTER 2" is not output during voice tag registration. ■ To select "PB NAME CHK", play the registered voice. (KDC-X395/ KDC-348U only) ■ To select "PN TYPE DEL", delete a voice tag. Turn the volume knob to select "YES", then press to finish the procedure. ■ To exit Bluetooth mode, press SRC.... not be recalled by voice command. KDC-X395 / KDC-348U Press and hold the volume knob to enter Bluetooth mode. 2 Turn the volume knob to select [SETTINGS], then press to enter. 3 Turn the volume knob to select [VOICE TAG], then press to enter. 4 Turn the volume knob to select [PN TYPE...
Instruction Manual
Page 22
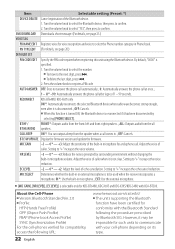
...right speakers. ; Setting to "+" increases the echo cancel reduction. EC LEVEL -2 - 0 * - +2: Adjust the level of caller. Turn the volume knob to select "YES", then press to select the Phone number category in or external microphone is selectable only for conformity with ...phones verified for compatibility, access the following URL: 22 English www.kenwood.com/cs/ce/bt/ ■ The units supporting the Bluetooth function have been certified for KDC-BT648U, KDC-X695 and KDC-X395/KDC-348U with the Bluetooth Standard following the procedure prescribed by surrounding ...
...right speakers. ; Setting to "+" increases the echo cancel reduction. EC LEVEL -2 - 0 * - +2: Adjust the level of caller. Turn the volume knob to select "YES", then press to select the Phone number category in or external microphone is selectable only for conformity with ...phones verified for compatibility, access the following URL: 22 English www.kenwood.com/cs/ce/bt/ ■ The units supporting the Bluetooth function have been certified for KDC-BT648U, KDC-X695 and KDC-X395/KDC-348U with the Bluetooth Standard following the procedure prescribed by surrounding ...
Instruction Manual
Page 23
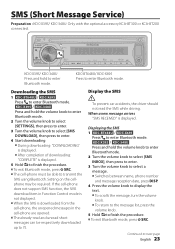
... ■ During downloading: "DOWNLOADING" is displayed. ■ After completion of downloading: "COMPLETE" is displayed. KDC-X395/ KDC-348U Press and hold the volume knob to enter Bluetooth mode. 2 Turn the volume knob to select [SMS INBOX], then press to enter. 3 Turn the volume knob to select a message. ■ Switches between name, phone number and message...
... ■ During downloading: "DOWNLOADING" is displayed. ■ After completion of downloading: "COMPLETE" is displayed. KDC-X395/ KDC-348U Press and hold the volume knob to enter Bluetooth mode. 2 Turn the volume knob to select [SMS INBOX], then press to enter. 3 Turn the volume knob to select a message. ■ Switches between name, phone number and message...

Instruction Manual
Page 25
... tunes to confirm. Adjust [SETTINGS] mode settings While listening to the radio... 1 Press the volume knob to enter [FUNCTION] mode. 2 Turn the volume knob to select [SETTINGS], then press to enter. 3 Turn the volume knob to make no digital broadcast. ; English 25 AUTO MEMORY YES: Automatically starts memorizing 6 stations with good reception...
... tunes to confirm. Adjust [SETTINGS] mode settings While listening to the radio... 1 Press the volume knob to enter [FUNCTION] mode. 2 Turn the volume knob to select [SETTINGS], then press to enter. 3 Turn the volume knob to make no digital broadcast. ; English 25 AUTO MEMORY YES: Automatically starts memorizing 6 stations with good reception...
Instruction Manual
Page 26
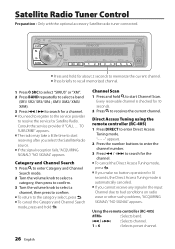
... 10 seconds. 2 Press to receives the current channel. Category and Channel Search 1 Press to enter Category and Channel Search mode. 2 Turn the volume knob to select a category, then press to confirm. 3 Turn the volume knob to select a channel, then press to confirm. ■ To return to the category select, press . ■ To...
... 10 seconds. 2 Press to receives the current channel. Category and Channel Search 1 Press to enter Category and Channel Search mode. 2 Turn the volume knob to select a category, then press to confirm. 3 Turn the volume knob to select a channel, then press to confirm. ■ To return to the category select, press . ■ To...


