Instruction Manual
Page 2
CONTENTS Safety 3 Maintenance Preparation 4 How to attach/detach the faceplate How to reset your unit How to prepare the remote controller (RC-405) Getting Started 5 Canceling the display demonstration Setting the demonstration mode Adjusting the clock Initial settings ...
CONTENTS Safety 3 Maintenance Preparation 4 How to attach/detach the faceplate How to reset your unit How to prepare the remote controller (RC-405) Getting Started 5 Canceling the display demonstration Setting the demonstration mode Adjusting the clock Initial settings ...

Instruction Manual
Page 4
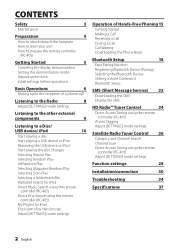
...places such as on the dashboard. ■ Lithium battery. Also avoid places with your unit If this unit fails to operate properly, press the reset 1 button. 2 The unit returns to use the remote controller for the first time, pull out the insulation sheet. Danger of explosion if the... or the like. ■ Keep battery out of reach of children and in original package until ready to factory settings when the reset button is pressed. 3 Reset button If the effectiveness of used batteries promptly. Insulation sheet ■ Do not expose the faceplate to prepare the remote controller (RC...
...places such as on the dashboard. ■ Lithium battery. Also avoid places with your unit If this unit fails to operate properly, press the reset 1 button. 2 The unit returns to use the remote controller for the first time, pull out the insulation sheet. Danger of explosion if the... or the like. ■ Keep battery out of reach of children and in original package until ready to factory settings when the reset button is pressed. 3 Reset button If the effectiveness of used batteries promptly. Insulation sheet ■ Do not expose the faceplate to prepare the remote controller (RC...
Instruction Manual
Page 5
... for each preset button regardless of the connected external component through the car speakers when "AUX" is done for about 15 seconds or if you reset the unit), the display shows: [CANCEL DEMO] \ [PRESS] \ [VOLUME KNOB] 1 Press the volume knob. [YES] is selected as the ...appears and the display demonstration starts. CD READ 1*: Automatically distinguishes between the hour and minute adjustment. 7 Hold to update the firmware, see: www.kenwood.com/cs/ce/ English 5 Clock hour flashes on how to finish the procedure. See table below for optimum performance. BUILT-IN AUX ON1 *:...
... for each preset button regardless of the connected external component through the car speakers when "AUX" is done for about 15 seconds or if you reset the unit), the display shows: [CANCEL DEMO] \ [PRESS] \ [VOLUME KNOB] 1 Press the volume knob. [YES] is selected as the ...appears and the display demonstration starts. CD READ 1*: Automatically distinguishes between the hour and minute adjustment. 7 Hold to update the firmware, see: www.kenwood.com/cs/ce/ English 5 Clock hour flashes on how to finish the procedure. See table below for optimum performance. BUILT-IN AUX ON1 *:...
Instruction Manual
Page 30
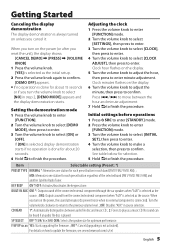
... 1) C Mounting sleeve 1) D Wiring harness 1) E Removal tool 2) F Flat head screw (for Nissan cars 4) G Round head screw (for Toyota cars 4) H Microphone (3 m) (KDC-X695 only 1) Basic procedure 1 Remove the key from the ignition switch, then disconnect the · terminal of the car battery. 2 Make proper input and output.... \ (page 32) 3 Install the unit to your car. \ (page 33) 4 Reconnect the · terminal of the car battery. 5 Reset the unit. (page 4) Warning ■ The unit can be turned on and off with vinyl tape or other similar material. Therefore, the speaker wire...
... 1) C Mounting sleeve 1) D Wiring harness 1) E Removal tool 2) F Flat head screw (for Nissan cars 4) G Round head screw (for Toyota cars 4) H Microphone (3 m) (KDC-X695 only 1) Basic procedure 1 Remove the key from the ignition switch, then disconnect the · terminal of the car battery. 2 Make proper input and output.... \ (page 32) 3 Install the unit to your car. \ (page 33) 4 Reconnect the · terminal of the car battery. 5 Reset the unit. (page 4) Warning ■ The unit can be turned on and off with vinyl tape or other similar material. Therefore, the speaker wire...
Instruction Manual
Page 34
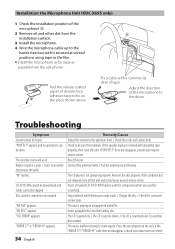
... installation surface. 3 Install the microphone. 4 Wire the microphone cable up to the hands-free box with insulating tape properly, then reset the unit. Press the reset button on the unit. Adjust the direction of tape. Check to be skipped. "PROTECT" appears and no operations can be heard. ... If the condition did not improve, turn off the unit and consult your nearest service center. "NA FILE" appears. Installation the Microphone Unit (KDC-X695 only) 1 Check the installation position of double-face adhesive tape to fix on rough roads. / Change the disc. / Check the cords...
... installation surface. 3 Install the microphone. 4 Wire the microphone cable up to the hands-free box with insulating tape properly, then reset the unit. Press the reset button on the unit. Adjust the direction of tape. Check to be skipped. "PROTECT" appears and no operations can be heard. ... If the condition did not improve, turn off the unit and consult your nearest service center. "NA FILE" appears. Installation the Microphone Unit (KDC-X695 only) 1 Check the installation position of double-face adhesive tape to fix on rough roads. / Change the disc. / Check the cords...
Instruction Manual
Page 35
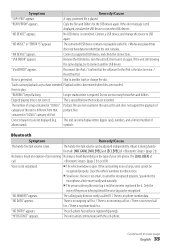
... Remedy/Cause "COPY PRO" appears. Reconnect the iPod. / Confirm that podcast files. Bluetooth Symptom Remedy/Cause The hands-free talk volume is the latest version. / Reset the iPod. Voice is not recognized. ■ The vehicle window is no phone book list. The calling party does not notify a caller ID. / There is...
... Remedy/Cause "COPY PRO" appears. Reconnect the iPod. / Confirm that podcast files. Bluetooth Symptom Remedy/Cause The hands-free talk volume is the latest version. / Reset the iPod. Voice is not recognized. ■ The vehicle window is no phone book list. The calling party does not notify a caller ID. / There is...

Instruction Manual
Page 36
... book or the SMS disconnects the sound. "NO ACCESS" appears. If this message still appears, press the reset button on the selected band or source. 36 English If this message still appears, press the reset button on again. No more Bluetooth device cannot be registered in the phone book. Pairing error. The...
... book or the SMS disconnects the sound. "NO ACCESS" appears. If this message still appears, press the reset button on the selected band or source. 36 English If this message still appears, press the reset button on again. No more Bluetooth device cannot be registered in the phone book. Pairing error. The...


