

Instruction Manual
Page 4
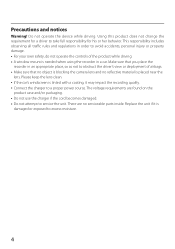
... Warning! Using this product does not change the requirement for a driver to obstruct the driver's view or deployment of the product while driving. • A window mount is needed when using the recorder in an appropriate place, so as not to take full responsibility for his or her behavior. Make sure that...
... Warning! Using this product does not change the requirement for a driver to obstruct the driver's view or deployment of the product while driving. • A window mount is needed when using the recorder in an appropriate place, so as not to take full responsibility for his or her behavior. Make sure that...

Instruction Manual
Page 7
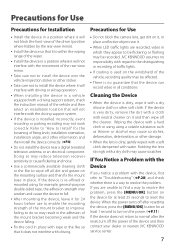
... the device can record video in the adhesion of the device and then contact your dealer or nearest JVC KENWOOD service center. 7 If the device is re-affixed or mounted using a volatile substance such as thinner or alcohol may be affected. • There is no responsibility with...button for the loosening of the vehicle, recording quality may not work correctly. JVC KENWOOD assumes no guarantee that it with a soft cloth dampened with neutral cleaner on the mounting surface and then fix the mount base in which they appear to reset the device. Rubbing the lens strongly with...
... the device can record video in the adhesion of the device and then contact your dealer or nearest JVC KENWOOD service center. 7 If the device is re-affixed or mounted using a volatile substance such as thinner or alcohol may be affected. • There is no responsibility with...button for the loosening of the vehicle, recording quality may not work correctly. JVC KENWOOD assumes no guarantee that it with a soft cloth dampened with neutral cleaner on the mounting surface and then fix the mount base in which they appear to reset the device. Rubbing the lens strongly with...
Instruction Manual
Page 8
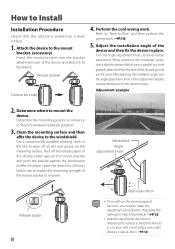
...sky and ground are the same. After adjusting the installation angle, turn the angle adjustment knob of the double-sided tape on the mounting surface. Use a commercially available cleaning cloth or the like to wipe off the release paper of the adjustment bracket counterclockwise to Match...in reference to Install Installation Procedure Check that the camera field of about 200 m. (ÁP.12) Attach the device to the mount bracket. (accessory) Insert the mount bracket into the bracket attachment part of the device and attach it in a location with a level surface and a sight ...
...sky and ground are the same. After adjusting the installation angle, turn the angle adjustment knob of the double-sided tape on the mounting surface. Use a commercially available cleaning cloth or the like to wipe off the release paper of the adjustment bracket counterclockwise to Match...in reference to Install Installation Procedure Check that the camera field of about 200 m. (ÁP.12) Attach the device to the mount bracket. (accessory) Insert the mount bracket into the bracket attachment part of the device and attach it in a location with a level surface and a sight ...
Instruction Manual
Page 9
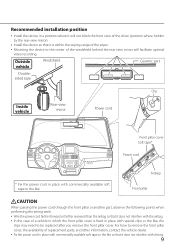
..., the clips may need to the center of the windshield behind the rear-view mirror will not block the front view of the wiper. • Mounting the device to be replaced after you remove the front pillar cover. Airbag Front pillar CAUTION When passing the power cord through the front pillar...
..., the clips may need to the center of the windshield behind the rear-view mirror will not block the front view of the wiper. • Mounting the device to be replaced after you remove the front pillar cover. Airbag Front pillar CAUTION When passing the power cord through the front pillar...
Instruction Manual
Page 11
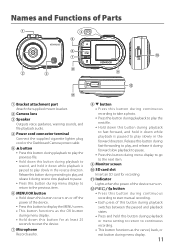
... turn on . @ button • Press this button during continuous recording to start manual recording. • Each press of Parts 1 4 5 6 0 7 8 9 2 3 @ ! 1 Bracket attachment part Attach the supplied mount bracket. 2 Camera lens 3 Speaker Outputs voice guidance, warning sounds, and file playback audio. 4 Power cord connector terminal Connect the supplied cigarette lighter plug cord or...
... turn on . @ button • Press this button during continuous recording to start manual recording. • Each press of Parts 1 4 5 6 0 7 8 9 2 3 @ ! 1 Bracket attachment part Attach the supplied mount bracket. 2 Camera lens 3 Speaker Outputs voice guidance, warning sounds, and file playback audio. 4 Power cord connector terminal Connect the supplied cigarette lighter plug cord or...
Instruction Manual
Page 12
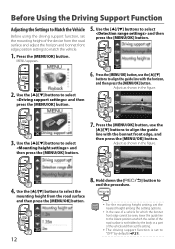
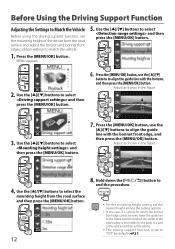
... bonnet front edge, and then press the [MENU/OK] button. Hold down the [ end the procedure. ] button to • For the mounting height setting, set the nearest height among the setting options. • In the case of a vehicle for which the bonnet front edge cannot be... buttons to select and then press the [MENU/OK] button. 1 2 2. Adjust as shown in the figure. 2 1 13 2 1 4. Use the [J]/[K] buttons to select the mounting height from the road surface and adjust the horizon and bonnet front edge position settings to match the vehicle. 1. MENU appears. 5. Adjust as shown in...
... bonnet front edge, and then press the [MENU/OK] button. Hold down the [ end the procedure. ] button to • For the mounting height setting, set the nearest height among the setting options. • In the case of a vehicle for which the bonnet front edge cannot be... buttons to select and then press the [MENU/OK] button. 1 2 2. Adjust as shown in the figure. 2 1 13 2 1 4. Use the [J]/[K] buttons to select the mounting height from the road surface and adjust the horizon and bonnet front edge position settings to match the vehicle. 1. MENU appears. 5. Adjust as shown in...
Instruction Manual
Page 21
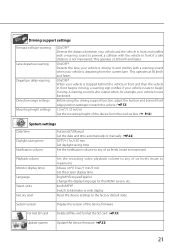
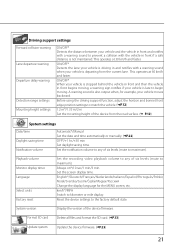
... device settings to kilometer or mile display. Driving support settings Forward collision warning Lane departure warning Departure delay warning Detection range settings Mounting height settings ON/OFF* Detects the distance between your vehicle and the vehicle in front and notifies with a warning sound to prevent... function, adjust the horizon and bonnet front edge position settings to match the vehicle. (ÁP.12) 1.2 m*/1.35 m/2 m Set the mounting height of six levels (mute to begin moving. Set the notification volume to maximum). This operates at 60 km/h and faster. Always on...
... device settings to kilometer or mile display. Driving support settings Forward collision warning Lane departure warning Departure delay warning Detection range settings Mounting height settings ON/OFF* Detects the distance between your vehicle and the vehicle in front and notifies with a warning sound to prevent... function, adjust the horizon and bonnet front edge position settings to match the vehicle. (ÁP.12) 1.2 m*/1.35 m/2 m Set the mounting height of six levels (mute to begin moving. Set the notification volume to maximum). This operates at 60 km/h and faster. Always on...
Instruction Manual
Page 34
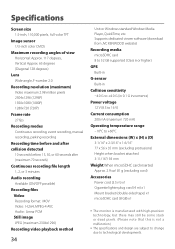
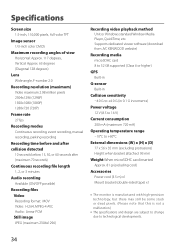
Supports dedicated viewer software (download from JVC KENWOOD website) Recording media microSDHC card 8 to 32 GB supported (Class 6 or higher) GPS Built-in G-sensor Built-in Collision sensitivity -4.0 G to +4.0 G (in 0.1 G increments) Power voltage ... bracket attached: 3-11/16"/ 93 mm Weight When microSDHC card inserted Approx. 2.9 oz/ 81 g (excluding cord) Accessories Power cord (3.5 m) x1 Cigarette lighter plug cord (4 m) x1 Mount bracket (double-sided tape) x1 microSDHC card (8 GB) x1 • The monitor is manufactured with high-precision technology, but there may still be some stuck...
Supports dedicated viewer software (download from JVC KENWOOD website) Recording media microSDHC card 8 to 32 GB supported (Class 6 or higher) GPS Built-in G-sensor Built-in Collision sensitivity -4.0 G to +4.0 G (in 0.1 G increments) Power voltage ... bracket attached: 3-11/16"/ 93 mm Weight When microSDHC card inserted Approx. 2.9 oz/ 81 g (excluding cord) Accessories Power cord (3.5 m) x1 Cigarette lighter plug cord (4 m) x1 Mount bracket (double-sided tape) x1 microSDHC card (8 GB) x1 • The monitor is manufactured with high-precision technology, but there may still be some stuck...
Operation Manual
Page 8
... a coating, it may impact the recording quality. • Connect the charger to obstruct the driver's view or deployment of the product while driving. • A window mount is needed when using the recorder in a car. Make sure that no object is placed near the lens. Please keep the lens clean. • If...
... a coating, it may impact the recording quality. • Connect the charger to obstruct the driver's view or deployment of the product while driving. • A window mount is needed when using the recorder in a car. Make sure that no object is placed near the lens. Please keep the lens clean. • If...
Operation Manual
Page 11
... place a reflective object near a digital terrestrial television antenna or an electrical component. JVC KENWOOD assumes no guarantee that the device can record video in all dirt and grease on the mounting surface and then fix the mount base in place. If you notice a problem with the device, first refer to "... turns off after the reset, turn on it and then wipe off the power of the device and then contact your dealer or nearest JVC KENWOOD service center. 7 Refer to "How to install the device where it will interfere with driving or airbag operation. • When installing the...
... place a reflective object near a digital terrestrial television antenna or an electrical component. JVC KENWOOD assumes no guarantee that the device can record video in all dirt and grease on the mounting surface and then fix the mount base in place. If you notice a problem with the device, first refer to "... turns off after the reset, turn on it and then wipe off the power of the device and then contact your dealer or nearest JVC KENWOOD service center. 7 Refer to "How to install the device where it will interfere with driving or airbag operation. • When installing the...

Operation Manual
Page 12
Adjust the installation angle of the device and then fix the device in place. Adjustment example 2. Clean the mounting surface and then affix the device to mount the device. How to Install Installation Procedure Check that the vehicle is parallel to a level ground surface and that the camera...." 3. Use a commercially available cleaning cloth or the like to fix the device in place. Perform the cord wiring work . (ÁP.10) 5. Mount bracket Camera lens side 4. Turn the angle adjustment knob clockwise before use the driving support function, you will use to enable the...
Adjust the installation angle of the device and then fix the device in place. Adjustment example 2. Clean the mounting surface and then affix the device to mount the device. How to Install Installation Procedure Check that the vehicle is parallel to a level ground surface and that the camera...." 3. Use a commercially available cleaning cloth or the like to fix the device in place. Perform the cord wiring work . (ÁP.10) 5. Mount bracket Camera lens side 4. Turn the angle adjustment knob clockwise before use the driving support function, you will use to enable the...

Operation Manual
Page 13
... the power cord in place with commercially available soft tape or the like so that it is within the wiping range of the wiper. • Mounting the device to the center of a vehicle in which the front pillar cover is fixed in place with special clips or the like, the clips...
... the power cord in place with commercially available soft tape or the like so that it is within the wiping range of the wiper. • Mounting the device to the center of a vehicle in which the front pillar cover is fixed in place with special clips or the like, the clips...

Operation Manual
Page 15
... to play , and release it down while playback is paused to start manual recording. • Each press of Parts 1 4 5 6 0 7 8 9 2 3 @ ! 1 Bracket attachment part Attach the supplied mount bracket. 2 Camera lens 3 Speaker Outputs voice guidance, warning sounds, and file playback audio. 4 Power cord connector terminal Connect the supplied cigarette lighter plug cord or...
... to play , and release it down while playback is paused to start manual recording. • Each press of Parts 1 4 5 6 0 7 8 9 2 3 @ ! 1 Bracket attachment part Attach the supplied mount bracket. 2 Camera lens 3 Speaker Outputs voice guidance, warning sounds, and file playback audio. 4 Power cord connector terminal Connect the supplied cigarette lighter plug cord or...
Operation Manual
Page 16
... 13 1 2 1 3. Before Using the Driving Support Function Adjusting the Settings to Match the Vehicle Before using the driving support function, set to select the mounting height from the road surface and adjust the horizon and bonnet front edge position settings to select and then press the [MENU/OK] button. 1 2 2. ... to "OFF" by the body or a part of the vehicle and then set the setting. • The driving support function is set the mounting height of the road surface is not hidden by default (ÁP.21). Hold down the [ end the procedure. ] button to • For the...
... 13 1 2 1 3. Before Using the Driving Support Function Adjusting the Settings to Match the Vehicle Before using the driving support function, set to select the mounting height from the road surface and adjust the horizon and bonnet front edge position settings to select and then press the [MENU/OK] button. 1 2 2. ... to "OFF" by the body or a part of the vehicle and then set the setting. • The driving support function is set the mounting height of the road surface is not hidden by default (ÁP.21). Hold down the [ end the procedure. ] button to • For the...
Operation Manual
Page 25
...maintained. km/h*/MPH Switch to begin moving. Reset the device settings to match the vehicle. (ÁP.12) 1.2 m*/1.35 m/2 m Set the mounting height of six levels (mute to maximum). Format SD card Delete all files and format the SD card. (ÁP.13) Update system Update.... This operates at 30 km/h and faster. Driving support settings Forward collision warning Lane departure warning Departure delay warning Detection range settings Mounting height settings ON/OFF* Detects the distance between your vehicle and the vehicle in front and notifies with a warning sound to prevent ...
...maintained. km/h*/MPH Switch to begin moving. Reset the device settings to match the vehicle. (ÁP.12) 1.2 m*/1.35 m/2 m Set the mounting height of six levels (mute to maximum). Format SD card Delete all files and format the SD card. (ÁP.13) Update system Update.... This operates at 30 km/h and faster. Driving support settings Forward collision warning Lane departure warning Departure delay warning Detection range settings Mounting height settings ON/OFF* Detects the distance between your vehicle and the vehicle in front and notifies with a warning sound to prevent ...
Operation Manual
Page 38
Supports dedicated viewer software (download from JVC KENWOOD website) Recording media microSDHC card 8 to 32 GB supported (Class 6 or higher) GPS Built-in G-sensor Built-in Collision sensitivity -4.0 G to +4.0 G (in 0.1 G increments) Power ...(W) x (H) x (D) 77 x 56 x 35 mm (excluding protrusions) Height when bracket attached: 93 mm Weight When microSDHC card inserted Approx. 81 g (excluding cord) Accessories Power cord (3.5 m) x1 Mount bracket (double-sided tape) x1 • The monitor is manufactured with high-precision technology, but there may still be some stuck or dead pixels. (Please...
Supports dedicated viewer software (download from JVC KENWOOD website) Recording media microSDHC card 8 to 32 GB supported (Class 6 or higher) GPS Built-in G-sensor Built-in Collision sensitivity -4.0 G to +4.0 G (in 0.1 G increments) Power ...(W) x (H) x (D) 77 x 56 x 35 mm (excluding protrusions) Height when bracket attached: 93 mm Weight When microSDHC card inserted Approx. 81 g (excluding cord) Accessories Power cord (3.5 m) x1 Mount bracket (double-sided tape) x1 • The monitor is manufactured with high-precision technology, but there may still be some stuck or dead pixels. (Please...

