
Instruction Manual
Page 3
... trouble, or due to the use of this document were created for explaining the operating procedures. CONTENTS Precautions for Use...7 How to Install...8 How to Wire...10 Names and Functions of Parts 11 Before Using the Driving Support Function 12 Basic Operations...13 Recording...16 Playback...17 Protecting or Deleting Files...18 Various Settings...19 Using the PC Application...24 Troubleshooting...28 Appendix...31 Specifications...34 • The screen...
... trouble, or due to the use of this document were created for explaining the operating procedures. CONTENTS Precautions for Use...7 How to Install...8 How to Wire...10 Names and Functions of Parts 11 Before Using the Driving Support Function 12 Basic Operations...13 Recording...16 Playback...17 Protecting or Deleting Files...18 Various Settings...19 Using the PC Application...24 Troubleshooting...28 Appendix...31 Specifications...34 • The screen...
Instruction Manual
Page 5
... drop objects on . Nonadhesive generic screen protectors designed specifically for extended periods of time. • Do not place anything on top of moisture condensation, allow the device to dry out completely before use paper towels to clean the screen. • Never attempt to disassemble, repair or make any attempt at repair could damage your device, its parts or accessories. • To...
... drop objects on . Nonadhesive generic screen protectors designed specifically for extended periods of time. • Do not place anything on top of moisture condensation, allow the device to dry out completely before use paper towels to clean the screen. • Never attempt to disassemble, repair or make any attempt at repair could damage your device, its parts or accessories. • To...

Instruction Manual
Page 7
... a driving support system, check the instruction manual of the vehicle and then select an installation location that it . • When LED traffic lights are unable to find a way to resolve the problem, press the [MENU/OK] button on it and then wipe off all conditions. Refer to "How to Install" for at least 1 second to turn off after resetting the device, press the [MENU/OK] button for Use...
... a driving support system, check the instruction manual of the vehicle and then select an installation location that it . • When LED traffic lights are unable to find a way to resolve the problem, press the [MENU/OK] button on it and then wipe off all conditions. Refer to "How to Install" for at least 1 second to turn off after resetting the device, press the [MENU/OK] button for Use...
Instruction Manual
Page 8
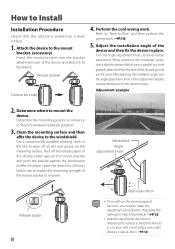
... then perform the wiring work . Determine where to the windshield. Turn the angle adjustment knob clockwise before use the driving support function, you will use to enable the mounting strength of the mount bracket to improve. Clean the mounting surface and then affix the device to mount the device. Windshield Angle adjustment knob Release paper 8 Rear-view mirror • If you need to make the adjustments described in "Adjusting the Settings to Match...
... then perform the wiring work . Determine where to the windshield. Turn the angle adjustment knob clockwise before use the driving support function, you will use to enable the mounting strength of the mount bracket to improve. Clean the mounting surface and then affix the device to mount the device. Windshield Angle adjustment knob Release paper 8 Rear-view mirror • If you need to make the adjustments described in "Adjusting the Settings to Match...
Instruction Manual
Page 9
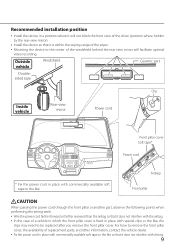
... with driving. 9 Recommended installation position • Install the device in a position where it will facilitate optimal video recording. Outside vehicle Windshield Ceramic part Doublesided tape Clip Inside vehicle Rear-view mirror Power cord Front pillar cover Soft tape* Power cord * Fix the power cord in which the front pillar cover is within the wiping range of the wiper. • Mounting the device to be replaced after you remove...
... with driving. 9 Recommended installation position • Install the device in a position where it will facilitate optimal video recording. Outside vehicle Windshield Ceramic part Doublesided tape Clip Inside vehicle Rear-view mirror Power cord Front pillar cover Soft tape* Power cord * Fix the power cord in which the front pillar cover is within the wiping range of the wiper. • Mounting the device to be replaced after you remove...
Instruction Manual
Page 10
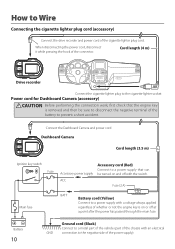
... switch. Fuse (2 A) Main fuse BATT Battery cord (Yellow) Connect to prevent a short accident. How to a power supply that the engine key is removed and then be turned on or off with an electrical GND connection to the cigarette lighter socket. Connect the Dashboard Camera and power cord. Dashboard Camera Cord length (3.5 m) Ignition key switch Fuse Accessory power supply ACC Accessory cord (Red) Connect to Wire Connecting the cigarette lighter plug cord (accessory) Connect the drive...
... switch. Fuse (2 A) Main fuse BATT Battery cord (Yellow) Connect to prevent a short accident. How to a power supply that the engine key is removed and then be turned on or off with an electrical GND connection to the cigarette lighter socket. Connect the Dashboard Camera and power cord. Dashboard Camera Cord length (3.5 m) Ignition key switch Fuse Accessory power supply ACC Accessory cord (Red) Connect to Wire Connecting the cigarette lighter plug cord (accessory) Connect the drive...
Instruction Manual
Page 11
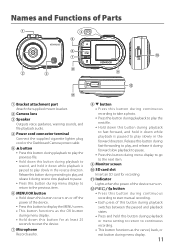
... this button during menu display. 11 Indicator Lights when the power of the device turns on or off the power of Parts 1 4 5 6 0 7 8 9 2 3 @ ! 1 Bracket attachment part Attach the supplied mount bracket. 2 Camera lens 3 Speaker Outputs voice guidance, warning sounds, and file playback audio. 4 Power cord connector terminal Connect the supplied cigarette lighter plug cord or the Dashboard Camera power cable. J button 5 • Press this button during playback to play the previous file. • Hold down this button during menu display...
... this button during menu display. 11 Indicator Lights when the power of the device turns on or off the power of Parts 1 4 5 6 0 7 8 9 2 3 @ ! 1 Bracket attachment part Attach the supplied mount bracket. 2 Camera lens 3 Speaker Outputs voice guidance, warning sounds, and file playback audio. 4 Power cord connector terminal Connect the supplied cigarette lighter plug cord or the Dashboard Camera power cable. J button 5 • Press this button during playback to play the previous file. • Hold down this button during menu display...
Instruction Manual
Page 12
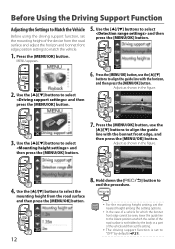
... the mounting height setting, set to "OFF" by the body or a part of the device from the road surface and then press the [MENU/OK] button. 1 2 1 12 2 8. Use the [J]/[K] buttons to select and then press the [MENU/OK] button. 2 7. Use the [J]/[K] buttons to select and then press the [MENU/OK] button. 1 2 2. Adjust as shown in the figure. 2 1 13 2 1 4. Before Using the Driving Support Function Adjusting the Settings to Match the Vehicle Before using the driving support function, set the mounting...
... the mounting height setting, set to "OFF" by the body or a part of the device from the road surface and then press the [MENU/OK] button. 1 2 1 12 2 8. Use the [J]/[K] buttons to select and then press the [MENU/OK] button. 2 7. Use the [J]/[K] buttons to select and then press the [MENU/OK] button. 1 2 2. Adjust as shown in the figure. 2 1 13 2 1 4. Before Using the Driving Support Function Adjusting the Settings to Match the Vehicle Before using the driving support function, set the mounting...

Instruction Manual
Page 13
... the [MENU/OK] button. 1 2 1 5. To protect the battery, remove the cigarette lighter plug when you hear a clicking sound. Press the [MENU/OK] button. To Turn the Power On/Off Manually When the accessories power (ACC) is on, the power of the device and starts continuous recording. Be careful with the device. 1. Formatting an SD Card Before using the power code (ÁP.10), turning off the accessories power (ACC) turns off the power of...
... the [MENU/OK] button. 1 2 1 5. To protect the battery, remove the cigarette lighter plug when you hear a clicking sound. Press the [MENU/OK] button. To Turn the Power On/Off Manually When the accessories power (ACC) is on, the power of the device and starts continuous recording. Be careful with the device. 1. Formatting an SD Card Before using the power code (ÁP.10), turning off the accessories power (ACC) turns off the power of...
Instruction Manual
Page 15
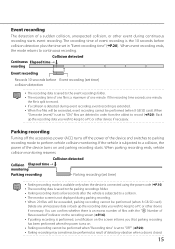
...recording starts. You can confirm whether there is an excess number of files with the "8 Number of files exceeded" indicator on the recording screen (ÁP.16). • If parking recording is performed, a notification on the screen informs you wish to keep to a PC or other... (when 8 GB SD card). Event recording The detection of the device turns on . • Parking recording cannot be performed when "Recording time" is set time) • Parking recording mode is available only when the device is connected using the power code (ÁP.10) • The recording data is saved to the ...
...recording starts. You can confirm whether there is an excess number of files with the "8 Number of files exceeded" indicator on the recording screen (ÁP.16). • If parking recording is performed, a notification on the screen informs you wish to keep to a PC or other... (when 8 GB SD card). Event recording The detection of the device turns on . • Parking recording cannot be performed when "Recording time" is set time) • Parking recording mode is available only when the device is connected using the power code (ÁP.10) • The recording data is saved to the ...

Instruction Manual
Page 19
.... ] button to the selected item. 3. MENU appears. Press the [MENU/OK] button. Use the [J]/[K] buttons to select an item and then press the [MENU/OK] button. 1 2 1 Repeat the same operation according to Parking recording settings Video recording settings Driving support settings System settings • Except for the recording described in the following order. Various Settings Operation with MENU Perform operations such as playback and configuring video recording settings on the MENU screen. 1. The MENU screen of step 2 changes in...
.... ] button to the selected item. 3. MENU appears. Press the [MENU/OK] button. Use the [J]/[K] buttons to select an item and then press the [MENU/OK] button. 1 2 1 Repeat the same operation according to Parking recording settings Video recording settings Driving support settings System settings • Except for the recording described in the following order. Various Settings Operation with MENU Perform operations such as playback and configuring video recording settings on the MENU screen. 1. The MENU screen of step 2 changes in...
Instruction Manual
Page 21
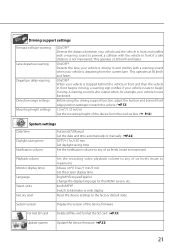
This operates at 30 km/h and faster. Playback volume Monitor display timer Language Select units Factory reset Set the recording video playback volume to any of six levels (mute to maximum). Reset the device settings to kilometer or mile display. A warning sound is also output when, for the MENU screen, etc. Always on*/10 sec/1 min/3 min Set the screen display time. ON/OFF* When your vehicle is stopped behind the vehicle in front and...
This operates at 30 km/h and faster. Playback volume Monitor display timer Language Select units Factory reset Set the recording video playback volume to any of six levels (mute to maximum). Reset the device settings to kilometer or mile display. A warning sound is also output when, for the MENU screen, etc. Always on*/10 sec/1 min/3 min Set the screen display time. ON/OFF* When your vehicle is stopped behind the vehicle in front and...
Instruction Manual
Page 24
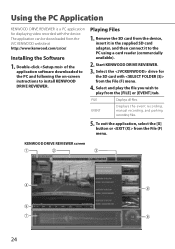
... (F) menu. Start KENWOOD DRIVE REVIEWER. 3. Select the drive for displaying video recorded with from the File (F) menu. 4. The application can be downloaded from the device, insert it in the supplied SD card adapter, and then connect it to the PC using a card reader (commercially available). 2. To exit the application, select the [X] button or from the [FILE] or [EVENT] tab. KENWOOD DRIVE REVIEWER screen 1 2 3 4 6 5 7 8 24 Select and play the file you wish to install KENWOOD DRIVE REVIEWER. Using...
... (F) menu. Start KENWOOD DRIVE REVIEWER. 3. Select the drive for displaying video recorded with from the File (F) menu. 4. The application can be downloaded from the device, insert it in the supplied SD card adapter, and then connect it to the PC using a card reader (commercially available). 2. To exit the application, select the [X] button or from the [FILE] or [EVENT] tab. KENWOOD DRIVE REVIEWER screen 1 2 3 4 6 5 7 8 24 Select and play the file you wish to install KENWOOD DRIVE REVIEWER. Using...

Instruction Manual
Page 28
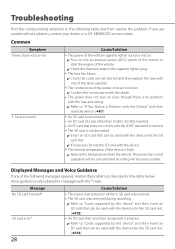
...) switch of the vehicle or start the engine of the vehicle. åå Check the insertion state of the cigarette lighter plug. • The fuse has blown. åå Check the cords are not shorted and then replace the fuse with one of the same capacity. • The connections of the power cord are unable to "Cards supported by this device...
...) switch of the vehicle or start the engine of the vehicle. åå Check the insertion state of the cigarette lighter plug. • The fuse has blown. åå Check the cords are not shorted and then replace the fuse with one of the same capacity. • The connections of the power cord are unable to "Cards supported by this device...

Operation Manual
Page 7
... Act. • Please note that differ from the actual screens or examples of Parts 11 Before Using the Driving Support Function 12 Basic Operations...13 Recording...16 Playback...17 Protecting or Deleting Files...18 Various Settings...19 Using the PC Application...24 Troubleshooting...28 Appendix...31 Specifications...34 • The screen images and operation examples in this document were created for any damages suffered...
... Act. • Please note that differ from the actual screens or examples of Parts 11 Before Using the Driving Support Function 12 Basic Operations...13 Recording...16 Playback...17 Protecting or Deleting Files...18 Various Settings...19 Using the PC Application...24 Troubleshooting...28 Appendix...31 Specifications...34 • The screen images and operation examples in this document were created for any damages suffered...
Operation Manual
Page 11
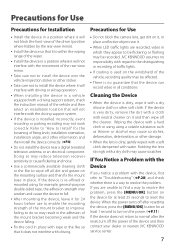
... the problem, press the [MENU/OK] button on the device for at least 1 second to turn off the power of the device and then contact your dealer or nearest JVC KENWOOD service center. 7 Precautions for Use Precautions for Installation • Install the device in a position where it will not block the front view of the driver (position where hidden by the rear-view mirror). • Install the device so...
... the problem, press the [MENU/OK] button on the device for at least 1 second to turn off the power of the device and then contact your dealer or nearest JVC KENWOOD service center. 7 Precautions for Use Precautions for Installation • Install the device in a position where it will not block the front view of the driver (position where hidden by the rear-view mirror). • Install the device so...

Operation Manual
Page 12
... a location with a level surface and a sight distance of about 200 m. (ÁP.12) Perform the cord wiring work . (ÁP.10) 5. Turn the angle adjustment knob clockwise before use the driving support function, you will use to enable the mounting strength of the mount bracket to improve. Clean the mounting surface and then affix the device to mount the device. Windshield Angle adjustment knob Release paper 8 Rear-view mirror • If you need to make...
... a location with a level surface and a sight distance of about 200 m. (ÁP.12) Perform the cord wiring work . (ÁP.10) 5. Turn the angle adjustment knob clockwise before use the driving support function, you will use to enable the mounting strength of the mount bracket to improve. Clean the mounting surface and then affix the device to mount the device. Windshield Angle adjustment knob Release paper 8 Rear-view mirror • If you need to make...

Operation Manual
Page 15
... continuous recording to start manual recording. • Each press of Parts 1 4 5 6 0 7 8 9 2 3 @ ! 1 Bracket attachment part Attach the supplied mount bracket. 2 Camera lens 3 Speaker Outputs voice guidance, warning sounds, and file playback audio. 4 Power cord connector terminal Connect the supplied cigarette lighter plug cord or the Dashboard Camera power cable. Indicator Lights when the power of the device turns on or off the power of the device. • Press this button during playback to rewind...
... continuous recording to start manual recording. • Each press of Parts 1 4 5 6 0 7 8 9 2 3 @ ! 1 Bracket attachment part Attach the supplied mount bracket. 2 Camera lens 3 Speaker Outputs voice guidance, warning sounds, and file playback audio. 4 Power cord connector terminal Connect the supplied cigarette lighter plug cord or the Dashboard Camera power cable. Indicator Lights when the power of the device turns on or off the power of the device. • Press this button during playback to rewind...

Operation Manual
Page 23
... recording settings Video recording settings Driving support settings System settings • Except for the recording described in the following order. Hold down the [ end the procedure. ] button to the selected item. 3. Playback 2. Various Settings Operation with MENU Perform operations such as playback and configuring video recording settings on the MENU screen. 1. The MENU screen of step 2 changes in "Recording at Any Location (Forcibly Recording)," recording is not possible while the menu is displayed...
... recording settings Video recording settings Driving support settings System settings • Except for the recording described in the following order. Hold down the [ end the procedure. ] button to the selected item. 3. Playback 2. Various Settings Operation with MENU Perform operations such as playback and configuring video recording settings on the MENU screen. 1. The MENU screen of step 2 changes in "Recording at Any Location (Forcibly Recording)," recording is not possible while the menu is displayed...
Operation Manual
Page 32
... replace the fuse with one of the same capacity. • The connections of the power cord are unable to find a solution, contact your dealer or a JVC KENWOOD service center. If you are incorrect. åå Confirm the connections with the device into the SD card slot. åå If necessary, format the SD card with the * mark. The protection circuit operation...
... replace the fuse with one of the same capacity. • The connections of the power cord are unable to find a solution, contact your dealer or a JVC KENWOOD service center. If you are incorrect. åå Confirm the connections with the device into the SD card slot. åå If necessary, format the SD card with the * mark. The protection circuit operation...


