
Quick Start Guide
Page 7
... R-CAM Interruption Front Camera Selects the type of rear camera to be set to "CAM"in [AUD Key Longer than 1 second. Initialize Initialization resets the settings made using the Panel Color SET process to the previous screen. For the adjustment method, refer to "ON", camera ...adjustment screen appears. Turn this setting on the EXT SW Control screen is connected. When setting to the manual of CMOS-300. Panel Color Coordinate SET Select a color [Blue] ... [White] Sets the selected color. [Adjust] Sets and registers favorite color to "ON", the...
... R-CAM Interruption Front Camera Selects the type of rear camera to be set to "CAM"in [AUD Key Longer than 1 second. Initialize Initialization resets the settings made using the Panel Color SET process to the previous screen. For the adjustment method, refer to "ON", camera ...adjustment screen appears. Turn this setting on the EXT SW Control screen is connected. When setting to the manual of CMOS-300. Panel Color Coordinate SET Select a color [Blue] ... [White] Sets the selected color. [Adjust] Sets and registers favorite color to "ON", the...
Quick Start Guide
Page 21
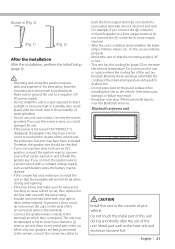
...may be turned on and off with the ignition key. English | 21 Also avoid places with vinyl tape or other similar material. on the panel surface when installing the unit to cause a short circuit, then replace the old fuse with one with the same rating. • Insulate unconnected ... to ground the unit to a negative 12V DC power supply. • Do not install the unit in a spot exposed to both the rear output terminals (do not mix front and rear). shown in (Fig. 2). (Fig. 1) (Fig. 2) After the Installation After the installation, perform the Initial Setup (page 6). ¤ •...
...may be turned on and off with the ignition key. English | 21 Also avoid places with vinyl tape or other similar material. on the panel surface when installing the unit to cause a short circuit, then replace the old fuse with one with the same rating. • Insulate unconnected ... to ground the unit to a negative 12V DC power supply. • Do not install the unit in a spot exposed to both the rear output terminals (do not mix front and rear). shown in (Fig. 2). (Fig. 1) (Fig. 2) After the Installation After the installation, perform the Initial Setup (page 6). ¤ •...
dnx7180 (pdf)
Page 108
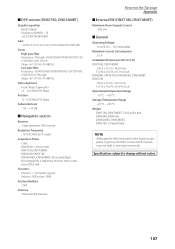
... Frequency: Through, 30/40/50/60/70/80/90/100/120 /150/180/ 220/ 250 Hz Slope: -6/-12/-18/-24 dB/Oct. Time alignment Front/ Rear/ Subwoofer : 0 - 14.4 ft (0.07 ft Step) Position : 0 - 5.58 ft (0.07 ft Step) Subwoofer level : -50 - +10 dB ■■Navigation...sensitivity GPS receiver Reception Frequency : 1575.42 MHz (C/A code) Acquisition Times Cold : DNX5180: < 38 seconds DNX7180, DNX7480BT, DNX6980, DNX6180, DNX6040EX, DNX6480BT: 38 seconds (typ) (On average for the liquid crystal panel is given as 99.99% or more, 0.01% of the sky) Accuracy Position : < 10 meters, typical Velocity : 0....
... Frequency: Through, 30/40/50/60/70/80/90/100/120 /150/180/ 220/ 250 Hz Slope: -6/-12/-18/-24 dB/Oct. Time alignment Front/ Rear/ Subwoofer : 0 - 14.4 ft (0.07 ft Step) Position : 0 - 5.58 ft (0.07 ft Step) Subwoofer level : -50 - +10 dB ■■Navigation...sensitivity GPS receiver Reception Frequency : 1575.42 MHz (C/A code) Acquisition Times Cold : DNX5180: < 38 seconds DNX7180, DNX7480BT, DNX6980, DNX6180, DNX6040EX, DNX6480BT: 38 seconds (typ) (On average for the liquid crystal panel is given as 99.99% or more, 0.01% of the sky) Accuracy Position : < 10 meters, typical Velocity : 0....
Quick Start Guide
Page 22
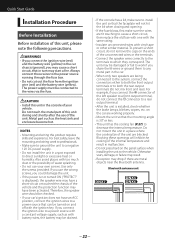
... with the same rating. • Insulate unconnected wires with vinyl tape or other similar material. To prevent a short circuit, do not mix front and rear). Do not touch the metal part of this product requires skills and experience. CAUTION • Install this unit, please note the following precautions. Metal part... use the wrong screws, you share the wires or ground them to any metal part in malfunction. • Do not press hard on the panel surface when installing the unit to both the front output terminals or to the vehicle. If you use your own screws. The unit may be...
... with the same rating. • Insulate unconnected wires with vinyl tape or other similar material. To prevent a short circuit, do not mix front and rear). Do not touch the metal part of this product requires skills and experience. CAUTION • Install this unit, please note the following precautions. Metal part... use the wrong screws, you share the wires or ground them to any metal part in malfunction. • Do not press hard on the panel surface when installing the unit to both the front output terminals or to the vehicle. If you use your own screws. The unit may be...

