Instruction Manual
Page 2
...11 Adjusting the panel angle 11 Adjusting the volume 11 Putting the unit in standby 12 Turning off the screen 12 Switching screens 13 AV SOURCE OPERATIONS Selecting the playback source ...... 14 Displaying the source control screen ..........14 Displaying all sources and items 15 Customizing the screen ........15 Disc operations 16 Playing a disc 16 Playable disc types 17 Playback operations 18 settings 22 USB operations 23 Playing a USB device 23 Listening to the iPod/iPhone device 25 iPod/iPhone playback operations from the unit 26 Selecting an audio/video file from the menu...
...11 Adjusting the panel angle 11 Adjusting the volume 11 Putting the unit in standby 12 Turning off the screen 12 Switching screens 13 AV SOURCE OPERATIONS Selecting the playback source ...... 14 Displaying the source control screen ..........14 Displaying all sources and items 15 Customizing the screen ........15 Disc operations 16 Playing a disc 16 Playable disc types 17 Playback operations 18 settings 22 USB operations 23 Playing a USB device 23 Listening to the iPod/iPhone device 25 iPod/iPhone playback operations from the unit 26 Selecting an audio/video file from the menu...
Instruction Manual
Page 3
... monitor panel and touch panel. For safety... • Do not raise the volume level too much, as air bags. - You can select the indication language from the actual displays or panels. English 3 Before use WARNINGS: (To prevent accidents and damage) • DO NOT install any unit or wire any complicated operations. If you need to operate the unit while driving, be sure to factory settings when the Reset button is...
... monitor panel and touch panel. For safety... • Do not raise the volume level too much, as air bags. - You can select the indication language from the actual displays or panels. English 3 Before use WARNINGS: (To prevent accidents and damage) • DO NOT install any unit or wire any complicated operations. If you need to operate the unit while driving, be sure to factory settings when the Reset button is...
Instruction Manual
Page 4
... help. This equipment may generate or use radio frequency energy. DDX790/DDX770/DDX470/DDX370: FCC WARNING This equipment may cause harmful interference to radio communications, if it in hazardous radiation exposure. DDX790/DDX770/DDX470/DDX370: CAUTION Use of controls or adjustments or performance of a weaker class. Changes or modifications to this unit when shipped from that interference will not occur in a particular installation...
... help. This equipment may generate or use radio frequency energy. DDX790/DDX770/DDX470/DDX370: FCC WARNING This equipment may cause harmful interference to radio communications, if it in hazardous radiation exposure. DDX790/DDX770/DDX470/DDX370: CAUTION Use of controls or adjustments or performance of a weaker class. Changes or modifications to this unit when shipped from that interference will not occur in a particular installation...
Instruction Manual
Page 5
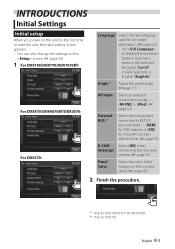
... Settings Initial setup When you power on the unit for the first time or reset the unit, the initial setting screen appears. • You can also change the settings on -screen information. (☞ page 52) • Set to EXT I/F input terminal - [OEM] for ADS adapter or [SXi] for SiriusXM Connect Vehicle Tuner. (☞ page 52) R-CAM Select [ON] when Interrupt connecting the rear view camera. (☞ page 52) Panel Color Select the color of the buttons...
... Settings Initial setup When you power on the unit for the first time or reset the unit, the initial setting screen appears. • You can also change the settings on -screen information. (☞ page 52) • Set to EXT I/F input terminal - [OEM] for ADS adapter or [SXi] for SiriusXM Connect Vehicle Tuner. (☞ page 52) R-CAM Select [ON] when Interrupt connecting the rear view camera. (☞ page 52) Panel Color Select the color of the buttons...
Instruction Manual
Page 10
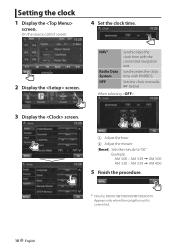
... procedure. * Only for DDX7070BT/DDX4070BT/DDX3070. Synchronizes the clock time with the connected navigation unit. Appears only when the navigation unit is connected. 10 English Sets the clock manually. (☞ below) When selecting : 3 Display the screen. 1 Adjust the hour 2 Adjust the minute [Reset]: Sets the minute to "00." Setting the clock 1 Display the screen. NAV * Radio Data System OFF Synchronizes the clock time with FM RBDS. Example: AM 3:00 - On the source control screen: 4 Set the clock time. 2 Display the screen.
... procedure. * Only for DDX7070BT/DDX4070BT/DDX3070. Synchronizes the clock time with the connected navigation unit. Appears only when the navigation unit is connected. 10 English Sets the clock manually. (☞ below) When selecting : 3 Display the screen. 1 Adjust the hour 2 Adjust the minute [Reset]: Sets the minute to "00." Setting the clock 1 Display the screen. NAV * Radio Data System OFF Synchronizes the clock time with FM RBDS. Example: AM 3:00 - On the source control screen: 4 Set the clock time. 2 Display the screen.
Instruction Manual
Page 13
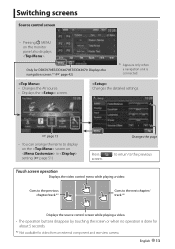
... source. • Displays the screen. English 13 Switching screens Source control screen • Pressing MENU on in setting. (☞ page 51) Changes the page Press [ screen. ] to return to the previous Touch screen operation Displays the video control menu while playing a video. Only for DDX7070BT/DDX4070BT/DDX3070: Displays the navigation screen.*1 (☞ page 42) *1 Appears only when a navigation unit is done for about 5 seconds. *2 Not available for video from an external component and rear view camera. Changes...
... source. • Displays the screen. English 13 Switching screens Source control screen • Pressing MENU on in setting. (☞ page 51) Changes the page Press [ screen. ] to return to the previous Touch screen operation Displays the video control menu while playing a video. Only for DDX7070BT/DDX4070BT/DDX3070: Displays the navigation screen.*1 (☞ page 42) *1 Appears only when a navigation unit is done for about 5 seconds. *2 Not available for video from an external component and rear view camera. Changes...
Instruction Manual
Page 14
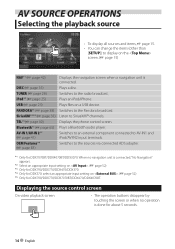
Plays an iPod/iPhone. Displays the phone control screen. Plays a Bluetooth audio player. Switches to an external component connected to the sources via connected ADS adapter. *1 Only for DDX7070BT/DDX4070BT/DDX3070. Switches to AV-IN1 and iPod/AV-IN2 input terminals. Displaying the source control screen On video playback screen • The operation buttons disappear by touching the screen or when no navigation unit is connected, "No Navigation" appears. *2 Select an appropriate input setting on . (☞ page 52) *3 Only for DDX790/DDX770/DDX470/DDX370. *4 Only...
Plays an iPod/iPhone. Displays the phone control screen. Plays a Bluetooth audio player. Switches to an external component connected to the sources via connected ADS adapter. *1 Only for DDX7070BT/DDX4070BT/DDX3070. Switches to AV-IN1 and iPod/AV-IN2 input terminals. Displaying the source control screen On video playback screen • The operation buttons disappear by touching the screen or when no navigation unit is connected, "No Navigation" appears. *2 Select an appropriate input setting on . (☞ page 52) *3 Only for DDX790/DDX770/DDX470/DDX370. *4 Only...
Instruction Manual
Page 22
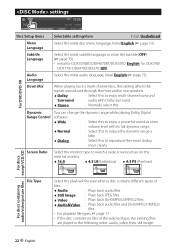
...-channel disc, this setting affects the signals reproduced through the front and/or rear speakers. ♦ Dolby : Select this to enjoy multi-channel surround Surround audio with its full dynamic range. ♦ Normal : Select this to reduce the dynamic range a little. ♦ Dialog : Select this to reproduce the movie dialog more clearly. Screen Ratio Select the monitor type to enjoy a powerful sound at a low volume level...
...-channel disc, this setting affects the signals reproduced through the front and/or rear speakers. ♦ Dolby : Select this to enjoy multi-channel surround Surround audio with its full dynamic range. ♦ Normal : Select this to reduce the dynamic range a little. ♦ Dialog : Select this to reproduce the movie dialog more clearly. Screen Ratio Select the monitor type to enjoy a powerful sound at a low volume level...
Instruction Manual
Page 23
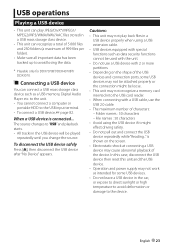
... the car, or expose to direct sunlight or high temperature to avoid deformation or damage to the USB input terminal. • To connect a USB device, ☞ page 82. In this case, disconnect the USB device then reset this unit and the USB device. • Operation and power supply may not work as a USB memory, Digital Audio Player etc. File names : 50 characters • Avoid using a USB extension cable. • USB devices equipped with special functions such...
... the car, or expose to direct sunlight or high temperature to avoid deformation or damage to the USB input terminal. • To connect a USB device, ☞ page 82. In this case, disconnect the USB device then reset this unit and the USB device. • Operation and power supply may not work as a USB memory, Digital Audio Player etc. File names : 50 characters • Avoid using a USB extension cable. • USB devices equipped with special functions such...
Instruction Manual
Page 25
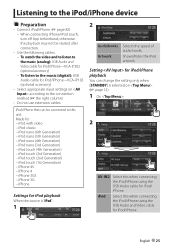
... when connecting the iPod/iPhone using the USB Audio and Video cable for iPod/iPhone playback You can be started after connection. • Use the following cables: - iPod with video - iPod touch (1st Generation) - iPod Select this when connecting the iPod/iPhone using the USB Audio cable for iPod playback When the source is selected on according to the music (digital): USB Audio cable for iPod/iPhone-KCA-iP102 (optional accessory) • Select appropriate input settings on . (☞ page 12) 1 On : 2 AV-IN2 Select this unit: Made for iPod/iPhone-KCA...
... when connecting the iPod/iPhone using the USB Audio and Video cable for iPod/iPhone playback You can be started after connection. • Use the following cables: - iPod with video - iPod touch (1st Generation) - iPod Select this when connecting the iPod/iPhone using the USB Audio cable for iPod playback When the source is selected on according to the music (digital): USB Audio cable for iPod/iPhone-KCA-iP102 (optional accessory) • Select appropriate input settings on . (☞ page 12) 1 On : 2 AV-IN2 Select this unit: Made for iPod/iPhone-KCA...

Instruction Manual
Page 28
Listening to the radio Band no./preset no./the station frequency currently tuned in Text information • Pressing [
Listening to the radio Band no./preset no./the station frequency currently tuned in Text information • Pressing [

Instruction Manual
Page 42
... Settings for navigation unit 1 On : 3 Guidance Volume NAV Mute NAV Setup Select front speakers used for the navigation unit. 42 English Press [Enter] to attenuate the sound coming out of speakers other than the front speakers during navigation guidance. Adjust the volume of the navigation guidance. (0 to 35) Select [ON] to display the setup screen for the navigation unit. See the instruction manual supplied for the navigation guidance. To view the navigation 2 screen...
... Settings for navigation unit 1 On : 3 Guidance Volume NAV Mute NAV Setup Select front speakers used for the navigation unit. 42 English Press [Enter] to attenuate the sound coming out of speakers other than the front speakers during navigation guidance. Adjust the volume of the navigation guidance. (0 to 35) Select [ON] to display the setup screen for the navigation unit. See the instruction manual supplied for the navigation guidance. To view the navigation 2 screen...

Instruction Manual
Page 44
...front or rear speakers (high pass filter). Flat Changes level of the frequency. Q Factor Adjusts the width of Bass/ Middle/Treble to 0. Adjusting the crossover frequency 1 On : 2 2 3 Adjust the sound of "Selecting a preset sound mode," then... Bass EXT Activates/deactivates bass. Frequency Selects frequency. SW Level Adjusts subwoofer level.* The adjustments are stored and is activated. * Adjustable only when the subwoofer is set to adjust, then make adjustment. Adjusts the cross over frequency. Selects the band 3 Select the item to . 44 English Level Adjusts level...
...front or rear speakers (high pass filter). Flat Changes level of the frequency. Q Factor Adjusts the width of Bass/ Middle/Treble to 0. Adjusting the crossover frequency 1 On : 2 2 3 Adjust the sound of "Selecting a preset sound mode," then... Bass EXT Activates/deactivates bass. Frequency Selects frequency. SW Level Adjusts subwoofer level.* The adjustments are stored and is activated. * Adjustable only when the subwoofer is set to adjust, then make adjustment. Adjusts the cross over frequency. Selects the band 3 Select the item to . 44 English Level Adjusts level...
Instruction Manual
Page 53
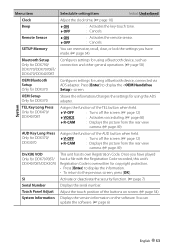
OEM Setup Only for DDX370 Shows the information/changes the settings for using a Bluetooth device, connected via ADS adapter. SETUP Memory You can update the software. (☞ page 6) English 53 Press [Enter] to the previous screen, press [OK]. System TEL Key Long Press Only for DDX470/ DDX4070BT Assigns the function of the TEL button when held. ♦ V-OFF : Turns off the screen. (☞ page 12) ♦ VOICE : Activates voice...
OEM Setup Only for DDX370 Shows the information/changes the settings for using a Bluetooth device, connected via ADS adapter. SETUP Memory You can update the software. (☞ page 6) English 53 Press [Enter] to the previous screen, press [OK]. System TEL Key Long Press Only for DDX470/ DDX4070BT Assigns the function of the TEL button when held. ♦ V-OFF : Turns off the screen. (☞ page 12) ♦ VOICE : Activates voice...
Instruction Manual
Page 56
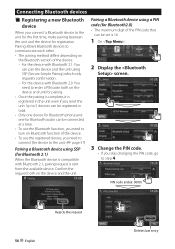
... the unit using SSP (for Bluetooth audio can be set is registered in total. • Only one device for Bluetooth phone and one for Bluetooth 2.1) When the Bluetooth device is compatible with Bluetooth 2.0: You need to the unit for the first time, make pairing between the unit and the device for pairing. • Once the pairing is complete, it is 16. 1 On : 2 Display the screen. 3 Change the PIN code. • If you need to turn on Bluetooth function of the device. - Pairing allows Bluetooth devices...
... the unit using SSP (for Bluetooth audio can be set is registered in total. • Only one device for Bluetooth phone and one for Bluetooth 2.1) When the Bluetooth device is compatible with Bluetooth 2.0: You need to the unit for the first time, make pairing between the unit and the device for pairing. • Once the pairing is complete, it is 16. 1 On : 2 Display the screen. 3 Change the PIN code. • If you need to turn on Bluetooth function of the device. - Pairing allows Bluetooth devices...
Instruction Manual
Page 58
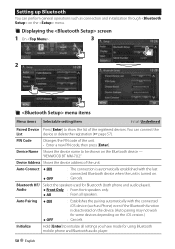
... device address of the unit. • Enter a new PIN code, then press [Enter]. Setting up Bluetooth You can connect the List device or delete the registration (☞ page 57). Audio ♦ Front Only : From front speakers only. ♦ All : From all settings you have made for Bluetooth (both phone and audio player). PIN Code Changes the PIN code of the unit. "KENWOOD BT MM-7U2." Displaying the screen 1 On : 3 2 menu items Menu items Selectable setting/item Initial: Underlined Paired Device...
... device address of the unit. • Enter a new PIN code, then press [Enter]. Setting up Bluetooth You can connect the List device or delete the registration (☞ page 57). Audio ♦ Front Only : From front speakers only. ♦ All : From all settings you have made for Bluetooth (both phone and audio player). PIN Code Changes the PIN code of the unit. "KENWOOD BT MM-7U2." Displaying the screen 1 On : 3 2 menu items Menu items Selectable setting/item Initial: Underlined Paired Device...

Instruction Manual
Page 76
... the tracks using other players. Replace the battery. Connect the antenna firmly. • Recordable/Rewritable discs cannot be a problem Symptom Remedy/Cause No sound comes out of files is displayed on the screen. (☞ page 12) Reset the unit. (☞ page 3) The remote controller* does not work . using a compliant application on the external monitor. Tracks are not played back as the source, set to [AV-IN]. * For DDX790/DDX770/DDX470/DDX370...
... the tracks using other players. Replace the battery. Connect the antenna firmly. • Recordable/Rewritable discs cannot be a problem Symptom Remedy/Cause No sound comes out of files is displayed on the screen. (☞ page 12) Reset the unit. (☞ page 3) The remote controller* does not work . using a compliant application on the external monitor. Tracks are not played back as the source, set to [AV-IN]. * For DDX790/DDX770/DDX470/DDX370...
Instruction Manual
Page 78
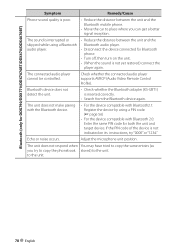
... distance between the unit and the Bluetooth audio player. • Disconnect the device connected for Bluetooth phone. • Turn off, then turn on its instructions, try to copy the phonebook stored) to the unit. Check whether the connected audio player supports AVRCP (Audio Video Remote Control Profile). If the PIN code of the device is not indicated on the unit. • (When the sound is inserted correctly. • Search from the Bluetooth device again. The unit does not...
... distance between the unit and the Bluetooth audio player. • Disconnect the device connected for Bluetooth phone. • Turn off, then turn on its instructions, try to copy the phonebook stored) to the unit. Check whether the connected audio player supports AVRCP (Audio Video Remote Control Profile). If the PIN code of the device is not indicated on the unit. • (When the sound is inserted correctly. • Search from the Bluetooth device again. The unit does not...
Instruction Manual
Page 79
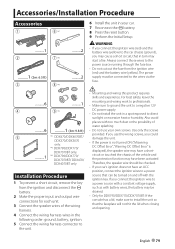
... power source running through the fuse box. • Do not cut out the fuse from the ignition and disconnect the · battery. 2 Make the proper input and output wire connections for each unit. 3 Connect the speaker wires of water splashing. • Do not use the wrong screws, you could damage the unit. • If the power is not turned ON ("Miswiring DC Offset Error", "Warning DC Offset Error" is displayed), the speaker wire...
... power source running through the fuse box. • Do not cut out the fuse from the ignition and disconnect the · battery. 2 Make the proper input and output wire connections for each unit. 3 Connect the speaker wires of water splashing. • Do not use the wrong screws, you could damage the unit. • If the power is not turned ON ("Miswiring DC Offset Error", "Warning DC Offset Error" is displayed), the speaker wire...
Instruction Manual
Page 81
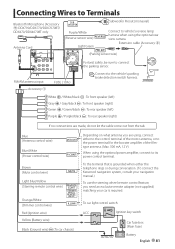
.../ DDX470/DDX4070BT only Antenna Cord Subwoofer Preout (monaural) Purple/White (Reverse sensor wire) Light Green Connect to vehicle's reverse lamp harness when using the optional power amplifier, connect to its power control terminal. FM/AM antenna input Accessory 1 FUSE ( 10A ) ⁄ Connect to connect the parking sensor. White ª / White/black · : To front speaker (left) Gray ª / Gray/black · : To front speaker (right) Green ª / Green/black · : To rear speaker...
.../ DDX470/DDX4070BT only Antenna Cord Subwoofer Preout (monaural) Purple/White (Reverse sensor wire) Light Green Connect to vehicle's reverse lamp harness when using the optional power amplifier, connect to its power control terminal. FM/AM antenna input Accessory 1 FUSE ( 10A ) ⁄ Connect to connect the parking sensor. White ª / White/black · : To front speaker (left) Gray ª / Gray/black · : To front speaker (right) Green ª / Green/black · : To rear speaker...


