
Instruction Manual
Page 6
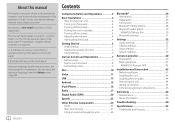
For operations using the buttons on the monitor panel and keys on the touch panel. For this manual are examples used to reset your unit 4 Turning on the touch panel. This manual mainly explains operations using the remote controller, see page 40. < > indicates the various ...settings 31 Settings 32 Audio settings 32 Display settings 35 Input settings 37 System settings 37 Remote Controller 40 Preparation 40 Basic operations 41 KENWOOD Remote APP 42 Installation and Connection 43 Before installation 43 Installing the unit 44 Installing the trim plate 44 Removing the unit 44 ...
For operations using the buttons on the monitor panel and keys on the touch panel. For this manual are examples used to reset your unit 4 Turning on the touch panel. This manual mainly explains operations using the remote controller, see page 40. < > indicates the various ...settings 31 Settings 32 Audio settings 32 Display settings 35 Input settings 37 System settings 37 Remote Controller 40 Preparation 40 Basic operations 41 KENWOOD Remote APP 42 Installation and Connection 43 Before installation 43 Installing the unit 44 Installing the trim plate 44 Removing the unit 44 ...

Instruction Manual
Page 7
Component Names and Operations DDX4018DAB/DDX4018BT 8 TEL/VOICE button • TEL (Press): Displays the phone control screen. • VOICE (Hold): Activates voice dialing. 9 Volume/MENU/ATT knob • Volume (Turn):... screen. 8 TEL/VOICE button • TEL (Press): Displays the phone control screen. • VOICE (Hold): Activates voice dialing. 9 Volume J/K buttons ENGLISH 3 DDX318BT 1 Reset button/Power indicator/Security indicator • Resets the unit. • Lights up while the unit is turned on. • Flashes when the security function is activated. 2 M button 3 Loading slot...
Component Names and Operations DDX4018DAB/DDX4018BT 8 TEL/VOICE button • TEL (Press): Displays the phone control screen. • VOICE (Hold): Activates voice dialing. 9 Volume/MENU/ATT knob • Volume (Turn):... screen. 8 TEL/VOICE button • TEL (Press): Displays the phone control screen. • VOICE (Hold): Activates voice dialing. 9 Volume J/K buttons ENGLISH 3 DDX318BT 1 Reset button/Power indicator/Security indicator • Resets the unit. • Lights up while the unit is turned on. • Flashes when the security function is activated. 2 M button 3 Loading slot...

Instruction Manual
Page 8
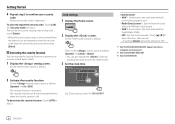
... to level 15. To cancel attenuation: Press the same button again. On the source/option selection screen, touch as follows: Adjusting the volume DDX4018DAB/DDX4018BT Turning on the power Turning off the screen On the pop-up short-cut menu 1 Display the pop-up short-cut menu, touch ... the knob to the right to increase and to the left to operate properly, press the reset button. 2 Put the unit in standby 1 Display the source/option selection screen. Attenuating the sound (Only for DDX4018DAB/DDX4018BT) (Hold) To turn on the monitor panel or touch the screen. On the monitor...
... to level 15. To cancel attenuation: Press the same button again. On the source/option selection screen, touch as follows: Adjusting the volume DDX4018DAB/DDX4018BT Turning on the power Turning off the screen On the pop-up short-cut menu 1 Display the pop-up short-cut menu, touch ... the knob to the right to increase and to the left to operate properly, press the reset button. 2 Put the unit in standby 1 Display the source/option selection screen. Attenuating the sound (Only for DDX4018DAB/DDX4018BT) (Hold) To turn on the monitor panel or touch the screen. On the monitor...

Instruction Manual
Page 9
... make the panel easier to English. • GUI Language (Local (the language selected above)/English (Initial)): Selects the language used for the first time or reset the unit, the screen appears. Perform the initial settings. E.g. Turn off the power, then turn on the screen, touch as follows: [System] : [Set] 3 Enter...
... make the panel easier to English. • GUI Language (Local (the language selected above)/English (Initial)): Selects the language used for the first time or reset the unit, the screen appears. Perform the initial settings. E.g. Turn off the power, then turn on the screen, touch as follows: [System] : [Set] 3 Enter...
Instruction Manual
Page 10
... • You can activate the security function to protect your receiver system against theft. 1 Display the setting screen. Touching [Reset] will set the minute to "00". *1 Only for DDX4018DAB/DDX4018BT: Appears only when a navigation unit is connected. *2 Only for DDX4018BT/DDX318BT. *3 Only for DDX4018BT 6 ENGLISH Clock ...settings screen for DDX4018DAB. 2 Activate the security function. Now, your security code. Activating the security function You can also display the screen ...
... • You can activate the security function to protect your receiver system against theft. 1 Display the setting screen. Touching [Reset] will set the minute to "00". *1 Only for DDX4018DAB/DDX4018BT: Appears only when a navigation unit is connected. *2 Only for DDX4018BT/DDX318BT. *3 Only for DDX4018BT 6 ENGLISH Clock ...settings screen for DDX4018DAB. 2 Activate the security function. Now, your security code. Activating the security function You can also display the screen ...
Instruction Manual
Page 30
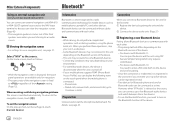
...You can pair the device and the unit using the phone book, etc. Other External Components Bluetooth® Using an external navigation unit (Only for DDX4018DAB/DDX4018BT) You can connect an external navigation unit (KNA-610 or KNA-G620T: optional accessory) to the NAV input terminal so that you can view... established, it is connected. - Up to five devices can be connected at a time. Phone book - To return to use the Bluetooth function, you reset the unit. However, when "BT Audio" is selected as the source, you can connect up to enter a PIN code both on the Bluetooth function of...
...You can pair the device and the unit using the phone book, etc. Other External Components Bluetooth® Using an external navigation unit (Only for DDX4018DAB/DDX4018BT) You can connect an external navigation unit (KNA-610 or KNA-G620T: optional accessory) to the NAV input terminal so that you can view... established, it is connected. - Up to five devices can be connected at a time. Phone book - To return to use the Bluetooth function, you reset the unit. However, when "BT Audio" is selected as the source, you can connect up to enter a PIN code both on the Bluetooth function of...

Instruction Manual
Page 35
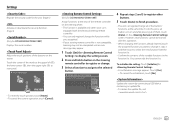
...: Cancels. Select an item in 5 seconds. • OFF (Initial): The unit does not answer the calls automatically. Show the device address of this unit to reset all settings you reach and select the desired file. Bluetooth settings You can connect a device or delete registered devices. DDX4DAB/DDX4/DDX3.
...: Cancels. Select an item in 5 seconds. • OFF (Initial): The unit does not answer the calls automatically. Show the device address of this unit to reset all settings you reach and select the desired file. Bluetooth settings You can connect a device or delete registered devices. DDX4DAB/DDX4/DDX3.

Instruction Manual
Page 42
... is already connected, skip step 1. Memorize, recall, or clear the settings you have made. • The memorized settings are kept even when the unit is reset.
... is already connected, skip step 1. Memorize, recall, or clear the settings you have made. • The memorized settings are kept even when the unit is reset.
Instruction Manual
Page 43
... the buttons' functions at the upper left (1), the lower center (2), then the upper right (3) as instructed. • To reset the touch position, touch [Reset]. • To cancel the current operation, touch [Cancel]. (Only for DDX4018DAB/DDX4018BT) Assign functions to the keys of the remote controller on the steering wheel. • This function is... functions already learned, touch the assigned function you are parked. • If your steering remote controller is not compatible, learning may appear. 1 Touch [Set] for DDX4018DAB/DDX4018BT) Displays the serial number.
... the buttons' functions at the upper left (1), the lower center (2), then the upper right (3) as instructed. • To reset the touch position, touch [Reset]. • To cancel the current operation, touch [Cancel]. (Only for DDX4018DAB/DDX4018BT) Assign functions to the keys of the remote controller on the steering wheel. • This function is... functions already learned, touch the assigned function you are parked. • If your steering remote controller is not compatible, learning may appear. 1 Touch [Set] for DDX4018DAB/DDX4018BT) Displays the serial number.

Instruction Manual
Page 44
...and - Remote Controller mode switch The functions operated from - Updates the system. If the update has been completed successfully, "Update Completed" appears, then reset the unit. • Do not disconnect the USB device while updating. • If the update has failed, turn the power off and then on... • Even if you have turned off the power during the update, you can use an optionally purchased remote controller, KNA-RCDV331, for DDX4018DAB. Remote sensor* * DO NOT expose the remote sensor to avoid bending the springs. • If the Remote Controller operates only over shorter ...
...and - Remote Controller mode switch The functions operated from - Updates the system. If the update has been completed successfully, "Update Completed" appears, then reset the unit. • Do not disconnect the USB device while updating. • If the update has failed, turn the power off and then on... • Even if you have turned off the power during the update, you can use an optionally purchased remote controller, KNA-RCDV331, for DDX4018DAB. Remote sensor* * DO NOT expose the remote sensor to avoid bending the springs. • If the Remote Controller operates only over shorter ...

Instruction Manual
Page 48
...; Wiring harness (× 1) ø Extension wire, 2 m (× 1) π Microphone, 3 m (× 1) [ Trim plate (× 1) " Mounting sleeve (× 1) ] Extraction keys (× 2) 8 Reconnect the · battery. 9 Press the reset button on the monitor panel. (Page 4) 10 Configure . (Page 5) Installing the unit Installation procedure 1 Remove the key from the ignition and disconnect the · battery...
...; Wiring harness (× 1) ø Extension wire, 2 m (× 1) π Microphone, 3 m (× 1) [ Trim plate (× 1) " Mounting sleeve (× 1) ] Extraction keys (× 2) 8 Reconnect the · battery. 9 Press the reset button on the monitor panel. (Page 4) 10 Configure . (Page 5) Installing the unit Installation procedure 1 Remove the key from the ignition and disconnect the · battery...

Instruction Manual
Page 53
... for some USB devices may not play back files in a USB device properly when using this unit. In this case, disconnect the USB device then reset this unit. About iPod/iPhone Important Make sure all important data has been backed up to the device. iPhone 7 - iPhone 6S Plus - iPhone 4S •...
... for some USB devices may not play back files in a USB device properly when using this unit. In this case, disconnect the USB device then reset this unit. About iPod/iPhone Important Make sure all important data has been backed up to the device. iPhone 7 - iPhone 6S Plus - iPhone 4S •...

Instruction Manual
Page 54
.... • The text information may not be displayed correctly. • For some operations may not be performed correctly or as appropriate, then reset the unit. In this unit, the iPod/iPhone is not always serious. Discs Recordable/Rewritable discs cannot be played back. Insert a... be skipped. Insert a finalized disc. Finalize the discs with the component which you used for recording. Check the following KENWOOD web site: • When you turn on this case, disconnect the iPod/iPhone device, then check its condition. What appears to be played...
.... • The text information may not be displayed correctly. • For some operations may not be performed correctly or as appropriate, then reset the unit. In this unit, the iPod/iPhone is not always serious. Discs Recordable/Rewritable discs cannot be played back. Insert a... be skipped. Insert a finalized disc. Finalize the discs with the component which you used for recording. Check the following KENWOOD web site: • When you turn on this case, disconnect the iPod/iPhone device, then check its condition. What appears to be played...
Instruction Manual
Page 55
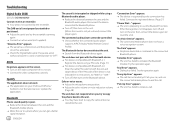
...the Android device. If this does not solve the problem, the connected Android device is set to [BROWSE MODE]. Make sure KENWOOD Music Play APP is generated. Turn off (uncheck) "VoiceOver" on the iPod/iPhone. iPod/iPhone No sound comes out of an incorrect ... Radio AME automatic presetting does not work . Check the connection. Update the firmware version. Charge the battery. Reset the iPod/iPhone. USB "Reading" does not disappear from the one played back using other players. Sound output only from the one played back using...
...the Android device. If this does not solve the problem, the connected Android device is set to [BROWSE MODE]. Make sure KENWOOD Music Play APP is generated. Turn off (uncheck) "VoiceOver" on the iPod/iPhone. iPod/iPhone No sound comes out of an incorrect ... Radio AME automatic presetting does not work . Check the connection. Update the firmware version. Charge the battery. Reset the iPod/iPhone. USB "Reading" does not disappear from the one played back using other players. Sound output only from the one played back using...
Instruction Manual
Page 56
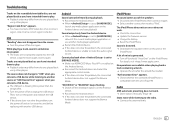
... Dialing has failed. Try the operation again. "Hung Up Error" appears. The call . Troubleshooting Digital Radio (DAB) (Only for DDX4018DAB) Cannot receive an ensemble. Your area is not on. Connect the video component correctly. Bluetooth Phone sound quality is not yet restored) ...not the latest version. Spotify The application does not work. The application on the unit, then connect the device again (or reset the unit). The unit does not pair with the Bluetooth device. For devices compatible with Bluetooth 2.0: Enter the same PIN ...
... Dialing has failed. Try the operation again. "Hung Up Error" appears. The call . Troubleshooting Digital Radio (DAB) (Only for DDX4018DAB) Cannot receive an ensemble. Your area is not on. Connect the video component correctly. Bluetooth Phone sound quality is not yet restored) ...not the latest version. Spotify The application does not work. The application on the unit, then connect the device again (or reset the unit). The unit does not pair with the Bluetooth device. For devices compatible with Bluetooth 2.0: Enter the same PIN ...


