
Instruction Manual
Page 1
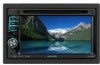
... DNX5120 DNX512EX MONITOR WITH DVD RECEIVER DDX512 DDX5032 INSTRUCTION MANUAL Take the time to the model and serial numbers whenever you obtain the best performance from your Kenwood product at www.Kenwoodusa.com © B64-3971-00/00 (KW/K2W/RW) Familiarity with installation and operation ...Model DNX5120/DNX512EX/DDX512/DDX5032 Serial number US Residence Only Register Online Register your new GPS Navigation System/DVD Receiver. Refer to read through this instruction manual. For your Kenwood dealer for information or service on the warranty card, and in the space provided below.
... DNX5120 DNX512EX MONITOR WITH DVD RECEIVER DDX512 DDX5032 INSTRUCTION MANUAL Take the time to the model and serial numbers whenever you obtain the best performance from your Kenwood product at www.Kenwoodusa.com © B64-3971-00/00 (KW/K2W/RW) Familiarity with installation and operation ...Model DNX5120/DNX512EX/DDX512/DDX5032 Serial number US Residence Only Register Online Register your new GPS Navigation System/DVD Receiver. Refer to read through this instruction manual. For your Kenwood dealer for information or service on the warranty card, and in the space provided below.
Instruction Manual
Page 3
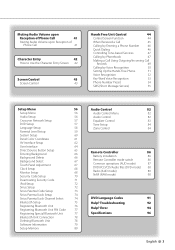
... 64 Direct Source Button Setup 65 Entering Background 66 Background Delete 66 Background Select 67 Touch Panel Adjustment 67 Clock Setup 68 Monitor Setup 68 Security Code Setup 70 Deactivating Security Code 71 iPod Setup 72 Sirius Setup 72 Sirius Parental Code Setup 73 Sirius...Audio Control Menu 82 Audio Control 82 Equalizer Control 83 Tone Setup 84 Zone Control 84 Remote Controller 86 Battery installation 86 Remote Controller mode switch 86 Common operations (AUD mode) 87 DVD/VCD/CD/Audio files (DVD mode) 88 Radio (AUD mode) 89 NAVI (NAVI mode) 90...
... 64 Direct Source Button Setup 65 Entering Background 66 Background Delete 66 Background Select 67 Touch Panel Adjustment 67 Clock Setup 68 Monitor Setup 68 Security Code Setup 70 Deactivating Security Code 71 iPod Setup 72 Sirius Setup 72 Sirius Parental Code Setup 73 Sirius...Audio Control Menu 82 Audio Control 82 Equalizer Control 83 Tone Setup 84 Zone Control 84 Remote Controller 86 Battery installation 86 Remote Controller mode switch 86 Common operations (AUD mode) 87 DVD/VCD/CD/Audio files (DVD mode) 88 Radio (AUD mode) 89 NAVI (NAVI mode) 90...
Instruction Manual
Page 6
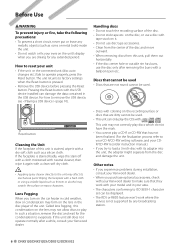
... work with a dry soft cloth such as a silicon cloth. Other notes • If you experience problems during installation, consult your Kenwood dealer. • When you purchase optional accessories, check with your Kenwood dealer to play the CDs with a clean soft dry cloth. ¤ • Applying spray cleaner directly to ...unit is stained badly, wipe the stain off with a cloth moistened with neutral cleaner, then wipe it with your model and in the disc player of the unit. Reset button Cleaning the Unit If the faceplate of the disc. • Do not stick tape etc. Lens Fogging When...
... work with a dry soft cloth such as a silicon cloth. Other notes • If you experience problems during installation, consult your Kenwood dealer. • When you purchase optional accessories, check with your Kenwood dealer to play the CDs with a clean soft dry cloth. ¤ • Applying spray cleaner directly to ...unit is stained badly, wipe the stain off with a cloth moistened with neutral cleaner, then wipe it with your model and in the disc player of the unit. Reset button Cleaning the Unit If the faceplate of the disc. • Do not stick tape etc. Lens Fogging When...
Instruction Manual
Page 8
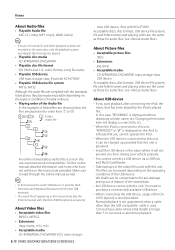
... systems are recorded in the same disc, only the playback system recorded at the first setout is played. • Playable disc media CD-R/RW/ROM, DVD±R/RW • Playable disc file format ISO 9660 Level 1/2, Joliet, Romeo, Long file name. • Playable USB device USB mass storage class, iPod with...
... systems are recorded in the same disc, only the playback system recorded at the first setout is played. • Playable disc media CD-R/RW/ROM, DVD±R/RW • Playable disc file format ISO 9660 Level 1/2, Joliet, Romeo, Long file name. • Playable USB device USB mass storage class, iPod with...

Instruction Manual
Page 41
Muting Audio Volume upon Reception of Phone Call When the telephone is paused. The system resumes playing automatically. ⁄ • To use the TEL Mute feature, you need to hook up the phone. English 41 Phone Call ("CALL") screen When the call When the telephone is called ... Refer to your telephone using a commercial telephone accessory. Hang up the MUTE wire to . The Phone Call ("CALL") screen appears, and system is called , the system is paused automatically. Muting Audio Volume upon Reception of Phone call ends...
Muting Audio Volume upon Reception of Phone Call When the telephone is paused. The system resumes playing automatically. ⁄ • To use the TEL Mute feature, you need to hook up the phone. English 41 Phone Call ("CALL") screen When the call When the telephone is called ... Refer to your telephone using a commercial telephone accessory. Hang up the MUTE wire to . The Phone Call ("CALL") screen appears, and system is called , the system is paused automatically. Muting Audio Volume upon Reception of Phone call ends...
Instruction Manual
Page 86
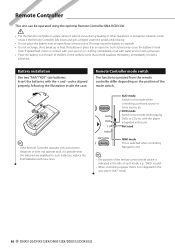
... or other operations. This may cause the battery to this mode when controlling a selected source or tuner source, etc. POSITION AUD • DVD • TV• • NAVI AUD mode Switch to explode. • Do not recharge, short, break up or heat the battery...is not integrated in the unit, select "AUD" mode. 86 DNX5120/DNX512EX/DNX512EX/DDX512/DDX5032 Battery installation Use two "AAA"/"R03"-size batteries. Insert the batteries with the player integrated in this unit. Remote Controller mode switch The functions operated from the remote controller differ depending ...
... or other operations. This may cause the battery to this mode when controlling a selected source or tuner source, etc. POSITION AUD • DVD • TV• • NAVI AUD mode Switch to explode. • Do not recharge, short, break up or heat the battery...is not integrated in the unit, select "AUD" mode. 86 DNX5120/DNX512EX/DNX512EX/DDX512/DDX5032 Battery installation Use two "AAA"/"R03"-size batteries. Insert the batteries with the player integrated in this unit. Remote Controller mode switch The functions operated from the remote controller differ depending ...
Instruction Manual
Page 92
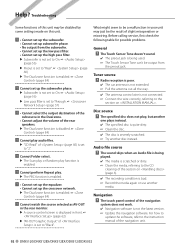
... the subsource in your unit may be the result of slight misoperation or miswiring. Cannot watch the source selected as AV-OUT in the rear monitor. ▲ A source control screen is displayed in front. ☞ (page 62) ▲ "AV-OUT Graphic Output" of is not the latest version. ☞ Update the...
... the subsource in your unit may be the result of slight misoperation or miswiring. Cannot watch the source selected as AV-OUT in the rear monitor. ▲ A source control screen is displayed in front. ☞ (page 62) ▲ "AV-OUT Graphic Output" of is not the latest version. ☞ Update the...
Instruction Manual
Page 99
...The user could lose the authority to correct the interference by one or more of the following are expressly approved in a residential installation. In compliance with Federal Regulations, following measures: • Reorient or relocate the receiving antenna. • Increase the separation ...interference unless the modifications are reproductions of labels on a circuit different from that interference will not occur in a particular installation. 2CAUTION Use of controls or adjustments or performance of procedures other than those specified herein may result in accordance with ...
...The user could lose the authority to correct the interference by one or more of the following are expressly approved in a residential installation. In compliance with Federal Regulations, following measures: • Reorient or relocate the receiving antenna. • Increase the separation ...interference unless the modifications are reproductions of labels on a circuit different from that interference will not occur in a particular installation. 2CAUTION Use of controls or adjustments or performance of procedures other than those specified herein may result in accordance with ...
Installation Guide
Page 1
DDX512 DDX5032 MONITOR WITH DVD RECEIVER INSTALLATION MANUAL MONITEUR AVEC RÉCEPTEUR DVD MANUEL D'INSTALLATION MONITOR CON RECEPTOR DVD MANUAL DE INSTALACIÓN © B54-4618-00/00 (KW/RW)
DDX512 DDX5032 MONITOR WITH DVD RECEIVER INSTALLATION MANUAL MONITEUR AVEC RÉCEPTEUR DVD MANUEL D'INSTALLATION MONITOR CON RECEPTOR DVD MANUAL DE INSTALACIÓN © B54-4618-00/00 (KW/RW)
Installation Guide
Page 3
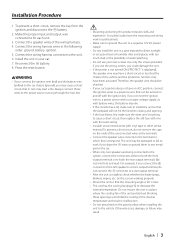
...the cooling of the wiring harness. 4. Do not mount the unit in turn may result. Otherwise scars, damage, or failure may start a fire. Installation Procedure 1. Press the reset button. 2WARNING • If you connect the ignition wire (red) and the battery wire (yellow) to the car chassis...may have a short-circuit or touched the chassis of the unit are working properly. • Mount the unit so that the mounting angle is installed, check whether the brake lamps, blinkers, wipers, etc. English | 3 For example, if you connect the ignition wire to decrease the internal temperature...
...the cooling of the wiring harness. 4. Do not mount the unit in turn may result. Otherwise scars, damage, or failure may start a fire. Installation Procedure 1. Press the reset button. 2WARNING • If you connect the ignition wire (red) and the battery wire (yellow) to the car chassis...may have a short-circuit or touched the chassis of the unit are working properly. • Mount the unit so that the mounting angle is installed, check whether the brake lamps, blinkers, wipers, etc. English | 3 For example, if you connect the ignition wire to decrease the internal temperature...
Installation Guide
Page 8
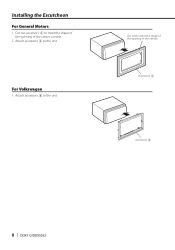
Attach accessory 4 to the unit. Attach accessory 8 to the unit. Accessory 4 Accessory 8 8 | DDX512/DDX5032 For Volkswagen 1. Installing the Escutcheon For General Motors 1. Cut out to meet the shape of the opening of the opening in the vehicle. Cut out accessory 4 to meet the shape of the center console. 2.
Attach accessory 4 to the unit. Attach accessory 8 to the unit. Accessory 4 Accessory 8 8 | DDX512/DDX5032 For Volkswagen 1. Installing the Escutcheon For General Motors 1. Cut out to meet the shape of the opening of the opening in the vehicle. Cut out accessory 4 to meet the shape of the center console. 2.
Installation Guide
Page 10
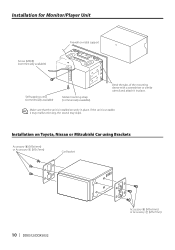
... 6 (M5x6mm) or Accessory 7 (M5x7mm) Car Bracket 10 | DDX512/DDX5032 Accessory 6 (M5x6mm) or Accessory 7 (M5x7mm) Make sure that the unit is unstable, it in place. Installation for Monitor/Player Unit Screw (M4X8) (commercially available) Firewall or metal support Self-tapping screw (commercially available) Metal mounting strap (commercially available) Bend the tabs of the mounting...
... 6 (M5x6mm) or Accessory 7 (M5x7mm) Car Bracket 10 | DDX512/DDX5032 Accessory 6 (M5x6mm) or Accessory 7 (M5x7mm) Make sure that the unit is unstable, it in place. Installation for Monitor/Player Unit Screw (M4X8) (commercially available) Firewall or metal support Self-tapping screw (commercially available) Metal mounting strap (commercially available) Bend the tabs of the mounting...


