Instruction Manual
Page 1
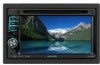
... read through this instruction manual. GPS NAVIGATION SYSTEM DNX5120 DNX512EX MONITOR WITH DVD RECEIVER DDX512 DDX5032 INSTRUCTION MANUAL Take the time to the model and serial numbers whenever you obtain the best performance from your records Record the serial number, found on the back of the unit, in the space provided below. Familiarity with installation and operation procedures will help you call upon your Kenwood product at www...
... read through this instruction manual. GPS NAVIGATION SYSTEM DNX5120 DNX512EX MONITOR WITH DVD RECEIVER DDX512 DDX5032 INSTRUCTION MANUAL Take the time to the model and serial numbers whenever you obtain the best performance from your records Record the serial number, found on the back of the unit, in the space provided below. Familiarity with installation and operation procedures will help you call upon your Kenwood product at www...
Instruction Manual
Page 2
... the Control Screen 17 DVD Disc Menu 18 VCD Zoom Control 20 Music Disc & Audio File Listening 21 Functions While Displaying the Control Screen 21 Video File/Picture Watching 23 Function During Playback Screen 23 Functions When Displaying the Easy Control Panel 24 Functions While Displaying the Control Screen 24 Picture Control 25 Radio Listening 26 Functions While Displaying the Control Screen 26 Seek Mode 27 Auto Memory 28 Manual Memory 28 Radio Text 29 Set Station Name 29 Traffic Information 30 Search for Program Type 30 iPod Control 31 Connecting an iPod...
... the Control Screen 17 DVD Disc Menu 18 VCD Zoom Control 20 Music Disc & Audio File Listening 21 Functions While Displaying the Control Screen 21 Video File/Picture Watching 23 Function During Playback Screen 23 Functions When Displaying the Easy Control Panel 24 Functions While Displaying the Control Screen 24 Picture Control 25 Radio Listening 26 Functions While Displaying the Control Screen 26 Seek Mode 27 Auto Memory 28 Manual Memory 28 Radio Text 29 Set Station Name 29 Traffic Information 30 Search for Program Type 30 iPod Control 31 Connecting an iPod...
Instruction Manual
Page 3
... Phone Number Preset 54 SMS (Short Message Service) 55 Setup Menu 56 Setup Menu 56 Audio Setup 56 Crossover Network Setup 57 DVD Setup 57 Language Setup 58 Parental Level Setup 59 System Setup 60 Panel Color Coordinate 61 AV Interface Setup 62 User Interface 64 Direct Source Button Setup 65 Entering Background 66 Background Delete 66 Background Select 67 Touch Panel Adjustment 67 Clock Setup 68 Monitor Setup 68 Security Code Setup 70 Deactivating Security Code 71 iPod Setup 72 Sirius Setup 72 Sirius Parental Code Setup 73 Sirius Parental Lock...
... Phone Number Preset 54 SMS (Short Message Service) 55 Setup Menu 56 Setup Menu 56 Audio Setup 56 Crossover Network Setup 57 DVD Setup 57 Language Setup 58 Parental Level Setup 59 System Setup 60 Panel Color Coordinate 61 AV Interface Setup 62 User Interface 64 Direct Source Button Setup 65 Entering Background 66 Background Delete 66 Background Select 67 Touch Panel Adjustment 67 Clock Setup 68 Monitor Setup 68 Security Code Setup 70 Deactivating Security Code 71 iPod Setup 72 Sirius Setup 72 Sirius Parental Code Setup 73 Sirius Parental Lock...
Instruction Manual
Page 6
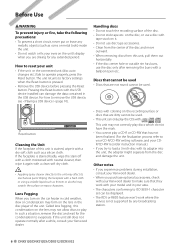
... allow discs to factory settings when the Reset button is stained badly, wipe the stain off with a cloth moistened with neutral cleaner, then wipe it again with the USB device installed can only play the CDs with a hard cloth or using a volatile liquid such as coins or metal tools) inside the unit. • Do not watch or fix your model and in the disc player of the disc...
... allow discs to factory settings when the Reset button is stained badly, wipe the stain off with a cloth moistened with neutral cleaner, then wipe it again with the USB device installed can only play the CDs with a hard cloth or using a volatile liquid such as coins or metal tools) inside the unit. • Do not watch or fix your model and in the disc player of the disc...
Instruction Manual
Page 7
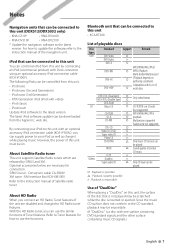
... latest iPod software updater can be played. SIRIUS tuner : Conversion cable CA-SR20V XM tuner : XM interface Box KCA-XM100V Refer to the instruction manual of playable discs Disc Standard Support types DVD DVD Video ‡ DVD Audio × DVD-R ‡ Remark DVD-RW DVD+R DVD+RW MP3/WMA/AAC/JPEG/ ‡ MPEG Playback Multi-border/Multisession/ ‡ (Playback depends on authoring conditions) Compatible with an optional accessory iPod connection cable (KCA-iP300V), you can supply power...
... latest iPod software updater can be played. SIRIUS tuner : Conversion cable CA-SR20V XM tuner : XM interface Box KCA-XM100V Refer to the instruction manual of playable discs Disc Standard Support types DVD DVD Video ‡ DVD Audio × DVD-R ‡ Remark DVD-RW DVD+R DVD+RW MP3/WMA/AAC/JPEG/ ‡ MPEG Playback Multi-border/Multisession/ ‡ (Playback depends on authoring conditions) Compatible with an optional accessory iPod connection cable (KCA-iP300V), you can supply power...
Instruction Manual
Page 8
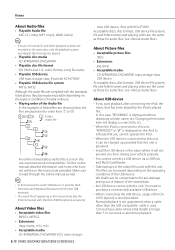
... at the first setout is played. • Playable disc media CD-R/RW/ROM, DVD±R/RW • Playable disc file format ISO 9660 Level 1/2, Joliet, Romeo, Long file name. • Playable USB device USB mass storage class, iPod with KCA-iP300V • Playable USB device file system FAT16, FAT32 Although the audio files are complied with the standards listed above, the play maybe impossible depending on the...
... at the first setout is played. • Playable disc media CD-R/RW/ROM, DVD±R/RW • Playable disc file format ISO 9660 Level 1/2, Joliet, Romeo, Long file name. • Playable USB device USB mass storage class, iPod with KCA-iP300V • Playable USB device file system FAT16, FAT32 Although the audio files are complied with the standards listed above, the play maybe impossible depending on the...

Instruction Manual
Page 10
... the USB device is changed. • Make sure that the USB device is turned off. B Switches to the Navigation system Press the button to switch the display to turn on the USB control screen to attenuate the volume. Even if the USB is removed and connected again, the playback will start from the point where it again to adjust the volume. E Adjusts the volume Turn it to enter the USB suspend mode, and then remove the USB device. When the button...
... the USB device is changed. • Make sure that the USB device is turned off. B Switches to the Navigation system Press the button to switch the display to turn on the USB control screen to attenuate the volume. Even if the USB is removed and connected again, the playback will start from the point where it again to adjust the volume. E Adjusts the volume Turn it to enter the USB suspend mode, and then remove the USB device. When the button...

Instruction Manual
Page 11
...device 5 connected. In addition, you load a disc into disc loading slot, the disc starts playing. Removing a disc Press [0] (Eject) button. The display switches between Favorite Source Select screen and Full Source Select screen by touching the button. 4 Displays Source Control screen. 5 Displays the Audio Control Menu screen. (page 82) 6 Displays the Setup Menu screen. (page 56) 7 Clock display ⁄ 8 • If a Bluetooth Unit is not connected, [TEL] will not appear. 8 Displays the Full Source Select screen. ⁄ • For how to register the frequently used source buttons...
...device 5 connected. In addition, you load a disc into disc loading slot, the disc starts playing. Removing a disc Press [0] (Eject) button. The display switches between Favorite Source Select screen and Full Source Select screen by touching the button. 4 Displays Source Control screen. 5 Displays the Audio Control Menu screen. (page 82) 6 Displays the Setup Menu screen. (page 56) 7 Clock display ⁄ 8 • If a Bluetooth Unit is not connected, [TEL] will not appear. 8 Displays the Full Source Select screen. ⁄ • For how to register the frequently used source buttons...

Instruction Manual
Page 15
... displaying navigation screen. 1 Display the easy control buttons When "DVD" is selected: 7 7 8 9 7 During iPod play : Selects music. See (page 43). 2 Turns the traffic information function On or Off. 3 During DVD play : Selects a file. 8 Plays or pauses. 9 When touched this area, the source control screen appears. During VCD play only) 5 Plays or pauses. 6 When touched this area, the source control screen appears. During Audio file, Video file, or Picture file play : Selects a file. 4When pressed twice, the disc is selected: 10 10 11 11 12 p Tunes in memory...
... displaying navigation screen. 1 Display the easy control buttons When "DVD" is selected: 7 7 8 9 7 During iPod play : Selects music. See (page 43). 2 Turns the traffic information function On or Off. 3 During DVD play : Selects a file. 8 Plays or pauses. 9 When touched this area, the source control screen appears. During VCD play only) 5 Plays or pauses. 6 When touched this area, the source control screen appears. During Audio file, Video file, or Picture file play : Selects a file. 4When pressed twice, the disc is selected: 10 10 11 11 12 p Tunes in memory...

Instruction Manual
Page 26
... memorized station. i Displays Radio Text screen. Radio Listening Various control screens appear in the Tuner Source mode. • For the basic method of lines displayed in a station. y Searches station by program type. For memory of broadcasting stations, see (page 86). See (page 30). Selects the Program Service Name, Title & Artist name, Station Name, Category Name 1/2, or Radio Text. 5 Switches to the FM1/2/3 band. 6 Switches to the station. r When to use various functions. [TUNER] button on memory. e Turns the Traffic Information function...
... memorized station. i Displays Radio Text screen. Radio Listening Various control screens appear in the Tuner Source mode. • For the basic method of lines displayed in a station. y Searches station by program type. For memory of broadcasting stations, see (page 86). See (page 30). Selects the Program Service Name, Title & Artist name, Station Name, Category Name 1/2, or Radio Text. 5 Switches to the FM1/2/3 band. 6 Switches to the station. r When to use various functions. [TUNER] button on memory. e Turns the Traffic Information function...

Instruction Manual
Page 35
... Device" is displalyed. 2 Track Number Display 3 Play Mode Display 4 Play Time Display 5 Music information display Selects the Folder Name, File Name, TItle, Artist Name, or Album Name. w Repeats to play music in random order).* r Switches the number of the category. e Starts or stops Random Play (to the playback screen. d Lists all the music in the folder currently being played, initial background is displayed. If there is no image in the selected category. t MUSIC, VIDEO or PICTURE...
... Device" is displalyed. 2 Track Number Display 3 Play Mode Display 4 Play Time Display 5 Music information display Selects the Folder Name, File Name, TItle, Artist Name, or Album Name. w Repeats to play music in random order).* r Switches the number of the category. e Starts or stops Random Play (to the playback screen. d Lists all the music in the folder currently being played, initial background is displayed. If there is no image in the selected category. t MUSIC, VIDEO or PICTURE...
Instruction Manual
Page 43
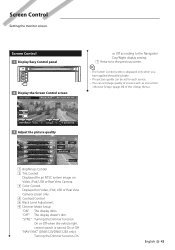
Screen Control 1 Display Easy Control panel 2 Display the Screen Control screen DVD VIDEO Mode:Full AV - "SYNC": Turning the Dimmer function On or Off when the vehicle light control switch is displayed only when you have applied the parking brake. • The picture quality can be set for an NTSC system image on Video, iPod, USB or Rear View Camera. 3 Color Control Displayed on Video, iPod, USB or Rear View Camera screen only. 4 Contrast Control 5 Black Level Adjustment 6 Dimmer Mode Setup "ON": The display dims. "OFF": The display doesn't dim. O U T: AV - "NAV-SYNC" (...
Screen Control 1 Display Easy Control panel 2 Display the Screen Control screen DVD VIDEO Mode:Full AV - "SYNC": Turning the Dimmer function On or Off when the vehicle light control switch is displayed only when you have applied the parking brake. • The picture quality can be set for an NTSC system image on Video, iPod, USB or Rear View Camera. 3 Color Control Displayed on Video, iPod, USB or Rear View Camera screen only. 4 Contrast Control 5 Black Level Adjustment 6 Dimmer Mode Setup "ON": The display dims. "OFF": The display doesn't dim. O U T: AV - "NAV-SYNC" (...
Instruction Manual
Page 59
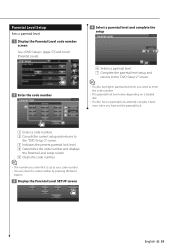
... Level code number screen See (page 57) and touch [Parental Level]. 2 Enter the code number 1 2 3 4 5 1 Enters a code number. 2 Cancels the current setup and returns to the "DVD Setup 2" screen. 3 Indicates the present parental lock level. 4 Determines the code number and displays the Parental Level setup screen. 5 Clears the code number. ⁄ • The number you enter first is set as your code number. • You can clear the code number by pressing the Reset button. 3 Display the Parental Level SETUP screen...
... Level code number screen See (page 57) and touch [Parental Level]. 2 Enter the code number 1 2 3 4 5 1 Enters a code number. 2 Cancels the current setup and returns to the "DVD Setup 2" screen. 3 Indicates the present parental lock level. 4 Determines the code number and displays the Parental Level setup screen. 5 Clears the code number. ⁄ • The number you enter first is set as your code number. • You can clear the code number by pressing the Reset button. 3 Display the Parental Level SETUP screen...
Instruction Manual
Page 60
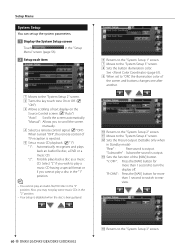
... scrolling of the [NAV] button. e Sets the function of text display on the Source Control screen. ( "Auto") "Auto": Scrolls the screen automatically. "Manual": Allows you may not play an Audio file/VCD disc in the "Setup 2 Setup each item 1 2 3 4 5 1 Moves to turn the display off. See (page 61). 9 When set up the system parameters. 1 Display the System Setup screen Touch Menu" screen (page 56). OFF" : Press the [NAV] button for more than 1 second to switch to rear view. 14 15 60 DNX5120...
... scrolling of the [NAV] button. e Sets the function of text display on the Source Control screen. ( "Auto") "Auto": Scrolls the screen automatically. "Manual": Allows you may not play an Audio file/VCD disc in the "Setup 2 Setup each item 1 2 3 4 5 1 Moves to turn the display off. See (page 61). 9 When set up the system parameters. 1 Display the System Setup screen Touch Menu" screen (page 56). OFF" : Press the [NAV] button for more than 1 second to switch to rear view. 14 15 60 DNX5120...
Instruction Manual
Page 62
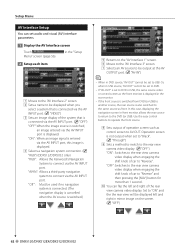
Use the easy control buttons to operate the front source. 8 Sets output of operation screen such as control screen to "Reverse" and then pressing the [NAV] button for more than 1 second. p You can set to the DVD (or USB). "OFF": Switches to the rear view camera video display when engaging the shift knob of the system that is connected via the AV INPUT port. ( "OFF") "OFF": When the image source is switched.) 5 6 7 8 9 10 5 Returns to the "AV Interface 1" screen. 6 Moves to...
Use the easy control buttons to operate the front source. 8 Sets output of operation screen such as control screen to "Reverse" and then pressing the [NAV] button for more than 1 second. p You can set to the DVD (or USB). "OFF": Switches to the rear view camera video display when engaging the shift knob of the system that is connected via the AV INPUT port. ( "OFF") "OFF": When the image source is switched.) 5 6 7 8 9 10 5 Returns to the "AV Interface 1" screen. 6 Moves to...

Instruction Manual
Page 64
... to the "User Interface 2" screen. Setup Menu User Interface You can set up user interface parameters. 1 Display the User Interface screen Touch Menu" screen (page 56). "Memory": Enables entering of background image entered into or from this unit. "Change": Displays images entered into this unit. See (page 66). 4 Sets whether to display the target when touching the panel. 5 6 7 8 9 5 Returns to the "User Interface 1" screen. 6 Moves to enter the USB suspend mode, and then remove the USB device. "Manual": Information is displayed for 5 seconds...
... to the "User Interface 2" screen. Setup Menu User Interface You can set up user interface parameters. 1 Display the User Interface screen Touch Menu" screen (page 56). "Memory": Enables entering of background image entered into or from this unit. "Change": Displays images entered into this unit. See (page 66). 4 Sets whether to display the target when touching the panel. 5 6 7 8 9 5 Returns to the "User Interface 1" screen. 6 Moves to enter the USB suspend mode, and then remove the USB device. "Manual": Information is displayed for 5 seconds...
Instruction Manual
Page 92
...) ! Troubleshooting Some functions of the rear speakers. ▲ The Dual zone function is bad. ☞ Record the media again or use another media. Tuner source ? Help? Cannot play , but another disc instead. Before calling service, first check the following table for possible problems. General ? The specified disc does not play audio files. ▲ "CD Read" of the navigation unit. 92 DNX5120/DNX512EX/DNX512EX/DDX512/DDX5032 The touch panel control of is set...
...) ! Troubleshooting Some functions of the rear speakers. ▲ The Dual zone function is bad. ☞ Record the media again or use another media. Tuner source ? Help? Cannot play , but another disc instead. Before calling service, first check the following table for possible problems. General ? The specified disc does not play audio files. ▲ "CD Read" of the navigation unit. 92 DNX5120/DNX512EX/DNX512EX/DDX512/DDX5032 The touch panel control of is set...

Instruction Manual
Page 94
.../DDX5032 Read Error : Disc is activated and you may have data recorded that the unit can not support. ➡ Confirm that cannot be played with this message will appear. ➡ Use the unit again after reducing the temperature inside the disc changer is upside down. ➡ Load the disc with the car chassis. ➡ Wire or insulate the speaker cord as a source although no playable audio file. Authorization Error: Connection to operate correctly...
.../DDX5032 Read Error : Disc is activated and you may have data recorded that the unit can not support. ➡ Confirm that cannot be played with this message will appear. ➡ Use the unit again after reducing the temperature inside the disc changer is upside down. ➡ Load the disc with the car chassis. ➡ Wire or insulate the speaker cord as a source although no playable audio file. Authorization Error: Connection to operate correctly...
Installation Guide
Page 3
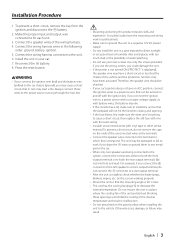
... not turned ON ("PROTECT" is displayed), the speaker wire may start a fire. battery. 2. Connect the wiring harness connector to the power source running through the fuse box. ¤ • Mounting and wiring this product requires skills and experience. Also avoid places with the ignition key. Use only the screws provided. If you use your car's ignition does not have a short-circuit or touched the chassis of the wiring harness. 4. Installation...
... not turned ON ("PROTECT" is displayed), the speaker wire may start a fire. battery. 2. Connect the wiring harness connector to the power source running through the fuse box. ¤ • Mounting and wiring this product requires skills and experience. Also avoid places with the ignition key. Use only the screws provided. If you use your car's ignition does not have a short-circuit or touched the chassis of the wiring harness. 4. Installation...
Installation Guide
Page 4
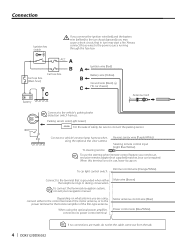
... using the optional rear view camera. Dimmer control wire (Orange/White) To car light control switch Connect to the terminal that in use the steering wheel remote control feature, you need to an exclusive remote adapter (not supplied) matches your navigation manual. Motor antenna control wire (Blue) Power control wire (Blue/White) 4 | DDX512/DDX5032 If no connections are using, connect either the telephone rings or during conversation. Parking sensor wire (Light Green) PRK SW For the sake of the film-type antenna. Connect to vehicle's reverse lamp harness when using...
... using the optional rear view camera. Dimmer control wire (Orange/White) To car light control switch Connect to the terminal that in use the steering wheel remote control feature, you need to an exclusive remote adapter (not supplied) matches your navigation manual. Motor antenna control wire (Blue) Power control wire (Blue/White) 4 | DDX512/DDX5032 If no connections are using, connect either the telephone rings or during conversation. Parking sensor wire (Light Green) PRK SW For the sake of the film-type antenna. Connect to vehicle's reverse lamp harness when using...


