

User Manual
Page 1
Refer to the instruction manual included with the AV CONTROL CENTER for this model also covers the systems in the KENWOOD System "SERIES 21" lineup. COMPACT DIGITAL AUDIO B60-3235-00 MA ( T, M, I ) I D 98/12 11 10 9 8 7 6 5 4 3 2 1 97/12 11 10 9 8 7 6 CD PLAYER D-S300 INSTRUCTION MANUAL KENWOOD CORPORATION This instruction manual for the basic remote control operations. Since the features vary depending on the combined systems, the remote control operation illustrations (icons) are shown for two types of remote control units.
Refer to the instruction manual included with the AV CONTROL CENTER for this model also covers the systems in the KENWOOD System "SERIES 21" lineup. COMPACT DIGITAL AUDIO B60-3235-00 MA ( T, M, I ) I D 98/12 11 10 9 8 7 6 5 4 3 2 1 97/12 11 10 9 8 7 6 CD PLAYER D-S300 INSTRUCTION MANUAL KENWOOD CORPORATION This instruction manual for the basic remote control operations. Since the features vary depending on the combined systems, the remote control operation illustrations (icons) are shown for two types of remote control units.

User Manual
Page 2
... rear panel and says that the component uses laser beams that the setting position of the AC voltage selector switch. D-S300 (En) Caution : Read this section carefully to your home or the cable is no danger of hazardous radiation outside the unit. Before connecting the power cord to ensure safe operation. If not, it must be set to which the unit is cut off , remove...
... rear panel and says that the component uses laser beams that the setting position of the AC voltage selector switch. D-S300 (En) Caution : Read this section carefully to your home or the cable is no danger of hazardous radiation outside the unit. Before connecting the power cord to ensure safe operation. If not, it must be set to which the unit is cut off , remove...
User Manual
Page 3
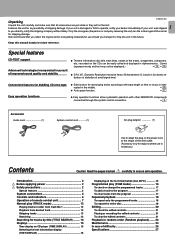
... features 3 System connections 4 Controls and indicators 6 Operation of remote control unit 7 Normal play (PGM mode 16 To check or change the programmed tracks 17 To add a track to the shape of difficulty 25 Specifications 27 If your unit is built in the middle. ) ¶ Auto space function. & ¶ Easy operation functions allow systematic operation with other KENWOOD components connected through the system control connection. 5 Accessories Audio cord 1) System control cord 1) AC plug adaptor 1) Use to adapt the plug on CD player (TIME DISPLAY 15...
... features 3 System connections 4 Controls and indicators 6 Operation of remote control unit 7 Normal play (PGM mode 16 To check or change the programmed tracks 17 To add a track to the shape of difficulty 25 Specifications 27 If your unit is built in the middle. ) ¶ Auto space function. & ¶ Easy operation functions allow systematic operation with other KENWOOD components connected through the system control connection. 5 Accessories Audio cord 1) System control cord 1) AC plug adaptor 1) Use to adapt the plug on CD player (TIME DISPLAY 15...

User Manual
Page 4
... when using the DIGITAL OUTPUT (OPTICAL) jack. Notes 1. When plugging and unplugging connection cords, be sure to the instruction manuals of the related components. When connecting the related system components, refer also to first remove the power cord from the largest outer dimensions including projections) equal to the unit. Connect all cords firmly. The actual connected equipment may vary depending on the sales region. Make connections as shown below . To AC outlet Audio cord CD L R SYSTEM CONTROL System control cord AV CONTROL CENTER...
... when using the DIGITAL OUTPUT (OPTICAL) jack. Notes 1. When plugging and unplugging connection cords, be sure to the instruction manuals of the related components. When connecting the related system components, refer also to first remove the power cord from the largest outer dimensions including projections) equal to the unit. Connect all cords firmly. The actual connected equipment may vary depending on the sales region. Make connections as shown below . To AC outlet Audio cord CD L R SYSTEM CONTROL System control cord AV CONTROL CENTER...

User Manual
Page 5
... provided audio cords to connect the OUTPUT jacks of this unit up with the System "SERIES 21," read the instruction manuals supplied with this unit, consult the store from which are inserted all the way in audio stores. ÷ When using an optical fiber cable or coaxial cable which you make great recordings from CD. System connections D-S300 (En) 5 Optical fiber cable SYSTEM CONTROL CONNECTIONS After hooking this unit to any components other than those specified by KENWOOD.
... provided audio cords to connect the OUTPUT jacks of this unit up with the System "SERIES 21," read the instruction manuals supplied with this unit, consult the store from which are inserted all the way in audio stores. ÷ When using an optical fiber cable or coaxial cable which you make great recordings from CD. System connections D-S300 (En) 5 Optical fiber cable SYSTEM CONTROL CONNECTIONS After hooking this unit to any components other than those specified by KENWOOD.

User Manual
Page 6
.... COMPACT DISC PLAYER D-S300 0 REPEAT RANDOM 4¢ 6 7 3 456 78 9 The keys with the same name as those on the display.) Pause indicator 12 DISPLAY ON/STANDBY COMPACT DIGITAL AUDIO TEXT D.R.I.V.E. Under that condition, the system can be played back. 4 Open/Close key (0) @ Opens and closes the disc tray. (When this unit is connected to the system in standby mode, pressing this key will automatically turn the unit ON and open the disc tray.) 5 REPEAT...
.... COMPACT DISC PLAYER D-S300 0 REPEAT RANDOM 4¢ 6 7 3 456 78 9 The keys with the same name as those on the display.) Pause indicator 12 DISPLAY ON/STANDBY COMPACT DIGITAL AUDIO TEXT D.R.I.V.E. Under that condition, the system can be played back. 4 Open/Close key (0) @ Opens and closes the disc tray. (When this unit is connected to the system in standby mode, pressing this key will automatically turn the unit ON and open the disc tray.) 5 REPEAT...

User Manual
Page 7
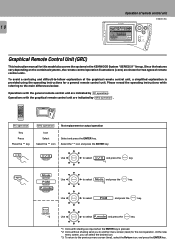
... key cannot be set to the AV CONTROL CENTER with the system control cords. 1 3 POWER A B REMOTE CONTROL UNIT RC-S0504 SLEEP DISPLAY PTY SEARCH +10 1 2 3 4 5 6 7 8 9 0 TUNER TITLE SEARCH TEXT DISP. SELECT RETURN PAL/NTSC FREEZE LD AUTO DIGITAL O.T.E. ¶REC/ARM ° 8 TAPE 1 2 7 PRO LOGIC 3 STEREO DSP 3 ¡ SOURCE STEREO DIRECT TEST TONE MULTI CONTROL MODE 2 % LEVEL INPUT TAPE 2 (MONITOR) VOLUME MUTE fi 2 4 This illustration is supplied with the KENWOOD SERIES 21 "AV CONTROL CENTER" (sold separately), and...
... key cannot be set to the AV CONTROL CENTER with the system control cords. 1 3 POWER A B REMOTE CONTROL UNIT RC-S0504 SLEEP DISPLAY PTY SEARCH +10 1 2 3 4 5 6 7 8 9 0 TUNER TITLE SEARCH TEXT DISP. SELECT RETURN PAL/NTSC FREEZE LD AUTO DIGITAL O.T.E. ¶REC/ARM ° 8 TAPE 1 2 7 PRO LOGIC 3 STEREO DSP 3 ¡ SOURCE STEREO DIRECT TEST TONE MULTI CONTROL MODE 2 % LEVEL INPUT TAPE 2 (MONITOR) VOLUME MUTE fi 2 4 This illustration is supplied with the KENWOOD SERIES 21 "AV CONTROL CENTER" (sold separately), and...

User Manual
Page 8
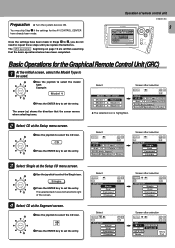
... played. 10key Pad icon # This icon switches to the AV CONTROL CENTER with the KENWOOD SERIES 21 "AV CONTROL CENTER" (sold separately), and other accessories to the Numeric Icon menu screen. 4 Joystick The joystick is supplied with the system control cords. 1 2 3 Main Menu Input CD Tuner LD Tape1 TapeA Source Return Cable Sat. Mode icon * This icon is used when selecting the icons. (Lightly press the edge of remote control unit D-S300 (En) 8 Graphical Remote Control Unit (GRC) A remote control...
... played. 10key Pad icon # This icon switches to the AV CONTROL CENTER with the KENWOOD SERIES 21 "AV CONTROL CENTER" (sold separately), and other accessories to the Numeric Icon menu screen. 4 Joystick The joystick is supplied with the system control cords. 1 2 3 Main Menu Input CD Tuner LD Tape1 TapeA Source Return Cable Sat. Mode icon * This icon is used when selecting the icons. (Lightly press the edge of remote control unit D-S300 (En) 8 Graphical Remote Control Unit (GRC) A remote control...
User Manual
Page 9
.... T V Cable VCR2 DVD/6ch Input Sound Speaker Reset 2 Select CD at the Setup CD menu screen. 1 ENTER 2 1 Use the joystick to select the Single icon. T V Cable VCR2 DVD/6ch Input Sound Speaker Reset Screen after selection Main Menu Input CD Tuner LD Tape1 TapeA Source Return Cable Sat. Set Up Confirm TV VCR1 VCR2 TapeB Setup CD Single Dual Carrousel Changer 3 Select Single at the Setup menu screen. 1 ENTER 2 1 Use the joystick to the bottom right of remote control unit D-S300 (En) Main Menu Input CD Tuner LD Tape1 TapeA Source...
.... T V Cable VCR2 DVD/6ch Input Sound Speaker Reset 2 Select CD at the Setup CD menu screen. 1 ENTER 2 1 Use the joystick to select the Single icon. T V Cable VCR2 DVD/6ch Input Sound Speaker Reset Screen after selection Main Menu Input CD Tuner LD Tape1 TapeA Source Return Cable Sat. Set Up Confirm TV VCR1 VCR2 TapeB Setup CD Single Dual Carrousel Changer 3 Select Single at the Setup menu screen. 1 ENTER 2 1 Use the joystick to the bottom right of remote control unit D-S300 (En) Main Menu Input CD Tuner LD Tape1 TapeA Source...
User Manual
Page 10
.... *2 Use ENTER to the main differences below. Operations with shading are shown for this model also covers the systems in the KENWOOD System "SERIES 21" lineup. Please reread the operating instructions while referring to select PGM and press the ENTER key. CD Set Up Confirm TV VCR1 VCR2 TapeB Mode Track 00 10key Pad REMOTE CONTROL UNIT ENTER VOLUME MUTING ON /STANDBY Graphical Remote Control Unit (GRC) This instruction manual...
.... *2 Use ENTER to the main differences below. Operations with shading are shown for this model also covers the systems in the KENWOOD System "SERIES 21" lineup. Please reread the operating instructions while referring to select PGM and press the ENTER key. CD Set Up Confirm TV VCR1 VCR2 TapeB Mode Track 00 10key Pad REMOTE CONTROL UNIT ENTER VOLUME MUTING ON /STANDBY Graphical Remote Control Unit (GRC) This instruction manual...
User Manual
Page 12
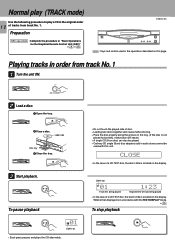
... the display. being played 1:23 Elapsed time of track being played ÷ In the case of tracks from track No. 1 1 Turn the unit ON. MULTIPLE CD PLAYER D-S300 6 To pause playback MULTIPLE CD PLAYER D-S300 6 01 Lights up . 01 Track NO. Normal play (TRACK mode) Use the following procedure to play a CD in order from track No. 1. MULTIPLE CD PLAYER D-S300 ON/STANDBY 2 Load a disc. 1 Open the tray. Label side MULTIPLE CD PLAYER D-S300 Disc tray MULTIPLE CD PLAYER D-S300 3 Close the tray. 0 3 Start...
... the display. being played 1:23 Elapsed time of track being played ÷ In the case of tracks from track No. 1 1 Turn the unit ON. MULTIPLE CD PLAYER D-S300 6 To pause playback MULTIPLE CD PLAYER D-S300 6 01 Lights up . 01 Track NO. Normal play (TRACK mode) Use the following procedure to play a CD in order from track No. 1. MULTIPLE CD PLAYER D-S300 ON/STANDBY 2 Load a disc. 1 Open the tray. Label side MULTIPLE CD PLAYER D-S300 Disc tray MULTIPLE CD PLAYER D-S300 3 Close the tray. 0 3 Start...

User Manual
Page 13
...; When using the GRC, you can return to the previous menu screen (level) at any time by selecting the Return icon and pressing the ENTER key. ÷ The track in which the PGM, EDIT and RANDOM mode displays are off . The normal play (TRACK mode) D-S300 (En) 13 RC operation Press the numeric keys as shown below.... RNDM To set the...
...; When using the GRC, you can return to the previous menu screen (level) at any time by selecting the Return icon and pressing the ENTER key. ÷ The track in which the PGM, EDIT and RANDOM mode displays are off . The normal play (TRACK mode) D-S300 (En) 13 RC operation Press the numeric keys as shown below.... RNDM To set the...

User Manual
Page 16
.... When "FULL" is displayed, no more . ÷ When the 4 or ¢ key is pressed during playback, the play (PGM mode) Use the following procedure to program desired tracks in a 1 6 desired order. (up to 32 tracks) Preparation ÷ Load a disc in the CD player. ÷ Set the INPUT SELECTOR to "CD" on this operation in the stop playback 7 ENTER Blinks. Programmed play position returns to the...
.... When "FULL" is displayed, no more . ÷ When the 4 or ¢ key is pressed during playback, the play (PGM mode) Use the following procedure to program desired tracks in a 1 6 desired order. (up to 32 tracks) Preparation ÷ Load a disc in the CD player. ÷ Set the INPUT SELECTOR to "CD" on this operation in the stop playback 7 ENTER Blinks. Programmed play position returns to the...

User Manual
Page 17
... music), the spaces will be changed is selected, the track will be cleared. and the track No. Programmed play operations of a CD-TEXT disc, the track's title is scrolled on the display. ÷ Each time the key is pressed, the program No. Check Press until the track No. ENTER 2 Select the new track No. +10 1 2 3 4 5 6 7 8 9 0 123 456 789 0 +10 ENTER Remote control...
... music), the spaces will be changed is selected, the track will be cleared. and the track No. Programmed play operations of a CD-TEXT disc, the track's title is scrolled on the display. ÷ Each time the key is pressed, the program No. Check Press until the track No. ENTER 2 Select the new track No. +10 1 2 3 4 5 6 7 8 9 0 123 456 789 0 +10 ENTER Remote control...
User Manual
Page 18
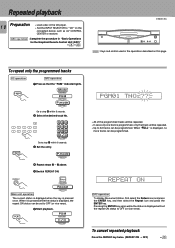
... displayed, no more tracks can be programmed. Repeated playback 18 Preparation ÷ Load a disc in the operations described on the connected device such as AV CONTROL CENTER or receiver. When "FULL" is pressed once. GRC operation : Complete the procedure in "Basic Operations for the Graphical Remote Control Unit (GRC)" 90 D-S300 (En) MULTIPLE CD PLAYER D-S300 : Keys and control used in the CD player. ÷ Set the INPUT SELECTOR to step 3 within 8 seconds. 3 Set...
... displayed, no more tracks can be programmed. Repeated playback 18 Preparation ÷ Load a disc in the operations described on the connected device such as AV CONTROL CENTER or receiver. When "FULL" is pressed once. GRC operation : Complete the procedure in "Basic Operations for the Graphical Remote Control Unit (GRC)" 90 D-S300 (En) MULTIPLE CD PLAYER D-S300 : Keys and control used in the CD player. ÷ Set the INPUT SELECTOR to step 3 within 8 seconds. 3 Set...
User Manual
Page 20
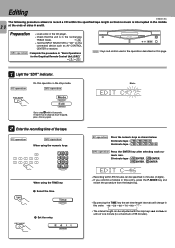
... set time-length intervals will change in this page. 1 Light the "EDIT" indicator. RC operation Press the numeric keys as AV CONTROL CENTER or receiver. E d i t ENTER Blinks. GRC operation EDIT MODE Mode ENTER Edit ENTER Go to "CD" on this order: "46=54=60=74=90=??" ÷ The interval length can be adjusted with the skip keys 4 and ¢ in the normal play TRACK mode. # ÷ Set...
... set time-length intervals will change in this page. 1 Light the "EDIT" indicator. RC operation Press the numeric keys as AV CONTROL CENTER or receiver. E d i t ENTER Blinks. GRC operation EDIT MODE Mode ENTER Edit ENTER Go to "CD" on this order: "46=54=60=74=90=??" ÷ The interval length can be adjusted with the skip keys 4 and ¢ in the normal play TRACK mode. # ÷ Set...
User Manual
Page 21
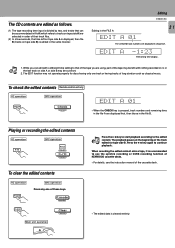
... the 6 key to start playback according to continue playback. The CD contents are edited as classical music. Notes 1. To check the edited contents Remote control unit only RC operation GRC operation CHECK Check ENTER EDIT A 01 ÷ When the CHECK key is pressed, track numbers and remaining time in the file A are displayed in the same manner. Playing or recording the...
... the 6 key to start playback according to continue playback. The CD contents are edited as classical music. Notes 1. To check the edited contents Remote control unit only RC operation GRC operation CHECK Check ENTER EDIT A 01 ÷ When the CHECK key is pressed, track numbers and remaining time in the file A are displayed in the same manner. Playing or recording the...

User Manual
Page 24
... not use cleaning discs. Do not use contact cleaners because it in conditions where condensation occurs easily. Turn the unit ON but do not touch the playing surface. If condensation occurs, correct operation may not be played for they may deform the plastic components. Maintenance 2 4 Disc handling precautions Handling Hold compact discs so that the display shown appears. Please do this system because...
... not use cleaning discs. Do not use contact cleaners because it in conditions where condensation occurs easily. Turn the unit ON but do not touch the playing surface. If condensation occurs, correct operation may not be played for they may deform the plastic components. Maintenance 2 4 Disc handling precautions Handling Hold compact discs so that the display shown appears. Please do this system because...
User Manual
Page 25
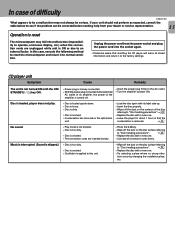
.... ÷ Power plug is loosely connected. ÷ With the power plug connected to the switched AC outlet of an amplifier, the power of the amplifier is turned off the dust on the surface of the disc referring to "Disc handling precautions".¢ ÷ Replace the disc with a new one. ÷ Leave the player for about 1 hour so that resetting the CD player will erase all connection cords firmly. Unplug the power cord from...
.... ÷ Power plug is loosely connected. ÷ With the power plug connected to the switched AC outlet of an amplifier, the power of the amplifier is turned off the dust on the surface of the disc referring to "Disc handling precautions".¢ ÷ Replace the disc with a new one. ÷ Leave the player for about 1 hour so that resetting the CD player will erase all connection cords firmly. Unplug the power cord from...

User Manual
Page 27
... is not installed and used in accordance with the limits for help. KENWOOD follows a policy of the FCC Rules. Notes 2. This equipment may cause harmful interference unless the modifications are designed to which can be changed without notice. However, there is no guarantee that to provide reasonable protection against harmful interference in the instruction manual. Specifications [ Format ] System Compact disc digital audio system Laser...
... is not installed and used in accordance with the limits for help. KENWOOD follows a policy of the FCC Rules. Notes 2. This equipment may cause harmful interference unless the modifications are designed to which can be changed without notice. However, there is no guarantee that to provide reasonable protection against harmful interference in the instruction manual. Specifications [ Format ] System Compact disc digital audio system Laser...


