
User Manual
Page 3
... protection for this product from the type of antenna-discharge unit, connection to determine that produce heat. Do not overload wall outlets, extension cords, or integral convenience receptacles as this product through openings as the original part. Refer all servicing to keep from overheating, and these openings must not be sure the antenna or cable system is in the operating instructions should be retained...
... protection for this product from the type of antenna-discharge unit, connection to determine that produce heat. Do not overload wall outlets, extension cords, or integral convenience receptacles as this product through openings as the original part. Refer all servicing to keep from overheating, and these openings must not be sure the antenna or cable system is in the operating instructions should be retained...

User Manual
Page 4
... DVD VIDEO discs 19 Video Formats 20 Playable files with this unit 21 Basic section Clock adjustment 23 Basic use method 24 Using Auto Room Equalizer function 26 Using Digital Sound Equalizer function 28 Enjoying surround sound 31 Playback of DVD/CD 33 Viewing JPEG images 36 Changing the display contents of the display 38 Receiving broadcast station 39 RDS (Radio Data System 43 Searching for a desired program type (PTY search) ..... 44 Listening to external input sources...
... DVD VIDEO discs 19 Video Formats 20 Playable files with this unit 21 Basic section Clock adjustment 23 Basic use method 24 Using Auto Room Equalizer function 26 Using Digital Sound Equalizer function 28 Enjoying surround sound 31 Playback of DVD/CD 33 Viewing JPEG images 36 Changing the display contents of the display 38 Receiving broadcast station 39 RDS (Radio Data System 43 Searching for a desired program type (PTY search) ..... 44 Listening to external input sources...
User Manual
Page 6
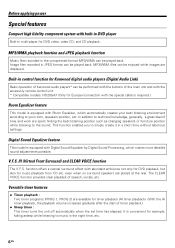
... function Music files recorded in multi-player for DVD video, video CD, and CD playback. even when no surround speakers are available for timer playback (AI timer playback). (With the AI timer playback, the playback volume increases gradually after the start of time and work are displayed. The CLEAR VOICE function provides clear playback of the main unit and with the accessory remote control unit. * Compatible models: HD20GA7 (Only for Europe) (connection...
... function Music files recorded in multi-player for DVD video, video CD, and CD playback. even when no surround speakers are available for timer playback (AI timer playback). (With the AI timer playback, the playback volume increases gradually after the start of time and work are displayed. The CLEAR VOICE function provides clear playback of the main unit and with the accessory remote control unit. * Compatible models: HD20GA7 (Only for Europe) (connection...

User Manual
Page 8
... connections are plugged or unplugged with unclear positioning of musical instruments, etc. ÷ Be sure to the following, or proper ventilation will be completely cut off from the wall outlet, first switch off . CAUTION Be sure to adhere to insert all connections have been made properly, reset the microcomputer by referring to connect the speaker cords 1 2 3 4 Speaker cord (Blue line) for surround Speaker cord (Red...
... connections are plugged or unplugged with unclear positioning of musical instruments, etc. ÷ Be sure to the following, or proper ventilation will be completely cut off from the wall outlet, first switch off . CAUTION Be sure to adhere to insert all connections have been made properly, reset the microcomputer by referring to connect the speaker cords 1 2 3 4 Speaker cord (Blue line) for surround Speaker cord (Red...

User Manual
Page 9
... outlet System control cord M-AX7 AC POWER cord To AC wall outlet Audio cord Audio cord Speaker (Left) Speaker cord for setting the auto room equalizer, and keep it disconnected at other times. System connections Microphone for Room Equalizer (not for recording) Connect this only for surround (Blue line) −+ LS-AXD7 L −+ How to connect the speaker cords 1 2 3 4 Speaker cord (Red line) Application section Knowledge section ÷ When subwoofer, center, and the two surround terminals are connected to the 3.1 channel speaker system to...
... outlet System control cord M-AX7 AC POWER cord To AC wall outlet Audio cord Audio cord Speaker (Left) Speaker cord for setting the auto room equalizer, and keep it disconnected at other times. System connections Microphone for Room Equalizer (not for recording) Connect this only for surround (Blue line) −+ LS-AXD7 L −+ How to connect the speaker cords 1 2 3 4 Speaker cord (Red line) Application section Knowledge section ÷ When subwoofer, center, and the two surround terminals are connected to the 3.1 channel speaker system to...

User Manual
Page 13
... section 1 23 4 5 1 STANDBY indicator % 2 (POWER) key ¢ Used for setting the unit to On or Standby. 3 POWER ON/OFF switch 4 CHANNEL SELECTOR key Used for switching the amplifier between 4 channels (25 W x 4) and 2 channels (50 W x 2). 5 Displays Display (C-AX7) The displays given in this manual are approximations only. AUTO V.F.S. 1 2 3 P.B.C. Tuner-related indicators CD time display Clock display Frequency display @ Timer-related indicators # DigitalEQ REC indicator $ DVD/CD-related indicators • a ˇ Q 13 EN Knowledge section Dolby Digital DTS MUTE PL RoomEQ...
... section 1 23 4 5 1 STANDBY indicator % 2 (POWER) key ¢ Used for setting the unit to On or Standby. 3 POWER ON/OFF switch 4 CHANNEL SELECTOR key Used for switching the amplifier between 4 channels (25 W x 4) and 2 channels (50 W x 2). 5 Displays Display (C-AX7) The displays given in this manual are approximations only. AUTO V.F.S. 1 2 3 P.B.C. Tuner-related indicators CD time display Clock display Frequency display @ Timer-related indicators # DigitalEQ REC indicator $ DVD/CD-related indicators • a ˇ Q 13 EN Knowledge section Dolby Digital DTS MUTE PL RoomEQ...

User Manual
Page 14
... for switching between the AUTO (auto tuning, stereo reception) and MONO (manual tuning, monaural reception) modes. cast band. 9 7 (Stop) / Tuning Mode key DVD/CD : Used for stopping a disc operation. › TUNER : q Used for DVD/CD tracks or chapters › ! MUTE key Used for blinking of the indicator. Red : Ordinary standby. Select a preset radio station fi , - p 4 D.AUDIO IN jack u Used as the input terminal for audio from the remote control unit. 6 DVD/CD tray 7 0 (DVD/CD open/close) key ‹ Used for opening or closing the DVD/CD tray. 8 6 (Play...
... for switching between the AUTO (auto tuning, stereo reception) and MONO (manual tuning, monaural reception) modes. cast band. 9 7 (Stop) / Tuning Mode key DVD/CD : Used for stopping a disc operation. › TUNER : q Used for DVD/CD tracks or chapters › ! MUTE key Used for blinking of the indicator. Red : Ordinary standby. Select a preset radio station fi , - p 4 D.AUDIO IN jack u Used as the input terminal for audio from the remote control unit. 6 DVD/CD tray 7 0 (DVD/CD open/close) key ‹ Used for opening or closing the DVD/CD tray. 8 6 (Play...

User Manual
Page 15
...), turn this is called Standby mode. During SOUND operation: Used to menu selection mode. at the time of function menu mode : SOUND PRESET º D.EQ Rec Mode Q REC LEVEL Q D.AUDIO OUT p INPUT LEVEL y AUTO MEMORY , DIMMER SET ∏ LEVEL METER a A.P.S. SET key During MODE operation: Used to confirm the program No. Used to confirm the selected item. This is used for selecting an input source. Items of DVD/ CD. % Clear voice indicator Tone indicator A.R. To set or enter setting of power is supplied...
...), turn this is called Standby mode. During SOUND operation: Used to menu selection mode. at the time of function menu mode : SOUND PRESET º D.EQ Rec Mode Q REC LEVEL Q D.AUDIO OUT p INPUT LEVEL y AUTO MEMORY , DIMMER SET ∏ LEVEL METER a A.P.S. SET key During MODE operation: Used to confirm the program No. Used to confirm the selected item. This is used for selecting an input source. Items of DVD/ CD. % Clear voice indicator Tone indicator A.R. To set or enter setting of power is supplied...

User Manual
Page 16
... Used to track mode, or program mode. ENTER key When setting up in a mode : Used for receiving a radio station. TOP MENU/JPEG LIST key flU Used to adjust various modes. Application section Knowledge section 16 EN TIME DISP. Preparations Basic section Controls and indicators Operation of remote control unit The keys on the remote control unit with only speakers installed at the front. 4 CLEAR VOICE key ¤ Used for selecting a DVD/CD track number or recall a preset station of the tuner...
... Used to track mode, or program mode. ENTER key When setting up in a mode : Used for receiving a radio station. TOP MENU/JPEG LIST key flU Used to adjust various modes. Application section Knowledge section 16 EN TIME DISP. Preparations Basic section Controls and indicators Operation of remote control unit The keys on the remote control unit with only speakers installed at the front. 4 CLEAR VOICE key ¤ Used for selecting a DVD/CD track number or recall a preset station of the tuner...

User Manual
Page 17
...DVD TUNER CONTROL PRE-AMPLIFIER PHONES D.AUDIO D.AUDIO SURROUND Clear voice LCR Tone LFE SL SW SR A.R. EQ Room EQ Mode SOUND SELECTOR INPUT SEL. / MULTI CONTROL MODE SET VOLUME 0 MUTE Tuning Mode 6 m ÷ The provided batteries are intended for use this model. ¢ l d @ Sound setting mode keys Press for displaying the day of three room equalizer setting modes. SUBTITLE key U Used to the remote sensor, malfunction may be operated. ÷ When pressing more between display and no display for speaker setup. TUNER : q Used for receiving a radio station...
...DVD TUNER CONTROL PRE-AMPLIFIER PHONES D.AUDIO D.AUDIO SURROUND Clear voice LCR Tone LFE SL SW SR A.R. EQ Room EQ Mode SOUND SELECTOR INPUT SEL. / MULTI CONTROL MODE SET VOLUME 0 MUTE Tuning Mode 6 m ÷ The provided batteries are intended for use this model. ¢ l d @ Sound setting mode keys Press for displaying the day of three room equalizer setting modes. SUBTITLE key U Used to the remote sensor, malfunction may be operated. ÷ When pressing more between display and no display for speaker setup. TUNER : q Used for receiving a radio station...

User Manual
Page 18
... screen connected to the DVD standard and a music side. CPRM is the abbreviation of Content Protection for recording media. Preparations Types of playable discs The system this unit is using does not only play music from that the disc being played is a technique for copyright protection for Recordable Media, and it indicates that of the TV in use, the disc cannot be played normally. As this player plays discs...
... screen connected to the DVD standard and a music side. CPRM is the abbreviation of Content Protection for recording media. Preparations Types of playable discs The system this unit is using does not only play music from that the disc being played is a technique for copyright protection for Recordable Media, and it indicates that of the TV in use, the disc cannot be played normally. As this player plays discs...

User Manual
Page 25
... headphones Insert the headphones plug into the PHONES jack. 065 Muting the sound temporarily (MUTE) Press the MUTE key. Adjusting volume. key is switched while recording or the CHANNEL SEL. When listening with a stereo mini plug can be interrupted. tial setting is HEADPHONE.) p Caution at the time of recording When the surround mode is operated etc., the sound may be connected. ÷ The sound from all speakers is cut off...
... headphones Insert the headphones plug into the PHONES jack. 065 Muting the sound temporarily (MUTE) Press the MUTE key. Adjusting volume. key is switched while recording or the CHANNEL SEL. When listening with a stereo mini plug can be interrupted. tial setting is HEADPHONE.) p Caution at the time of recording When the surround mode is operated etc., the sound may be connected. ÷ The sound from all speakers is cut off...
User Manual
Page 26
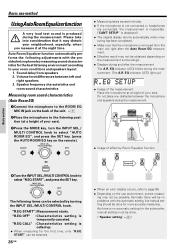
... depending on the measurement surroundings. ÷ Displays during the measurement. ÷ Image of the measurement Place the microphone at the night time. "R.EQ START": Measurement starts. Auto Room Equalizer function automatically performs the following items can be done for the subwoofer, manual setting must be selected by turning the INPUT SEL./MULTI CONTROL knob. Speaker frequency characteristics and room sound characteristics Measuring room sound characteristics (Auto Room EQ) 1Connect the...
... depending on the measurement surroundings. ÷ Displays during the measurement. ÷ Image of the measurement Place the microphone at the night time. "R.EQ START": Measurement starts. Auto Room Equalizer function automatically performs the following items can be done for the subwoofer, manual setting must be selected by turning the INPUT SEL./MULTI CONTROL knob. Speaker frequency characteristics and room sound characteristics Measuring room sound characteristics (Auto Room EQ) 1Connect the...

User Manual
Page 32
... 3.1 channel speaker system to be adjusted at the range of CENTER with the INPUT SEL./MULTI CONTROL knob [press the MULTI CONTROL % / fi key on the input source. Basic use method CLEAR VOICE setting 1 Press the SOUND SELECTOR key, turn the INPUT SEL./MULTI CONTROL knob to select "SURROUND". Basic section Application section When 2 channels (stereo) has been selected, switching is selected with the speaker settings, the LISTEN MODE is set to ON. 3 Turn the INPUT...
... 3.1 channel speaker system to be adjusted at the range of CENTER with the INPUT SEL./MULTI CONTROL knob [press the MULTI CONTROL % / fi key on the input source. Basic use method CLEAR VOICE setting 1 Press the SOUND SELECTOR key, turn the INPUT SEL./MULTI CONTROL knob to select "SURROUND". Basic section Application section When 2 channels (stereo) has been selected, switching is selected with the speaker settings, the LISTEN MODE is set to ON. 3 Turn the INPUT...
User Manual
Page 47
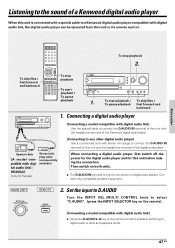
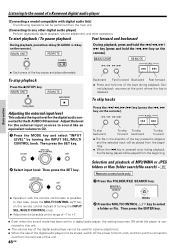
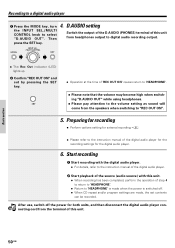
... switch off the power for the digital audio player and for connection of the Kenwood digital audio player. [Connecting to any other digital audio player] Use a commercial cord with stereo mini plugs to a Kenwood digital audio player compatible with digital audio link] ÷ When the D.AUDIO 6 key on both units. ÷ The D.AUDIO IN terminal is done and playback starts. 47 EN Knowledge section MAIN UNIT REMOTE 2. Set the input to D.AUDIO Turn the INPUT SEL./MULTI CONTROL knob to select "D.AUDIO". [press the INPUT SELECTOR key on the remote]. [Connecting a model compatible...
... switch off the power for the digital audio player and for connection of the Kenwood digital audio player. [Connecting to any other digital audio player] Use a commercial cord with stereo mini plugs to a Kenwood digital audio player compatible with digital audio link] ÷ When the D.AUDIO 6 key on both units. ÷ The D.AUDIO IN terminal is done and playback starts. 47 EN Knowledge section MAIN UNIT REMOTE 2. Set the input to D.AUDIO Turn the INPUT SEL./MULTI CONTROL knob to select "D.AUDIO". [press the INPUT SELECTOR key on the remote]. [Connecting a model compatible...
User Manual
Page 48
... the direction of turning the INPUT SEL./MULTI CONTROL knob. ÷ Adjustment is possible at the point where the key is to be ended, switch off the power for a digital audio player, the setting becomes Off while the player is possible. Blinks 2 Press the MULTI CONTROL % / fi key to any other digital audio player] Perform digital audio player playback, volume adjustment, and other operations. Then press the ENTER key. ÷ Even when the sound mode...
... the direction of turning the INPUT SEL./MULTI CONTROL knob. ÷ Adjustment is possible at the point where the key is to be ended, switch off the power for a digital audio player, the setting becomes Off while the player is possible. Blinks 2 Press the MULTI CONTROL % / fi key to any other digital audio player] Perform digital audio player playback, volume adjustment, and other operations. Then press the ENTER key. ÷ Even when the sound mode...
User Manual
Page 50
... EN D.AUDIO setting the INPUT SEL./MULTI CONTROL knob to the instruction manual of this unit from the speakers when switching to a digital audio player 1 Press the MODE key, turn 4. Then Switch the output of the D.AUDIO (PHONES) terminal of "REC OUT ON" causes return to "HEADPHONE". ÷ Please note that the volume may become high when switching "D.AUDIO OUT" while using headphones. ÷ Please pay attention to the volume setting as sound will...
... EN D.AUDIO setting the INPUT SEL./MULTI CONTROL knob to the instruction manual of this unit from the speakers when switching to a digital audio player 1 Press the MODE key, turn 4. Then Switch the output of the D.AUDIO (PHONES) terminal of "REC OUT ON" causes return to "HEADPHONE". ÷ Please note that the volume may become high when switching "D.AUDIO OUT" while using headphones. ÷ Please pay attention to the volume setting as sound will...

User Manual
Page 66
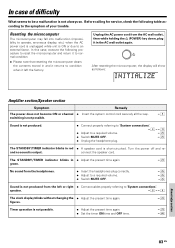
... time overlapping. 2 Set the timer setting program number. 1 Press the MODE key, turn the INPUT SEL./ MULTI CONTROL knob to "System connections" 8~@ 1 Make preparations for a component connected to external input jacks. ÷ Set the POWER switch of "PROG.1" and "PROG.2" can be overwritten by the new setting. Basic section Application section 2 Select "PROG.1 SET" or "PROG.2 SET". 3 Press the SET key. Listening to DVD/CD Set a disc. (Only normal playback is turned. Then press the SET key. Adjust the clock before setting the timer...
... time overlapping. 2 Set the timer setting program number. 1 Press the MODE key, turn the INPUT SEL./ MULTI CONTROL knob to "System connections" 8~@ 1 Make preparations for a component connected to external input jacks. ÷ Set the POWER switch of "PROG.1" and "PROG.2" can be overwritten by the new setting. Basic section Application section 2 Select "PROG.1 SET" or "PROG.2 SET". 3 Press the SET key. Listening to DVD/CD Set a disc. (Only normal playback is turned. Then press the SET key. Adjust the clock before setting the timer...

User Manual
Page 72
... to change the DVD/CD settings. NTSC ➝ PAL Set the video format from comparison of the preceding and the following three types. P-picture (expected coding in both direction): This is the display shown on -screen display" I -picture and P-picture). The SETUP MENU has the following image (I -picture (encoding inside the frame): This is switched. (Only DOLBY DIGITAL) Player Menu Language Set the display language for a wide screen. Subtitle Language Set the disc...
... to change the DVD/CD settings. NTSC ➝ PAL Set the video format from comparison of the preceding and the following three types. P-picture (expected coding in both direction): This is the display shown on -screen display" I -picture and P-picture). The SETUP MENU has the following image (I -picture (encoding inside the frame): This is switched. (Only DOLBY DIGITAL) Player Menu Language Set the display language for a wide screen. Subtitle Language Set the disc...
User Manual
Page 83
... a required volume. ∞ ÷ Switch MUTE OFF. ∞ ÷ Unplug the headphone plug. figures. £ Timer operation is output. The STANDBY/TIMER indicator blinks in the AC wall outlet again. and no sound is not possible. ÷ Adjust the present time again. ÷ Set the timer ON time and OFF time. £ Á 83 EN Knowledge section speaker. 8~9 The clock display blinks without changing the ÷ Adjust the present time again. After resetting the...
... a required volume. ∞ ÷ Switch MUTE OFF. ∞ ÷ Unplug the headphone plug. figures. £ Timer operation is output. The STANDBY/TIMER indicator blinks in the AC wall outlet again. and no sound is not possible. ÷ Adjust the present time again. ÷ Set the timer ON time and OFF time. £ Á 83 EN Knowledge section speaker. 8~9 The clock display blinks without changing the ÷ Adjust the present time again. After resetting the...


