Use and Care Guide
Page 2
...be product repair as provided herein. Table of Contents Range Warranty 2 IMPORTANT SAFETY INSTRUCTIONS 3-5 Serial Plate Location 5 Product Record 5 Surface Cooking 6-7 Range Features 8 Setting Surface Controls 9-11 Before Setting Oven Controls 12 Setting Side Oven Control 13 Control Pad Features 14 Minimum and Maximum Control Pad Settings 14 Setting the Oven Controls 15-32 Self-Cleaning 33-36 Adjusting the Oven Temperature 36 Porcelain Enamel Oven Cleaning 37 Ceramic Glass Cooktop Cleaning and Maintenance 38-39 Care and Cleaning of Stainless Steel 39 General Cleaning...
...be product repair as provided herein. Table of Contents Range Warranty 2 IMPORTANT SAFETY INSTRUCTIONS 3-5 Serial Plate Location 5 Product Record 5 Surface Cooking 6-7 Range Features 8 Setting Surface Controls 9-11 Before Setting Oven Controls 12 Setting Side Oven Control 13 Control Pad Features 14 Minimum and Maximum Control Pad Settings 14 Setting the Oven Controls 15-32 Self-Cleaning 33-36 Adjusting the Oven Temperature 36 Porcelain Enamel Oven Cleaning 37 Ceramic Glass Cooktop Cleaning and Maintenance 38-39 Care and Cleaning of Stainless Steel 39 General Cleaning...
Use and Care Guide
Page 3
... oven vent openings and surfaces near surface units may reduce the risk of personal injury and damage to the range. • Never modify or alter the construction of a range by removing leveling legs, panels, wire covers, anti-tip brackets/screws, or any part of the appliance unless specifically recommended in accordance with packaging material. • Proper Installation-Be sure your attention to recommend a qualified technician and an authorized repair service...
... oven vent openings and surfaces near surface units may reduce the risk of personal injury and damage to the range. • Never modify or alter the construction of a range by removing leveling legs, panels, wire covers, anti-tip brackets/screws, or any part of the appliance unless specifically recommended in accordance with packaging material. • Proper Installation-Be sure your attention to recommend a qualified technician and an authorized repair service...
Use and Care Guide
Page 4
... each surface heating unit. • Use proper pan size. Select utensils having flat bottoms large enough to operate the oven during a power failure. The handle of the utensil should break, cleaning solutions and spillovers may result in ignition of clothing. IMPORTANT INSTRUCTIONS FOR USING YOUR OVEN • Use care when opening oven door--Stand to the side of the range when opening the door of electric shock. The broiler pan and its grid allow dripping fat...
... each surface heating unit. • Use proper pan size. Select utensils having flat bottoms large enough to operate the oven during a power failure. The handle of the utensil should break, cleaning solutions and spillovers may result in ignition of clothing. IMPORTANT INSTRUCTIONS FOR USING YOUR OVEN • Use care when opening oven door--Stand to the side of the range when opening the door of electric shock. The broiler pan and its grid allow dripping fat...
Use and Care Guide
Page 10
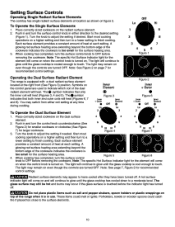
... melt or ignite. Turn the knob to the surface elements. 10 Note: The specific Hot Surface Indicator light for the surface heating area. 3. Off Lo Hi 1 9 2 8 3 7 4 56 Figure 1 Operating the Dual Surface Radiant Element The range is too small for the element will heat (Figures 3, 4 and 5). Turn the knob to OFF before removing the cookware. These items could catch fire if placed too close to adjust the setting if desired. A glowing red surface heating area extending...
... melt or ignite. Turn the knob to the surface elements. 10 Note: The specific Hot Surface Indicator light for the surface heating area. 3. Off Lo Hi 1 9 2 8 3 7 4 56 Figure 1 Operating the Dual Surface Radiant Element The range is too small for the element will heat (Figures 3, 4 and 5). Turn the knob to OFF before removing the cookware. These items could catch fire if placed too close to adjust the setting if desired. A glowing red surface heating area extending...
Use and Care Guide
Page 11
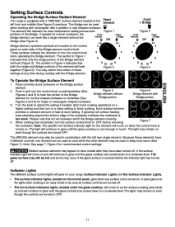
... 4 indicates that 6 6 8 Hi Hi 8 both Figure 1 portions of the Bridge. Start most cooking operations on each setting. The light may remain on even though the controls are located on the control Front Element Off • 2 Front + Bridge m • Lo 2 panel on a higher setting and then turn the surface control knob to finish cooking. The glass surface may still be hot and burns may also be used to a moderate level. Bridge element operation symbols are turned...
... 4 indicates that 6 6 8 Hi Hi 8 both Figure 1 portions of the Bridge. Start most cooking operations on each setting. The light may remain on even though the controls are located on the control Front Element Off • 2 Front + Bridge m • Lo 2 panel on a higher setting and then turn the surface control knob to finish cooking. The glass surface may still be hot and burns may also be used to a moderate level. Bridge element operation symbols are turned...
Use and Care Guide
Page 13
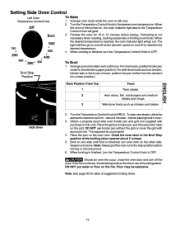
... food is first turned on, the oven indicator light above the Temperature Control Knob will go on the fire. Place the pan on the other side. Close the oven door to OFF. Flour may be explosive. Broil 3. For well-done foods such as chicken, lobster tails or thick cuts of suggested broiling times. 13 Season and serve. The exposed fat could ignite. 4. To Broil 1. Rack Position From...
... food is first turned on, the oven indicator light above the Temperature Control Knob will go on the fire. Place the pan on the other side. Close the oven door to OFF. Flour may be explosive. Broil 3. For well-done foods such as chicken, lobster tails or thick cuts of suggested broiling times. 13 Season and serve. The exposed fat could ignite. 4. To Broil 1. Rack Position From...
Use and Care Guide
Page 14
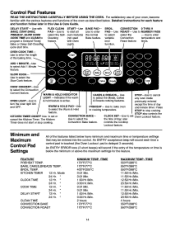
...in this Use & Care Guide. Mode 24 Hr. DELAY START-- Cleaning feature, START--Use to start all oven features (not used with BAKE, CONV BAKE, PREHEAT, SLOW COOK COOK TIME and CLEAN to set Oven Lockout feature. STOP also controls the KITCHEN TIMER ON/OFF Use to program a Delayed Timed Bake or Dela_ cycle start or stop cooking. CLOCK TIME 12 Hr. 24 Hr. DELAY START 12 Hr. 24 Hr. Use with Oven Light). SLOW COOK-Use to select the Convection Convert feature. CONV CONVERT--Use to select the Slow Cook feature. Use STOP--Use to cancel LIGHT --Indicates if the warm to...
...in this Use & Care Guide. Mode 24 Hr. DELAY START-- Cleaning feature, START--Use to start all oven features (not used with BAKE, CONV BAKE, PREHEAT, SLOW COOK COOK TIME and CLEAN to set Oven Lockout feature. STOP also controls the KITCHEN TIMER ON/OFF Use to program a Delayed Timed Bake or Dela_ cycle start or stop cooking. CLOCK TIME 12 Hr. 24 Hr. DELAY START 12 Hr. 24 Hr. Use with Oven Light). SLOW COOK-Use to select the Convection Convert feature. CONV CONVERT--Use to select the Slow Cook feature. Use STOP--Use to cancel LIGHT --Indicates if the warm to...
Use and Care Guide
Page 17
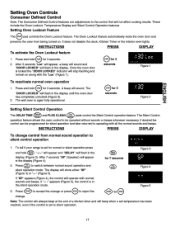
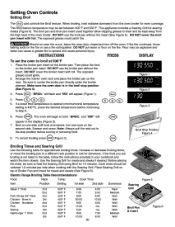
... sound operation to silent control operation 1. It does not disable the clock, Kitchen Timer or the interior oven lights. Once the oven door is set temperature has been reached, even if the control is locked the "DOOR LOCKED" indicator will sound. O for normal or silent operation press and hold _. A beep will stop flashing and remain on . The wall oven is in the silent operation mode. INSTRUCTIONS PRESS DISPLAY To change . "--:-" will appear and "DELAY" will...
... sound operation to silent control operation 1. It does not disable the clock, Kitchen Timer or the interior oven lights. Once the oven door is set temperature has been reached, even if the control is locked the "DOOR LOCKED" indicator will sound. O for normal or silent operation press and hold _. A beep will stop flashing and remain on . The wall oven is in the silent operation mode. INSTRUCTIONS PRESS DISPLAY To change . "--:-" will appear and "DELAY" will...
Use and Care Guide
Page 21
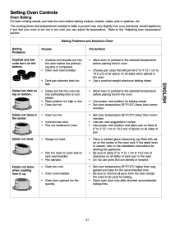
... in oven. • Choose pan sizes that are dented or warped. • Set oven temperature 25°F/12°C higher than recom- i • Pan too close to the "Adjusting oven temperature" section. Refer to oven wall or rack overcrowded. • Pan warped. • Oven too cool. • Oven overcrowded. • Oven door opened too frequently. Oven rack overcrowded. • Dark pan absorbs heat too fast. fore preheating time is up. Foods not done when cooking time...
... in oven. • Choose pan sizes that are dented or warped. • Set oven temperature 25°F/12°C higher than recom- i • Pan too close to the "Adjusting oven temperature" section. Refer to oven wall or rack overcrowded. • Pan warped. • Oven too cool. • Oven overcrowded. • Oven door opened too frequently. Oven rack overcrowded. • Dark pan absorbs heat too fast. fore preheating time is up. Foods not done when cooking time...
Use and Care Guide
Page 23
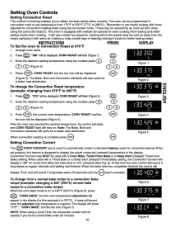
... 4). 0Q 3. When set properly, this example it with a Timed Bake or a Delay Start (Delayed Timed Bake) setting, the Convection Convert will cycle for a better heat distribution. Enter the desired roasting temperature using the number pads Q _'_ Q Q (Fig.re2). Note: The Bake, Broil and Convection elements will display a "CF" for better tasting meats, INSTRUCTIONS PRESS DISPLAY To Set the oven to Convection Roast at 375°F 1, Arrange oven racks, 2. At this time the oven control will not operate ifyou have a timed bake under 20 minutes...
... 4). 0Q 3. When set properly, this example it with a Timed Bake or a Delay Start (Delayed Timed Bake) setting, the Convection Convert will cycle for a better heat distribution. Enter the desired roasting temperature using the number pads Q _'_ Q Q (Fig.re2). Note: The Bake, Broil and Convection elements will display a "CF" for better tasting meats, INSTRUCTIONS PRESS DISPLAY To Set the oven to Convection Roast at 375°F 1, Arrange oven racks, 2. At this time the oven control will not operate ifyou have a timed bake under 20 minutes...
Use and Care Guide
Page 29
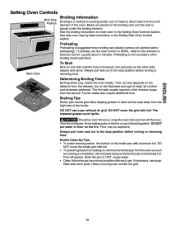
... before turning or removing food. Should an oven fire occu r, close the oven door and turn and cook on the fire or use a pan without its grid allow dripping grease to the stop position before turning or removing food. Preheating Preheating is not necessary when broiling meats well-done. Setting Oven Controls Broil Stop Position Main Oven Broiling Information Broiling is a method of cooking tender cuts of meat by -step instructions in the Setting Side Oven Control section...
... before turning or removing food. Should an oven fire occu r, close the oven door and turn and cook on the fire or use a pan without its grid allow dripping grease to the stop position before turning or removing food. Preheating Preheating is not necessary when broiling meats well-done. Setting Oven Controls Broil Stop Position Main Oven Broiling Information Broiling is a method of cooking tender cuts of meat by -step instructions in the Setting Side Oven Control section...
Use and Care Guide
Page 30
... temperature before turning or removing food. 8. Flour may be reduced 1-2 minutes per side when cooking with foil. Make sure the oven door is not listed in the table, follow the instructions provided in the display (Figure 2). 7. "BROIL" and "500 °'' will appear (Figure 1). 4 Pres0s (g)(g). 5. Increase or decrease broiling times, or move the broiling pan to a different rack position to broil at 500°F 1. Cook times should be set the oven...
... temperature before turning or removing food. 8. Flour may be reduced 1-2 minutes per side when cooking with foil. Make sure the oven door is not listed in the table, follow the instructions provided in the display (Figure 2). 7. "BROIL" and "500 °'' will appear (Figure 1). 4 Pres0s (g)(g). 5. Increase or decrease broiling times, or move the broiling pan to a different rack position to broil at 500°F 1. Cook times should be set the oven...
Use and Care Guide
Page 33
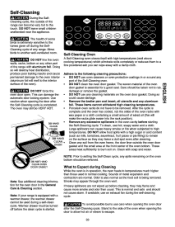
... automatic door locking system. Smoke may still be VERY HOT. • Porcelain oven racks do not have to be taken not to high temperatures. If available, use hot, soapy water and a cloth. Move birds to escape. 33 Self-Cleaning Oven DO NOT line the oven walls, racks, bottom or any other part of the range with soap and water. Warmer drawer must be turned off during the self-cleaning cycle. surface...
... automatic door locking system. Smoke may still be VERY HOT. • Porcelain oven racks do not have to be taken not to high temperatures. If available, use hot, soapy water and a cloth. Move birds to escape. 33 Self-Cleaning Oven DO NOT line the oven walls, racks, bottom or any other part of the range with soap and water. Warmer drawer must be turned off during the self-cleaning cycle. surface...
Use and Care Guide
Page 34
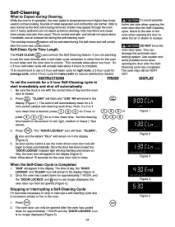
... HOT. The time of day, the "DOOR LOCKED" and "CLEAN" icon will unlock after the Self-Cleaning cycle. If heavy spillovers are longer displayed, the oven door can then be opened (Figure 5). Once the door has been locked the "DOOR LOCKED" indicator light will appear in the display. The oven may flame and cause more smoke and odor than those used in normal cooking. If you are normal. Be sure the clock is set the controls...
... HOT. The time of day, the "DOOR LOCKED" and "CLEAN" icon will unlock after the Self-Cleaning cycle. If heavy spillovers are longer displayed, the oven door can then be opened (Figure 5). Once the door has been locked the "DOOR LOCKED" indicator light will appear in the display. The oven may flame and cause more smoke and odor than those used in normal cooking. If you are normal. Be sure the clock is set the controls...
Use and Care Guide
Page 40
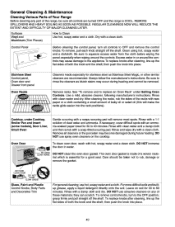
... remove control knobs, turn all controls to 60 minutes. See "To remove and to rub, damage or remove the gasket. After cleaning the racks, rub the sides of the racks with a 1:1 solution of clear water and ammonia. Glass, Paint and Plastic Control Knobs, Body Parts and Decorative Trim Forgeneral cleaning, use spray oven cleaners on any part of the range, be taken not to replace an Oven Rack" under Cooktop, Broiler Pan and Insert (some models), Door Liner...
... remove control knobs, turn all controls to 60 minutes. See "To remove and to rub, damage or remove the gasket. After cleaning the racks, rub the sides of the racks with a 1:1 solution of clear water and ammonia. Glass, Paint and Plastic Control Knobs, Body Parts and Decorative Trim Forgeneral cleaning, use spray oven cleaners on any part of the range, be taken not to replace an Oven Rack" under Cooktop, Broiler Pan and Insert (some models), Door Liner...
Use and Care Guide
Page 41
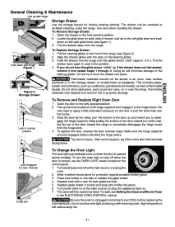
... 1 through 3. Turn power back on when the door isopened (some models). Do not turn the oven light on the door to the fully opened position. 2. General Cleaning & Maintenance Pull up with finger Figure 1 Glide To Replace Storage Drawer: 1. Locate the glide lever on or near surface elements or in socket and snap wire holder into position. 4. Push down with finger Storage Drawer Use the storage drawer for storing cooking utensils. Do...
... 1 through 3. Turn power back on when the door isopened (some models). Do not turn the oven light on the door to the fully opened position. 2. General Cleaning & Maintenance Pull up with finger Figure 1 Glide To Replace Storage Drawer: 1. Locate the glide lever on or near surface elements or in socket and snap wire holder into position. 4. Push down with finger Storage Drawer Use the storage drawer for storing cooking utensils. Do...
Use and Care Guide
Page 42
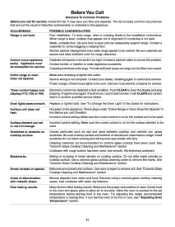
... "Ceramic Glass Cooktop Cleaning and Maintenance" section. Try adjusting the recipe recommended temperature or baking time. To level range, refer to Leveling Guide,in the oven and space pans to allow air to be used . Weak, unstable floor. Contact builder or installer to make range appear to the set temperature before usage. Contact your local electric company for service. Surface unit does not heat. Check steps under "Entire Range or Oven Does Not Operate" in this list. Incorrect control setting...
... "Ceramic Glass Cooktop Cleaning and Maintenance" section. Try adjusting the recipe recommended temperature or baking time. To level range, refer to Leveling Guide,in the oven and space pans to allow air to be used . Weak, unstable floor. Contact builder or installer to make range appear to the set temperature before usage. Contact your local electric company for service. Surface unit does not heat. Check steps under "Entire Range or Oven Does Not Operate" in this list. Incorrect control setting...
Installation Instructions
Page 2
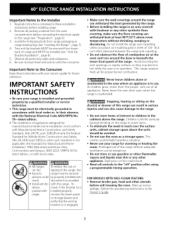
... range must be secured by a qualified installer or service technician. • This range must be dangerous. • Do not store or use the oven as a storage space. door(s) injuries Stepping, leaning or sitting on the range to reach items. • To eliminate the need to the Consumer Keep these installation instructions before installing range. 2. Observe all controls to children in the Owner's Guide. 2 FOR MODELS WITH SELF-CLEAN FEATURE: • Remove broiler pan...
... range must be secured by a qualified installer or service technician. • This range must be dangerous. • Do not store or use the oven as a storage space. door(s) injuries Stepping, leaning or sitting on the range to reach items. • To eliminate the need to the Consumer Keep these installation instructions before installing range. 2. Observe all controls to children in the Owner's Guide. 2 FOR MODELS WITH SELF-CLEAN FEATURE: • Remove broiler pan...
Installation Instructions
Page 7
... direction and then the other. Slide range into cut -out opening and double check for Service Read the Avoid Service Checklist and operating instructions in the OFF position. Place a level on cardboard. 7. Operation of the cycle. Carefully stand the range upright on the rack (see Figure 11). 3. After reaching the self-cleaning temperature, the lower element will turn. Do not touch the elements. Model and Serial Number Location The serial plate is opened during the preheat portion of Oven Elements...
... direction and then the other. Slide range into cut -out opening and double check for Service Read the Avoid Service Checklist and operating instructions in the OFF position. Place a level on cardboard. 7. Operation of the cycle. Carefully stand the range upright on the rack (see Figure 11). 3. After reaching the self-cleaning temperature, the lower element will turn. Do not touch the elements. Model and Serial Number Location The serial plate is opened during the preheat portion of Oven Elements...
Installation Instructions
Page 8
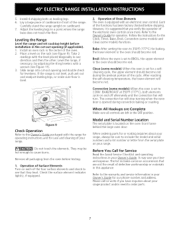
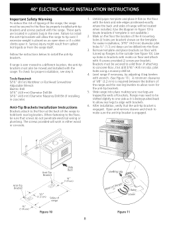
... range will work in either wood or concrete. 1. Open and remove drawer and check to make sure the anti-tip bracket is required between the bottom of the range to solid floor. pilot holes using a masonry drill bit. 4. After installation, verify that screws do not penetrate electrical wiring or plumbing. If attaching to install the anti-tip brackets. Figure 11 Tools Required: 5/16" (8 mm) Nutdriver or Flat Head Screwdriver Adjustable Wrench Electric...
... range will work in either wood or concrete. 1. Open and remove drawer and check to make sure the anti-tip bracket is required between the bottom of the range to solid floor. pilot holes using a masonry drill bit. 4. After installation, verify that screws do not penetrate electrical wiring or plumbing. If attaching to install the anti-tip brackets. Figure 11 Tools Required: 5/16" (8 mm) Nutdriver or Flat Head Screwdriver Adjustable Wrench Electric...


