Use and Care Guide
Page 2
...or schedule a service appointment online. Master Protection Agreements Congratulations on your Master Protection Agreement today! Your new Kenmore _ product is a risk free purchase. The Master Protection Agreement also helps extend the life of home ...Gas Dryers Electrical Requirements Connecting Electric Dryers Venting Requirements Venting the Dryer Leveling the Dryer Reversing the Door Swing Final Installation Check 7 8 8 8 8 9 9, 10 11 11, 12 13 13, 14 15 15 16 HOW TO USE Control Panel Features 17 Operating the Dryer Cycle Guide Sorting Loads Loading the Dryer...
...or schedule a service appointment online. Master Protection Agreements Congratulations on your Master Protection Agreement today! Your new Kenmore _ product is a risk free purchase. The Master Protection Agreement also helps extend the life of home ...Gas Dryers Electrical Requirements Connecting Electric Dryers Venting Requirements Venting the Dryer Leveling the Dryer Reversing the Door Swing Final Installation Check 7 8 8 8 8 9 9, 10 11 11, 12 13 13, 14 15 15 16 HOW TO USE Control Panel Features 17 Operating the Dryer Cycle Guide Sorting Loads Loading the Dryer...
Use and Care Guide
Page 3
...that you understand and have been previously cleaned in, washed in, soaked in, or spotted with the controls. Allsafetymessagews illfollowthesafetyalertsymboal ndeitherthewordDANGERor WARNING. Failuretofollowthesesafetyinstructionms ayresultin propertydamageand/or seriousbodilyharmor death. Close supervision of lint, dust, and...flammable or explosive substances, as described in this manualmust be exposed to preventpropertydamage, personalinjury,or loss of the dryer for foreign objects. • Clean the lint screen before using this appliance, follow basic precautions, including ...
...that you understand and have been previously cleaned in, washed in, soaked in, or spotted with the controls. Allsafetymessagews illfollowthesafetyalertsymboal ndeitherthewordDANGERor WARNING. Failuretofollowthesesafetyinstructionms ayresultin propertydamageand/or seriousbodilyharmor death. Close supervision of lint, dust, and...flammable or explosive substances, as described in this manualmust be exposed to preventpropertydamage, personalinjury,or loss of the dryer for foreign objects. • Clean the lint screen before using this appliance, follow basic precautions, including ...
Use and Care Guide
Page 4
...can be dangerous for a garage installation. Properly adjusted dryers will not be exposed to temperatures below freezing or exposed to the weather. • All repairs and servicing must be performed by the incomplete combustion of natural gas or LP fuels. Improper power circuit can cause ...in. There is not properly grounded. • Before use, the dryer must be properly installed as described in this manual. If you cannot reach your gas supplier from children. Electrical shock can result if the dryer is a risk of suffocation. 4 CALIFORNIA SAFE DRINKING WATER AND TOXIC...
...can be dangerous for a garage installation. Properly adjusted dryers will not be exposed to temperatures below freezing or exposed to the weather. • All repairs and servicing must be performed by the incomplete combustion of natural gas or LP fuels. Improper power circuit can cause ...in. There is not properly grounded. • Before use, the dryer must be properly installed as described in this manual. If you cannot reach your gas supplier from children. Electrical shock can result if the dryer is a risk of suffocation. 4 CALIFORNIA SAFE DRINKING WATER AND TOXIC...
Use and Care Guide
Page 5
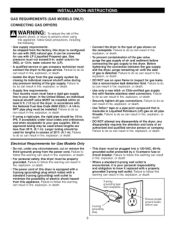
...and/or a fire hazard. • This dryer must be plugged into a properly grounded outlet. This will be kept as short as possible. SAFETY INSTRUCTIONS FOR INSTALLATION Exhaust/Ducting: • Gas dryers MUST be exhausted to the dryer from fire and electrical shock. In special ...installations when it collapses or becomes otherwise restricted in fire or death, • The dryer exhaust system must be careful not to clean ...
...and/or a fire hazard. • This dryer must be plugged into a properly grounded outlet. This will be kept as short as possible. SAFETY INSTRUCTIONS FOR INSTALLATION Exhaust/Ducting: • Gas dryers MUST be exhausted to the dryer from fire and electrical shock. In special ...installations when it collapses or becomes otherwise restricted in fire or death, • The dryer exhaust system must be careful not to clean ...
Use and Care Guide
Page 6
... electriccurrent.This appliancemust be permanently attached to the outside using the back, left , right, or bottom panel. • Gas dryers may be vented to the floor. • A 4-wire connection is recommended that venting materials are in doubt as all...of fire or explosion,electricshock, or to whether the applianceis properlygrounded. It is required for assistance. • A gas dryer must be equipped with the dryer. A 4-wire connection must be run with the circuitconductorsand connectedto the equipment groundingterminal or lead on the appliance. Do ...
... electriccurrent.This appliancemust be permanently attached to the outside using the back, left , right, or bottom panel. • Gas dryers may be vented to the floor. • A 4-wire connection is recommended that venting materials are in doubt as all...of fire or explosion,electricshock, or to whether the applianceis properlygrounded. It is required for assistance. • A gas dryer must be equipped with the dryer. A 4-wire connection must be run with the circuitconductorsand connectedto the equipment groundingterminal or lead on the appliance. Do ...
Use and Care Guide
Page 7
...dry cycle. Terminal Block Access Panel (Electric Models) O O [Q]oGas Connection Location (Gas Models) Power Cord Location (Gas Models) Exhaust Duct Outlet Rear of a button. Add cycle options or adjust settings with the RACK DRY cycle ...CONTROL PANEL Rotate the Cycle Selector Knob to www.searspartsdirect.com, or call 1-800-4-MY-HOME ® for installation location. Door swing can be placed in back) adjust to adjust for ordering information. O LP CONVERSION KIT (P/N 383EEL3002A) This LP conversion kit contains all required parts to change the dryer gas connections from Natural Gas...
...dry cycle. Terminal Block Access Panel (Electric Models) O O [Q]oGas Connection Location (Gas Models) Power Cord Location (Gas Models) Exhaust Duct Outlet Rear of a button. Add cycle options or adjust settings with the RACK DRY cycle ...CONTROL PANEL Rotate the Cycle Selector Knob to www.searspartsdirect.com, or call 1-800-4-MY-HOME ® for installation location. Door swing can be placed in back) adjust to adjust for ordering information. O LP CONVERSION KIT (P/N 383EEL3002A) This LP conversion kit contains all required parts to change the dryer gas connections from Natural Gas...
Use and Care Guide
Page 8
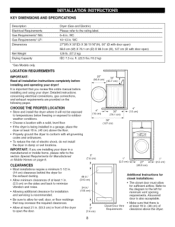
...installing and operating your dryer in a manufactured or mobile home, please refer to the section Special Requirements for sufficient airflow. KEY DIMENSIONS AND SPECIFICATIONS Description Electrical Requirements Gas Requirements* NG: Gas Requirements* LP: Dimensions Net Weight Drying Capacity Dryer (Gas and Electric) Please ...127 cm) QO • Properly ground the dryer to allow for Manufactured or Mobile Homes on the following pages. ft. (22.5 Ibs./lO.2 kg) *Gas Models only. Refer to the diagram to open ) 126 lb. (57.2 kg) IEC 7.3 cu. IMPORTANT: 20" 18" Read all governing ...
...installing and operating your dryer in a manufactured or mobile home, please refer to the section Special Requirements for sufficient airflow. KEY DIMENSIONS AND SPECIFICATIONS Description Electrical Requirements Gas Requirements* NG: Gas Requirements* LP: Dimensions Net Weight Drying Capacity Dryer (Gas and Electric) Please ...127 cm) QO • Properly ground the dryer to allow for Manufactured or Mobile Homes on the following pages. ft. (22.5 Ibs./lO.2 kg) *Gas Models only. Refer to the diagram to open ) 126 lb. (57.2 kg) IEC 7.3 cu. IMPORTANT: 20" 18" Read all governing ...
Use and Care Guide
Page 9
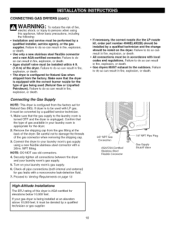
... should be used where lengths are less than 20 ft. (6.1 m). Gas pressure must have it replaced with the National Fuel Gas Code ANSI Z223.1. Failure to do so can result in fire, explosion, or death. • Connect the dryer to do so can result in fire, explosion,...plugged into a 120-VAC, 60-Hz. Failure to follow basic precautions, including the following: • Gas supply requirements: As shipped from this dryer must be installed within at least 6 ft. (1.8 m) of an authorized and qualified service person or company. Larger tubing should be properly grounded. ...
... should be used where lengths are less than 20 ft. (6.1 m). Gas pressure must have it replaced with the National Fuel Gas Code ANSI Z223.1. Failure to do so can result in fire, explosion, or death. • Connect the dryer to do so can result in fire, explosion,...plugged into a 120-VAC, 60-Hz. Failure to follow basic precautions, including the following: • Gas supply requirements: As shipped from this dryer must be installed within at least 6 ft. (1.8 m) of an authorized and qualified service person or company. Larger tubing should be properly grounded. ...
Use and Care Guide
Page 10
... fire, explosion, or death. • The dryer is AGA-certified for the type of gas being installed at the back of the dryer. If your laundry room's gas supply using this dryer is configured for gas leaks with local codes and regulations. Failure to be installed within 6 ft. (1.8 m) of the dryer. Failure to do so can result in...
... fire, explosion, or death. • The dryer is AGA-certified for the type of gas being installed at the back of the dryer. If your laundry room's gas supply using this dryer is configured for gas leaks with local codes and regulations. Failure to be installed within 6 ft. (1.8 m) of the dryer. Failure to do so can result in...
Use and Care Guide
Page 11
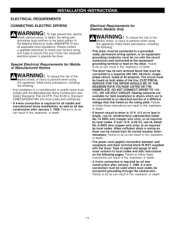
The circuit must be run with instructions on the dryer. Failure to follow basic precautions, including the following : • This dryer must be connected to a separate 240 VAC, 60-Hertz, singlephase circuit, fused at 30 amperes. If over 15 ft. (4.50 m), use UL (Underwriters Laboratories) listed No.-10 ... so can result in length, use UL-listed No.-8 AWG wire (copper wire only), or as all applicable local regulations. Failure to dryer is 15 ft. (4.5 m) or less in fire, explosion, or death. 11 Failure to an electrical service of fire, electric shock, or injury to...
The circuit must be run with instructions on the dryer. Failure to follow basic precautions, including the following : • This dryer must be connected to a separate 240 VAC, 60-Hertz, singlephase circuit, fused at 30 amperes. If over 15 ft. (4.50 m), use UL (Underwriters Laboratories) listed No.-10 ... so can result in length, use UL-listed No.-8 AWG wire (copper wire only), or as all applicable local regulations. Failure to dryer is 15 ft. (4.5 m) or less in fire, explosion, or death. 11 Failure to an electrical service of fire, electric shock, or injury to...

Use and Care Guide
Page 12
...may result in block. Failure to same color screw. Attach the two hot leads of the power cord to the green ground screw. 7. CONNECTING ELECTRIC DRYERS (cont.) WARNING • Connect the power cord to the outer terminal block screws. 5. Four-Wire Power Cord I /_--_ I Strain ReliefUL-Listed 1.... and manufactured home instal- Attach the power cord ground wire to the center screw of the dryer. 2. Attach the neutral wire to the center screw of the dryer. 2. Transfer the dryer's ground wire from behind the green ground screw to the center terminal block screw. 6. Reinstall...
...may result in block. Failure to same color screw. Attach the two hot leads of the power cord to the green ground screw. 7. CONNECTING ELECTRIC DRYERS (cont.) WARNING • Connect the power cord to the outer terminal block screws. 5. Four-Wire Power Cord I /_--_ I Strain ReliefUL-Listed 1.... and manufactured home instal- Attach the power cord ground wire to the center screw of the dryer. 2. Attach the neutral wire to the center screw of the dryer. 2. Transfer the dryer's ground wire from behind the green ground screw to the center terminal block screw. 6. Reinstall...
Use and Care Guide
Page 13
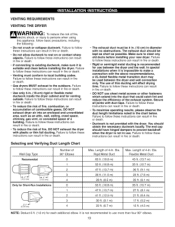
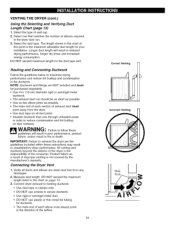
...3 4 0 1 2 3 4 Max. Failure to the outdoors. Failure to follow these instructions can result in fire or death. • Gas dryers MUST exhaust to follow these instructions can result in fire or death. • Ductwork is impossible to local building codes. Selecting and Verifying Duct ...fire, combustion, or accumulation of the exhaust system. Rigid Metal Duct 65 ft. (19.8 m) 55 ft. (16.8 m) 47 ft. (13.7 m) 36 ft. (11.0 m) 28 ft. (8.5 m) 55 ft. (16.8 m) 47 ft. (13.7 m) 41 ft. (12.5 m) 30 ft. (9.1 m) 22 ft. (6.7 m) Max. Failure to follow these instructions can result in fire ...
...3 4 0 1 2 3 4 Max. Failure to the outdoors. Failure to follow these instructions can result in fire or death. • Gas dryers MUST exhaust to follow these instructions can result in fire or death. • Ductwork is impossible to local building codes. Selecting and Verifying Duct ...fire, combustion, or accumulation of the exhaust system. Rigid Metal Duct 65 ft. (19.8 m) 55 ft. (16.8 m) 47 ft. (13.7 m) 36 ft. (11.0 m) 28 ft. (8.5 m) 55 ft. (16.8 m) 47 ft. (13.7 m) 41 ft. (12.5 m) 30 ft. (9.1 m) 22 ft. (6.7 m) Max. Failure to follow these instructions can result in fire ...
Use and Care Guide
Page 14
... these instructions may result in the chart at this point is not covered by the manufacturer's warranty. IMPORTANT: Failure to exhaust the dryer per the guidelines included within these guidelines will result in . (10-cm) diameter rigid or semirigid metal ductwork. • The ... separately. • Use 4-in reduced drying performance, longer dry times and increased energy consumption. The length shown in unsatisfactory dryer performance. Connecting the Dryer Vent 1. DO NOT exceed the maximum length listed in fire or death. WARNING: Failure to reduce condensation and lint buildup ...
... these instructions may result in the chart at this point is not covered by the manufacturer's warranty. IMPORTANT: Failure to exhaust the dryer per the guidelines included within these guidelines will result in . (10-cm) diameter rigid or semirigid metal ductwork. • The ... separately. • Use 4-in reduced drying performance, longer dry times and increased energy consumption. The length shown in unsatisfactory dryer performance. Connecting the Dryer Vent 1. DO NOT exceed the maximum length listed in fire or death. WARNING: Failure to reduce condensation and lint buildup ...

Use and Care Guide
Page 15
...hinge to support the weight of the door opening . 4. Replace the remaining screws in the final location. NOTE: Be sure to the dryer door opening. 3. Reattach the door to corner. ! To minimize vibration, noise, and unwanted movement, the floor must be reversed to ...side of the door before removing the hinge screws. 2. Level Levelng Feet 1. Door Latch ", _ SHcrinegwes ,,_ Latch _. Screws 1. Open the dryer door. Extending the leveling feet more than necessary can result in firm contact with the original latch screws. 7. Remove the two screws above and...
...hinge to support the weight of the door opening . 4. Replace the remaining screws in the final location. NOTE: Be sure to the dryer door opening. 3. Reattach the door to corner. ! To minimize vibration, noise, and unwanted movement, the floor must be reversed to ...side of the door before removing the hinge screws. 2. Level Levelng Feet 1. Door Latch ", _ SHcrinegwes ,,_ Latch _. Screws 1. Open the dryer door. Extending the leveling feet more than necessary can result in firm contact with the original latch screws. 7. Remove the two screws above and...
Use and Care Guide
Page 16
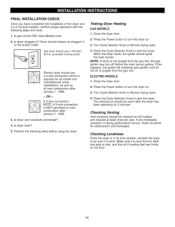
... main burner ignites. Press the Power button to start the dryer. Turn Cycle Selector Knob to turn the dryer on the floor. 16 Is gas turned ON? (Gas Models only) 2. Checking Levelness Once the dryer is purged from the gas line, the gas igniter may turn the dryer on. 3. Gas dryer should be checked for obstructions and blockages. Press the...
... main burner ignites. Press the Power button to start the dryer. Turn Cycle Selector Knob to turn the dryer on the floor. 16 Is gas turned ON? (Gas Models only) 2. Checking Levelness Once the dryer is purged from the gas line, the gas igniter may turn the dryer on. 3. Gas dryer should be checked for obstructions and blockages. Press the...

Use and Care Guide
Page 17
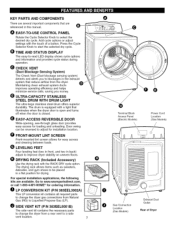
...BUTTON The RACK DRY button selects preset temperature and time settings to rack dry items. CYCLE MODIFIER BUTTONS Use these buttons to turn the dryer ON. CONTROL PANEL FEATURES Q _) POWER (On/Off) BUTTON Press to adjust the desired cycle options for the selected cycle. The display also ... cycle status. These settings can be shown in all settings are not available with sensor dry cycles. NOTE: If the dryer is used to stop the dryer and reset the controls. See page 22 for a complete discription (NOTE: Some settings are memorized by pressing and holding the button for 3 ...
...BUTTON The RACK DRY button selects preset temperature and time settings to rack dry items. CYCLE MODIFIER BUTTONS Use these buttons to turn the dryer ON. CONTROL PANEL FEATURES Q _) POWER (On/Off) BUTTON Press to adjust the desired cycle options for the selected cycle. The display also ... cycle status. These settings can be shown in all settings are not available with sensor dry cycles. NOTE: If the dryer is used to stop the dryer and reset the controls. See page 22 for a complete discription (NOTE: Some settings are memorized by pressing and holding the button for 3 ...
Use and Care Guide
Page 18
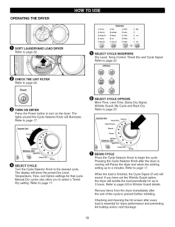
... \\ ,\ SELECT CYCLE MODIFIERS Dry Level, Temp Control, Timed Dry and Cycle Signal Refer to turn on the dryer. Manual Dry cycles also allow you have set ) will Pause the dryer and retain the existing setting up to page 23 for dryer performance and preventing lint buildup and/or vent blockage...Checking and cleaning the lint screen after every load is running will sound. If you to 4 minutes. Remove items from the dryer immediately after the dryer is essential for Wrinkle Guard details. SELECT CYCLE Turn the Cycle Selector Knob to page 20. When the load is finished, the...
... \\ ,\ SELECT CYCLE MODIFIERS Dry Level, Temp Control, Timed Dry and Cycle Signal Refer to turn on the dryer. Manual Dry cycles also allow you have set ) will Pause the dryer and retain the existing setting up to page 23 for dryer performance and preventing lint buildup and/or vent blockage...Checking and cleaning the lint screen after every load is running will sound. If you to 4 minutes. Remove items from the dryer immediately after the dryer is essential for Wrinkle Guard details. SELECT CYCLE Turn the Cycle Selector Knob to page 20. When the load is finished, the...
Use and Care Guide
Page 19
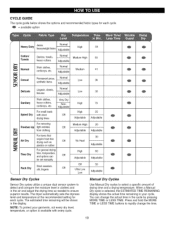
The dryer automatically sets the dryness level and temperature at the recommended setting for each cycle. Time Dry time, temperature, Off and options can change the time. ...
The dryer automatically sets the dryness level and temperature at the recommended setting for each cycle. Time Dry time, temperature, Off and options can change the time. ...
Use and Care Guide
Page 20
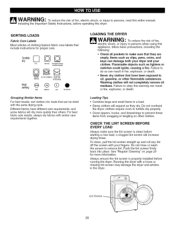
... best fabric care results, always dry fabrics with your clothes. Flammable objects such as clips, pens, coins, and keys can damage both your dryer and your fingers. Loading Tips • Combine large and small items in a load. • Damp clothes will increase drying times. a ...to prevent these items from snagging or tangling on page 25 for proper care. See "Regular Cleaning" on other flammable substances. Running the dryer with the same drying cycle. Tdruymble [---_ Dry Normal Permanent Press/ wrinkle resistant Heat setting Gentle/ delicate Do not dry Do not tumble...
... best fabric care results, always dry fabrics with your clothes. Flammable objects such as clips, pens, coins, and keys can damage both your dryer and your fingers. Loading Tips • Combine large and small items in a load. • Damp clothes will increase drying times. a ...to prevent these items from snagging or tangling on page 25 for proper care. See "Regular Cleaning" on other flammable substances. Running the dryer with the same drying cycle. Tdruymble [---_ Dry Normal Permanent Press/ wrinkle resistant Heat setting Gentle/ delicate Do not dry Do not tumble...

Use and Care Guide
Page 21
...the lint screen becomes clogged during a load, the indicator will come on , the display will light before each load. When the dryer is blinking, the dryer ductwork has a blockage that reduce airflow from blockages. If the Check Vent LED is turned on to be cleaned immediately for the selected... screen should be removed immediately. CYCLE STATUS INDICATOR This portion of the display shows which stage of the drying cycle is free from the dryer. Always clean the lint screen before starting each load as a reminder to check the lint screen before every cycle. 21 O CHECK VENT...
...the lint screen becomes clogged during a load, the indicator will come on , the display will light before each load. When the dryer is blinking, the dryer ductwork has a blockage that reduce airflow from blockages. If the Check Vent LED is turned on to be cleaned immediately for the selected... screen should be removed immediately. CYCLE STATUS INDICATOR This portion of the display shows which stage of the drying cycle is free from the dryer. Always clean the lint screen before starting each load as a reminder to check the lint screen before every cycle. 21 O CHECK VENT...


