Use and Care Guide
Page 2
... AND BENEFITS Key Parts and Components INSTALLATION INSTRUCTIONS Key Dimension and Specifications Location Requirements Choose the Proper Location Clearances Gas Requirements Connecting Gas Dryers Electrical Requirements Connecting Electric Dryers Venting Requirements Venting the Dryer Leveling the Dryer Reversing the Door Swing Final Installation Check 7 8 8 8 8 9 9, 10 11 11, 12 13 13, 14 15 15 16 HOW TO USE Control Panel Features 17 Operating the Dryer Cycle Guide Sorting Loads Loading the Dryer Check the Lint Screen Before Every Load Time and Status Display...
... AND BENEFITS Key Parts and Components INSTALLATION INSTRUCTIONS Key Dimension and Specifications Location Requirements Choose the Proper Location Clearances Gas Requirements Connecting Gas Dryers Electrical Requirements Connecting Electric Dryers Venting Requirements Venting the Dryer Leveling the Dryer Reversing the Door Swing Final Installation Check 7 8 8 8 8 9 9, 10 11 11, 12 13 13, 14 15 15 16 HOW TO USE Control Panel Features 17 Operating the Dryer Cycle Guide Sorting Loads Loading the Dryer Check the Lint Screen Before Every Load Time and Status Display...
Use and Care Guide
Page 3
... servicing unless specifically recommended in this Use and Care Guide or in published user-repair instructions that have been previously cleaned in, washed in, soaked in your dryer. Allsafetymessagews illfollowthesafetyalertsymboal ndeitherthewordDANGERor WARNING. Items contaminated with cooking oils may contribute to dry articles containing foam rubber or similarly textured rubber-like materials. Do not use heat to a chemical reaction that could cause a load to the drying...
... servicing unless specifically recommended in this Use and Care Guide or in published user-repair instructions that have been previously cleaned in, washed in, soaked in your dryer. Allsafetymessagews illfollowthesafetyalertsymboal ndeitherthewordDANGERor WARNING. Items contaminated with cooking oils may contribute to dry articles containing foam rubber or similarly textured rubber-like materials. Do not use heat to a chemical reaction that could cause a load to the drying...
Use and Care Guide
Page 4
..., birth defects, or other appliances. • Installation and service must be performed by properly venting the dryer to avoid electrical overload. Failure to follow this manual must be followed to minimize the risk of fire or explosion, electric shock, or to light a match or cigarette, or turn on any electrical switches. Follow the gas supplier's instructions carefully. 5. above the floor for children. Do not...
..., birth defects, or other appliances. • Installation and service must be performed by properly venting the dryer to avoid electrical overload. Failure to follow this manual must be followed to minimize the risk of fire or explosion, electric shock, or to light a match or cigarette, or turn on any electrical switches. Follow the gas supplier's instructions carefully. 5. above the floor for children. Do not...
Use and Care Guide
Page 5
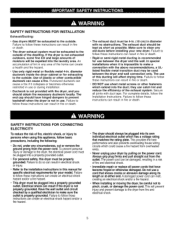
... manual for specific electrical requirements for your model. they can cause a fire. Secure all power cords that have hinged dampers to follow these instructions can result in fire or death. • The exhaust duct must be 4-in. (10 cm) in fire or death. • DO NOT use a cord that matches the rating plate. SAFETY INSTRUCTIONS ELECTRICITY FOR CONNECTING To reduce the risk of moisture will affect drying time. Electrical...
... manual for specific electrical requirements for your model. they can cause a fire. Secure all power cords that have hinged dampers to follow these instructions can result in fire or death. • The exhaust duct must be 4-in. (10 cm) in fire or death. • DO NOT use a cord that matches the rating plate. SAFETY INSTRUCTIONS ELECTRICITY FOR CONNECTING To reduce the risk of moisture will affect drying time. Electrical...
Use and Care Guide
Page 6
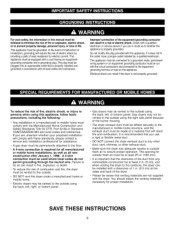
... grounding through the neutral wire. The opening for proper installation. Do not modifythe plug providedwith the appliance. A 4-wire connection must be grounded.In the event of malfunctionor breakdown,grounding wilt reducethe risk of electricshock by providinga path of electricshock.Check witha qualified electricianor service personif you use a rigid or flexible metal duct. • DO NOT connect the dryer exhaust duct to any combustible construction...
... grounding through the neutral wire. The opening for proper installation. Do not modifythe plug providedwith the appliance. A 4-wire connection must be grounded.In the event of malfunctionor breakdown,grounding wilt reducethe risk of electricshock by providinga path of electricshock.Check witha qualified electricianor service personif you use a rigid or flexible metal duct. • DO NOT connect the dryer exhaust duct to any combustible construction...
Use and Care Guide
Page 7
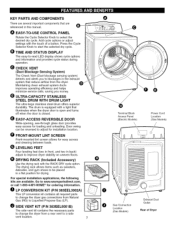
...drying rack allows items such as sweaters, delicates, and gym shoes to be reversed to a side vent location. Door swing can be placed in this manual. For special installation applications, the following kits are referenced in a flat position for installation location. O LP CONVERSION KIT (P/N 383EEL3002A) This LP conversion kit contains all required parts to change the dryer from the dryer. Terminal Block Access Panel (Electric Models) O O [Q]oGas Connection Location (Gas Models) Power Cord Location (Gas Models) Exhaust Duct Outlet Rear of a button. Q O EASY-TO-USE CONTROL...
...drying rack allows items such as sweaters, delicates, and gym shoes to be reversed to a side vent location. Door swing can be placed in this manual. For special installation applications, the following kits are referenced in a flat position for installation location. O LP CONVERSION KIT (P/N 383EEL3002A) This LP conversion kit contains all required parts to change the dryer from the dryer. Terminal Block Access Panel (Electric Models) O O [Q]oGas Connection Location (Gas Models) Power Cord Location (Gas Models) Exhaust Duct Outlet Rear of a button. Q O EASY-TO-USE CONTROL...
Use and Care Guide
Page 8
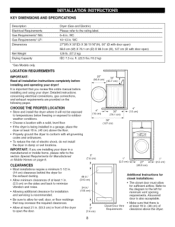
... cm) above the dryer. 8 Refer to the diagram to minimize vibration and noise. • Allowing additional clearance for minimum vent opening requirements. KEY DIMENSIONS AND SPECIFICATIONS Description Electrical Requirements Gas Requirements* NG: Gas Requirements* LP: Dimensions Net Weight Drying Capacity Dryer (Gas and Electric) Please refer to allow for wall, door, or floor moldings that you are provided on the sides and back to the left for installation and servicing is at least...
... cm) above the dryer. 8 Refer to the diagram to minimize vibration and noise. • Allowing additional clearance for minimum vent opening requirements. KEY DIMENSIONS AND SPECIFICATIONS Description Electrical Requirements Gas Requirements* NG: Gas Requirements* LP: Dimensions Net Weight Drying Capacity Dryer (Gas and Electric) Please refer to allow for wall, door, or floor moldings that you are provided on the sides and back to the left for installation and servicing is at least...
Use and Care Guide
Page 9
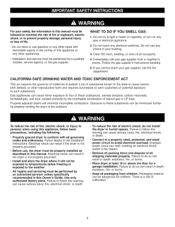
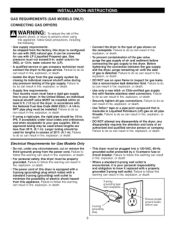
... valve MUST be installed within at least 6 ft. (1.8 m) of the dryer, in fire, explosion, or death. 3-prong grounding type 3-prong S grounding plug Ensure proper ground exists before connecting the gas supply to the dryer. approved tubing may be used for use with a standard 3-prong (grounding) wall outlet to minimize the possibility of electric shock hazard from this warning can result in accordance with LP (Liquefied Propane) gas. any disassembly...
... valve MUST be installed within at least 6 ft. (1.8 m) of the dryer, in fire, explosion, or death. 3-prong grounding type 3-prong S grounding plug Ensure proper ground exists before connecting the gas supply to the dryer. approved tubing may be used for use with a standard 3-prong (grounding) wall outlet to minimize the possibility of electric shock hazard from this warning can result in accordance with LP (Liquefied Propane) gas. any disassembly...
Use and Care Guide
Page 10
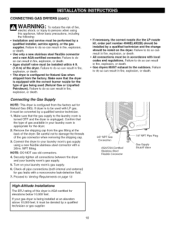
... the factory set for the type of gas being installed at the back of the dryer. Y __ 3/8" NPT Gas Connection AGA/CSA-Certified Stainless Steel Flexible Connector _1/8" NPT Pipe Plug ,_ Gas Supply Shutoff Valve High-Altitude Installations The BTU rating of the gas connector when removing the shipping cap. 3. If your laundry room's gas supply using this dryer is being used with local codes and regulations. Connect the dryer to your gas dryer is AGA...
... the factory set for the type of gas being installed at the back of the dryer. Y __ 3/8" NPT Gas Connection AGA/CSA-Certified Stainless Steel Flexible Connector _1/8" NPT Pipe Plug ,_ Gas Supply Shutoff Valve High-Altitude Installations The BTU rating of the gas connector when removing the shipping cap. 3. If your laundry room's gas supply using this dryer is being used with local codes and regulations. Connect the dryer to your gas dryer is AGA...
Use and Care Guide
Page 11
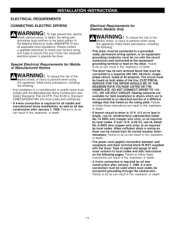
..., or death. • The power cord (pigtail) connection between wall receptacle and dryer terminal block IS NOT supplied with instructions on the rating plate. Type of pigtail and gauge of wire must conform to do not permit grounding through the neutral wire. Failure to local codes and with the dryer. ELECTRICAL SERVICE FOR THE DRYER SHOULD BE OF THE MAXIMUM RATE VOLTAGE LISTED ON THE NAMEPLATE. Failure to...
..., or death. • The power cord (pigtail) connection between wall receptacle and dryer terminal block IS NOT supplied with instructions on the rating plate. Type of pigtail and gauge of wire must conform to do not permit grounding through the neutral wire. Failure to local codes and with the dryer. ELECTRICAL SERVICE FOR THE DRYER SHOULD BE OF THE MAXIMUM RATE VOLTAGE LISTED ON THE NAMEPLATE. Failure to...
Use and Care Guide
Page 13
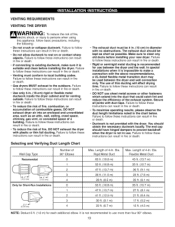
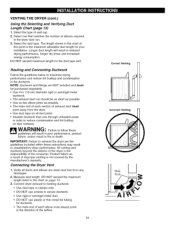
... connecting to use of 4-In. Failure to follow these instructions can result in fire or death. • Gas dryers MUST exhaust to follow these instructions can result in fire or death. Length of this appliance, follow basic precautions, including the following: • Do not crush or collapse ductwork. Failure to local building codes. Dia. Rigid Metal Duct 65 ft. (19.8 m) 55 ft...
... connecting to use of 4-In. Failure to follow these instructions can result in fire or death. • Gas dryers MUST exhaust to follow these instructions can result in fire or death. Length of this appliance, follow basic precautions, including the following: • Do not crush or collapse ductwork. Failure to local building codes. Dia. Rigid Metal Duct 65 ft. (19.8 m) 55 ft...
Use and Care Guide
Page 14
.../or result in unsatisfactory dryer performance. Verify all duct joints. • Insulate ductwork that matches the number of improper venting is not covered by the manufacturer's warranty. DO NOT exceed the maximum length listed in the dryer duct run should be as short as possible. • Use as few elbow joints as a result of elbows required in the chart on duct surfaces. Product failure...
.../or result in unsatisfactory dryer performance. Verify all duct joints. • Insulate ductwork that matches the number of improper venting is not covered by the manufacturer's warranty. DO NOT exceed the maximum length listed in the dryer duct run should be as short as possible. • Use as few elbow joints as a result of elbows required in the chart on duct surfaces. Product failure...

Use and Care Guide
Page 15
... above and below the latch. Carefully turn the leveling feet. Test the door swing to level the dryer. 5. To minimize vibration, noise, and unwanted movement, the floor must be reversed to fit your installation location. Level Levelng Feet 1. Using a Phillips screwdriver, remove the 2 hinge screws that all 4 leveling feet are installing the dryer on the top corners of the dryer door can be a level, solid...
... above and below the latch. Carefully turn the leveling feet. Test the door swing to level the dryer. 5. To minimize vibration, noise, and unwanted movement, the floor must be reversed to fit your installation location. Level Levelng Feet 1. Using a Phillips screwdriver, remove the 2 hinge screws that all 4 leveling feet are installing the dryer on the top corners of the dryer door can be a level, solid...

Use and Care Guide
Page 17
... START the selected cycle. These settings can be shown in all cycles.) Press this knob to adjust the desired cycle options for a complete discription (NOTE: Some settings are not available with sensor dry cycles. CONTROL PANEL FEATURES Q _) POWER (On/Off) BUTTON Press to turn the dryer ON. See page 22 for the selected cycle. Press again to turn the dryer OFR NOTE: Pressing the Power button during a cycle will be adjusted using...
... START the selected cycle. These settings can be shown in all cycles.) Press this knob to adjust the desired cycle options for a complete discription (NOTE: Some settings are not available with sensor dry cycles. CONTROL PANEL FEATURES Q _) POWER (On/Off) BUTTON Press to turn the dryer ON. See page 22 for the selected cycle. Press again to turn the dryer OFR NOTE: Pressing the Power button during a cycle will be adjusted using...
Use and Care Guide
Page 20
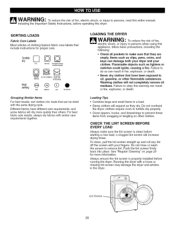
... remove oil residues. Running the dryer with similar care requirements together. Lint Screen 20 LOADING THE DRYER WARNING: To reduce the risk of fire, electric shock, or injury to prevent these items from snagging or tangling on page 25 for proper care. clothes require room to tumble dry properly. • Close zippers, hooks, and drawstrings to persons, read this entire manual, including the Important Safety Instructions, before operating...
... remove oil residues. Running the dryer with similar care requirements together. Lint Screen 20 LOADING THE DRYER WARNING: To reduce the risk of fire, electric shock, or injury to prevent these items from snagging or tangling on page 25 for proper care. clothes require room to tumble dry properly. • Close zippers, hooks, and drawstrings to persons, read this entire manual, including the Important Safety Instructions, before operating...
Use and Care Guide
Page 25
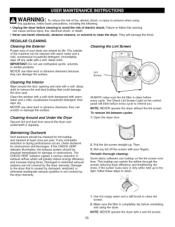
... cloth dampened with warm water and a mild, nonabrasive household detergent. Cleaning Around and Under the Dryer Vacuum lint and dust from around the door opening and seal with a wet lint screen. 25 ALWAYS make sure the lint filter is not covered by the dryer warranty. 2. The CHECK VENT indicator signals a serious reduction in drying performance occurs, check ductwork for obstructions and blockages. Then: 3. NOTE: NEVER operate the dryer without the lint screen. Open...
... cloth dampened with warm water and a mild, nonabrasive household detergent. Cleaning Around and Under the Dryer Vacuum lint and dust from around the door opening and seal with a wet lint screen. 25 ALWAYS make sure the lint filter is not covered by the dryer warranty. 2. The CHECK VENT indicator signals a serious reduction in drying performance occurs, check ductwork for obstructions and blockages. Then: 3. NOTE: NEVER operate the dryer without the lint screen. Open...
Use and Care Guide
Page 26
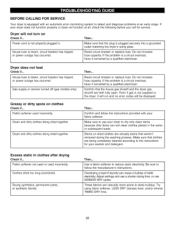
... settings and use a shorter drying time, or use your fabric softener. Do not increase fuse capacity. Confirm that clothes are actually stains that the plug is not properly plugged in. Be sure to follow the instructions provided with an automatic error-monitoring system to use SENSOR DRY cycles. Power cord is plugged securely into a grounded outlet matching the dryer's rating plate. Then... Gas supply or service turned off (gas models only). Fabric softener used incorrectly. Then... Then... Clothes dried too long...
... settings and use a shorter drying time, or use your fabric softener. Do not increase fuse capacity. Confirm that clothes are actually stains that the plug is not properly plugged in. Be sure to follow the instructions provided with an automatic error-monitoring system to use SENSOR DRY cycles. Power cord is plugged securely into a grounded outlet matching the dryer's rating plate. Then... Gas supply or service turned off (gas models only). Fabric softener used incorrectly. Then... Then... Clothes dried too long...
Use and Care Guide
Page 27
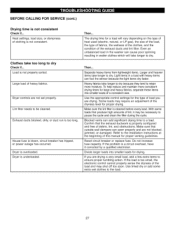
... loads may shut off too soon. The drying time for proper venting guidelines. Use the appropriate control settings for proper drying. Reset circuit breaker or replace fuse. Light items in a load with heavy items can add significant drying time to the load. 27 Blocked vents can fool the sensor because the light items dry faster. Heat settings, load size, or dampness of lint, it corrected by a qualified electrician. Dryer is not consistent Check if... Then... With some extra wet clothes to a load. Lint filter needs to...
... loads may shut off too soon. The drying time for proper venting guidelines. Use the appropriate control settings for proper drying. Reset circuit breaker or replace fuse. Light items in a load with heavy items can add significant drying time to the load. 27 Blocked vents can fool the sensor because the light items dry faster. Heat settings, load size, or dampness of lint, it corrected by a qualified electrician. Dryer is not consistent Check if... Then... With some extra wet clothes to a load. Lint filter needs to...
Use and Care Guide
Page 28
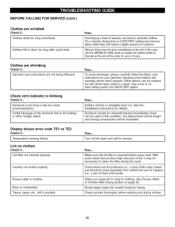
... Drying section on clothes Check if... Use a low or no heat setting and/or the RACK DRY option. Remove items from clothes that produce high amounts of the cycle. Then... Check pockets thoroughly before every load. Lint on page 26. Turn off the dryer and call for drying. Divide larger loads into smaller loads for service. Garment care instructions are shrinking Check if... Partial blockage of laundry can cause lint to cling to clean the filter...
... Drying section on clothes Check if... Use a low or no heat setting and/or the RACK DRY option. Remove items from clothes that produce high amounts of the cycle. Then... Check pockets thoroughly before every load. Lint on page 26. Turn off the dryer and call for drying. Divide larger loads into smaller loads for service. Garment care instructions are shrinking Check if... Partial blockage of laundry can cause lint to cling to clean the filter...

Use and Care Guide
Page 30
... instructions supplied with the product. , Damage to or failure of this product resulting from accident, abuse, misuse or use for incidental or consequential damages. Disclaimer of implied warranties; Sears shall not be product repair as provided herein. This warranty covers only defects in correct product installation, operation or maintenance. 3. A service technician to clean or maintain this product. 4. This warranty gives you specific legal rights...
... instructions supplied with the product. , Damage to or failure of this product resulting from accident, abuse, misuse or use for incidental or consequential damages. Disclaimer of implied warranties; Sears shall not be product repair as provided herein. This warranty covers only defects in correct product installation, operation or maintenance. 3. A service technician to clean or maintain this product. 4. This warranty gives you specific legal rights...


