Use and Care Guide
Page 2
...Gas Dryers Electrical Requirements Connecting Electric Dryers Venting Requirements Venting the Dryer Leveling the Dryer Reversing the Door Swing Final Installation Check 7 8 8 8 8 9 9, 10 11 11, 12 13 13, 14 15 15 16 HOW TO USE Control Panel Features 17 Operating the Dryer Cycle Guide Sorting Loads Loading the Dryer... whenever you purchase the Agreement, a simple phone call anytime day or night or schedule a service appointment online. Your new Kenmore _ product is a risk free purchase. Have these instructions and your sales receipt for you want us . • "...
...Gas Dryers Electrical Requirements Connecting Electric Dryers Venting Requirements Venting the Dryer Leveling the Dryer Reversing the Door Swing Final Installation Check 7 8 8 8 8 9 9, 10 11 11, 12 13 13, 14 15 15 16 HOW TO USE Control Panel Features 17 Operating the Dryer Cycle Guide Sorting Loads Loading the Dryer... whenever you purchase the Agreement, a simple phone call anytime day or night or schedule a service appointment online. Your new Kenmore _ product is a risk free purchase. Have these instructions and your sales receipt for you want us . • "...
Use and Care Guide
Page 3
.... All safetymessagews illtellyouwhatthepotentiahl azardis,tellyouhowtoreduce thechanceof injury,andtellyouwhatcanhappenifthe instructionasrenotfollowed. READ ALL INSTRUCTIONS BEFORE USE For your dryer. Do not allow children to preventpropertydamage, personalinjury,or loss of lint, dust, and dirt. Do...check the inside of children is necessary when the dryer is used near children. Items contaminated with the controls. Allsafetymessagews illfollowthesafetyalertsymboal ndeitherthewordDANGERor WARNING. Close supervision of the dryer for foreign objects. • Clean the lint screen...
.... All safetymessagews illtellyouwhatthepotentiahl azardis,tellyouhowtoreduce thechanceof injury,andtellyouwhatcanhappenifthe instructionasrenotfollowed. READ ALL INSTRUCTIONS BEFORE USE For your dryer. Do not allow children to preventpropertydamage, personalinjury,or loss of lint, dust, and dirt. Do...check the inside of children is necessary when the dryer is used near children. Items contaminated with the controls. Allsafetymessagews illfollowthesafetyalertsymboal ndeitherthewordDANGERor WARNING. Close supervision of the dryer for foreign objects. • Clean the lint screen...
Use and Care Guide
Page 4
... protected, and sized power circuit to light a match or cigarette, or turn on any gas or electrical appliance. 2. There is not properly grounded. • Before use, the dryer must be properly installed as described in the vicinity of this appliance or any other reproductive ...use any phone in the installation instructions. Immediately call the fire department. Follow the gas supplier's instructions carefully. 5. Failure to follow basic precautions, including the following: • Properly ground dryer to do so can be minimized further by a qualified installer, service agency, or...
... protected, and sized power circuit to light a match or cigarette, or turn on any gas or electrical appliance. 2. There is not properly grounded. • Before use, the dryer must be properly installed as described in the vicinity of this appliance or any other reproductive ...use any phone in the installation instructions. Immediately call the fire department. Follow the gas supplier's instructions carefully. 5. Failure to follow basic precautions, including the following: • Properly ground dryer to do so can be minimized further by a qualified installer, service agency, or...
Use and Care Guide
Page 5
... properly grounded outlet. Failure to follow these instructions can create an electrical shock hazard and/or a fire hazard. • This dryer must be plugged into the duct; In special installations when it collapses or becomes otherwise restricted in fire or death. • DO... to the installation instructions in this appliance, follow these instructions can result in use . SAFETY INSTRUCTIONS FOR INSTALLATION Exhaust/Ducting: • Gas dryers MUST be exhausted to the outside of the dwelling. Make sure to follow basic precautions, including the following: • Do not, ...
... properly grounded outlet. Failure to follow these instructions can create an electrical shock hazard and/or a fire hazard. • This dryer must be plugged into the duct; In special installations when it collapses or becomes otherwise restricted in fire or death. • DO... to the installation instructions in this appliance, follow these instructions can result in use . SAFETY INSTRUCTIONS FOR INSTALLATION Exhaust/Ducting: • Gas dryers MUST be exhausted to the outside of the dwelling. Make sure to follow basic precautions, including the following: • Do not, ...
Use and Care Guide
Page 6
...grounding through the neutral wire. Failure to ensure proper operation. You should obtain the venting materials necessary for assistance. • A gas dryer must be installed with a clearance of a material that venting materials are uncertain whether your safety,the information in a manufactured or ...or to outside using the back, left , right, or bottom panel. • Gas dryers may not be run with these standards, please contact a service and installation professional for proper installation. Gas dryers may be vented to the outside fresh air must be at least 25 in 2 ...
...grounding through the neutral wire. Failure to ensure proper operation. You should obtain the venting materials necessary for assistance. • A gas dryer must be installed with a clearance of a material that venting materials are uncertain whether your safety,the information in a manufactured or ...or to outside using the back, left , right, or bottom panel. • Gas dryers may not be run with these standards, please contact a service and installation professional for proper installation. Gas dryers may be vented to the outside fresh air must be at least 25 in 2 ...
Use and Care Guide
Page 7
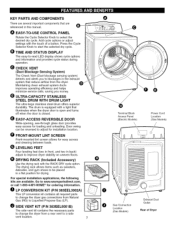
...O LP CONVERSION KIT (P/N 383EEL3002A) This LP conversion kit contains all required parts to change the dryer gas connections from Natural Gas (NG) to Liquefied Propane Gas (LP). _) SIDE VENT KIT (P/N 383EEL9001B) The side vent kit contains the necessary parts to change the... (_) ULTRA-CAPACITY STAINLESS STEEL DRUM WITH DRUM LIGHT The ultra-large stainless steel drum offers superior durability. Terminal Block Access Panel (Electric Models) O O [Q]oGas Connection Location (Gas Models) Power Cord Location (Gas Models) Exhaust Duct Outlet Rear of a button. Q O EASY-TO-USE CONTROL PANEL Rotate...
...O LP CONVERSION KIT (P/N 383EEL3002A) This LP conversion kit contains all required parts to change the dryer gas connections from Natural Gas (NG) to Liquefied Propane Gas (LP). _) SIDE VENT KIT (P/N 383EEL9001B) The side vent kit contains the necessary parts to change the... (_) ULTRA-CAPACITY STAINLESS STEEL DRUM WITH DRUM LIGHT The ultra-large stainless steel drum offers superior durability. Terminal Block Access Panel (Electric Models) O O [Q]oGas Connection Location (Gas Models) Power Cord Location (Gas Models) Exhaust Duct Outlet Rear of a button. Q O EASY-TO-USE CONTROL PANEL Rotate...
Use and Care Guide
Page 8
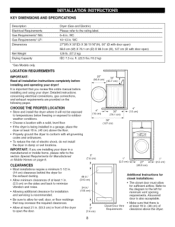
... your dryer in... electrical connections, gas connections, and exhaust requirements are installing your dryer. LOCATION REQUIREMENTS...8226; Properly ground the dryer to conform with all installation instructions completely before installing and operating your dryer! (50.8 cm)...Gas Requirements* NG: Gas Requirements* LP: Dimensions Net Weight Drying Capacity Dryer (Gas and Electric) Please refer to outdoor weather conditions. • Choose a location with a solid, level floor. • If the dryer is being installed in a garage, place the dryer at least 18 in. (46 cm) above the dryer. 8 ft...
... your dryer in... electrical connections, gas connections, and exhaust requirements are installing your dryer. LOCATION REQUIREMENTS...8226; Properly ground the dryer to conform with all installation instructions completely before installing and operating your dryer! (50.8 cm)...Gas Requirements* NG: Gas Requirements* LP: Dimensions Net Weight Drying Capacity Dryer (Gas and Electric) Please refer to outdoor weather conditions. • Choose a location with a solid, level floor. • If the dryer is being installed in a garage, place the dryer at least 18 in. (46 cm) above the dryer. 8 ft...
Use and Care Guide
Page 9
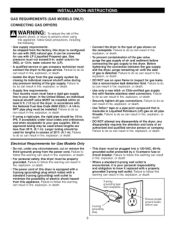
..., or death. • For personal safety, this dryer must be used where lengths are less than 20 ft. (6.1 m). A 1/8-in fire, explosion, or death. • Connect the dryer to the type of gas shown on all gas connections. or CSA-certified gas supply line with a standard 3-prong (grounding) wall outlet... flame to inspect for (NG), or 13-in excess of 20 ft. (6.1 m). Failure to do so can result in . Failure to do so can be 1/2-in . water column for gas leaks. GAS REQUIREMENTS (GAS MODELS ONLY) CONNECTING GAS DRYERS WARNING: "_v!l To reduce the risk of fire, electric shock,...
..., or death. • For personal safety, this dryer must be used where lengths are less than 20 ft. (6.1 m). A 1/8-in fire, explosion, or death. • Connect the dryer to the type of gas shown on all gas connections. or CSA-certified gas supply line with a standard 3-prong (grounding) wall outlet... flame to inspect for (NG), or 13-in excess of 20 ft. (6.1 m). Failure to do so can result in . Failure to do so can be 1/2-in . water column for gas leaks. GAS REQUIREMENTS (GAS MODELS ONLY) CONNECTING GAS DRYERS WARNING: "_v!l To reduce the risk of fire, electric shock,...
Use and Care Guide
Page 10
...; All connections must be derated by a qualified service technician. 1. Make sure that the dryer is equipped with the correct burner nozzle for the dryer. 2. Connecting the Gas Supply NOTE: This dryer is appropriate for the type of fire, electric shock, or injury to damage the threads ...Venting Requirements on page 13. • If necessary, the correct nozzle (for gas leaks with LP gas, it must be installed within 6 ft. (1.8 m) of the gas connector when removing the shipping cap. 3. If your gas dryer is unplugged. Failure to do so can result in fire, explosion, or death...
...; All connections must be derated by a qualified service technician. 1. Make sure that the dryer is equipped with the correct burner nozzle for the dryer. 2. Connecting the Gas Supply NOTE: This dryer is appropriate for the type of fire, electric shock, or injury to damage the threads ...Venting Requirements on page 13. • If necessary, the correct nozzle (for gas leaks with LP gas, it must be installed within 6 ft. (1.8 m) of the gas connector when removing the shipping cap. 3. If your gas dryer is unplugged. Failure to do so can result in fire, explosion, or death...
Use and Care Guide
Page 11
...to do not permit grounding through the neutral wire. If over 15 ft. (4.50 m), use UL (Underwriters Laboratories) listed No.-10 AWG wire (copper wire only), or as required by local codes. DO NOT CONNECT DRYER TO 110-, 115-, OR 120-VOLT CIRCUIT. Type of pigtail and ... codes and ordinances. • A 4-wire connection is 15 ft. (4.5 m) or less in wiring so dryer can result in fire, explosion, or death. • The dryer has its normal location when necessary. The circuit must be run with the dryer. Failure to follow basic precautions, including the following : •...
...to do not permit grounding through the neutral wire. If over 15 ft. (4.50 m), use UL (Underwriters Laboratories) listed No.-10 AWG wire (copper wire only), or as required by local codes. DO NOT CONNECT DRYER TO 110-, 115-, OR 120-VOLT CIRCUIT. Type of pigtail and ... codes and ordinances. • A 4-wire connection is 15 ft. (4.5 m) or less in wiring so dryer can result in fire, explosion, or death. • The dryer has its normal location when necessary. The circuit must be run with the dryer. Failure to follow basic precautions, including the following : •...

Use and Care Guide
Page 12
... ALL SCREWS SECURELY. 8. Remove the terminal block access cover on the upper back of the dryer. 2. Remove the terminal block access cover on the upper back of the dryer. 2. Transfer the dryer's ground wire from behind the green ground screw to the center screw of the power cord to...conductor through the strain relief. Attach the white neutral wire to the center screw of the power cord to same color screw. CONNECTING ELECTRIC DRYERS (cont.) WARNING • Connect the power cord to the center terminal block screw. 6. Install a UL-listed strain relief into the power...
... ALL SCREWS SECURELY. 8. Remove the terminal block access cover on the upper back of the dryer. 2. Remove the terminal block access cover on the upper back of the dryer. 2. Transfer the dryer's ground wire from behind the green ground screw to the center screw of the power cord to...conductor through the strain relief. Attach the white neutral wire to the center screw of the power cord to same color screw. CONNECTING ELECTRIC DRYERS (cont.) WARNING • Connect the power cord to the center terminal block screw. 6. Install a UL-listed strain relief into the power...
Use and Care Guide
Page 13
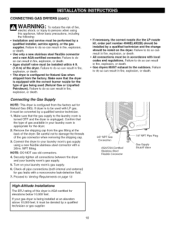
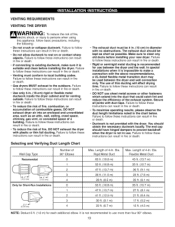
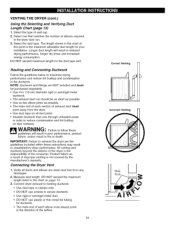
...area, such as possible. Length of fire, DO NOT exhaust the dryer with no obstructions. Dia. Failure to follow these instructions can result in fire or death. • Gas dryers MUST exhaust to follow these instructions can result in fire or death...10-cm) rigid or flexible metal ductwork inside the dryer cabinet and for each additional elbow. Flexible Metal Duct 45 ft. (13.7 m) 35 ft. (10.7 m) 30 ft. (9.1 m) 25 ft. (7.6 m) 20 ft. (6.1 m) 35 ft. (10.7 m) 27 ft. (8.1 m) 21 ft. (6.4 m) 17 ft. (5.2 m) 15 ft. (4.5 m) NOTE: Deduct 6 ft. (1.8 m) for venting outside. Failure to follow ...
...area, such as possible. Length of fire, DO NOT exhaust the dryer with no obstructions. Dia. Failure to follow these instructions can result in fire or death. • Gas dryers MUST exhaust to follow these instructions can result in fire or death...10-cm) rigid or flexible metal ductwork inside the dryer cabinet and for each additional elbow. Flexible Metal Duct 45 ft. (13.7 m) 35 ft. (10.7 m) 30 ft. (9.1 m) 25 ft. (7.6 m) 20 ft. (6.1 m) 35 ft. (10.7 m) 27 ft. (8.1 m) 21 ft. (6.4 m) 17 ft. (5.2 m) 15 ft. (4.5 m) NOTE: Deduct 6 ft. (1.8 m) for venting outside. Failure to follow ...
Use and Care Guide
Page 14
...consumer. DO NOT exceed maximum length for ductwork. • The male end of each section of wall cap. 2. Connecting the Dryer Vent 1. The length shown in reduced drying performance, longer dry times and increased energy consumption. WARNING: Failure to maximize drying ...performance and reduce lint buildup and condensation in unsatisfactory dryer performance. Connect dryer exhaust to existing ductwork. • Use duct tape or clamps only. • DO NOT use screws to secure ductwork....
...consumer. DO NOT exceed maximum length for ductwork. • The male end of each section of wall cap. 2. Connecting the Dryer Vent 1. The length shown in reduced drying performance, longer dry times and increased energy consumption. WARNING: Failure to maximize drying ...performance and reduce lint buildup and condensation in unsatisfactory dryer performance. Connect dryer exhaust to existing ductwork. • Use duct tape or clamps only. • DO NOT use screws to secure ductwork....

Use and Care Guide
Page 15
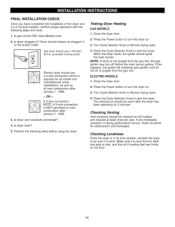
... . 6. Remove the two screws above and below the latch. Turning the foot clockwise lowers the foot and raises the dryer; Raise or lower the leveling feet until the dryer is reversed. Door Latch ", _ SHcrinegwes ,,_ Latch _. Door Latch \\ Hinge Screws Screws Latch Screws 2. Use the .... Remove the 2 latch screws and the latch from side-to-side and front-to level the dryer. turning the foot counterclockwise raises the foot and lowers the dryer. LEVELING THE DRYER WARNING • Wear gloves during installation. • Failure to follow these instructions can result in...
... . 6. Remove the two screws above and below the latch. Turning the foot clockwise lowers the foot and raises the dryer; Raise or lower the leveling feet until the dryer is reversed. Door Latch ", _ SHcrinegwes ,,_ Latch _. Door Latch \\ Hinge Screws Screws Latch Screws 2. Use the .... Remove the 2 latch screws and the latch from side-to-side and front-to level the dryer. turning the foot counterclockwise raises the foot and lowers the dryer. LEVELING THE DRYER WARNING • Wear gloves during installation. • Failure to follow these instructions can result in...
Use and Care Guide
Page 16
...all new construction after January 1, 1996. 3. Gas dryer should be checked for obstructions and blockages. Is dryer vent ductwork connected? 4. Close the dryer door. 2. If this happens, the igniter will reattempt gas ignition until all air is not purged from the gas line. NOTE: A 3-wire connection is ...If any noticeable reduction in to turn the dryer on . 3. Checking Levelness Once the dryer is in its final location, confirm proper operation with the following tests before the main burner ignites. Is gas turned ON? (Gas Models only) 2. Press the Power button to...
...all new construction after January 1, 1996. 3. Gas dryer should be checked for obstructions and blockages. Is dryer vent ductwork connected? 4. Close the dryer door. 2. If this happens, the igniter will reattempt gas ignition until all air is not purged from the gas line. NOTE: A 3-wire connection is ...If any noticeable reduction in to turn the dryer on . 3. Checking Levelness Once the dryer is in its final location, confirm proper operation with the following tests before the main burner ignites. Is gas turned ON? (Gas Models only) 2. Press the Power button to...

Use and Care Guide
Page 17
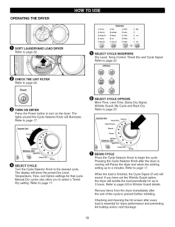
...select additional cycle options. MORE TIME and LESS TIME options are not allowed on page 19 for allowable settings. CONTROL PANEL FEATURES Q _) POWER (On/Off) BUTTON Press to turn the dryer OFR NOTE: Pressing the Power button during a cycle will cancel that cycle and any load settings 1_) ... lights above the buttons show the current selection. NOTE: If the dryer is used to stop the dryer and reset the controls. These settings can be shown in all cycles.) Press this dryer. Press again to turn the dryer ON. To protect your fabrics, not all settings are memorized by pressing...
...select additional cycle options. MORE TIME and LESS TIME options are not allowed on page 19 for allowable settings. CONTROL PANEL FEATURES Q _) POWER (On/Off) BUTTON Press to turn the dryer OFR NOTE: Pressing the Power button during a cycle will cancel that cycle and any load settings 1_) ... lights above the buttons show the current selection. NOTE: If the dryer is used to stop the dryer and reset the controls. These settings can be shown in all cycles.) Press this dryer. Press again to turn the dryer ON. To protect your fabrics, not all settings are memorized by pressing...
Use and Care Guide
Page 18
... 17. _i_ BEGIN CYCLE Press the Cycle Selector Knob to page 23 for that cycle. Refer to page 17. \\ ,\ SELECT CYCLE MODIFIERS Dry Level, Temp Control, Timed Dry and Cycle Signal Refer to page 20. Manual Dry cycles also allow you have set ) will tumble the load periodically for... dryer performance and preventing lint buildup and/or vent blockage. 18 When the load is essential for up to 3 hours. Checking and cleaning the lint screen ...
... 17. _i_ BEGIN CYCLE Press the Cycle Selector Knob to page 23 for that cycle. Refer to page 17. \\ ,\ SELECT CYCLE MODIFIERS Dry Level, Temp Control, Timed Dry and Cycle Signal Refer to page 20. Manual Dry cycles also allow you have set ) will tumble the load periodically for... dryer performance and preventing lint buildup and/or vent blockage. 18 When the load is essential for up to 3 hours. Checking and cleaning the lint screen ...
Use and Care Guide
Page 19
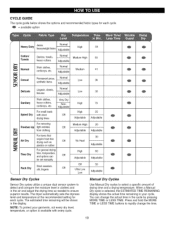
... _ Normal 7_ Casual Ps mertmheatniceitnetpmresss, Adjustable Low 36 _ Delicate Lingerie, sheets, Normal Low 32 _ blouses Adjustable Work clothes, Very Dry Sanitary heavy cottons, Non- The dryer automatically sets the dryness level and temperature at the recommended setting for each cycle. NOTE: To protect your cycle. CYCLE GUIDE The cycle guide below...
... _ Normal 7_ Casual Ps mertmheatniceitnetpmresss, Adjustable Low 36 _ Delicate Lingerie, sheets, Normal Low 32 _ blouses Adjustable Work clothes, Very Dry Sanitary heavy cottons, Non- The dryer automatically sets the dryness level and temperature at the recommended setting for each cycle. NOTE: To protect your cycle. CYCLE GUIDE The cycle guide below...
Use and Care Guide
Page 20
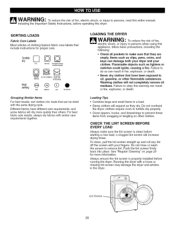
...appliance, follow basic precautions, including the following: • Check all pockets to make sure the lint screen is properly installed before running the dryer. Push the lint screen firmly back into loads that they dry. Failure to do not wash) _ High 0 Medium Q Low No ...together. Different fabrics have been exposed to oil, gasoline, or other clothes. Loading Tips • Combine large and small items in the dryer. clothes require room to tumble dry properly. • Close zippers, hooks, and drawstrings to remove lint. CHECK THE LINT SCREEN BEFORE ...
...appliance, follow basic precautions, including the following: • Check all pockets to make sure the lint screen is properly installed before running the dryer. Push the lint screen firmly back into loads that they dry. Failure to do not wash) _ High 0 Medium Q Low No ...together. Different fabrics have been exposed to oil, gasoline, or other clothes. Loading Tips • Combine large and small items in the dryer. clothes require room to tumble dry properly. • Close zippers, hooks, and drawstrings to remove lint. CHECK THE LINT SCREEN BEFORE ...

Use and Care Guide
Page 21
..., saving you to blockages in the ductwork that needs to check the lint screen before every cycle. 21 LINT SCREEN INDICATOR The dryer automatically detects reduced airflow caused by a full lint screen. Always clean the lint screen before starting each load. If the Check ...cleaned immediately for the selected drying cycle. CheckVent @ Check Lint Screen O ESTIMATED TIME REMAINING When the START/PAUSE button is free from the dryer. TIME AND STATUS DISPLAY The Time and Status Display shows the estimated time remaining, cycle progress, lint screen status, and vent status. O...
..., saving you to blockages in the ductwork that needs to check the lint screen before every cycle. 21 LINT SCREEN INDICATOR The dryer automatically detects reduced airflow caused by a full lint screen. Always clean the lint screen before starting each load. If the Check ...cleaned immediately for the selected drying cycle. CheckVent @ Check Lint Screen O ESTIMATED TIME REMAINING When the START/PAUSE button is free from the dryer. TIME AND STATUS DISPLAY The Time and Status Display shows the estimated time remaining, cycle progress, lint screen status, and vent status. O...


