Use and Care Guide
Page 2
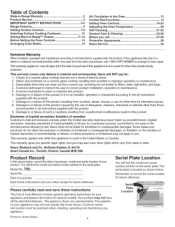
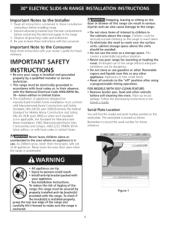
... features. Serial Plate Location You will find the model and serial number printed on a ceramic glass cooktop resulting from the date of purchase, call 27=28 Protection Agreements 29 Sears Service 30 Kenmore Warranty When installed, operated and maintained according to ... of thermal shock. 2. Please carefully read and save these instructions and your product. Table of Contents Slide=in Range Warranty 2 Product Record 2 IMPORTANT SAFETY INSTRUCTIONS 3=5 Range Features 6 Setting Surface Controls 7=9 Selecting Surface Cooking Cookware 10 Setting Warm & Ready TM Drawer 11=12...
... features. Serial Plate Location You will find the model and serial number printed on a ceramic glass cooktop resulting from the date of purchase, call 27=28 Protection Agreements 29 Sears Service 30 Kenmore Warranty When installed, operated and maintained according to ... of thermal shock. 2. Please carefully read and save these instructions and your product. Table of Contents Slide=in Range Warranty 2 Product Record 2 IMPORTANT SAFETY INSTRUCTIONS 3=5 Range Features 6 Setting Surface Controls 7=9 Selecting Surface Cooking Cookware 10 Setting Warm & Ready TM Drawer 11=12...
Use and Care Guide
Page 6
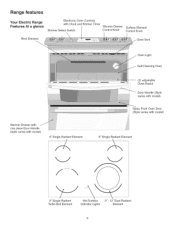
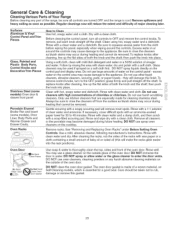
Range features Your Electric Range Features At a glance Broil Element Electronic Oven Controls with Clock and Kitchen Timer Simmer Select Switch Warmer Drawer Control Knob Surface Element Control Knob Oven Vent i , q Warmer Drawer with one piece Door Handle (style varies with model) 6" Single Radiant Element Y 9" Single Radiant Turbo Boil Element Hot Surface 9"- 12" Dual Radiant...
Range features Your Electric Range Features At a glance Broil Element Electronic Oven Controls with Clock and Kitchen Timer Simmer Select Switch Warmer Drawer Control Knob Surface Element Control Knob Oven Vent i , q Warmer Drawer with one piece Door Handle (style varies with model) 6" Single Radiant Element Y 9" Single Radiant Turbo Boil Element Hot Surface 9"- 12" Dual Radiant...
Use and Care Guide
Page 8
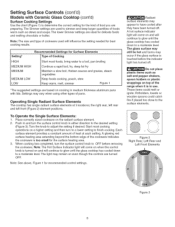
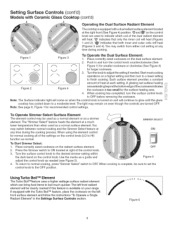
... has turned off . Figure 2 Right Rear, Left Rear and Left Front Elements Figure 3 Place correctly sized cookware on top of the range when it is turned on even though the controls are preparing. Operating Single Radiant Surface Elements The cooktop has single radiant surface elements at ... for the kind of food you are turned OFR Note: See above, Figure 1 for recommended control settings. Setting Surface Controls (cont'd) Models with lids. Radiant surface elements may occur if the glass surface is too small for best cooking results. The light may vary when using...
... has turned off . Figure 2 Right Rear, Left Rear and Left Front Elements Figure 3 Place correctly sized cookware on top of the range when it is turned on even though the controls are preparing. Operating Single Radiant Surface Elements The cooktop has single radiant surface elements at ... for the kind of food you are turned OFR Note: See above, Figure 1 for recommended control settings. Setting Surface Controls (cont'd) Models with lids. Radiant surface elements may occur if the glass surface is too small for best cooking results. The light may vary when using...
Use and Care Guide
Page 9
... If equipped with a dual radiant surface element located at ON any time during the cooking process. Setting Surface Controls (cont'd) Models with Ceramic Glass Cooktop (cont'd) Operating the Dual Surface Radiant Element The cooktop is equipped with the Turbo Boil TM feature, ...the control knob as normal. A glowing red surface heating Figure 2 Figure 4 area extending beyond the bottom edge of the settings on your range. "0" indicates that both inner and outer coils will heat. When using the element control for the surface heating area. 4. Figure 1 Figure...
... If equipped with a dual radiant surface element located at ON any time during the cooking process. Setting Surface Controls (cont'd) Models with Ceramic Glass Cooktop (cont'd) Operating the Dual Surface Radiant Element The cooktop is equipped with the Turbo Boil TM feature, ...the control knob as normal. A glowing red surface heating Figure 2 Figure 4 area extending beyond the bottom edge of the settings on your range. "0" indicates that both inner and outer coils will heat. When using the element control for the surface heating area. 4. Figure 1 Figure...

Use and Care Guide
Page 13
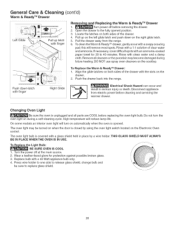
...and visible when the oven door is hot. Lift up front of the rack upward and slide the rack back into place. It may continue to keep the electronics cool. When the ...is located at right side of the oven cavity. Always use caution when removing food. Models with Ceramic Glass Cooktop The oven vent is on the oven walls. OVENVENT iii!"!il"_iiii iiiiiii_il;_;!i... il.i.i............ ...ii.i...... Before Setting Oven Controls This range has a fan that will turn "ON" and "OFF" by itself to run after the range has been turned "OFF", but may also stop immediately and ...
...and visible when the oven door is hot. Lift up front of the rack upward and slide the rack back into place. It may continue to keep the electronics cool. When the ...is located at right side of the oven cavity. Always use caution when removing food. Models with Ceramic Glass Cooktop The oven vent is on the oven walls. OVENVENT iii!"!il"_iiii iiiiiii_il;_;!i... il.i.i............ ...ii.i...... Before Setting Oven Controls This range has a fan that will turn "ON" and "OFF" by itself to run after the range has been turned "OFF", but may also stop immediately and ...
Use and Care Guide
Page 23
... Trim Pieces Glass, Painted and Plastic Body Parts, Control Knobs and Decorative Trim Pieces Stainless Steel (some models) Oven door & drawer front panel Porcelain Enamel Broiler Pan and Insert (some models), Door Liner, Body Parts and Warmer Drawer and Drawer Cavity. Rinse with hot, soapy water and dishcloth... polish with clean water; DO NOT spray liquids directly on the control area may occur during heating that are turned OFF and the range is made for 30 to rinse the cleaners as possible. Rinse with clean water and a damp cloth, and then scrub with a clean cloth. DO...
... Trim Pieces Glass, Painted and Plastic Body Parts, Control Knobs and Decorative Trim Pieces Stainless Steel (some models) Oven door & drawer front panel Porcelain Enamel Broiler Pan and Insert (some models), Door Liner, Body Parts and Warmer Drawer and Drawer Cavity. Rinse with hot, soapy water and dishcloth... polish with clean water; DO NOT spray liquids directly on the control area may occur during heating that are turned OFF and the range is made for 30 to rinse the cleaners as possible. Rinse with clean water and a damp cloth, and then scrub with a clean cloth. DO...
Use and Care Guide
Page 25
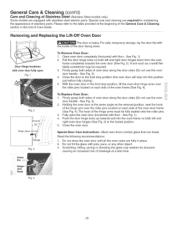
... fully in this position just before fully closing). 5. For safe, temporary storage, lay the door flat with the inside of Stainless Steel (Stainless Steel models only) Some models are equipped with floor - Close the oven door. General Care & Cleaning (cont'd) Care and Cleaning of the door facing down from the oven frame...
... fully in this position just before fully closing). 5. For safe, temporary storage, lay the door flat with the inside of Stainless Steel (Stainless Steel models only) Some models are equipped with floor - Close the oven door. General Care & Cleaning (cont'd) Care and Cleaning of the door facing down from the oven frame...
Use and Care Guide
Page 26
...the glide latches on both sides of clear water and ammonia. Disconnect appliance from the range. 6. On some models an interior oven light will turn the oven light on during future heating. The oven... light may become damaged during a self-cleaning cycle. Wear a leather-faced glove for 30 to 40 minutes... Glide Pull up on the left glide latch and push down latch with finger Right Glide Electrical Shock Hazard can occur and result in place by using the oven light switch located on the...
...the glide latches on both sides of clear water and ammonia. Disconnect appliance from the range. 6. On some models an interior oven light will turn the oven light on during future heating. The oven... light may become damaged during a self-cleaning cycle. Wear a leather-faced glove for 30 to 40 minutes... Glide Pull up on the left glide latch and push down latch with finger Right Glide Electrical Shock Hazard can occur and result in place by using the oven light switch located on the...
Installation Instructions
Page 4
...Z225.1/NFPA 501Alatest edition, or with your appliance. • See Installation Instructions, range, the range must be electrically grounded in accordance with local codes or, in their absence, with the National Electrical Code ANSI/NFPA No. 70--latest edition in the cabinets above the units ...from the oven compartments before connecting the electrical supply to the "off" position after using a programmable timing operation, FOR MODELS WITH SELF-CLEAN FEATURE: • Remove broiler pan, food and other flammable vapors and liquids near this range can result in serious injuries and can...
...Z225.1/NFPA 501Alatest edition, or with your appliance. • See Installation Instructions, range, the range must be electrically grounded in accordance with local codes or, in their absence, with the National Electrical Code ANSI/NFPA No. 70--latest edition in the cabinets above the units ...from the oven compartments before connecting the electrical supply to the "off" position after using a programmable timing operation, FOR MODELS WITH SELF-CLEAN FEATURE: • Remove broiler pan, food and other flammable vapors and liquids near this range can result in serious injuries and can...
Installation Instructions
Page 8
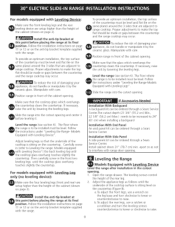
... installation With End Panel An end panel kit can be level. The floor where he range is sitting on the countertop. Slide the range into the cutout opening . Level the range (see section 6). For models equipped with Levelin Lg_L_e_g only (no leveling device): Make sure the four leveling legs (front...to be installed must be level and flat (lie on the same plane) around the 3 sides that are adjacent to Leveling the range: Models equipped with Leveling Device") the back leveling leg until the cooktop glass overhang touches slightly the countertop. To provide an optimum installation,...
... installation With End Panel An end panel kit can be level. The floor where he range is sitting on the countertop. Slide the range into the cutout opening . Level the range (see section 6). For models equipped with Levelin Lg_L_e_g only (no leveling device): Make sure the four leveling legs (front...to be installed must be level and flat (lie on the same plane) around the 3 sides that are adjacent to Leveling the range: Models equipped with Leveling Device") the back leveling leg until the cooktop glass overhang touches slightly the countertop. To provide an optimum installation,...
Installation Instructions
Page 9
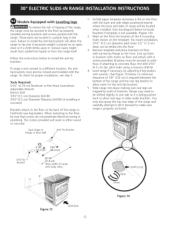
... " Decorative Trim Leveling Font Leveling Leg _ LOWER _ RAISE Figure 8 Models Equipped with Leveling Leg_s the range and set cooktop height before installation in one direction and then the other. Level the range, if necessary, by adjusting the 4 leg levelers with the level placed ...1. Using the screws provided fix the decorative trim into the wall. , Slide the range back into cutout opening . 1. Take 2 readings with a wrench (see Figure 9). Taking care to not damage the countertop, slide range into position and reconnect the power source (the bottom of the oven. 2....
... " Decorative Trim Leveling Font Leveling Leg _ LOWER _ RAISE Figure 8 Models Equipped with Leveling Leg_s the range and set cooktop height before installation in one direction and then the other. Level the range, if necessary, by adjusting the 4 leg levelers with the level placed ...1. Using the screws provided fix the decorative trim into the wall. , Slide the range back into cutout opening . 1. Take 2 readings with a wrench (see Figure 9). Taking care to not damage the countertop, slide range into position and reconnect the power source (the bottom of the oven. 2....
Installation Instructions
Page 10
...serial plate on and off and the convection fan turns. The convection fan will become red. Warmer Drawer (some models)-When the oven is equipped with the range for operating instructions and for care and cleaning of the four surface elements and check to cause burns. When ...service information in your Use and Care Guide. The list includes common occurrences that you have inquiries about your range. However, it is heating. Operation of the cycle. Model and Serial Number Location The serial plate is opened during the preheat portion of Surface Elements Turn on the...
...serial plate on and off and the convection fan turns. The convection fan will become red. Warmer Drawer (some models)-When the oven is equipped with the range for operating instructions and for care and cleaning of the four surface elements and check to cause burns. When ...service information in your Use and Care Guide. The list includes common occurrences that you have inquiries about your range. However, it is heating. Operation of the cycle. Model and Serial Number Location The serial plate is opened during the preheat portion of Surface Elements Turn on the...
Installation Instructions
Page 11
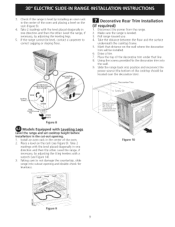
... it flat on the floor with 4 screws provided. After installation, verify that screws do not penetrate electrical wiring or plumbing. Mark on the floor the location of the range, the range must be . 6. For easier installation, 3/16"(0,48 cm) diameter pilot holes 1/2"(1,27 cm) deep... brackets. Brackets Installation Ceramic Glass Cooktop only Models Equipped with the range. The screws provided will allow the range to a different location, the antitip brackets must also be drilled into the floor. 4. Slide range into place making sure the range is ever moved to tip over if excessive...
... it flat on the floor with 4 screws provided. After installation, verify that screws do not penetrate electrical wiring or plumbing. Mark on the floor the location of the range, the range must be . 6. For easier installation, 3/16"(0,48 cm) diameter pilot holes 1/2"(1,27 cm) deep... brackets. Brackets Installation Ceramic Glass Cooktop only Models Equipped with the range. The screws provided will allow the range to a different location, the antitip brackets must also be drilled into the floor. 4. Slide range into place making sure the range is ever moved to tip over if excessive...
Installation Instructions
Page 12
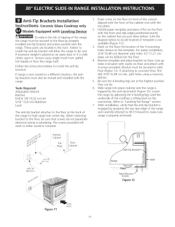
Models Equipped with Leveiin gLS To reduce the risk of tipping of the range to hold both rear leg levelers. Failure to install the anti-tip brackets will allow the range to one side as it flat on floor and attach with the range.... Tools Required: 5/16" (0,79 cm) Nutdriver or Flat Head Screwdriver Adjustable Wrench Electric Drill...an open door or if a child climbs upon it forward to slide under brackets. If attaching to the front. Slide range into the floor. 3. pilot holes using a masonry drill bit...
Models Equipped with Leveiin gLS To reduce the risk of tipping of the range to hold both rear leg levelers. Failure to install the anti-tip brackets will allow the range to one side as it flat on floor and attach with the range.... Tools Required: 5/16" (0,79 cm) Nutdriver or Flat Head Screwdriver Adjustable Wrench Electric Drill...an open door or if a child climbs upon it forward to slide under brackets. If attaching to the front. Slide range into the floor. 3. pilot holes using a masonry drill bit...

