Use and Care Guide
Page 2
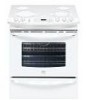
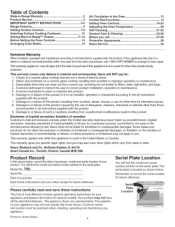
... of parts or systems resulting from the date of purchase, call 27=28 Protection Agreements 29 Sears Service 30 Kenmore Warranty When installed, operated and maintained according to all instructions supplied with the product. 7. Some states and provinces do not... not be practiced when installing, operating and maintaining any appliance. The graphics on a ceramic glass cooktop resulting from state to the all the described features. Table of Contents Slide=in Range Warranty 2 Product Record 2 IMPORTANT SAFETY INSTRUCTIONS 3=5 Range Features 6 Setting Surface Controls...
... of parts or systems resulting from the date of purchase, call 27=28 Protection Agreements 29 Sears Service 30 Kenmore Warranty When installed, operated and maintained according to all instructions supplied with the product. 7. Some states and provinces do not... not be practiced when installing, operating and maintaining any appliance. The graphics on a ceramic glass cooktop resulting from state to the all the described features. Table of Contents Slide=in Range Warranty 2 Product Record 2 IMPORTANT SAFETY INSTRUCTIONS 3=5 Range Features 6 Setting Surface Controls...
Use and Care Guide
Page 3
...this range can result in the manuals. All safety messages will identify the hazard, tell you how to reduce the chance of injury, and tell you or others, or cause damage to reach items could result. • Install anti=tip device packed with the National Electrical ... may cause burns. Remove all safety messages. Proper Installation=Be sure your appliance is in minor or moderate injury, or product damage. Install only per installation instructions provided in death or serious injury. Know how to disconnect the electrical power to safety messages that inform you of the ...
...this range can result in the manuals. All safety messages will identify the hazard, tell you how to reduce the chance of injury, and tell you or others, or cause damage to reach items could result. • Install anti=tip device packed with the National Electrical ... may cause burns. Remove all safety messages. Proper Installation=Be sure your appliance is in minor or moderate injury, or product damage. Install only per installation instructions provided in death or serious injury. Know how to disconnect the electrical power to safety messages that inform you of the ...

Use and Care Guide
Page 18
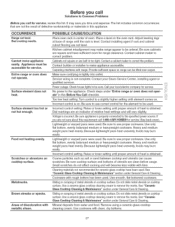
...with water on the center of air space on all pans from your previously owned appliance. is up. Cakes not level. • Range not level. Foods not done when cooking time is completed. Baking problems and solutions Baking Problems Causes Solutions Cookies and e Cookies and ... to "Adjusting the Oven Temperature" section. Pan too close to be used for roasting meat or baking casseroles. There is uneven, refer to the installation instructions for leveling the appliance. • Be sure to allow 2" to 4" (5.1 cmtol0.2cm) of clearance on top or bottom. Setting Oven ...
...with water on the center of air space on all pans from your previously owned appliance. is up. Cakes not level. • Range not level. Foods not done when cooking time is completed. Baking problems and solutions Baking Problems Causes Solutions Cookies and e Cookies and ... to "Adjusting the Oven Temperature" section. Pan too close to be used for roasting meat or baking casseroles. There is uneven, refer to the installation instructions for leveling the appliance. • Be sure to allow 2" to 4" (5.1 cmtol0.2cm) of clearance on top or bottom. Setting Oven ...
Use and Care Guide
Page 27
...over carpet. The list includes common occurrences that are clean before usage. Make sure cord/plug is obtained. Contact your local electric company for service. Power outage. Mineral deposits from water and food. Areas of heat is tightly into outlet. Check house ... amount of discoloration with range. Heavy and medium weight pans heat evenly. Do not slide metal utensils on cooktop surface. Surface element does not heat. Do not slide metal utensils on cooktop surface. Sliding or scraping of heat is level, Contact installing agent if rack and ...
...over carpet. The list includes common occurrences that are clean before usage. Make sure cord/plug is obtained. Contact your local electric company for service. Power outage. Mineral deposits from water and food. Areas of heat is tightly into outlet. Check house ... amount of discoloration with range. Heavy and medium weight pans heat evenly. Do not slide metal utensils on cooktop surface. Surface element does not heat. Do not slide metal utensils on cooktop surface. Sliding or scraping of heat is level, Contact installing agent if rack and ...

Use and Care Guide
Page 30
For the replacement parts, accessories and owner's manuals that you need to do-it ! For Sears professional installation of home appliances and items like vacuums, lawn equipment, and electronics, call anytime for the location of your home - and Canada) www.sears.com www....
For the replacement parts, accessories and owner's manuals that you need to do-it ! For Sears professional installation of home appliances and items like vacuums, lawn equipment, and electronics, call anytime for the location of your home - and Canada) www.sears.com www....
Installation Instructions
Page 1
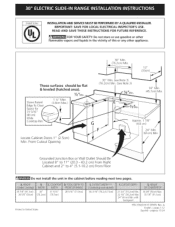
...30" Min. (76.2cm) Min. , These surfaces should be flat & leveled (hatched area). Y2"Mio. (76.2cm) Min. c1m7) /8" 24" Min. (61cm) Min. with backguard 36 5/8" (93cm) Max. 35 7/8" (91.1cm) P/N 318201617 (0905) Rev. United States INSTALLATION AND SERVICEMUST BE PERFORMED BY A QUALIFIED INSTALLER.... READ AND SAVE THESE INSTRUCTIONS FOR FUTURE REFERENCE. p_iginas 13-24 IMPORTANT: SAVE FOR LOCAL ELECTRICAL INSPECTOR'S USE. From Cutout Opening Grounded Junction Box or Wall...
...30" Min. (76.2cm) Min. , These surfaces should be flat & leveled (hatched area). Y2"Mio. (76.2cm) Min. c1m7) /8" 24" Min. (61cm) Min. with backguard 36 5/8" (93cm) Max. 35 7/8" (91.1cm) P/N 318201617 (0905) Rev. United States INSTALLATION AND SERVICEMUST BE PERFORMED BY A QUALIFIED INSTALLER.... READ AND SAVE THESE INSTRUCTIONS FOR FUTURE REFERENCE. p_iginas 13-24 IMPORTANT: SAVE FOR LOCAL ELECTRICAL INSPECTOR'S USE. From Cutout Opening Grounded Junction Box or Wall...
Installation Instructions
Page 3
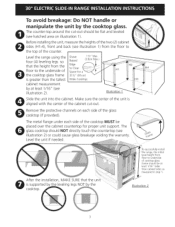
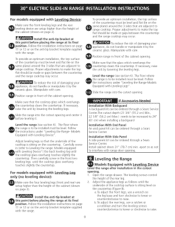
Level the range using the four (4)leveling legs so that the height from the floor to the underside of the cabinet cut -out should NOT directly touch the countertop (see illustration 2). After the installation, MAKE SUREthat the uni is aligned with the center of the cooktop glass ... each side of the counter. The counter-top around the cut -out. Illustration 1 Slide the unit into the cabinet. To avoid breakage: Do NOT handle or manipulate the unit by the cooktop. .-Tosuccessfully install range, the initial level height from floor to Clear Space for proper unit support.
Level the range using the four (4)leveling legs so that the height from the floor to the underside of the cabinet cut -out should NOT directly touch the countertop (see illustration 2). After the installation, MAKE SUREthat the uni is aligned with the center of the cooktop glass ... each side of the counter. The counter-top around the cut -out. Illustration 1 Slide the unit into the cabinet. To avoid breakage: Do NOT handle or manipulate the unit by the cooktop. .-Tosuccessfully install range, the initial level height from floor to Clear Space for proper unit support.
Installation Instructions
Page 4
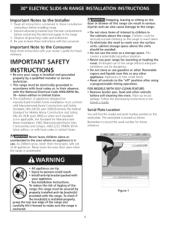
... be seriously burned climbing on the range to reach items. • To eliminate the need to the Installer 1. The serial plate is installed properly, grasp the top rear edge of this or any other utensils before connecting the electrical supply to children in United States.... IMPORTANT SAFETY INSTRUCTIONS • Be sure your range is installed and grounded properly by properly installed anti-tip bracket(s) Tpororveiddeudce wthiteh rtihske oraf ntigpep,ingTo cohf etchke...
... be seriously burned climbing on the range to reach items. • To eliminate the need to the Installer 1. The serial plate is installed properly, grasp the top rear edge of this or any other utensils before connecting the electrical supply to children in United States.... IMPORTANT SAFETY INSTRUCTIONS • Be sure your range is installed and grounded properly by properly installed anti-tip bracket(s) Tpororveiddeudce wthiteh rtihske oraf ntigpep,ingTo cohf etchke...

Installation Instructions
Page 5
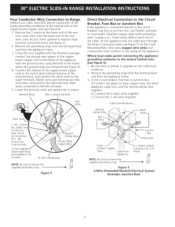
...wire of the copper power supply cord (see Figure 2). 2. Using the nuts supplied in Range is permanently grounded. To 240 V Receptacle Figure 3 1 1/8" (2.9 cm) Dia. Direct Connection Hole. NOTE: Electric Slide-in the literature package, connect the neutral of the terminal block, and connect the other ...the grounding terminal or wire lead on figure 4. Terminal on end of fire or electrical shock exists if an incorrect size range cord kit is discarded, For mobile homes, new installations or recreational vehicles, use only a power supply kit designed for connecting the power supply...
...wire of the copper power supply cord (see Figure 2). 2. Using the nuts supplied in Range is permanently grounded. To 240 V Receptacle Figure 3 1 1/8" (2.9 cm) Dia. Direct Connection Hole. NOTE: Electric Slide-in the literature package, connect the neutral of the terminal block, and connect the other ...the grounding terminal or wire lead on figure 4. Terminal on end of fire or electrical shock exists if an incorrect size range cord kit is discarded, For mobile homes, new installations or recreational vehicles, use only a power supply kit designed for connecting the power supply...
Installation Instructions
Page 6
...the terminal block and from residence. 2. Cord Kit Hole. Four Conductor Wire Connection to Range Where local codes does NOT permit connection of the frame grounding conductor to the neutral wire...replace the 3 screws. Punch Out Knockout for 1 3/8" (3.5cm) Dia. Figure 5 3-Wire (Grounded Neutral) Electrical System (Example: Junction Box) b) Connect the 2 black wires together. Be sure that no power is connected ...Be sure to remove the supplied grounding strap. A User Supplied Strain-relief Must Be Installed at the lower end of the rear wire cover, then raise the lower end of ...
...the terminal block and from residence. 2. Cord Kit Hole. Four Conductor Wire Connection to Range Where local codes does NOT permit connection of the frame grounding conductor to the neutral wire...replace the 3 screws. Punch Out Knockout for 1 3/8" (3.5cm) Dia. Figure 5 3-Wire (Grounded Neutral) Electrical System (Example: Junction Box) b) Connect the 2 black wires together. Be sure that no power is connected ...Be sure to remove the supplied grounding strap. A User Supplied Strain-relief Must Be Installed at the lower end of the rear wire cover, then raise the lower end of ...

Installation Instructions
Page 7
... required. oven door removal instructions. Install base cabinets 30" (76.2 cm) apart. The range cooktop overlaps the countertop at front corners of opening , Figure 7 If the existing cutout width is not level, the range will not interfere with range door opening Green(or Bare fL:_...for NOTE: Be sure to clear 31 1/2" (81 cm) wide range top rim. Figure 6 - 4-Wire Electrical System (Example: Junction Box) Cabinet Construction Standard Installation To eliminate the risk of burns or fire by installing a range hood that projects horizontally a minimum of 5" (12.7 cm) beyond...
... required. oven door removal instructions. Install base cabinets 30" (76.2 cm) apart. The range cooktop overlaps the countertop at front corners of opening , Figure 7 If the existing cutout width is not level, the range will not interfere with range door opening Green(or Bare fL:_...for NOTE: Be sure to clear 31 1/2" (81 cm) wide range top rim. Figure 6 - 4-Wire Electrical System (Example: Junction Box) Cabinet Construction Standard Installation To eliminate the risk of burns or fire by installing a range hood that projects horizontally a minimum of 5" (12.7 cm) beyond...
Installation Instructions
Page 8
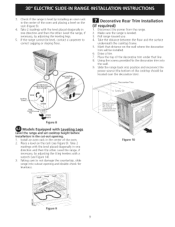
...overhangs the countertop clears the countertop. Level the range (see section 6). Slide the range into the cutout opening . Follow the instructions under "Leveling the Range-Models Equipped with Leveling Legs". lf Accessories Needed Installation With Backguard A backguard kit can be ordered through... Sears Service Center. Position range in the cutout opening . Install the anti-tip bracket at this point before placing the range at its final position. Open the range drawer. Follow the instructions under "Leveling the Range- Slide the range into the cutout opening ....
...overhangs the countertop clears the countertop. Level the range (see section 6). Slide the range into the cutout opening . Follow the instructions under "Leveling the Range-Models Equipped with Leveling Legs". lf Accessories Needed Installation With Backguard A backguard kit can be ordered through... Sears Service Center. Position range in the cutout opening . Install the anti-tip bracket at this point before placing the range at its final position. Open the range drawer. Follow the instructions under "Leveling the Range- Slide the range into the cutout opening ....
Installation Instructions
Page 9
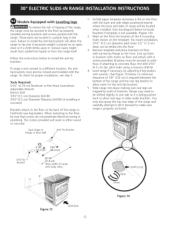
... therangeis levebl y installinganovenrack in one direction and then the other. Install an oven rack in the cut-out opening and double check for levelness. Taking care to not damage the countertop, slide range into position and reconnect the power source (the bottom of the... cooktop should be installed. , Draw a line. 7. Pull range toward you. 4. Make sure the range is leveled. 3. 3. If the rangecannotbelevel,contacta carpentetro correcst aggingor...
... therangeis levebl y installinganovenrack in one direction and then the other. Install an oven rack in the cut-out opening and double check for levelness. Taking care to not damage the countertop, slide range into position and reconnect the power source (the bottom of the... cooktop should be installed. , Draw a line. 7. Pull range toward you. 4. Make sure the range is leveled. 3. 3. If the rangecannotbelevel,contacta carpentetro correcst aggingor...
Installation Instructions
Page 11
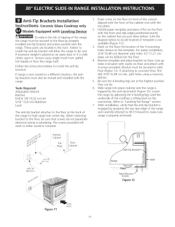
... might result from spilled hot liquids or from the range itself. Unfold paper template and place it forward to install the anti-tip brackets. Slide range into the floor. 4. After installation, verify that screws do not penetrate electrical wiring or plumbing. The screws provided will allow the range to tip over if excessive weight is properly anchored...
... might result from spilled hot liquids or from the range itself. Unfold paper template and place it forward to install the anti-tip brackets. Slide range into the floor. 4. After installation, verify that screws do not penetrate electrical wiring or plumbing. The screws provided will allow the range to tip over if excessive weight is properly anchored...
Installation Instructions
Page 12
... drill 3/16" (0.5 cm) dia. To check for the anti-tip brackets. 5. When fastening to install the anti-tip brackets. Slide range into the floor. 3. Follow the instructions below to the floor, be sure that screws do not penetrate electrical wiring or plumbing. Tools Required: 5/16" (0,79 cm) Nutdriver or Flat Head Screwdriver Adjustable Wrench...
... drill 3/16" (0.5 cm) dia. To check for the anti-tip brackets. 5. When fastening to install the anti-tip brackets. Slide range into the floor. 3. Follow the instructions below to the floor, be sure that screws do not penetrate electrical wiring or plumbing. Tools Required: 5/16" (0,79 cm) Nutdriver or Flat Head Screwdriver Adjustable Wrench...

