Owners Manual
Page 2
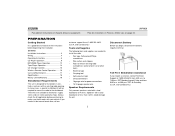
... power connections • 16-18 gauge speaker wire Speaker Requirements Only connect speakers rated with a load impedance of 4 ohms. Speakers with a load impedance of the instructions before purchasing to make sure the kit works with an existing radio opening. EST Monday through Friday and from... existing radio (screwdriver, socket wrench set or other tools) • Electrical tape • Crimping tool • Volt meter/test light • Crimp connections • 18 gauge wire for installation in cars, trucks, and vans with your vehicle. and Canada only.) UMP9020 PREPARATION ...
... power connections • 16-18 gauge speaker wire Speaker Requirements Only connect speakers rated with a load impedance of 4 ohms. Speakers with a load impedance of the instructions before purchasing to make sure the kit works with an existing radio opening. EST Monday through Friday and from... existing radio (screwdriver, socket wrench set or other tools) • Electrical tape • Crimping tool • Volt meter/test light • Crimp connections • 18 gauge wire for installation in cars, trucks, and vans with your vehicle. and Canada only.) UMP9020 PREPARATION ...
Owners Manual
Page 4
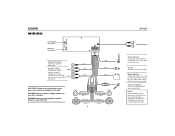
... ATO). Using an incorrect fuse could damage the radio. LF/AVG White/Black (-) LR/ARG White (+) Green/Black (-) Green (+) 4 Blue Black Yellow + Red 0.5A Gray/Black (-) Gray (+) Violet/Black (-) Violet (+) RF/AVD RR/ARD UMP9020 Auxiliary Input Power Antenna Connect to optional subwoofer. ...to chassis ground. Amplifier Wiring Connect line out for use with 1 speaker. Never combine (bridge) outputs for Rear optional external amplifiers. If not used, tape bare end of wire. Accessory/Ignition Connect to the radio. Fuses When replacing a fuse, make sure the new fuse is...
... ATO). Using an incorrect fuse could damage the radio. LF/AVG White/Black (-) LR/ARG White (+) Green/Black (-) Green (+) 4 Blue Black Yellow + Red 0.5A Gray/Black (-) Gray (+) Violet/Black (-) Violet (+) RF/AVD RR/ARD UMP9020 Auxiliary Input Power Antenna Connect to optional subwoofer. ...to chassis ground. Amplifier Wiring Connect line out for use with 1 speaker. Never combine (bridge) outputs for Rear optional external amplifiers. If not used, tape bare end of wire. Accessory/Ignition Connect to the radio. Fuses When replacing a fuse, make sure the new fuse is...
Owners Manual
Page 6
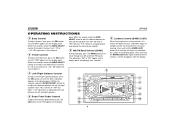
...low volumes, this feature as indicated by "LOUD" on the display panel. The indications "AM" or "FM" appear on the display panel. UMP9020 OPERATING INSTRUCTIONS 4 Bass Control To adjust the bass level, press the SEL button (4) until "BAS" appears on the display panel. Press and hold...deactivate the function. Within five seconds, rotate the AUDIO ADJUST control (3) to adjust the balance between the front and rear speakers. 5 AM/FM Band Selector (BAND) During radio play, press the BAND button (5) to activate this feature will boost the bass and treble ranges to compensate for the...
...low volumes, this feature as indicated by "LOUD" on the display panel. The indications "AM" or "FM" appear on the display panel. UMP9020 OPERATING INSTRUCTIONS 4 Bass Control To adjust the bass level, press the SEL button (4) until "BAS" appears on the display panel. Press and hold...deactivate the function. Within five seconds, rotate the AUDIO ADJUST control (3) to adjust the balance between the front and rear speakers. 5 AM/FM Band Selector (BAND) During radio play, press the BAND button (5) to activate this feature will boost the bass and treble ranges to compensate for the...


