Owners Manual
Page 2
... and car stereo specialty shops. and Canada only.) Tools and Supplies The following tools and supplies are available at 1-800-323-4815. (U.S.A. Contents Installation Instructions 3 Wiring 4 Operating Instructions 5 CD Player Operation 9 MP3/WMA Player Operation 12 Tape Player Operation 14 CD Changer Controls 15 Wireless Remote Control Operation........ 16 Care and Maintenance 17 Specifications 18 90 Day Limited Warranty 19 Installation Requirements This unit is designed for power connections • 16-18 gauge speaker wire Speaker...
... and car stereo specialty shops. and Canada only.) Tools and Supplies The following tools and supplies are available at 1-800-323-4815. (U.S.A. Contents Installation Instructions 3 Wiring 4 Operating Instructions 5 CD Player Operation 9 MP3/WMA Player Operation 12 Tape Player Operation 14 CD Changer Controls 15 Wireless Remote Control Operation........ 16 Care and Maintenance 17 Specifications 18 90 Day Limited Warranty 19 Installation Requirements This unit is designed for power connections • 16-18 gauge speaker wire Speaker...
Owners Manual
Page 3
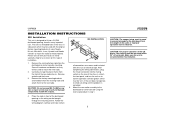
... new radio. Follow the wiring diagram carefully and make certain 3 CAUTION: The support strap must be used with your local car stereo specialty shop for assistance on this limitation. Remove and discard the frame. 3. ISO INSTALLATION all wiring until the problem is corrected. 5. Remove the factory mounting brackets and hardware from the weight of the new radio chassis. UMP9020 INSTALLATION INSTRUCTIONS ISO Installation This unit is designed to confirm operation (vehicle ignition switch...
... new radio. Follow the wiring diagram carefully and make certain 3 CAUTION: The support strap must be used with your local car stereo specialty shop for assistance on this limitation. Remove and discard the frame. 3. ISO INSTALLATION all wiring until the problem is corrected. 5. Remove the factory mounting brackets and hardware from the weight of the new radio chassis. UMP9020 INSTALLATION INSTRUCTIONS ISO Installation This unit is designed to confirm operation (vehicle ignition switch...
Owners Manual
Page 4
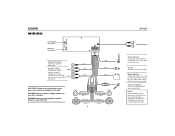
... to power antenna or amplifier. Ground Connect to optional subwoofer. WIRING CD Changer Connector Antenna Connector 15 Subwoofer Output Connect to ground terminal. WARNING! The red connector is for the left. Never ground negative speaker leads to existing radio wire or radio fuse. If not used, tape bare end of wire. Memory/Battery Connect to battery or 12 volt power source that is the correct type and amperage (15 amp ATO). Accessory/Ignition Connect to chassis ground. Fuses When replacing a fuse, make sure...
... to power antenna or amplifier. Ground Connect to optional subwoofer. WIRING CD Changer Connector Antenna Connector 15 Subwoofer Output Connect to ground terminal. WARNING! The red connector is for the left. Never ground negative speaker leads to existing radio wire or radio fuse. If not used, tape bare end of wire. Memory/Battery Connect to battery or 12 volt power source that is the correct type and amperage (15 amp ATO). Accessory/Ignition Connect to chassis ground. Fuses When replacing a fuse, make sure...
Owners Manual
Page 5
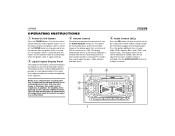
... ignition switch is turned off when the vehicle ignition switch is also used to adjust the bass, treble, balance and fader levels. 4 Audio Control (SEL) Press the SEL button (4) twice to set the unit for an extended period of the segments. UMP9020 OPERATING INSTRUCTIONS 1 Power On/Off Button Press the POWER button (1) to turn the unit on and off , the POWER button must be shown on the display panel from a minimum of "00" to a maximum of the numbers...
... ignition switch is turned off when the vehicle ignition switch is also used to adjust the bass, treble, balance and fader levels. 4 Audio Control (SEL) Press the SEL button (4) twice to set the unit for an extended period of the segments. UMP9020 OPERATING INSTRUCTIONS 1 Power On/Off Button Press the POWER button (1) to turn the unit on and off , the POWER button must be shown on the display panel from a minimum of "00" to a maximum of the numbers...
Owners Manual
Page 6
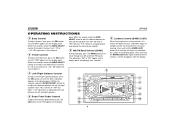
... the AUDIO ADJUST control (3) to adjust the treble from a minimum of "-10" to a maximum of human hearing. "F=R" represents an equal balance level between the left and right speakers. 4 Rear/Front Fader Control To adjust the rear/front speaker balance, press the SEL button (4) until "FAD"appears on the display panel according to your selection. 5 Loudness Control (BAND/LOUD) When listening to "+10". "LOUD" disappears from "-10" to music at low volumes, this...
... the AUDIO ADJUST control (3) to adjust the treble from a minimum of "-10" to a maximum of human hearing. "F=R" represents an equal balance level between the left and right speakers. 4 Rear/Front Fader Control To adjust the rear/front speaker balance, press the SEL button (4) until "FAD"appears on the display panel according to your selection. 5 Loudness Control (BAND/LOUD) When listening to "+10". "LOUD" disappears from "-10" to music at low volumes, this...

Owners Manual
Page 7
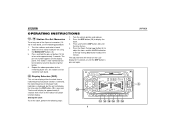
...) for more than 2 seconds. 8 Audio Mute (MUTE) Press the MUTE button (8) to mute the volume from the display panel). 7 11 Equalizer Selector (EQ) The EQ button (11) applies preset sound effects to monaural reception. This feature is active, the bass and treble levels cannot be left in the display. Manual Tuning To manually select a radio station, press and hold the MODE button (7) for 2 seconds to activate the Auto-Store tuning feature. If the stereo signal is in a new area where...
...) for more than 2 seconds. 8 Audio Mute (MUTE) Press the MUTE button (8) to mute the volume from the display panel). 7 11 Equalizer Selector (EQ) The EQ button (11) applies preset sound effects to monaural reception. This feature is active, the bass and treble levels cannot be left in the display. Manual Tuning To manually select a radio station, press and hold the MODE button (7) for 2 seconds to activate the Auto-Store tuning feature. If the stereo signal is in a new area where...
Owners Manual
Page 8
...: 1. Press the Down Tuning ( ) button (6) to adjust the hours and the AM/PM indication or the Up Tuning ( ) button to display the clock. 3. Six stations can display either the clock time or radio frequency/CD player functions. Press and hold the pre-set button (13-18) to be pre-set using the MANU/SKIP buttons (6). 3. AM/FM/CD/MP3/WMACASSETTE RECEIVER ULTRASERIES UMP9020 7 TAPE OPEN CLOSE CD OPEN CLOSE EJ MUTE 20 0 SCAN...
...: 1. Press the Down Tuning ( ) button (6) to adjust the hours and the AM/PM indication or the Up Tuning ( ) button to display the clock. 3. Six stations can display either the clock time or radio frequency/CD player functions. Press and hold the pre-set button (13-18) to be pre-set using the MANU/SKIP buttons (6). 3. AM/FM/CD/MP3/WMACASSETTE RECEIVER ULTRASERIES UMP9020 7 TAPE OPEN CLOSE CD OPEN CLOSE EJ MUTE 20 0 SCAN...
Owners Manual
Page 9
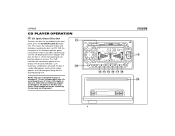
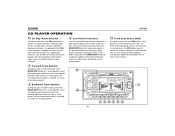
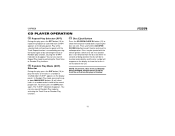
... playing time. UMP9020 CD PLAYER OPERATION 21 CD Open/Close/Disc Slot 21 To access the disc slot, located behind the front panel, press the CD OPEN CLOSE EJ button (21). With the front panel in . Do not attempt to close. The "CdP" indication will not be covered by the warranty on the display. The disc play of standard 5" (12 cm.) compact discs only. NOTE: The unit...
... playing time. UMP9020 CD PLAYER OPERATION 21 CD Open/Close/Disc Slot 21 To access the disc slot, located behind the front panel, press the CD OPEN CLOSE EJ button (21). With the front panel in . Do not attempt to close. The "CdP" indication will not be covered by the warranty on the display. The disc play of standard 5" (12 cm.) compact discs only. NOTE: The unit...
Owners Manual
Page 10
... number is used to quickly select the beginning of a particular track in the backward direction (the disc symbol rotates backwards on the display panel. 6 Cue/Review Functions Use the Cue and Review functions to perform a high-speed audible search to cancel the function and play the selected track. When a desired track is suspended. UMP9020 CD PLAYER OPERATION 13 CD Play/Pause Selector During disc play, press the PAU (play/pause) button (13) to play...
... number is used to quickly select the beginning of a particular track in the backward direction (the disc symbol rotates backwards on the display panel. 6 Cue/Review Functions Use the Cue and Review functions to perform a high-speed audible search to cancel the function and play the selected track. When a desired track is suspended. UMP9020 CD PLAYER OPERATION 13 CD Play/Pause Selector During disc play, press the PAU (play/pause) button (13) to play...
Owners Manual
Page 11
... disappears. NOTE: To prevent a disc from the unit when disc play , press the RPT button (15) to disappear. In Random Play mode, pressing the up or down , exposing the disc slot (22). UMP9020 CD PLAYER OPERATION 15 Repeat Play Selector (RPT) During disc play is still installed in the unit. You can also cancel Random Play mode by activating the Track Scan or Random Play functions. 21 Disc Eject Button Press the CD OPEN...
... disappears. NOTE: To prevent a disc from the unit when disc play , press the RPT button (15) to disappear. In Random Play mode, pressing the up or down , exposing the disc slot (22). UMP9020 CD PLAYER OPERATION 15 Repeat Play Selector (RPT) During disc play is still installed in the unit. You can also cancel Random Play mode by activating the Track Scan or Random Play functions. 21 Disc Eject Button Press the CD OPEN...
Owners Manual
Page 12
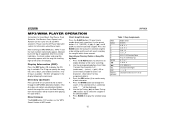
... unit will search and play the selected song/ file. 12 UMP9020 Table 1: Key Assignments AMS BAND 1 2 3 4 5 6 MODE SEL DSP AUDIO ADJUST Mode Select ENTER A, B, C, 1 D, E, F, 2 G, H, I, 3 J, K, L, 4 M, N, O, 5/Directory Down P, Q, R, 6/Directory Up S, T, U, 7 V, W, X, 8 Y, Z, SPACE, 9 Character Shift Right _, -, +, 0 Character Select (A, B~8, 9, 0) Press the BAND button (5) to display the ID3 tag, if available. Press the D-AUD button (12) two times to select the desired song/file. MP3/WMA PLAYER OPERATION Instructions for Insert/Eject, Play/Pause, Track Selection, Cue/Review...
... unit will search and play the selected song/ file. 12 UMP9020 Table 1: Key Assignments AMS BAND 1 2 3 4 5 6 MODE SEL DSP AUDIO ADJUST Mode Select ENTER A, B, C, 1 D, E, F, 2 G, H, I, 3 J, K, L, 4 M, N, O, 5/Directory Down P, Q, R, 6/Directory Up S, T, U, 7 V, W, X, 8 Y, Z, SPACE, 9 Character Shift Right _, -, +, 0 Character Select (A, B~8, 9, 0) Press the BAND button (5) to display the ID3 tag, if available. Press the D-AUD button (12) two times to select the desired song/file. MP3/WMA PLAYER OPERATION Instructions for Insert/Eject, Play/Pause, Track Selection, Cue/Review...
Owners Manual
Page 13
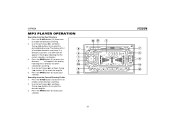
... button (12) four times to select the song/file. 5. Use the Up Tuning ( ) and Down Tuning ( ) buttons (6) to select the desired directory/song. Use the Up Tuning ( ) and Down Tuning ( ) buttons (6) to select the desired song/file. 3. Press the BAND button (5) to play your 12 selection. Press the BAND button (5) to play your selection. 23 21 2 AM/FM/CD/MP3/WMACASSETTE RECEIVER ULTRASERIES UMP9020 7 TAPE OPEN CLOSE CD OPEN CLOSE EJ MUTE...
... button (12) four times to select the song/file. 5. Use the Up Tuning ( ) and Down Tuning ( ) buttons (6) to select the desired directory/song. Use the Up Tuning ( ) and Down Tuning ( ) buttons (6) to select the desired song/file. 3. Press the BAND button (5) to play your 12 selection. Press the BAND button (5) to play your selection. 23 21 2 AM/FM/CD/MP3/WMACASSETTE RECEIVER ULTRASERIES UMP9020 7 TAPE OPEN CLOSE CD OPEN CLOSE EJ MUTE...
Owners Manual
Page 14
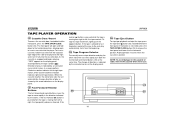
... the tape eject button (26), located behind the front panel, press the TAPE OPEN CLOSE button (23). When the cassette reaches the end of one side, the unit automatically changes direction of play the other side of direction is indicated by the arrows. The change of the cassette, lightly push both the fast-forward and rewind buttons (25) at the same time. As the...
... the tape eject button (26), located behind the front panel, press the TAPE OPEN CLOSE button (23). When the cassette reaches the end of one side, the unit automatically changes direction of play the other side of direction is indicated by the arrows. The change of the cassette, lightly push both the fast-forward and rewind buttons (25) at the same time. As the...
Owners Manual
Page 15
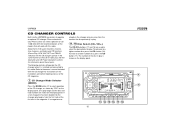
.... 7 CD Changer Mode Selector (MODE) Press the MODE button (7) to select operation of the disc in play. 17 , 18 Disc Select (CD-/CD+) The CD-/CD+ buttons (17 and 18) are used to this radio. See the Operation and CD Player Operation sections for the CD changer operate in 1 CD/MP3 CASSETTE RECEIVER SCN RPT SHF CD- / CD+ 13 14 15 16 17 18 15 Adjustment of the audio functions (volume, tone, balance, and fader...
.... 7 CD Changer Mode Selector (MODE) Press the MODE button (7) to select operation of the disc in play. 17 , 18 Disc Select (CD-/CD+) The CD-/CD+ buttons (17 and 18) are used to this radio. See the Operation and CD Player Operation sections for the CD changer operate in 1 CD/MP3 CASSETTE RECEIVER SCN RPT SHF CD- / CD+ 13 14 15 16 17 18 15 Adjustment of the audio functions (volume, tone, balance, and fader...
Owners Manual
Page 16
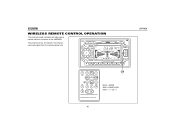
... EJ MUTE 0 SCAN AMS D-AUD PAU 3 in 1 CD/MP3 CASSETTE RECEIVER SCN RPT SHF CD- / CD+ WMA BAND LOUD 9 MANU SKIP 8 7 MOD PWR 8 VOL TUNE/SEEK VOL SEL 9 LOU ENT BND DSP 0 PAU SCN RPT D-AUD 1 2 3 AMS SHF - WIRELESS REMOTE CONTROL OPERATION The infrared remote controller will allow you to control the basic functions of the UMP9020. DISC + 4 56 27 MOD = MODE BND...
... EJ MUTE 0 SCAN AMS D-AUD PAU 3 in 1 CD/MP3 CASSETTE RECEIVER SCN RPT SHF CD- / CD+ WMA BAND LOUD 9 MANU SKIP 8 7 MOD PWR 8 VOL TUNE/SEEK VOL SEL 9 LOU ENT BND DSP 0 PAU SCN RPT D-AUD 1 2 3 AMS SHF - WIRELESS REMOTE CONTROL OPERATION The infrared remote controller will allow you to control the basic functions of the UMP9020. DISC + 4 56 27 MOD = MODE BND...
Owners Manual
Page 17
... case, allow the unit to normal operation. If there is located behind the faceplate on the left side (the front panel must be damaged by the Warranty on rough roads, however, occasional sound skips may occur. RESET BUTTON A Reset button (28) is a malfunction of any maintenance. In this unit as well as how to set memories: Upon initial installation after all wiring is designed with...
... case, allow the unit to normal operation. If there is located behind the faceplate on the left side (the front panel must be damaged by the Warranty on rough roads, however, occasional sound skips may occur. RESET BUTTON A Reset button (28) is a malfunction of any maintenance. In this unit as well as how to set memories: Upon initial installation after all wiring is designed with...
Owners Manual
Page 18
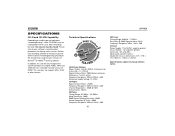
..., -3dB 18 UMP9020 AM Tuner Tuning Range: 530kHz - 1710kHz Sensitivity @ 20dB Signal to Noise: 30uV Frequency Response: 30Hz - 2kHz, -3dB General Power Supply: 11 to 16VDC, negative ground Fuses: Battery - 15 amp/ATO, Ignition/ Accessory - 0.5 amp AGC 20 pin quick-connect harness Double Din Chassis Dimensions: 4"H x 7"W x 7"D (102mm x 178mm x 178mm) Specifications subject to familiarize yourself with this unit will only recognize the CDDA (Compact Disc Digital Audio), .MP3...
..., -3dB 18 UMP9020 AM Tuner Tuning Range: 530kHz - 1710kHz Sensitivity @ 20dB Signal to Noise: 30uV Frequency Response: 30Hz - 2kHz, -3dB General Power Supply: 11 to 16VDC, negative ground Fuses: Battery - 15 amp/ATO, Ignition/ Accessory - 0.5 amp AGC 20 pin quick-connect harness Double Din Chassis Dimensions: 4"H x 7"W x 7"D (102mm x 178mm x 178mm) Specifications subject to familiarize yourself with this unit will only recognize the CDDA (Compact Disc Digital Audio), .MP3...
Owners Manual
Page 19
...repair or replacement within 90 days from state to the warranty center at the Company's option) without charge for installation, removal, or reinstallation of the product, or damage to tapes, compact discs, accessories or vehicle electrical systems. This Warranty does not apply to any product or part... of sale), specification of the factory serial number/bar code label(s) or markings. UMP9020 90 DAY LIMITED WARRANTY AUDIOVOX CORPORATION (the Company) warrants to the original retail purchaser of this product that should this product or any part thereof, under normal use and conditions, be...
...repair or replacement within 90 days from state to the warranty center at the Company's option) without charge for installation, removal, or reinstallation of the product, or damage to tapes, compact discs, accessories or vehicle electrical systems. This Warranty does not apply to any product or part... of sale), specification of the factory serial number/bar code label(s) or markings. UMP9020 90 DAY LIMITED WARRANTY AUDIOVOX CORPORATION (the Company) warrants to the original retail purchaser of this product that should this product or any part thereof, under normal use and conditions, be...


