User Guide
Page 2
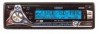
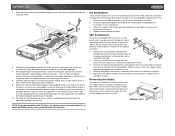
...Tools and Supplies The following tools and supplies are needed to install the radio. • Torx type, flathead and Philips screwdrivers • Wire cutters and strippers • Tools to remove existing radio (screwdriver, socket wrench set or other tools) • Electrical tape ... load impedance less than 4 ohms could damage the unit. Remove Transport Screws 3. Remove Radio from radio. Disconnect Battery Before you begin, always disconnect the battery negative terminal. 2. Pre-installation 1. TRANSPORT SCREWS HALF SLEEVE ENTER A UDIO ERASE SEARC MUTE H MPA6611X COPY TUNE...
...Tools and Supplies The following tools and supplies are needed to install the radio. • Torx type, flathead and Philips screwdrivers • Wire cutters and strippers • Tools to remove existing radio (screwdriver, socket wrench set or other tools) • Electrical tape ... load impedance less than 4 ohms could damage the unit. Remove Transport Screws 3. Remove Radio from radio. Disconnect Battery Before you begin, always disconnect the battery negative terminal. 2. Pre-installation 1. TRANSPORT SCREWS HALF SLEEVE ENTER A UDIO ERASE SEARC MUTE H MPA6611X COPY TUNE...
User Guide
Page 3
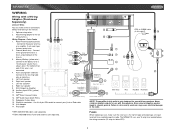
... part of wire. 2. The MPA6611X uses one 15 amp fuse located below the wiring connector (15 amp fast blow ATO). 3 Attach wiring adapter to the power antenna or a amplifier. Connect to the car wiring harness. Connect to connect your jLink or iPod cable. 16. Accessory/Ignition (red wire) - Subwoofer Output (blue) 15. Use this radio is Rear...
... part of wire. 2. The MPA6611X uses one 15 amp fuse located below the wiring connector (15 amp fast blow ATO). 3 Attach wiring adapter to the power antenna or a amplifier. Connect to the car wiring harness. Connect to connect your jLink or iPod cable. 16. Accessory/Ignition (red wire) - Subwoofer Output (blue) 15. Use this radio is Rear...
User Guide
Page 4
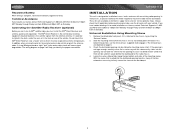
... the kit application before purchasing to make sure the kit works with an existing radio opening is designed for the external antenna do not kink or pinch the antenna ... off of the tabs outward as necessary until the sleeve easily slides into the dashboard. MPA6611X INSTALLATION This unit is not large enough, carefully cut or file as necessary to firmly ... will be exposed to extreme temperatures. Universal Installation Using Mounting Sleeve 1. Reconnect Battery When wiring is the central data receiving equipment required to process the satellite signals from the external antenna....
... the kit application before purchasing to make sure the kit works with an existing radio opening is designed for the external antenna do not kink or pinch the antenna ... off of the tabs outward as necessary until the sleeve easily slides into the dashboard. MPA6611X INSTALLATION This unit is not large enough, carefully cut or file as necessary to firmly ... will be exposed to extreme temperatures. Universal Installation Using Mounting Sleeve 1. Reconnect Battery When wiring is the central data receiving equipment required to process the satellite signals from the external antenna....
User Guide
Page 5
...the chassis and test radio operation by lifting in the center and pulling it into the mounting sleeve making sure it is right-side-up until the problem is mounted within 20° of the chassis. 8. NOTE: For proper operation of the CD player, the chassis ...dashboard or center console mounting. MPA6611X 5. After completing the wiring connections, attach the front panel and turn the ignition switch off from the existing radio and attach them to mount the new radio. 2. Mount the new radio assembly to ensure proper operation. 7. Follow the wiring diagram carefully and make certain all...
...the chassis and test radio operation by lifting in the center and pulling it into the mounting sleeve making sure it is right-side-up until the problem is mounted within 20° of the chassis. 8. NOTE: For proper operation of the CD player, the chassis ...dashboard or center console mounting. MPA6611X 5. After completing the wiring connections, attach the front panel and turn the ignition switch off from the existing radio and attach them to mount the new radio. 2. Mount the new radio assembly to ensure proper operation. 7. Follow the wiring diagram carefully and make certain all...
User Guide
Page 9
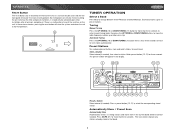
...located on the front of the chassis and can only be activated upon initial installation after all wiring is complete or if there is a malfunction of any stations already stored in the current band.... The preset number will appear in the display. 3 20 18 10 11 DIO ERASE SEARCH ENTER AU MUTE MPA6611X COPY CARD READER TUNE 2 21 12 13 14 15 16 17 7 Recall a Station Select a band (if... the UP TUNING (10) or DOWN TUNING (11) button for less than three seconds to move the radio frequency number up to change between three FM bands and two AM bands. Hold a preset button (12-17...
...located on the front of the chassis and can only be activated upon initial installation after all wiring is complete or if there is a malfunction of any stations already stored in the current band.... The preset number will appear in the display. 3 20 18 10 11 DIO ERASE SEARCH ENTER AU MUTE MPA6611X COPY CARD READER TUNE 2 21 12 13 14 15 16 17 7 Recall a Station Select a band (if... the UP TUNING (10) or DOWN TUNING (11) button for less than three seconds to move the radio frequency number up to change between three FM bands and two AM bands. Hold a preset button (12-17...
User Guide
Page 17
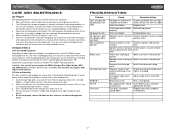
...upside down Replace with the correct "recording/burning" procedures. nections tions Speaker wires shorting to Check splices, insulate all bare chassis ground or to each wires other sizes (even with a vibration dampening CD mechanism to minimize interruption of disc play will resume when the rough conditions...) Not all splices and connec- MPA6611X CARE AND MAINTENANCE CD Player The following guidelines will help you extend the life of your recording software to yellow wire; The CD player will not operate properly in use . 5. Always remove the CD when the player is not is ...
...upside down Replace with the correct "recording/burning" procedures. nections tions Speaker wires shorting to Check splices, insulate all bare chassis ground or to each wires other sizes (even with a vibration dampening CD mechanism to minimize interruption of disc play will resume when the rough conditions...) Not all splices and connec- MPA6611X CARE AND MAINTENANCE CD Player The following guidelines will help you extend the life of your recording software to yellow wire; The CD player will not operate properly in use . 5. Always remove the CD when the player is not is ...
User Guide
Page 18
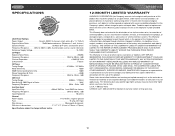
... (-3dB), Auxiliary input used as source reference Reference Supply Voltage 14.4VDC CD Player Signal to Noise Ratio 90dBA Frequency Response 20Hz to 20kHz, -3dB ...General Power Supply 11 to 16VDC, negative ground Fuse 15 amp, ATO type Wire Harness 20-pin quick-disconnect DIN chassis dimensions 2" X 7" X 7" (...in connection with the sale of this Warranty, please contact Jensen at the Company's option) without notice. To obtain ... original retail purchaser of this product that should this product. MPA6611X 12-MONTH LIMITED WARRANTY AUDIOVOX CORPORATION (the Company) warrants to...
... (-3dB), Auxiliary input used as source reference Reference Supply Voltage 14.4VDC CD Player Signal to Noise Ratio 90dBA Frequency Response 20Hz to 20kHz, -3dB ...General Power Supply 11 to 16VDC, negative ground Fuse 15 amp, ATO type Wire Harness 20-pin quick-disconnect DIN chassis dimensions 2" X 7" X 7" (...in connection with the sale of this Warranty, please contact Jensen at the Company's option) without notice. To obtain ... original retail purchaser of this product that should this product. MPA6611X 12-MONTH LIMITED WARRANTY AUDIOVOX CORPORATION (the Company) warrants to...


