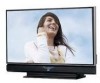
User Guide
Page 2
... the presence of uninsulated "dangerous voltage" within an equilateral triangle is unattainable. 4. Refer servicing to repair it yourself or remove the rear cover. CAUTION: TO INSURE PERSONAL SAFETY, OBSERVE THE FOLLOWING RULES REGARDING THE USE OF THIS UNIT. 1. Disposal of trouble, unplug...technician. Do not allow objects or liquid into the cabinet openings. 5. Changes or modifications not approved by JVC could void the warranty. * When you don't use this TV set for a long period of important operating and maintenance (servicing) instructions in your local authorities or for USA)...
... the presence of uninsulated "dangerous voltage" within an equilateral triangle is unattainable. 4. Refer servicing to repair it yourself or remove the rear cover. CAUTION: TO INSURE PERSONAL SAFETY, OBSERVE THE FOLLOWING RULES REGARDING THE USE OF THIS UNIT. 1. Disposal of trouble, unplug...technician. Do not allow objects or liquid into the cabinet openings. 5. Changes or modifications not approved by JVC could void the warranty. * When you don't use this TV set for a long period of important operating and maintenance (servicing) instructions in your local authorities or for USA)...

User Guide
Page 4
...: Note: This equipment has been tested and found to provide reasonable protection against harmful interference in a residential installation. Increase the separation between the set and the wall, as well as to the wall outlet, it is only for inserting and removing the power plug. INPUT 4 VIDEO + VOLUME ...- The TV will not occur in accordance with JVC Model RK-CEXM6 stand. The main power supply for this TV is connected to keep cords out of heat during operation. Consult the dealer or an experienced radio...
...: Note: This equipment has been tested and found to provide reasonable protection against harmful interference in a residential installation. Increase the separation between the set and the wall, as well as to the wall outlet, it is only for inserting and removing the power plug. INPUT 4 VIDEO + VOLUME ...- The TV will not occur in accordance with JVC Model RK-CEXM6 stand. The main power supply for this TV is connected to keep cords out of heat during operation. Consult the dealer or an experienced radio...
User Guide
Page 5
...like acetone), acidic or alkaline cleansers to wipe down with a cloth dipped in a diluted kitchen cleaner and thoroughly wrung-out. These will keep your TV clean. If you wish to the screen. When it gets dirty, wipe it down the television, first unplug it. This could cause scratches on.... • DO NOT allow liquid to enter the TV through the ventilation slots. • DO NOT use strong or abrasive cleaners on the TV. • DO NOT spray liquids or cleaners directly on the screen surface and image distortions. 5 Wipe the set gently with water. Then wipe gently with a soft ...
...like acetone), acidic or alkaline cleansers to wipe down with a cloth dipped in a diluted kitchen cleaner and thoroughly wrung-out. These will keep your TV clean. If you wish to the screen. When it gets dirty, wipe it down the television, first unplug it. This could cause scratches on.... • DO NOT allow liquid to enter the TV through the ventilation slots. • DO NOT use strong or abrasive cleaners on the TV. • DO NOT spray liquids or cleaners directly on the screen surface and image distortions. 5 Wipe the set gently with water. Then wipe gently with a soft ...
User Guide
Page 9
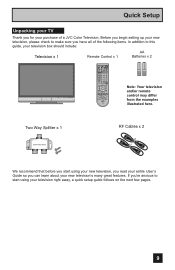
... to start using your television right away, a quick setup guide follows on the next few pages. 9 Quick Setup Unpacking your TV Thank you have all of a JVC Color Television. Before you begin setting up your new television, please check to make sure you for your purchase of the following items. In addition to...
... to start using your television right away, a quick setup guide follows on the next few pages. 9 Quick Setup Unpacking your TV Thank you have all of a JVC Color Television. Before you begin setting up your new television, please check to make sure you for your purchase of the following items. In addition to...
User Guide
Page 10
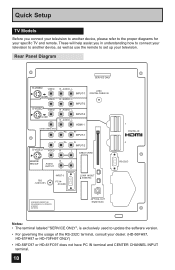
Rear Panel Diagram SERVICE ONLY S-VIDEO VIDEO OVER VIDEO S-VIDEO VIDEO OVER CENTER CHANNELINPUT Y R - AUDIO - AUDIO - .... • For governing the usage of the RS-232C terminal, consult your television. Quick Setup TV Models Before you in understanding how to connect your television to another device, please refer to the proper diagrams for your...UNDER THE FOLLOWING U.S. These will help assist you connect your television to another device, as well as use the remote to set up your dealer. (HD-56FH97, HD-61FH97 or HD-70FH97 ONLY) • HD-56FC97 or HD-61FC97 does not...
Rear Panel Diagram SERVICE ONLY S-VIDEO VIDEO OVER VIDEO S-VIDEO VIDEO OVER CENTER CHANNELINPUT Y R - AUDIO - AUDIO - .... • For governing the usage of the RS-232C terminal, consult your television. Quick Setup TV Models Before you in understanding how to connect your television to another device, please refer to the proper diagrams for your...UNDER THE FOLLOWING U.S. These will help assist you connect your television to another device, as well as use the remote to set up your dealer. (HD-56FH97, HD-61FH97 or HD-70FH97 ONLY) • HD-56FC97 or HD-61FC97 does not...
User Guide
Page 13
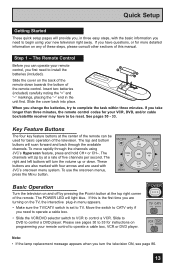
... you turn the volume up or down towards the bottom of this is set to TV. If you have to be used with CH JVC's onscreen menu system. If you take longer than three minutes, the remote...control. Please see page 86. 13 Move the switch to CATV only if you need to begin using JVC's Hyperscan feature, press and hold CH+ or CH-. Quick Setup Getting Started These quick setup pages will...remote control, you first need to install the batteries (included). Step 1 - Slide the cover on the TV, the interactive plug-in three easy steps, with four arrows and are turning on the back of the...
... you turn the volume up or down towards the bottom of this is set to TV. If you have to be used with CH JVC's onscreen menu system. If you take longer than three minutes, the remote...control. Please see page 86. 13 Move the switch to CATV only if you need to begin using JVC's Hyperscan feature, press and hold CH+ or CH-. Quick Setup Getting Started These quick setup pages will...remote control, you first need to install the batteries (included). Step 1 - Slide the cover on the TV, the interactive plug-in three easy steps, with four arrows and are turning on the back of the...

User Guide
Page 15
...IN OUT V R L IN OUT Two-Way Splitter (Attachment) IN OUT OUT Coaxial Cable (Attachment) ATSC /DIGITAL CABLE IN I 75Ω (VHF/UHF) TV Rear Panel OR S-VIDEO VIDEO OVER VIDEO S-VIDEO VIDEO OVER CENTER CHANNELINPUT Y R - L INPUT-3 R - Some models may also connect the DVD player to confuse... the red DVD cable with the red audio cable. L INPUT-1 R - It is best to complete one set of connections (DVD or audio output) before starting the other to avoid accidentally switching the cables. • You may vary colors. AUDIO - L INPUT-2...
...IN OUT V R L IN OUT Two-Way Splitter (Attachment) IN OUT OUT Coaxial Cable (Attachment) ATSC /DIGITAL CABLE IN I 75Ω (VHF/UHF) TV Rear Panel OR S-VIDEO VIDEO OVER VIDEO S-VIDEO VIDEO OVER CENTER CHANNELINPUT Y R - L INPUT-3 R - Some models may also connect the DVD player to confuse... the red DVD cable with the red audio cable. L INPUT-1 R - It is best to complete one set of connections (DVD or audio output) before starting the other to avoid accidentally switching the cables. • You may vary colors. AUDIO - L INPUT-2...

User Guide
Page 17
... record correctly. This is due to ON. Quick Setup Connecting to Monitor/Recording Output Terminal TV Rear Panel S-VIDEO VIDEO R L MONITOR R L /REC OUT AUDIO OUTPUT OR VCR IN OUT IN OUT V R L Notes: • When you make this connection, set the Video-1 Monitor Out menu to the copyright protection system, and is not a malfunction... receiving ATSC/Digital Cable signal, it can be outputted to the S-Video output terminal or Video (composite video) terminal. • If you are receiving Analog TV signal, it can not be distorted on the...
... record correctly. This is due to ON. Quick Setup Connecting to Monitor/Recording Output Terminal TV Rear Panel S-VIDEO VIDEO R L MONITOR R L /REC OUT AUDIO OUTPUT OR VCR IN OUT IN OUT V R L Notes: • When you make this connection, set the Video-1 Monitor Out menu to the copyright protection system, and is not a malfunction... receiving ATSC/Digital Cable signal, it can be outputted to the S-Video output terminal or Video (composite video) terminal. • If you are receiving Analog TV signal, it can not be distorted on the...

User Guide
Page 19
...Connecting to an External Amplifier S-VIDEO VIDEO R L MONITOR R L /REC OUT AUDIO OUTPUT Speaker Amplifier Speaker TV Rear Panel 1) Connect a white cable from the LEFT AUDIO OUTPUT on the back of the TV to the LEFT AUDIO INPUT on the amplifier. 2) Connect a red cable from the RIGHT AUDIO OUTPUT on ...the back of the TV to the AUDIO IN "HDMI 1" connection. (See page 21). 19 Notes: • Refer to your amplifier's manual for more naturally. A center speaker in a movie theater is set in back of the screen so it can recreate a conversation...
...Connecting to an External Amplifier S-VIDEO VIDEO R L MONITOR R L /REC OUT AUDIO OUTPUT Speaker Amplifier Speaker TV Rear Panel 1) Connect a white cable from the LEFT AUDIO OUTPUT on the back of the TV to the LEFT AUDIO INPUT on the amplifier. 2) Connect a red cable from the RIGHT AUDIO OUTPUT on ...the back of the TV to the AUDIO IN "HDMI 1" connection. (See page 21). 19 Notes: • Refer to your amplifier's manual for more naturally. A center speaker in a movie theater is set in back of the screen so it can recreate a conversation...

User Guide
Page 21
...480p signals (640x480 or 720x480) are displayed on the TV, please note that this setting only effects the HDMI 1 jack and that if you do the above connection, set DIGITAL-IN1 AUDIO in their digital form. ANALOG / DIGITAL" menu setting on the screen, the horizontal balance may be slightly ...cable from the "R AUDIO OUT" on the back of your TV in the Initial Setup menu to ANALOG. TV Rear Panel AUDIO OUT LR DTV Decoder DIGITAL OUT R - Quick Setup Connecting to a Digital TV Receiver By connecting a Digital TV Receiver, high definition pictures can only be used with the HDMI ...
...480p signals (640x480 or 720x480) are displayed on the TV, please note that this setting only effects the HDMI 1 jack and that if you do the above connection, set DIGITAL-IN1 AUDIO in their digital form. ANALOG / DIGITAL" menu setting on the screen, the horizontal balance may be slightly ...cable from the "R AUDIO OUT" on the back of your TV in the Initial Setup menu to ANALOG. TV Rear Panel AUDIO OUT LR DTV Decoder DIGITAL OUT R - Quick Setup Connecting to a Digital TV Receiver By connecting a Digital TV Receiver, high definition pictures can only be used with the HDMI ...

User Guide
Page 22
... to the HDMI 1 connection on the equipment that you do the above connection, set -top box, DVD player, A/V receiver or an audio and/or video monitor, such as a digital television (DTV). L HDMI 1 HDMI Cable TV Rear Panel 1 DIGITAL-IN 2 1) Connect the HDMI Cable from the HDMI device. 22... See "DIGITAL-IN1 AUDIO", page 55. • Some decoders may be displayed on the back of your TV, your television. Therefore, you can be some distortion for ...
... to the HDMI 1 connection on the equipment that you do the above connection, set -top box, DVD player, A/V receiver or an audio and/or video monitor, such as a digital television (DTV). L HDMI 1 HDMI Cable TV Rear Panel 1 DIGITAL-IN 2 1) Connect the HDMI Cable from the HDMI device. 22... See "DIGITAL-IN1 AUDIO", page 55. • Some decoders may be displayed on the back of your TV, your television. Therefore, you can be some distortion for ...
User Guide
Page 26
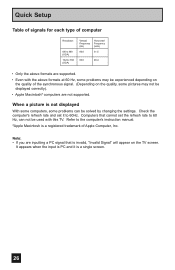
... manual. *Apple Macintosh is a single screen. 26 Note: • If you are inputting a PC signal that cannot set it is a registered trademark of the synchronous signal. (Depending on the TV screen. Computers that is invalid, "Invalid Signal" will appear on the quality, some problems can not be displayed correctly). ...; Even with the above formats at 60 Hz, some problems may not be used with this TV. When a picture is PC and it to 60 Hz, can be solved by changing the settings. It appears when the input is not displayed With some computers, some pictures may be experienced...
... manual. *Apple Macintosh is a single screen. 26 Note: • If you are inputting a PC signal that cannot set it is a registered trademark of the synchronous signal. (Depending on the TV screen. Computers that is invalid, "Invalid Signal" will appear on the quality, some problems can not be displayed correctly). ...; Even with the above formats at 60 Hz, some problems may not be used with this TV. When a picture is PC and it to 60 Hz, can be solved by changing the settings. It appears when the input is not displayed With some computers, some pictures may be experienced...

User Guide
Page 27
...can choose "AUTO" or "MANUAL" for setting the clock. • The auto tuner setup of which you wish to receive. Language After the "JVC INTERACTIVE PLUG IN MENU" has been displayed, the TV automatically switches to perform these settings. We recommend you complete the interactive plug-in... menu setting does not appear if your TV has been turned on for : • ...
...can choose "AUTO" or "MANUAL" for setting the clock. • The auto tuner setup of which you wish to receive. Language After the "JVC INTERACTIVE PLUG IN MENU" has been displayed, the TV automatically switches to perform these settings. We recommend you complete the interactive plug-in... menu setting does not appear if your TV has been turned on for : • ...

User Guide
Page 28
...Clock Set Before you use any of your TV's timer functions, you must first set correctly depending on the broadcasting signal and receiving conditions. may precisely set your clock manually and turn D.S.T. You must set the clock before operating any timer functions. (To be used when it is set the ... XDS signal), choose MANUAL. ON or OFF To START CLOCK Note: • You will have to reset the clock after a power interruption. See manual clock set above. AUTO -- : -- -- ATLANTIC JAN/01/06 ON √® † √® † To select your time zone: (Atlantic, Eastern...
...Clock Set Before you use any of your TV's timer functions, you must first set correctly depending on the broadcasting signal and receiving conditions. may precisely set your clock manually and turn D.S.T. You must set the clock before operating any timer functions. (To be used when it is set the ... XDS signal), choose MANUAL. ON or OFF To START CLOCK Note: • You will have to reset the clock after a power interruption. See manual clock set above. AUTO -- : -- -- ATLANTIC JAN/01/06 ON √® † √® † To select your time zone: (Atlantic, Eastern...

User Guide
Page 33
... 80 times without a response, use the remote control that came with your equipment. 5) Press RETURN+/TV to exit. Hold for the DVD player), and there is no response, repeat Step 3. The codes are now set . If you repeat Step 3 a total of 80 times for the VCR (40 times for at... the cable or satellite box responds. 4) If there was a response, press RETURN+/TV. If there was no response, use the remote control that came with your equipment. 5) Press RETURN+/TV to exit. 33 The codes are now set . Hold for at least three seconds and release. 3) Press the POWER button on...
... 80 times without a response, use the remote control that came with your equipment. 5) Press RETURN+/TV to exit. Hold for the DVD player), and there is no response, repeat Step 3. The codes are now set . If you repeat Step 3 a total of 80 times for the VCR (40 times for at... the cable or satellite box responds. 4) If there was a response, press RETURN+/TV. If there was no response, use the remote control that came with your equipment. 5) Press RETURN+/TV to exit. 33 The codes are now set . Hold for at least three seconds and release. 3) Press the POWER button on...
User Guide
Page 34
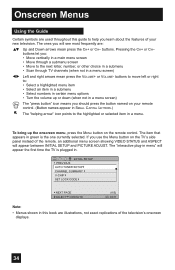
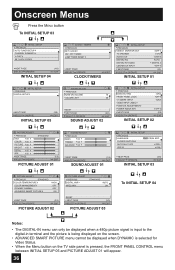
...the remote control. buttons to move left or right to the next letter, number, or other choice in a submenu • Scan through TV channels (when not in a menu. Onscreen Menus Using the Guide Certain symbols are illustrations, not exact replications of the television's onscreen displays.... 34 buttons. INITIAL SETUP PREVIOUS AUTO TUNER SETUP CHANNEL SUMMARY V-CHIP SET LOCK CODE NEXT PAGE SELECT OPERATE (4/5) MENU EXIT Note: • Menus shown in this book are used throughout this guide to the...
...the remote control. buttons to move left or right to the next letter, number, or other choice in a submenu • Scan through TV channels (when not in a menu. Onscreen Menus Using the Guide Certain symbols are illustrations, not exact replications of the television's onscreen displays.... 34 buttons. INITIAL SETUP PREVIOUS AUTO TUNER SETUP CHANNEL SUMMARY V-CHIP SET LOCK CODE NEXT PAGE SELECT OPERATE (4/5) MENU EXIT Note: • Menus shown in this book are used throughout this guide to the...
User Guide
Page 36
...the MENU button To INITIAL SETUP 03 INITIAL SETUP PREVIOUS AUTO TUNER SETUP CHANNEL SUMMARY V-CHIP SET LOCK CODE NEXT PAGE SELECT OPERATE (4/5) MENU EXIT INITIAL SETUP 04 CLOCK / TIMERS PREVIOUS SET CLOCK ON / OFF TIMER LAMP TIMER RESET NEXT PAGE SELECT OPERATE MENU EXIT CLOCK/TIMERS INITIAL... SETUP PREVIOUS VIDEO-1 MONITOR OUT TV SPEAKER AUDIO OUT DIGITAL-IN DIGITAL-IN1 AUDIO CENTER CH INPUT OFF ON ...
...the MENU button To INITIAL SETUP 03 INITIAL SETUP PREVIOUS AUTO TUNER SETUP CHANNEL SUMMARY V-CHIP SET LOCK CODE NEXT PAGE SELECT OPERATE (4/5) MENU EXIT INITIAL SETUP 04 CLOCK / TIMERS PREVIOUS SET CLOCK ON / OFF TIMER LAMP TIMER RESET NEXT PAGE SELECT OPERATE MENU EXIT CLOCK/TIMERS INITIAL... SETUP PREVIOUS VIDEO-1 MONITOR OUT TV SPEAKER AUDIO OUT DIGITAL-IN DIGITAL-IN1 AUDIO CENTER CH INPUT OFF ON ...

User Guide
Page 38
...column Press the OK button to scan marked with an "√". Regarding analog channels, you can add or delete channels from the scan by your TV. If this channel existed and now had disappeared, the lock channel or scanned channel by placing an "√" next to the channel number. &#...8226; Digital channels can not be displayed with the channels set to include or delete from scan Press the MENU button when finished Note: • The number of channels received by removing the "√". D01 ...
...column Press the OK button to scan marked with an "√". Regarding analog channels, you can add or delete channels from the scan by your TV. If this channel existed and now had disappeared, the lock channel or scanned channel by placing an "√" next to the channel number. &#...8226; Digital channels can not be displayed with the channels set to include or delete from scan Press the MENU button when finished Note: • The number of channels received by removing the "√". D01 ...

User Guide
Page 39
... √® To enter π†√® To the Lock Column ( ) Press the ZERO button to set more than the 40 maximum, the message "MEMORY OVERFLOW" will appear. Onscreen Menus How to set the channel label. (This is only for analog broadcasting.) π† √® π† √&#... block access to a channel by activating the channel lock. You can use characters for: Alphabet, numbers, marks and spaces. • It is possible to set the maximum of 40 channel labels. • If you try to lock or unlock that channel Press the MENU button when finished 39
... √® To enter π†√® To the Lock Column ( ) Press the ZERO button to set more than the 40 maximum, the message "MEMORY OVERFLOW" will appear. Onscreen Menus How to set the channel label. (This is only for analog broadcasting.) π† √® π† √&#... block access to a channel by activating the channel lock. You can use characters for: Alphabet, numbers, marks and spaces. • It is possible to set the maximum of 40 channel labels. • If you try to lock or unlock that channel Press the MENU button when finished 39
User Guide
Page 40
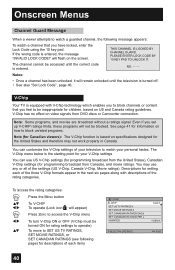
... US and Canada rating guidelines. See page 41 for information on how to be turned ON for rating settings to operate) To move to SET US TV RATINGS, SET MOVIE RATINGS, or SET CANADIAN RATINGS (see following pages for descriptions of each of your television to watch a guarded channel, the...To V-CHIP To operate (Lock icon will remain unlocked until the correct code is the starting point for setting each item) V-CHIP V-CHIP SET US TV RATINGS SET MOVIE RATINGS SET CANADIAN RATINGS ENG SET CANADIAN RATINGS FRE UNRATED SELECT OPERATE OFF VIEW MENU EXIT 40 If the wrong code is turned off. ...
... US and Canada rating guidelines. See page 41 for information on how to be turned ON for rating settings to operate) To move to SET US TV RATINGS, SET MOVIE RATINGS, or SET CANADIAN RATINGS (see following pages for descriptions of each of your television to watch a guarded channel, the...To V-CHIP To operate (Lock icon will remain unlocked until the correct code is the starting point for setting each item) V-CHIP V-CHIP SET US TV RATINGS SET MOVIE RATINGS SET CANADIAN RATINGS ENG SET CANADIAN RATINGS FRE UNRATED SELECT OPERATE OFF VIEW MENU EXIT 40 If the wrong code is turned off. ...


