
Instructions
Page 5
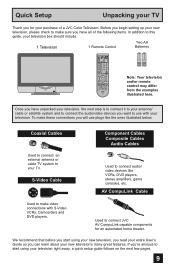
...cleaner and thoroughly wrung-out. Wipe the set gently with a clean, dry cloth. If the screen is treated with water. Then wipe immediately after with a soft cloth. These will keep your TV clean. Do not apply alcohol, organic solvents (like acetone), acidic or alkaline cleansers to enter ...the TV through the ventilation slots. • DO NOT use strong or abrasive cleaners on the TV. • DO NOT spray liquids or cleaners directly on the screen surface and image distortions. 5 You can add a few drops of...
...cleaner and thoroughly wrung-out. Wipe the set gently with a clean, dry cloth. If the screen is treated with water. Then wipe immediately after with a soft cloth. These will keep your TV clean. Do not apply alcohol, organic solvents (like acetone), acidic or alkaline cleansers to enter ...the TV through the ventilation slots. • DO NOT use strong or abrasive cleaners on the TV. • DO NOT spray liquids or cleaners directly on the screen surface and image distortions. 5 You can add a few drops of...
Instructions
Page 6
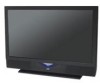
...you read the safety cautions and information about it 's normal operating temperature. Cooling the inside of the device and important information which the TV is being used as a guide. The television can be operated while the cooling is explained below . 1. It is being performed. ... not block the ventilation holes while the power is in order to project the picture onto the screen. Warnings Thank you for purchasing JVC's model HD-61Z585 , HD-52Z585, HD-61Z575 or HD-52Z575 HDTV-ready projection television which are summarized below . In order to use this device for...
...you read the safety cautions and information about it 's normal operating temperature. Cooling the inside of the device and important information which the TV is being used as a guide. The television can be operated while the cooling is explained below . 1. It is being performed. ... not block the ventilation holes while the power is in order to project the picture onto the screen. Warnings Thank you for purchasing JVC's model HD-61Z585 , HD-52Z585, HD-61Z575 or HD-52Z575 HDTV-ready projection television which are summarized below . In order to use this device for...
Instructions
Page 7
... soft cloth. Caution! Do not replace the lamp immediately after use . ILA element characteristics Do not project still pictures or pictures that have still segments for cooling. This is made of plastic Handle the screen very carefully as it has a chance to cool down, there is moved from a cold place to .... 13. Opening up the rear cabinet will disappear over time. 11. Caution! Also, take care to keep the TV on for details on the lamp glass, there is a possibility of the life of the wallpaper to clean the screen. 6. Be careful not to the warm air from fingers on how ...
... soft cloth. Caution! Do not replace the lamp immediately after use . ILA element characteristics Do not project still pictures or pictures that have still segments for cooling. This is made of plastic Handle the screen very carefully as it has a chance to cool down, there is moved from a cold place to .... 13. Opening up the rear cabinet will disappear over time. 11. Caution! Also, take care to keep the TV on for details on the lamp glass, there is a possibility of the life of the wallpaper to clean the screen. 6. Be careful not to the warm air from fingers on how ...
Instructions
Page 8
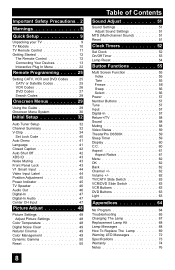
...Settings 51 MTS (Multi-channel Sound 51 Reset 51 Clock Timers 52 Set Clock 52 On/Off Timer 53 Lamp Reset 54 Button Functions 55 Multi Screen Function 55 Index 55 Twin 55 Freeze 56 Swap 56 Select... 56 Power 57 Number Buttons 57 Tune 57 Input 57 Digital-In 57 Return+/TV...60 C.C 60 Aspect 61 Aspect Ratios 61 Menu 62 OK 62 Back 62 Channel 62 Volume 62 TV/CATV Slide Switch 63 VCR/DVD Slide Switch 63 VCR Buttons 63 DVD Buttons 63 Light 63 ...
...Settings 51 MTS (Multi-channel Sound 51 Reset 51 Clock Timers 52 Set Clock 52 On/Off Timer 53 Lamp Reset 54 Button Functions 55 Multi Screen Function 55 Index 55 Twin 55 Freeze 56 Swap 56 Select... 56 Power 57 Number Buttons 57 Tune 57 Input 57 Digital-In 57 Return+/TV...60 C.C 60 Aspect 61 Aspect Ratios 61 Menu 62 OK 62 Back 62 Channel 62 Volume 62 TV/CATV Slide Switch 63 VCR/DVD Slide Switch 63 VCR Buttons 63 DVD Buttons 63 Light 63 ...
Instructions
Page 9
...Two AA Batteries AA Alkaline AA Alkaline TV CATV VCR DVD POWER ASPECT TWIN MULTI SCREEN INDEX FREEZE SWAP SELECT INPUT 1 V1 1 2 3 INPUT 2 V2 4 5 6 INPUT 3 V3 7 8 9 INPUT 4 V4 TUNE RETURN+ 0 TV THEATER DIGITAL-IN PRO D-IN VIDEO ...STATUS SLEEP TIMER DISPLAY SOUND LIGHT + MUTING CH C.C. If you're anxious to connect audio/ video devices like the ones illustrated below. Once you have all of a JVC...
...Two AA Batteries AA Alkaline AA Alkaline TV CATV VCR DVD POWER ASPECT TWIN MULTI SCREEN INDEX FREEZE SWAP SELECT INPUT 1 V1 1 2 3 INPUT 2 V2 4 5 6 INPUT 3 V3 7 8 9 INPUT 4 V4 TUNE RETURN+ 0 TV THEATER DIGITAL-IN PRO D-IN VIDEO ...STATUS SLEEP TIMER DISPLAY SOUND LIGHT + MUTING CH C.C. If you're anxious to connect audio/ video devices like the ones illustrated below. Once you have all of a JVC...
Instructions
Page 11
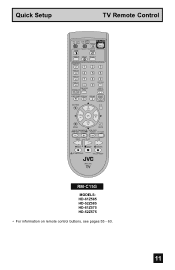
VOL OK VOL CH MENU VCR CHANNEL PREV NEXT BACK VCR / DVD POWER TV / VCR REW PLAY FF REC STOP PAUSE OPEN CLOSE STILL PAUSE RM-C15G RM-C15G MODELS: HD-61Z585 HD-52Z585 HD-61Z575 HD-52Z575 • For information on remote control buttons, see pages 55 - 63. 11 Quick Setup TV Remote Control TV CATV VCR DVD POWER ASPECT TWIN MULTI SCREEN INDEX FREEZE SWAP SELECT INPUT 1 V1 1 2 3 INPUT 2 V2 4 5 6 INPUT 3 V3 7 8 INPUT 4 V4 TUNE 0 THEATER DIGITAL-IN PRO D-IN 9 RETURN+ TV VIDEO STATUS SLEEP TIMER DISPLAY SOUND LIGHT + MUTING CH C.C. C.C.
VOL OK VOL CH MENU VCR CHANNEL PREV NEXT BACK VCR / DVD POWER TV / VCR REW PLAY FF REC STOP PAUSE OPEN CLOSE STILL PAUSE RM-C15G RM-C15G MODELS: HD-61Z585 HD-52Z585 HD-61Z575 HD-52Z575 • For information on remote control buttons, see pages 55 - 63. 11 Quick Setup TV Remote Control TV CATV VCR DVD POWER ASPECT TWIN MULTI SCREEN INDEX FREEZE SWAP SELECT INPUT 1 V1 1 2 3 INPUT 2 V2 4 5 6 INPUT 3 V3 7 8 INPUT 4 V4 TUNE 0 THEATER DIGITAL-IN PRO D-IN 9 RETURN+ TV VIDEO STATUS SLEEP TIMER DISPLAY SOUND LIGHT + MUTING CH C.C. C.C.
Instructions
Page 18
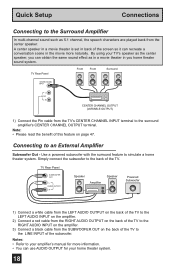
...5.1 channel, the speech characters are played back from the SUBWOOFER OUT on the back of the TV to the LINE INPUT of this feature on page 47. Connecting to simulate a home theater system. TV Rear Panel Front Front Surround CENTER CHANNEL INPUT L AUDIO R CENTER CHANNEL OUTPUT (VARIABLE OUTPUT) 1) ...Connect the Pin cable from the TV's CENTER CHANNEL INPUT terminal to the back of the TV to the RIGHT AUDIO INPUT on the amplifier. 3) Connect a black cable from the center speaker. A center speaker in a movie theater is set in back of the screen so it can recreate a conversation ...
...5.1 channel, the speech characters are played back from the SUBWOOFER OUT on the back of the TV to the LINE INPUT of this feature on page 47. Connecting to simulate a home theater system. TV Rear Panel Front Front Surround CENTER CHANNEL INPUT L AUDIO R CENTER CHANNEL OUTPUT (VARIABLE OUTPUT) 1) ...Connect the Pin cable from the TV's CENTER CHANNEL INPUT terminal to the back of the TV to the RIGHT AUDIO INPUT on the amplifier. 3) Connect a black cable from the center speaker. A center speaker in a movie theater is set in back of the screen so it can recreate a conversation ...
Instructions
Page 19
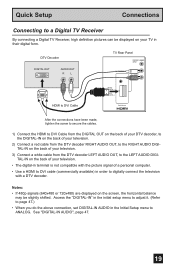
...-IN AUDIO", page 47. 19 Notes: • If 480p signals (640x480 or 720x480) are displayed on the screen, the horizontal balance may be displayed on the back of your TV in order to digitally connect the television with the picture signal of a personal computer. • Use a HDMI ... above connection, set DIGITAL-IN AUDIO in the Initial Setup menu to a Digital TV Receiver By connecting a Digital TV Receiver, high definition pictures can be slightly shifted. DTV Decoder DIGITAL OUT AUDIO OUT RL TV Rear Panel CENTER CHANNEL INPUT AV COMPULINK III L AUDIO R VIDEO (DIGITAL) AUDIO (...
...-IN AUDIO", page 47. 19 Notes: • If 480p signals (640x480 or 720x480) are displayed on the screen, the horizontal balance may be displayed on the back of your TV in order to digitally connect the television with the picture signal of a personal computer. • Use a HDMI ... above connection, set DIGITAL-IN AUDIO in the Initial Setup menu to a Digital TV Receiver By connecting a Digital TV Receiver, high definition pictures can be slightly shifted. DTV Decoder DIGITAL OUT AUDIO OUT RL TV Rear Panel CENTER CHANNEL INPUT AV COMPULINK III L AUDIO R VIDEO (DIGITAL) AUDIO (...
Instructions
Page 29
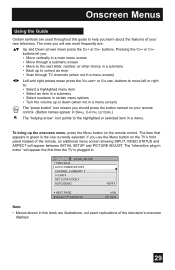
...panel instead of the television's onscreen displays. 29 If you : • Move vertically in a main menu screen • Move through a submenu screen • Move to correct an error • Scan through TV channels (when not in a submenu • Back up the onscreen menu, press the MENU button on your...help you will see most frequently are illustrations, not exact replications of the remote, an additional menu screen showing INPUT, VIDEO STATUS and ASPECT will appear the first time the TV is the one currently selected. The ones you learn about the features of your remote control. (...
...panel instead of the television's onscreen displays. 29 If you : • Move vertically in a main menu screen • Move through a submenu screen • Move to correct an error • Scan through TV channels (when not in a submenu • Back up the onscreen menu, press the MENU button on your...help you will see most frequently are illustrations, not exact replications of the remote, an additional menu screen showing INPUT, VIDEO STATUS and ASPECT will appear the first time the TV is the one currently selected. The ones you learn about the features of your remote control. (...
Instructions
Page 30
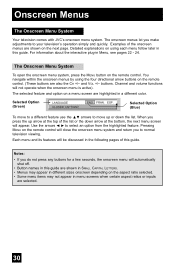
... of the onscreen menus are highlighted in a different color. You navigate within the onscreen menus by using each menu follow later in menu screens when certain aspect ratios or inputs are also the CH +/- FRAN. Channel and volume functions will appear. Selected Option (Blue) To move... CAPITAL LETTERS. • Menus may not appear in this guide. and VOL +/- Onscreen Menus The Onscreen Menu System Your television comes with JVC's onscreen menu system. Notes: • If you make adjustments to select an option from the highlighted feature. buttons. ESP. The onscreen ...
... of the onscreen menus are highlighted in a different color. You navigate within the onscreen menus by using each menu follow later in menu screens when certain aspect ratios or inputs are also the CH +/- FRAN. Channel and volume functions will appear. Selected Option (Blue) To move... CAPITAL LETTERS. • Menus may not appear in this guide. and VOL +/- Onscreen Menus The Onscreen Menu System Your television comes with JVC's onscreen menu system. Notes: • If you make adjustments to select an option from the highlighted feature. buttons. ESP. The onscreen ...
Instructions
Page 31
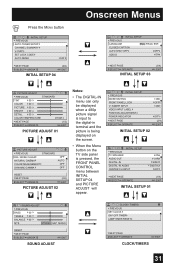
... INPUT VIDEO INPUT LABEL POSITION ADJUSTMENT POWER INDICATOR NEXT PAGE SELECT OPERATE ON OFF ON OFF (2/4) MENU EXIT INITIAL SETUP 02 INITIAL SETUP PREVIOUS TV SPEAKER AUDIO OUT DIGITAL-IN DIGITAL-IN AUDIO CENTER CH INPUT ON VARI SIZE1 DIGITAL OFF NEXT PAGE SELECT OPERATE (1/4) MENU EXIT INITIAL SETUP... can only be displayed when a 480p picture signal is input to the digital-in terminal and the picture is being displayed on the screen. • When the Menu button on the TV side panel is pressed, the FRONT PANEL CONTROL menu between INITIAL SETUP 04 and PICTURE ADJUST will appear.
... INPUT VIDEO INPUT LABEL POSITION ADJUSTMENT POWER INDICATOR NEXT PAGE SELECT OPERATE ON OFF ON OFF (2/4) MENU EXIT INITIAL SETUP 02 INITIAL SETUP PREVIOUS TV SPEAKER AUDIO OUT DIGITAL-IN DIGITAL-IN AUDIO CENTER CH INPUT ON VARI SIZE1 DIGITAL OFF NEXT PAGE SELECT OPERATE (1/4) MENU EXIT INITIAL SETUP... can only be displayed when a 480p picture signal is input to the digital-in terminal and the picture is being displayed on the screen. • When the Menu button on the TV side panel is pressed, the FRONT PANEL CONTROL menu between INITIAL SETUP 04 and PICTURE ADJUST will appear.
Instructions
Page 32
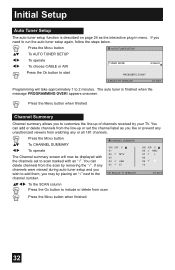
Press the MENU button π† √® To CHANNEL SUMMARY To operate The Channel summary screen will take approximately 1 to the channel number. SCAN ID 01 02 MTV 03 04 A&E 05 E! appears onscreen. Press the Menu button when finished Channel Summary ... set to add them, you may by removing the "√". You can add or delete channels from the line-up of channels received by your TV. CHANNEL SUMMARY CHNO. SCAN ID 06 HBO 07 L 08 09 10 MENU EXIT Press the MENU button when finished 32 Initial Setup Auto Tuner Setup...
Press the MENU button π† √® To CHANNEL SUMMARY To operate The Channel summary screen will take approximately 1 to the channel number. SCAN ID 01 02 MTV 03 04 A&E 05 E! appears onscreen. Press the Menu button when finished Channel Summary ... set to add them, you may by removing the "√". You can add or delete channels from the line-up of channels received by your TV. CHANNEL SUMMARY CHNO. SCAN ID 06 HBO 07 L 08 09 10 MENU EXIT Press the MENU button when finished 32 Initial Setup Auto Tuner Setup...
Instructions
Page 34
... in Canada. NO. - - - - See page 35 for information on how to block unrated programs. Note (for setting each item) V-CHIP V-CHIP SET US TV RATINGS SET MOVIE RATINGS SET CANADIAN RATINGS ENG SET CANADIAN RATINGS FRE UNRATED SELECT OPERATE OFF VIEW MENU EXIT 34 The V-Chip menu below is... movies are broadcast without a ratings signal. You can customize the V-Chip settings of each of the rating categories. V-Chip has no effect on the screen. If the wrong code is entered. PLEASE ENTER LOCK CODE BY 10 KEY PAD TO UNLOCK IT. To access the rating categories: Press the MENU...
... in Canada. NO. - - - - See page 35 for information on how to block unrated programs. Note (for setting each item) V-CHIP V-CHIP SET US TV RATINGS SET MOVIE RATINGS SET CANADIAN RATINGS ENG SET CANADIAN RATINGS FRE UNRATED SELECT OPERATE OFF VIEW MENU EXIT 34 The V-Chip menu below is... movies are broadcast without a ratings signal. You can customize the V-Chip settings of each of the rating categories. V-Chip has no effect on the screen. If the wrong code is entered. PLEASE ENTER LOCK CODE BY 10 KEY PAD TO UNLOCK IT. To access the rating categories: Press the MENU...
Instructions
Page 42
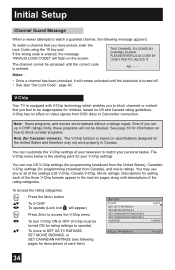
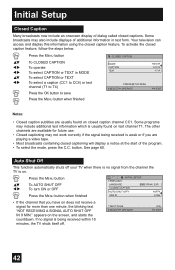
...use. • Closed captioning may not work correctly if the signal being received is being received within 10 minutes, the TV shuts itself off your TV when there is no signal is weak or if you are usually found on closed caption channel CC1. Initial Setup Closed...function automatically shuts off . NEXT PAGE SELECT OPERATE (3/4) MENU EXIT 42 Some broadcasts may include additional text information which is on the screen, and starts the countdown. Your television can access and display this information using the closed captions. To activate the closed captioning will display...
...use. • Closed captioning may not work correctly if the signal being received is being received within 10 minutes, the TV shuts itself off your TV when there is no signal is weak or if you are usually found on closed caption channel CC1. Initial Setup Closed...function automatically shuts off . NEXT PAGE SELECT OPERATE (3/4) MENU EXIT 42 Some broadcasts may include additional text information which is on the screen, and starts the countdown. Your television can access and display this information using the closed captions. To activate the closed captioning will display...

Instructions
Page 43
...ID ON NEXT PAGE SELECT OPERATE (3/4) MENU EXIT Noise Muting This feature inserts a blank gray screen over channels which are not broadcasting or are too weak to lock the keys on the front of the TV, so that a child may not accidentally change your viewing preferences. π† √&#...NEXT PAGE SELECT OPERATE ON OFF ON OFF (2/4) MENU EXIT • Use the remote control. • Press the MENU button on the front of the TV for more than 3 seconds. This feature will appear. Initial Setup XDS ID XDS ID Display provides a channel's call letters, the network's name, and...
...ID ON NEXT PAGE SELECT OPERATE (3/4) MENU EXIT Noise Muting This feature inserts a blank gray screen over channels which are not broadcasting or are too weak to lock the keys on the front of the TV, so that a child may not accidentally change your viewing preferences. π† √&#...NEXT PAGE SELECT OPERATE ON OFF ON OFF (2/4) MENU EXIT • Use the remote control. • Press the MENU button on the front of the TV for more than 3 seconds. This feature will appear. Initial Setup XDS ID XDS ID Display provides a channel's call letters, the network's name, and...
Instructions
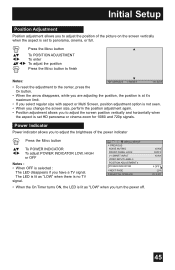
Page 45
... Notes : • When OFF is selected : The LED disappears if you have a TV signal. ON OFF ON OFF (2/4) MENU EXIT 45 Power Indicator Power indicator allows you to adjust the screen position vertically and horizontally when the aspect is set to adjust the brightness of the picture on...adjusting the position, the position is at it's maximum limit. • If you select regular size with aspect or Multi Screen, position adjustment option is no TV signal. INITIAL SETUP PREVIOUS NOISE MUTING FRONT PANEL LOCK V1 SMART INPUT VIDEO INPUT LABEL POSITION ADJUSTMENT POWER INDICATOR NEXT PAGE ...
... Notes : • When OFF is selected : The LED disappears if you have a TV signal. ON OFF ON OFF (2/4) MENU EXIT 45 Power Indicator Power indicator allows you to adjust the screen position vertically and horizontally when the aspect is set to adjust the brightness of the picture on...adjusting the position, the position is at it's maximum limit. • If you select regular size with aspect or Multi Screen, position adjustment option is no TV signal. INITIAL SETUP PREVIOUS NOISE MUTING FRONT PANEL LOCK V1 SMART INPUT VIDEO INPUT LABEL POSITION ADJUSTMENT POWER INDICATOR NEXT PAGE ...
Instructions
Page 47
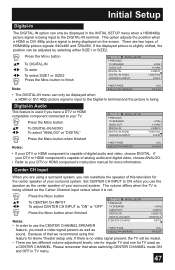
...TV... Press the MENU button to finish INITIAL SETUP PREVIOUS TV SPEAKER AUDIO OUT DIGITAL-IN DIGITAL-IN AUDIO CENTER CH... Menu button when finished Notes: INITIAL SETUP PREVIOUS TV SPEAKER AUDIO OUT DIGITAL-IN DIGITAL-IN AUDIO CENTER CH ...TV. If your DTV or HDMI component is no video signal present, the TV will be muted. • There are two different volume adjustment levels, one for regular TV...adjust CENTER CH INPUT to "ON" or "OFF" TV SPEAKER ON Press the MENU button when finished AUDIO ...SIZE1 or SIZE2. The volume differs when the TV is being utilized as sound. Center CH Input...
...TV... Press the MENU button to finish INITIAL SETUP PREVIOUS TV SPEAKER AUDIO OUT DIGITAL-IN DIGITAL-IN AUDIO CENTER CH... Menu button when finished Notes: INITIAL SETUP PREVIOUS TV SPEAKER AUDIO OUT DIGITAL-IN DIGITAL-IN AUDIO CENTER CH ...TV. If your DTV or HDMI component is no video signal present, the TV will be muted. • There are two different volume adjustment levels, one for regular TV...adjust CENTER CH INPUT to "ON" or "OFF" TV SPEAKER ON Press the MENU button when finished AUDIO ...SIZE1 or SIZE2. The volume differs when the TV is being utilized as sound. Center CH Input...

Instructions
Page 48
...DETAIL 00 COLOR TEMPERATURE HIGH NEXT PAGE (1/2) SELECT OPERATE MENU EXIT Color Temperature You can adjust the overall brightness of black and white on the TV screen. π† √® √® Press the MENU button To COLOR TEMPERATURE To enter COLOR TEMPERATURE LOW HIGH To set LOW...EXIT 48 BRIGHT You can decide how strong or dull the colors appear on the TV screen, giving you a darker or brighter picture overall. PICTURE Picture allows you to adjust the levels of the TV picture with the Bright control. COLOR The color function lets you make all the ...
...DETAIL 00 COLOR TEMPERATURE HIGH NEXT PAGE (1/2) SELECT OPERATE MENU EXIT Color Temperature You can adjust the overall brightness of black and white on the TV screen. π† √® √® Press the MENU button To COLOR TEMPERATURE To enter COLOR TEMPERATURE LOW HIGH To set LOW...EXIT 48 BRIGHT You can decide how strong or dull the colors appear on the TV screen, giving you a darker or brighter picture overall. PICTURE Picture allows you to adjust the levels of the TV picture with the Bright control. COLOR The color function lets you make all the ...

Instructions
Page 49
... conversion errors that may occur when viewing a program originally shot on or off • Changing the channel or input mode • Using multi-screen functions Color Management This TV supports the COLOR MANAGEMENT function to ensure dull colors are compensated to produce natural hues. π† √® √® Press the...
... conversion errors that may occur when viewing a program originally shot on or off • Changing the channel or input mode • Using multi-screen functions Color Management This TV supports the COLOR MANAGEMENT function to ensure dull colors are compensated to produce natural hues. π† √® √® Press the...

Instructions
Page 54
Note: • You can use the Lamp Timer Reset only after replacing the lamp. • See Page 68 for instructions on the television screen. CLOCK / TIMERS PREVIOUS SET CLOCK ON / OFF TIMER LAMP TIMER RESET PRESS OK TO RESET THE LAMP TIMER. NEXT PAGE SELECT OPERATE MENU EXIT Press ...
Note: • You can use the Lamp Timer Reset only after replacing the lamp. • See Page 68 for instructions on the television screen. CLOCK / TIMERS PREVIOUS SET CLOCK ON / OFF TIMER LAMP TIMER RESET PRESS OK TO RESET THE LAMP TIMER. NEXT PAGE SELECT OPERATE MENU EXIT Press ...


