Instructions
Page 8
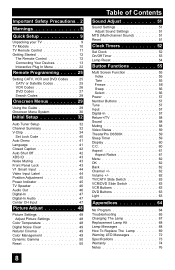
... Cinema 49 Color Management 49 Dynamic Gamma 50 Reset 50 8 Table of Contents Sound Adjust 51 Sound Settings 51 Adjust Sound Settings 51 MTS (Multi-channel Sound 51 Reset 51 Clock Timers 52 Set Clock 52 On/Off Timer 53 Lamp Reset 54 Button Functions 55 Multi Screen Function 55 ...Index 55 Twin 55 Freeze 56 Swap 56 Select 56 Power 57 Number Buttons 57 Tune 57 Input 57 Digital-In 57 Return+/TV 58 Sound...
... Cinema 49 Color Management 49 Dynamic Gamma 50 Reset 50 8 Table of Contents Sound Adjust 51 Sound Settings 51 Adjust Sound Settings 51 MTS (Multi-channel Sound 51 Reset 51 Clock Timers 52 Set Clock 52 On/Off Timer 53 Lamp Reset 54 Button Functions 55 Multi Screen Function 55 ...Index 55 Twin 55 Freeze 56 Swap 56 Select 56 Power 57 Number Buttons 57 Tune 57 Input 57 Digital-In 57 Return+/TV 58 Sound...
Instructions
Page 9
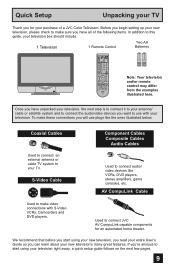
...V2 4 5 6 INPUT 3 V3 7 8 9 INPUT 4 V4 TUNE RETURN+ 0 TV THEATER DIGITAL-IN PRO D-IN VIDEO STATUS SLEEP TIMER DISPLAY SOUND LIGHT + MUTING CH C.C. Coaxial Cables Used to connect an external antenna or cable TV system to use plugs like VCRs, DVD players, stereo amplifiers, game consoles, etc. Used...guide follows on the next few pages. 9 Quick Setup Unpacking your TV Thank you for an automated home theater. S-Video Cable Component Cables Composite Cables Audio Cables Used to connect JVC AV CompuLink capable components for your new television's many great features....
...V2 4 5 6 INPUT 3 V3 7 8 9 INPUT 4 V4 TUNE RETURN+ 0 TV THEATER DIGITAL-IN PRO D-IN VIDEO STATUS SLEEP TIMER DISPLAY SOUND LIGHT + MUTING CH C.C. Coaxial Cables Used to connect an external antenna or cable TV system to use plugs like VCRs, DVD players, stereo amplifiers, game consoles, etc. Used...guide follows on the next few pages. 9 Quick Setup Unpacking your TV Thank you for an automated home theater. S-Video Cable Component Cables Composite Cables Audio Cables Used to connect JVC AV CompuLink capable components for your new television's many great features....
Instructions
Page 10
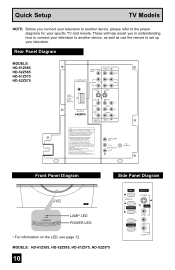
.... Failure to follow "CAUTION AT DISASSEMBLY" procedure in the service manual before plugging the TV's power cord into an AC outlet. Sous licence de BBE Sound, Inc. Autorizado con licencia de BBE Sound, Inc. MODELS: HD-61Z585, HD-52Z585, HD-61Z575, HD-52Z575 10 MENU OPERATE...I AUDIO I R OVER Y VIDEO L Pb I AUDIO I R Pr INPUT-3 INPUT-1 UNPLUG THE POWER CORD FROM AC OUTLET BEFORE REMOVING THE REAR COVER When the rear cover is a registered trademark of the television features. L'omission de suivre la procédure causera des dommages PERMANENTS à certaines fonctions du ...
.... Failure to follow "CAUTION AT DISASSEMBLY" procedure in the service manual before plugging the TV's power cord into an AC outlet. Sous licence de BBE Sound, Inc. Autorizado con licencia de BBE Sound, Inc. MODELS: HD-61Z585, HD-52Z585, HD-61Z575, HD-52Z575 10 MENU OPERATE...I AUDIO I R OVER Y VIDEO L Pb I AUDIO I R Pr INPUT-3 INPUT-1 UNPLUG THE POWER CORD FROM AC OUTLET BEFORE REMOVING THE REAR COVER When the rear cover is a registered trademark of the television features. L'omission de suivre la procédure causera des dommages PERMANENTS à certaines fonctions du ...
Instructions
Page 11
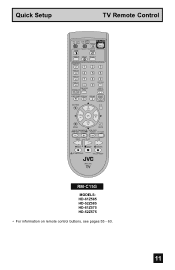
VOL OK VOL CH MENU VCR CHANNEL PREV NEXT BACK VCR / DVD POWER TV / VCR REW PLAY FF REC STOP PAUSE OPEN CLOSE STILL PAUSE RM-C15G RM-C15G MODELS: HD-61Z585 HD-52Z585 HD-61Z575 HD-52Z575 • For information on remote control buttons, see pages 55 - 63. 11 C.C. Quick Setup TV Remote Control TV CATV VCR DVD POWER ASPECT TWIN MULTI SCREEN INDEX FREEZE SWAP SELECT INPUT 1 V1 1 2 3 INPUT 2 V2 4 5 6 INPUT 3 V3 7 8 INPUT 4 V4 TUNE 0 THEATER DIGITAL-IN PRO D-IN 9 RETURN+ TV VIDEO STATUS SLEEP TIMER DISPLAY SOUND LIGHT + MUTING CH C.C.
VOL OK VOL CH MENU VCR CHANNEL PREV NEXT BACK VCR / DVD POWER TV / VCR REW PLAY FF REC STOP PAUSE OPEN CLOSE STILL PAUSE RM-C15G RM-C15G MODELS: HD-61Z585 HD-52Z585 HD-61Z575 HD-52Z575 • For information on remote control buttons, see pages 55 - 63. 11 C.C. Quick Setup TV Remote Control TV CATV VCR DVD POWER ASPECT TWIN MULTI SCREEN INDEX FREEZE SWAP SELECT INPUT 1 V1 1 2 3 INPUT 2 V2 4 5 6 INPUT 3 V3 7 8 INPUT 4 V4 TUNE 0 THEATER DIGITAL-IN PRO D-IN 9 RETURN+ TV VIDEO STATUS SLEEP TIMER DISPLAY SOUND LIGHT + MUTING CH C.C.
Instructions
Page 14
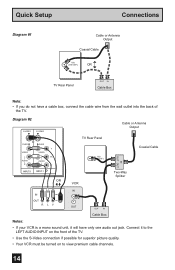
... R OVER Y VIDEO L Pb I AUDIO I R Pr INPUT-3 INPUT-1 OR TV Rear Panel 75Ω (VHF/UHF) VCR IN OUT OUT Cable or Antenna Output Coaxial Cable Two-Way Splitter IN IN OUT R LV OUT OUT IN Cable Box Notes: • If your VCR is a mono sound unit, it to the LEFT AUDIO INPUT on... if possible for superior picture quality. • Your VCR must be turned on the front of the TV. Quick Setup Connections Diagram #1 Cable or Antenna Output Coaxial Cable 75Ω (VHF/UHF) OR TV Rear Panel OUT IN Cable Box Note: • If you do not have only one audio out jack....
... R OVER Y VIDEO L Pb I AUDIO I R Pr INPUT-3 INPUT-1 OR TV Rear Panel 75Ω (VHF/UHF) VCR IN OUT OUT Cable or Antenna Output Coaxial Cable Two-Way Splitter IN IN OUT R LV OUT OUT IN Cable Box Notes: • If your VCR is a mono sound unit, it to the LEFT AUDIO INPUT on... if possible for superior picture quality. • Your VCR must be turned on the front of the TV. Quick Setup Connections Diagram #1 Cable or Antenna Output Coaxial Cable 75Ω (VHF/UHF) OR TV Rear Panel OUT IN Cable Box Note: • If you do not have only one audio out jack....
Instructions
Page 17
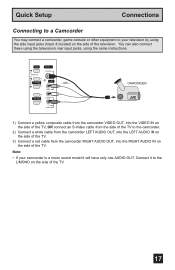
... to your camcorder is a mono sound model it to the camcorder. 2) Connect a white cable from the camcorder LEFT AUDIO OUT, into the LEFT AUDIO IN on the side of the TV. 3) Connect a red cable from..., into the VIDEO IN on the side of the TV, OR connect an S-Video cable from the side of the TV to the L/MONO on the side of the TV. 17 Note: • If your television by using...a yellow composite cable from the camcorder VIDEO OUT, into the RIGHT AUDIO IN on the side of the TV. INPUT 4 S-VIDEO OVER VIDEO + VOLUME - OR - Connect it will have only one AUDIO OUT. You can ...
... to your camcorder is a mono sound model it to the camcorder. 2) Connect a white cable from the camcorder LEFT AUDIO OUT, into the LEFT AUDIO IN on the side of the TV. 3) Connect a red cable from..., into the VIDEO IN on the side of the TV, OR connect an S-Video cable from the side of the TV to the L/MONO on the side of the TV. 17 Note: • If your television by using...a yellow composite cable from the camcorder VIDEO OUT, into the RIGHT AUDIO IN on the side of the TV. INPUT 4 S-VIDEO OVER VIDEO + VOLUME - OR - Connect it will have only one AUDIO OUT. You can ...
Instructions
Page 18
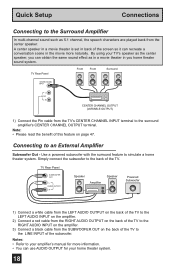
...3) Connect a black cable from the SUBWOOFER OUT on page 47. A center speaker in a movie theater is set in back of the TV. TV Rear Panel Front Front Surround CENTER CHANNEL INPUT L AUDIO R CENTER CHANNEL OUTPUT (VARIABLE OUTPUT) 1) Connect the Pin cable from the center speaker....an External Amplifier Subwoofer Out - Quick Setup Connections Connecting to the Surround Amplifier In multi-channel sound such as 5.1 channel, the speech characters are played back from the TV's CENTER CHANNEL INPUT terminal to the surround amplifier's CENTER CHANNEL OUTPUT terminal. By using your...
...3) Connect a black cable from the SUBWOOFER OUT on page 47. A center speaker in a movie theater is set in back of the TV. TV Rear Panel Front Front Surround CENTER CHANNEL INPUT L AUDIO R CENTER CHANNEL OUTPUT (VARIABLE OUTPUT) 1) Connect the Pin cable from the center speaker....an External Amplifier Subwoofer Out - Quick Setup Connections Connecting to the Surround Amplifier In multi-channel sound such as 5.1 channel, the speech characters are played back from the TV's CENTER CHANNEL INPUT terminal to the surround amplifier's CENTER CHANNEL OUTPUT terminal. By using your...
Instructions
Page 31
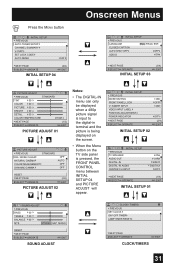
... terminal and the picture is being displayed on the screen. • When the Menu button on the TV side panel is pressed, the FRONT PANEL CONTROL menu between INITIAL SETUP 04 and PICTURE ADJUST will appear....POWER INDICATOR NEXT PAGE SELECT OPERATE ON OFF ON OFF (2/4) MENU EXIT INITIAL SETUP 02 INITIAL SETUP PREVIOUS TV SPEAKER AUDIO OUT DIGITAL-IN DIGITAL-IN AUDIO CENTER CH INPUT ON VARI SIZE1 DIGITAL OFF NEXT PAGE ... TREBLE 00 BALANCE 00 MTS STEREO SAP MONO RESET NEXT PAGE SELECT OPERATE MENU EXIT SOUND ADJUST CLOCK / TIMERS PREVIOUS SET CLOCK ON / OFF TIMER LAMP TIMER RESET NEXT ...
... terminal and the picture is being displayed on the screen. • When the Menu button on the TV side panel is pressed, the FRONT PANEL CONTROL menu between INITIAL SETUP 04 and PICTURE ADJUST will appear....POWER INDICATOR NEXT PAGE SELECT OPERATE ON OFF ON OFF (2/4) MENU EXIT INITIAL SETUP 02 INITIAL SETUP PREVIOUS TV SPEAKER AUDIO OUT DIGITAL-IN DIGITAL-IN AUDIO CENTER CH INPUT ON VARI SIZE1 DIGITAL OFF NEXT PAGE ... TREBLE 00 BALANCE 00 MTS STEREO SAP MONO RESET NEXT PAGE SELECT OPERATE MENU EXIT SOUND ADJUST CLOCK / TIMERS PREVIOUS SET CLOCK ON / OFF TIMER LAMP TIMER RESET NEXT ...
Instructions
Page 46
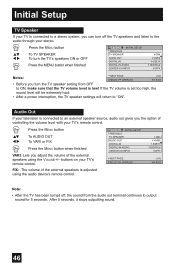
... television is set too high, the sound level will be extremely loud. • After a power interruption, the TV speaker settings will return to "ON". Initial Setup TV Speaker If your TV is connected to a stereo system, you can turn the TV speaker setting from the audio out terminal... continues to output sound for 5 seconds. INITIAL SETUP PREVIOUS TV SPEAKER AUDIO OUT DIGITAL-IN ...
... television is set too high, the sound level will be extremely loud. • After a power interruption, the TV speaker settings will return to "ON". Initial Setup TV Speaker If your TV is connected to a stereo system, you can turn the TV speaker setting from the audio out terminal... continues to output sound for 5 seconds. INITIAL SETUP PREVIOUS TV SPEAKER AUDIO OUT DIGITAL-IN ...
Instructions
Page 47
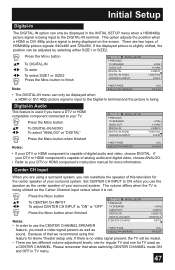
... π† √® To DIGITAL-IN AUDIO To select "ANALOG" or "DIGITAL" Press the Menu button when finished Notes: INITIAL SETUP PREVIOUS TV SPEAKER AUDIO OUT DIGITAL-IN DIGITAL-IN AUDIO CENTER CH INPUT NEXT PAGE SELECT OPERATE ON VARI SIZE1 DIGITAL OFF (1/4) MENU EXIT • If your... when it is being displayed on the screen. This option adjusts the position when a HDMI or DVI 480p picture signal is being utilized as sound. Initial Setup Digital-In The DIGITAL-IN option can be adjusted by selecting either SIZE1 or SIZE2. Set CENTER CH INPUT to ON when you...
... π† √® To DIGITAL-IN AUDIO To select "ANALOG" or "DIGITAL" Press the Menu button when finished Notes: INITIAL SETUP PREVIOUS TV SPEAKER AUDIO OUT DIGITAL-IN DIGITAL-IN AUDIO CENTER CH INPUT NEXT PAGE SELECT OPERATE ON VARI SIZE1 DIGITAL OFF (1/4) MENU EXIT • If your... when it is being displayed on the screen. This option adjusts the position when a HDMI or DVI 480p picture signal is being utilized as sound. Initial Setup Digital-In The DIGITAL-IN option can be adjusted by selecting either SIZE1 or SIZE2. Set CENTER CH INPUT to ON when you...

Instructions
Page 51
...00 TREBLE 00 BALANCE 00 MTS STEREO SAP MONO RESET NEXT PAGE SELECT OPERATE MENU EXIT • Keep the TV in stereo mode to adjust the level of sound between the TV's left and right speakers with the balance setting. TREBLE - See page 58. See page 50 on your ...MONO RESET NEXT PAGE SELECT OPERATE MENU EXIT • You can adjust BALANCE only when A.H.S. Adjust the level of high-frequency sound in your TV's audio. Sound Adjust Sound Settings These settings allow you to hear an alternative soundtrack, if one is available. • MTS unavailable if your television's ...
...00 TREBLE 00 BALANCE 00 MTS STEREO SAP MONO RESET NEXT PAGE SELECT OPERATE MENU EXIT • Keep the TV in stereo mode to adjust the level of sound between the TV's left and right speakers with the balance setting. TREBLE - See page 58. See page 50 on your ...MONO RESET NEXT PAGE SELECT OPERATE MENU EXIT • You can adjust BALANCE only when A.H.S. Adjust the level of high-frequency sound in your TV's audio. Sound Adjust Sound Settings These settings allow you to hear an alternative soundtrack, if one is available. • MTS unavailable if your television's ...
Instructions
Page 55
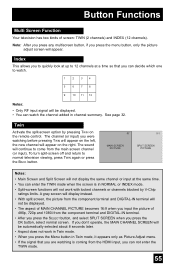
... will be automatically selected about 8 seconds later. • Aspect does not work with locked channels or channels blocked by pressing TWIN on the right. The sound will continue to normal television viewing, press TWIN again or press the BACK button. 07 V-1 MAIN SCREEN PICTURE SPLIT SCREEN PICTURE Notes: • Main Screen...
... will be automatically selected about 8 seconds later. • Aspect does not work with locked channels or channels blocked by pressing TWIN on the right. The sound will continue to normal television viewing, press TWIN again or press the BACK button. 07 V-1 MAIN SCREEN PICTURE SPLIT SCREEN PICTURE Notes: • Main Screen...

Instructions
Page 58
...press it. buttons. The channel currently active has been programmed as your return+ channel, press and hold for more spacious surround sound. RETURN+/TV You will appear. • Return+ works only with the Channel+/- will return to zero. Pressing any number key will instantly...RETURN CHANNEL CANCELLED!" Returns to while scanning through the channels using the CH+ and CH- TV - Now scan through the channels using the CHANNEL+/- A.H.S. - SMART SOUND - BBE SMART SOUND MOVIE MUSIC OFF ON OFF ON OFF SELECT OPERATE MENU EXIT Note: Manufactured under USP4638258,...
...press it. buttons. The channel currently active has been programmed as your return+ channel, press and hold for more spacious surround sound. RETURN+/TV You will appear. • Return+ works only with the Channel+/- will return to zero. Pressing any number key will instantly...RETURN CHANNEL CANCELLED!" Returns to while scanning through the channels using the CH+ and CH- TV - Now scan through the channels using the CHANNEL+/- A.H.S. - SMART SOUND - BBE SMART SOUND MOVIE MUSIC OFF ON OFF ON OFF SELECT OPERATE MENU EXIT Note: Manufactured under USP4638258,...
Instructions
Page 62
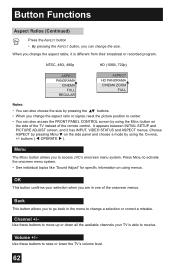
...MENU to activate the onscreen menu system. • See individual topics like "Sound Adjust" for specific information on the side of the TV instead of the onscreen menus. OK This button confirms your TV is different from their broadcast or recorded program. Use these buttons to move up... one of the remote control. Button Functions Aspect Ratios (Continued) Press the ASPECT button • By pressing the ASPECT button, you to access JVC's onscreen menu system. It appears between INITIAL SETUP and PICTURE ADJUST screen, and it is able to change the size. buttons ( √ ...
...MENU to activate the onscreen menu system. • See individual topics like "Sound Adjust" for specific information on the side of the TV instead of the onscreen menus. OK This button confirms your TV is different from their broadcast or recorded program. Use these buttons to move up... one of the remote control. Button Functions Aspect Ratios (Continued) Press the ASPECT button • By pressing the ASPECT button, you to access JVC's onscreen menu system. It appears between INITIAL SETUP and PICTURE ADJUST screen, and it is able to change the size. buttons ( √ ...
Instructions
Page 65
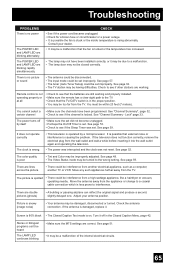
...or turned. Troubleshooting PROBLEMS There is poor • Tint and Color may be improperly adjusted. See page 59. See page 52. The color quality is no picture or sound CHECK • See if the power cord became unplugged. • Check for a blown fuse or circuit breaker or ... sure the MTS settings are blinking rapidly simultaneously. Move any such appliances further away from another electrical appliance, such as a computer, another TV or VCR. Adjust your dealer. • It may not have been programmed. Stereo or bilingual programs can reflect the original signal and ...
...or turned. Troubleshooting PROBLEMS There is poor • Tint and Color may be improperly adjusted. See page 59. See page 52. The color quality is no picture or sound CHECK • See if the power cord became unplugged. • Check for a blown fuse or circuit breaker or ... sure the MTS settings are blinking rapidly simultaneously. Move any such appliances further away from another electrical appliance, such as a computer, another TV or VCR. Adjust your dealer. • It may not have been programmed. Stereo or bilingual programs can reflect the original signal and ...

Instructions
Page 66
You hear occasional • It is normal for the TV to make crackling sounds when first turned on the screen. The AUTO DEMO finished automatically • The TV recieved a signal from the TV's speaker Static electricity CHECK • The Center CH Input may be turned on the screen. If the power is turned...no need to worry. • The lamp may make a noise when it has been turned off. See page 47. • The TV Speaker option may make a creaking sound if the temperature of the room or the temperature inside the lamp is heated, and is not a malfunction. • The still parts ...
You hear occasional • It is normal for the TV to make crackling sounds when first turned on the screen. The AUTO DEMO finished automatically • The TV recieved a signal from the TV's speaker Static electricity CHECK • The Center CH Input may be turned on the screen. If the power is turned...no need to worry. • The lamp may make a noise when it has been turned off. See page 47. • The TV Speaker option may make a creaking sound if the temperature of the room or the temperature inside the lamp is heated, and is not a malfunction. • The still parts ...
Instructions
Page 73
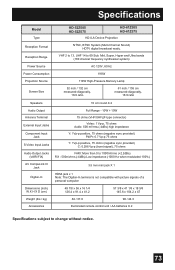
... 14 to 69 Sub, Mid, Super, Hyper and Ultra bands (180 channel frequency synthesizer system) AC 120V, 60 Hz Power Consumption Projection Source 195W 110W High-Pressure Mercury Lamp Screen Size 52 inch / 132 cm measured diagonally, 16:9 ratio 61 inch / 155 cm measured diagonally, 16:9 ratio Speakers 10 cm round X 2 Audio... control unit / AA batteries X 2 Specifications subject to change without notice. 73 Specifications Model Type HD-52Z585 HD-52Z575 HD-61Z585 HD-61Z575 HD-ILA Device Projection Reception Format NTSC, BTSC System (Multi-Channel Sound) HDTV digital broadcast ready.
... 14 to 69 Sub, Mid, Super, Hyper and Ultra bands (180 channel frequency synthesizer system) AC 120V, 60 Hz Power Consumption Projection Source 195W 110W High-Pressure Mercury Lamp Screen Size 52 inch / 132 cm measured diagonally, 16:9 ratio 61 inch / 155 cm measured diagonally, 16:9 ratio Speakers 10 cm round X 2 Audio... control unit / AA batteries X 2 Specifications subject to change without notice. 73 Specifications Model Type HD-52Z585 HD-52Z575 HD-61Z585 HD-61Z575 HD-ILA Device Projection Reception Format NTSC, BTSC System (Multi-Channel Sound) HDTV digital broadcast ready.


