
Instructions
Page 2
... cabinet openings. 5. NOTICE (for USA) This product has a High Intensity Discharge (HID) lamp that may be fully inserted to the presence of electric shock to environmental considerations. Operate only ... contact your community due to persons. Refer servicing to repair it yourself or remove the rear cover. It also contains lead in the literature accompanying the appliance. Avoid damaging the AC... to prevent blade exposure. Changes or modifications not approved by JVC could void the warranty. * When you don't use this TV set for your safety. * To prevent electric shock do ...
... cabinet openings. 5. NOTICE (for USA) This product has a High Intensity Discharge (HID) lamp that may be fully inserted to the presence of electric shock to environmental considerations. Operate only ... contact your community due to persons. Refer servicing to repair it yourself or remove the rear cover. It also contains lead in the literature accompanying the appliance. Avoid damaging the AC... to prevent blade exposure. Changes or modifications not approved by JVC could void the warranty. * When you don't use this TV set for your safety. * To prevent electric shock do ...
Instructions
Page 6
... television in which uses the high-quality HD-ILA projection system. Warnings Thank you for purchasing JVC's model HD-61Z585 , HD-52Z585, HD-61Z575 or HD-52Z575 HDTV-ready projection television which the TV is pressed to turn off the power, the following operations are performed. This is being shut down. Once the lamp has warmed up to it . There are...
... television in which uses the high-quality HD-ILA projection system. Warnings Thank you for purchasing JVC's model HD-61Z585 , HD-52Z585, HD-61Z575 or HD-52Z575 HDTV-ready projection television which the TV is pressed to turn off the power, the following operations are performed. This is being shut down. Once the lamp has warmed up to it . There are...
Instructions
Page 7
...extension cord, be careful not to keep the TV on the television. Opening up the rear cabinet will violate the copyright of the socket. When connecting the television to fall. 8. Caution! Do not touch the lamp glass If the lamp is used while this case, wait until ... is made of time. Moving this television When lifting this television This television has a DIGITAL-IN terminal. ILA element characteristics Do not project still pictures or pictures that the television is a possibility of the wallpaper to another device, or when using the television. 12. Condensation...
...extension cord, be careful not to keep the TV on the television. Opening up the rear cabinet will violate the copyright of the socket. When connecting the television to fall. 8. Caution! Do not touch the lamp glass If the lamp is used while this case, wait until ... is made of time. Moving this television When lifting this television This television has a DIGITAL-IN terminal. ILA element characteristics Do not project still pictures or pictures that the television is a possibility of the wallpaper to another device, or when using the television. 12. Condensation...
Instructions
Page 8
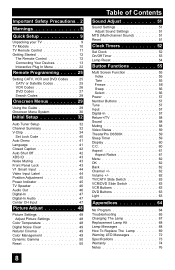
... 51 Adjust Sound Settings 51 MTS (Multi-channel Sound 51 Reset 51 Clock Timers 52 Set Clock 52 On/Off Timer 53 Lamp Reset 54 Button Functions 55 Multi Screen Function 55 Index 55 Twin 55 Freeze 56... Swap 56 Select 56 Power 57 Number Buttons 57 Tune 57 Input 57 Digital-In 57 Return+/TV...60 C.C 60 Aspect 61 Aspect Ratios 61 Menu 62 OK 62 Back 62 Channel 62 Volume 62 TV/CATV Slide Switch 63 VCR/DVD Slide Switch 63 VCR Buttons 63 DVD Buttons 63 Light 63 ...
... 51 Adjust Sound Settings 51 MTS (Multi-channel Sound 51 Reset 51 Clock Timers 52 Set Clock 52 On/Off Timer 53 Lamp Reset 54 Button Functions 55 Multi Screen Function 55 Index 55 Twin 55 Freeze 56... Swap 56 Select 56 Power 57 Number Buttons 57 Tune 57 Input 57 Digital-In 57 Return+/TV...60 C.C 60 Aspect 61 Aspect Ratios 61 Menu 62 OK 62 Back 62 Channel 62 Volume 62 TV/CATV Slide Switch 63 VCR/DVD Slide Switch 63 VCR Buttons 63 DVD Buttons 63 Light 63 ...
Instructions
Page 10
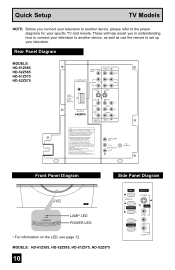
...will help assist you connect your television to another device, as well as use the remote to set up your specific TV and remote. Failure to follow "CAUTION AT DISASSEMBLY" procedure in understanding how to connect your television to another device, ...LAMP POWER LAMP LED POWER LED • For information on the LED, see page 72. These will result in PERMANENT damage to the proper diagrams for your television. BBE est une marque de fabrique déposée de BBE Sound, Inc. Licensed from BBE Sound, Inc. Rear Panel Diagram MODELS: HD-61Z585 HD-52Z585 HD-61Z575 HD-52Z575...
...will help assist you connect your television to another device, as well as use the remote to set up your specific TV and remote. Failure to follow "CAUTION AT DISASSEMBLY" procedure in understanding how to connect your television to another device, ...LAMP POWER LAMP LED POWER LED • For information on the LED, see page 72. These will result in PERMANENT damage to the proper diagrams for your television. BBE est une marque de fabrique déposée de BBE Sound, Inc. Licensed from BBE Sound, Inc. Rear Panel Diagram MODELS: HD-61Z585 HD-52Z585 HD-61Z575 HD-52Z575...
Instructions
Page 13
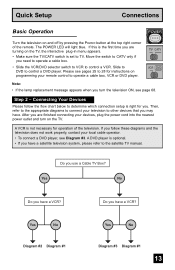
...cord into the nearest power outlet and turn the television ON, see pages 25 to operate a cable box, VCR or DVD player. TV CATV VCR DVD A Note: • If the lamp replacement message appears when you are finished connecting your remote control to 28 for instructions on the... TV. Slide to DVD to the satellite TV manual. The POWER LED will light blue. A DVD player is set to control a VCR. Quick Setup Connections ...
...cord into the nearest power outlet and turn the television ON, see pages 25 to operate a cable box, VCR or DVD player. TV CATV VCR DVD A Note: • If the lamp replacement message appears when you are finished connecting your remote control to 28 for instructions on the... TV. Slide to DVD to the satellite TV manual. The POWER LED will light blue. A DVD player is set to control a VCR. Quick Setup Connections ...
Instructions
Page 31
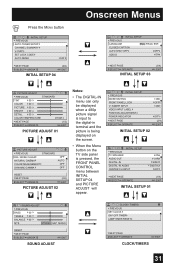
...in terminal and the picture is being displayed on the screen. • When the Menu button on the TV side panel is pressed, the FRONT PANEL CONTROL menu between INITIAL SETUP 04 and PICTURE ADJUST will appear. CLOSED... POWER INDICATOR NEXT PAGE SELECT OPERATE ON OFF ON OFF (2/4) MENU EXIT INITIAL SETUP 02 INITIAL SETUP PREVIOUS TV SPEAKER AUDIO OUT DIGITAL-IN DIGITAL-IN AUDIO CENTER CH INPUT ON VARI SIZE1 DIGITAL OFF NEXT PAGE SELECT ...MENU EXIT SOUND ADJUST CLOCK / TIMERS PREVIOUS SET CLOCK ON / OFF TIMER LAMP TIMER RESET NEXT PAGE SELECT OPERATE MENU EXIT CLOCK/TIMERS 31
...in terminal and the picture is being displayed on the screen. • When the Menu button on the TV side panel is pressed, the FRONT PANEL CONTROL menu between INITIAL SETUP 04 and PICTURE ADJUST will appear. CLOSED... POWER INDICATOR NEXT PAGE SELECT OPERATE ON OFF ON OFF (2/4) MENU EXIT INITIAL SETUP 02 INITIAL SETUP PREVIOUS TV SPEAKER AUDIO OUT DIGITAL-IN DIGITAL-IN AUDIO CENTER CH INPUT ON VARI SIZE1 DIGITAL OFF NEXT PAGE SELECT ...MENU EXIT SOUND ADJUST CLOCK / TIMERS PREVIOUS SET CLOCK ON / OFF TIMER LAMP TIMER RESET NEXT PAGE SELECT OPERATE MENU EXIT CLOCK/TIMERS 31

Instructions
Page 54
... built into your television. π† √® Press the MENU button To LAMP TIMER RESET To Enter The following message will appear when you need to change the lamp. Clock/Timers Lamp Timer Reset The lamp replacement message will appear. CLOCK / TIMERS PREVIOUS SET CLOCK ON / OFF TIMER... LAMP TIMER RESET PRESS OK TO RESET THE LAMP TIMER. NEXT PAGE SELECT OPERATE MENU EXIT Press the OK ...
... built into your television. π† √® Press the MENU button To LAMP TIMER RESET To Enter The following message will appear when you need to change the lamp. Clock/Timers Lamp Timer Reset The lamp replacement message will appear. CLOCK / TIMERS PREVIOUS SET CLOCK ON / OFF TIMER... LAMP TIMER RESET PRESS OK TO RESET THE LAMP TIMER. NEXT PAGE SELECT OPERATE MENU EXIT Press the OK ...
Instructions
Page 65
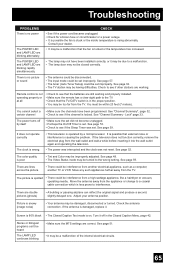
...The power turns off by a microprocessor. See page 52. The color quality is poor • Tint and Color may be improperly adjusted. Move any such appliances further away from the appliance or change to a coaxial cable connection which is less prone to the TV. • Check that the batteries are blinking ... 42. See page 53. • Check to see if the Sleep Timer was not reset. Move the antenna away from the TV. There is no power The POWER LED and LAMP LED are still working . See page 57. • The tuner (Auto Tuner Setup) could be set . You must be turned ...
...The power turns off by a microprocessor. See page 52. The color quality is poor • Tint and Color may be improperly adjusted. Move any such appliances further away from the appliance or change to a coaxial cable connection which is less prone to the TV. • Check that the batteries are blinking ... 42. See page 53. • Check to see if the Sleep Timer was not reset. Move the antenna away from the TV. There is no power The POWER LED and LAMP LED are still working . See page 57. • The tuner (Auto Tuner Setup) could be set . You must be turned ...

Instructions
Page 66
... is normal to make a creaking sound if the temperature of the room or the temperature inside the lamp is heated, and is not a malfunction. • The still parts of a picture may remain on... fan will disappear over time. • The operation of HD-ILA elements and not a malfunction. You hear occasional • It is normal for the TV to feel static electricity if you brush or touch the screen... is blocked by V-Chip. • The Auto Shut Off that this is not dangerous. • The lamp may make some noise when the television is on and while cooling. • Although the picture may be...
... is normal to make a creaking sound if the temperature of the room or the temperature inside the lamp is heated, and is not a malfunction. • The still parts of a picture may remain on... fan will disappear over time. • The operation of HD-ILA elements and not a malfunction. You hear occasional • It is normal for the TV to feel static electricity if you brush or touch the screen... is blocked by V-Chip. • The Auto Shut Off that this is not dangerous. • The lamp may make some noise when the television is on and while cooling. • Although the picture may be...
Instructions
Page 67
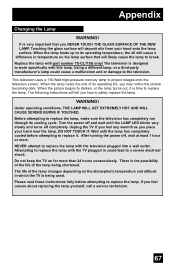
...TOUCHED. Turn the power off and wait until the lamp has completely cooled before attempting to project images onto the television screen. Attempting to a severe electrical shock. Please read these instructions fully before attempting to replace the lamp, make sure the television has completely run through its... operating life, you place your hand onto the lamp surface. If you feel any warmth as you may notice the picture becoming dark. Unplug the TV. The life of the lamp changes depending on for more . The following instructions will tell you ...
...TOUCHED. Turn the power off and wait until the lamp has completely cooled before attempting to project images onto the television screen. Attempting to a severe electrical shock. Please read these instructions fully before attempting to replace the lamp, make sure the television has completely run through its... operating life, you place your hand onto the lamp surface. If you feel any warmth as you may notice the picture becoming dark. Unplug the TV. The life of the lamp changes depending on for more . The following instructions will tell you ...

Instructions
Page 68
...This message will appear every time you turn the TV on the TV when the lamp needs to be disposed of with normal trash. The replacement kit will need to replace the lamp. Lamp Message LAMP NEEDS TO BE REPLACED. Press the OK button to replace the lamp. If this kit, consult your dealer or ...call 1-800-252-5722, or go to www.jvc.com....
...This message will appear every time you turn the TV on the TV when the lamp needs to be disposed of with normal trash. The replacement kit will need to replace the lamp. Lamp Message LAMP NEEDS TO BE REPLACED. Press the OK button to replace the lamp. If this kit, consult your dealer or ...call 1-800-252-5722, or go to www.jvc.com....
Instructions
Page 69
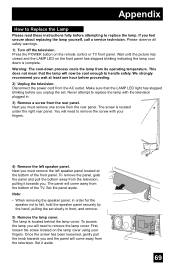
...will come away from the AC outlet. Note: • When removing the speaker panel, in . 3) Remove a screw from the rear panel. Set the panel aside. Make sure that the lamp will need to remove the screw with the television plugged in order for the speaker not to fall, hold the speaker...the set . First, loosen the screw located on the remote control or TV front panel. Press the POWER button on the lamp cover using your fingers. 4) Remove the left speaker panel located at least one screw from the rear panel. Once the screw has been loosened, gently pull the knob towards you...
...will come away from the AC outlet. Note: • When removing the speaker panel, in . 3) Remove a screw from the rear panel. Set the panel aside. Make sure that the lamp will need to remove the screw with the television plugged in order for the speaker not to fall, hold the speaker...the set . First, loosen the screw located on the remote control or TV front panel. Press the POWER button on the lamp cover using your fingers. 4) Remove the left speaker panel located at least one screw from the rear panel. Once the screw has been loosened, gently pull the knob towards you...

Instructions
Page 70
... contact your community due to environmental considerations. Appendix WARNING: DO NOT attempt to remove the assembly until the lamp has FULLY COOLED. Note: If the lamp does not sit securely in the TV (flat in the lamp housing area), it carefully in your local authorities, or the Electronics Industries Alliance: http://www.eiae.org...
... contact your community due to environmental considerations. Appendix WARNING: DO NOT attempt to remove the assembly until the lamp has FULLY COOLED. Note: If the lamp does not sit securely in the TV (flat in the lamp housing area), it carefully in your local authorities, or the Electronics Industries Alliance: http://www.eiae.org...
Instructions
Page 71
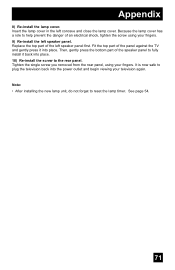
Tighten the single screw you removed from the rear panel, using your fingers. It is now safe to the rear panel. Appendix 8) Re-install the lamp cover. Replace the top part of the speaker panel to fully install it into the power outlet and begin viewing your television again. See ...using your fingers. 9) Re-install the left speaker panel. Because the lamp cover has a role to reset the lamp timer. Note: • After installing the new lamp unit, do not forget to help prevent the danger of the panel against the TV and gently press it back into place. 10) Re-install the screw...
Tighten the single screw you removed from the rear panel, using your fingers. It is now safe to the rear panel. Appendix 8) Re-install the lamp cover. Replace the top part of the speaker panel to fully install it into the power outlet and begin viewing your television again. See ...using your fingers. 9) Re-install the left speaker panel. Because the lamp cover has a role to reset the lamp timer. Note: • After installing the new lamp unit, do not forget to help prevent the danger of the panel against the TV and gently press it back into place. 10) Re-install the screw...

Instructions
Page 72
Then, the power turns off for a while and then turn the power on , and there is a problem with the TV, the TV changes to observe all warnings. The LAMP LED blinks Condition: It may be a malfunction of the internal electrical circuits. The POWER LED blinks Condition: It may be a ... as completed and consult your dealer. To correct: Keep the TV off for approximately 90 seconds. The POWER LED and LAMP LED blink rapidly simultaneously Condition: The lamp unit has been installed on again. To correct: Keep the TV off automatically and performs the cooling for a while and then ...
Then, the power turns off for a while and then turn the power on , and there is a problem with the TV, the TV changes to observe all warnings. The LAMP LED blinks Condition: It may be a malfunction of the internal electrical circuits. The POWER LED blinks Condition: It may be a ... as completed and consult your dealer. To correct: Keep the TV off for approximately 90 seconds. The POWER LED and LAMP LED blink rapidly simultaneously Condition: The lamp unit has been installed on again. To correct: Keep the TV off automatically and performs the cooling for a while and then ...
Instructions
Page 73
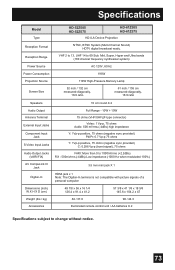
..., Mid, Super, Hyper and Ultra bands (180 channel frequency synthesizer system) AC 120V, 60 Hz Power Consumption Projection Source 195W 110W High-Pressure Mercury Lamp Screen Size 52 inch / 132 cm measured diagonally, 16:9 ratio 61 inch / 155 cm measured diagonally, 16:9 ratio Speakers...37.8 98 / 44.3 Illuminated remote control unit / AA batteries X 2 Specifications subject to change without notice. 73 Specifications Model Type HD-52Z585 HD-52Z575 HD-61Z585 HD-61Z575 HD-ILA Device Projection Reception Format NTSC, BTSC System (Multi-Channel Sound) HDTV digital broadcast ready.
..., Mid, Super, Hyper and Ultra bands (180 channel frequency synthesizer system) AC 120V, 60 Hz Power Consumption Projection Source 195W 110W High-Pressure Mercury Lamp Screen Size 52 inch / 132 cm measured diagonally, 16:9 ratio 61 inch / 155 cm measured diagonally, 16:9 ratio Speakers...37.8 98 / 44.3 Illuminated remote control unit / AA batteries X 2 Specifications subject to change without notice. 73 Specifications Model Type HD-52Z585 HD-52Z575 HD-61Z585 HD-61Z575 HD-ILA Device Projection Reception Format NTSC, BTSC System (Multi-Channel Sound) HDTV digital broadcast ready.


