

Instructions
Page 2
... to the presence of electric shock to environmental considerations. Changes or modifications not approved by JVC could void the warranty. * When you don't use this polarized plug with arrowhead symbol...safety. * To prevent electric shock do not use this TV set for USA) This product has a High Intensity Discharge (HID) lamp that may be of sufficient magnitude to constitute a risk of...within an equilateral triangle is unattainable. 4. Refer servicing to repair it yourself or remove the rear cover. Do not allow objects or liquid into the cabinet openings. 5. Do not attempt ...
... to the presence of electric shock to environmental considerations. Changes or modifications not approved by JVC could void the warranty. * When you don't use this polarized plug with arrowhead symbol...safety. * To prevent electric shock do not use this TV set for USA) This product has a High Intensity Discharge (HID) lamp that may be of sufficient magnitude to constitute a risk of...within an equilateral triangle is unattainable. 4. Refer servicing to repair it yourself or remove the rear cover. Do not allow objects or liquid into the cabinet openings. 5. Do not attempt ...

Instructions
Page 4
L/MONO R AUDIO 17) Cautions for safe operation. 200 mm 200 mm 150 mm 150 mm 50 mm LAMP/PROGRAM POWER MENU OPERATE + CHANNEL - Install the TV in a corner on , the user is encouraged to try to correct the interference by one or more of time. 14) Refer... the limits for a Class B digital device, pursuant to the minimum distance guidelines shown for installation - Consult the dealer or an experienced radio/TV technician for long periods of the following measures: - This equipment generates, uses and can be exposed to allow satisfactory cooling. Connect the equipment ...
L/MONO R AUDIO 17) Cautions for safe operation. 200 mm 200 mm 150 mm 150 mm 50 mm LAMP/PROGRAM POWER MENU OPERATE + CHANNEL - Install the TV in a corner on , the user is encouraged to try to correct the interference by one or more of time. 14) Refer... the limits for a Class B digital device, pursuant to the minimum distance guidelines shown for installation - Consult the dealer or an experienced radio/TV technician for long periods of the following measures: - This equipment generates, uses and can be exposed to allow satisfactory cooling. Connect the equipment ...
Instructions
Page 6
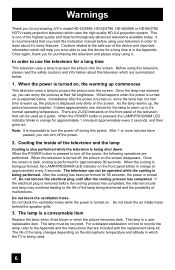
... please enjoy using this television, please read this television which the TV is turned on, the warming up , you for purchasing JVC's model HD-52G886, HD-52G786, HD-56G886 or HD-56G786 HDTV-ready projection television which will help you for a long time This television uses a lamp to project the picture onto the screen. When the power is being performed...
... please enjoy using this television, please read this television which the TV is turned on, the warming up , you for purchasing JVC's model HD-52G886, HD-52G786, HD-56G886 or HD-56G786 HDTV-ready projection television which will help you for a long time This television uses a lamp to project the picture onto the screen. When the power is being performed...
Instructions
Page 7
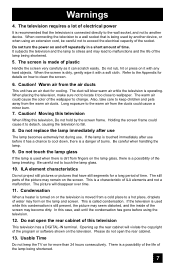
..., hit or press on the lamp glass, there is a possibility of burns. The warm air could cause a minor burn. 7. Caution! ILA element characteristics Do not project still pictures or pictures that is... danger of the lamp breaking. When placing the television, make sure not to locate it to detach, causing the television to clean the screen. 6. Also, take care to keep the TV on how to... of ILA elements and not a malfunction. This is a characteristic of time. Opening up the rear cabinet will violate the copyright of plastic Handle the screen very carefully as it with any hard...
..., hit or press on the lamp glass, there is a possibility of burns. The warm air could cause a minor burn. 7. Caution! ILA element characteristics Do not project still pictures or pictures that is... danger of the lamp breaking. When placing the television, make sure not to locate it to detach, causing the television to clean the screen. 6. Also, take care to keep the TV on how to... of ILA elements and not a malfunction. This is a characteristic of time. Opening up the rear cabinet will violate the copyright of plastic Handle the screen very carefully as it with any hard...
Instructions
Page 8
...Smart Input 54 Video Input Label 55 Position Adjustment 56 Power Indicator 56 Video-1 Monitor Out 57 TV Speaker 57 Audio Out 57 Digital-In 58 Digital-In Audio 58 Center CH Input 59 Picture ...Settings 63 Adjust Sound Settings 63 Reset 63 Clock/Timers 64 Set Clock 64 On/Off Timer 65 Lamp Reset 66 Button Functions 67 Multi Screen Function 67 Twin 67 Index 68 Freeze 68 Swap 68 Select... 68 Power 69 Number Buttons 69 Tune 69 Input 69 TheaterPro D6500K 69 Return+/TV 70 Sound 70 Muting 71 Video Status 71 Natural Cinema 71 Sleep Timer 72 ML/MTS 72 ...
...Smart Input 54 Video Input Label 55 Position Adjustment 56 Power Indicator 56 Video-1 Monitor Out 57 TV Speaker 57 Audio Out 57 Digital-In 58 Digital-In Audio 58 Center CH Input 59 Picture ...Settings 63 Adjust Sound Settings 63 Reset 63 Clock/Timers 64 Set Clock 64 On/Off Timer 65 Lamp Reset 66 Button Functions 67 Multi Screen Function 67 Twin 67 Index 68 Freeze 68 Swap 68 Select... 68 Power 69 Number Buttons 69 Tune 69 Input 69 TheaterPro D6500K 69 Return+/TV 70 Sound 70 Muting 71 Video Status 71 Natural Cinema 71 Sleep Timer 72 ML/MTS 72 ...
Instructions
Page 9
... Information 87 Weak Signal 87 No Program 87 Invalid Signal 87 Cable Card Information . . . . 88 Cable Card Connection 88 Appendices 89 Troubleshooting 89 Changing The Lamp 91 Replacement Lamp Kit 92 Lamp Messages 92 How To Replace The Lamp 93 Warning LED Messages 95 Warranty 96 Specifications 98 Notes 99 Table of Contents 9
... Information 87 Weak Signal 87 No Program 87 Invalid Signal 87 Cable Card Information . . . . 88 Cable Card Connection 88 Appendices 89 Troubleshooting 89 Changing The Lamp 91 Replacement Lamp Kit 92 Lamp Messages 92 How To Replace The Lamp 93 Warning LED Messages 95 Warranty 96 Specifications 98 Notes 99 Table of Contents 9
Instructions
Page 10
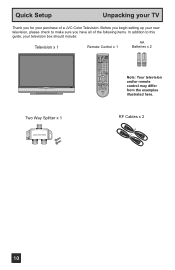
... GUIDE VOL OK VOL Note: Your television CH MENU BACK and/or remote VCR CHANNEL VCR DVD PREV NEXT POWER TV VCR REW PLAY FF control may differ LAMP/PROGRAM POWER REC STOP PAUSE OPEN CLOSE STILL PAUSE from the examples RM-C14G illustrated here. Before you have all ...of a JVC Color Television. Quick Setup Unpacking your TV Thank you for your purchase of the following items. In addition to make sure you...
... GUIDE VOL OK VOL Note: Your television CH MENU BACK and/or remote VCR CHANNEL VCR DVD PREV NEXT POWER TV VCR REW PLAY FF control may differ LAMP/PROGRAM POWER REC STOP PAUSE OPEN CLOSE STILL PAUSE from the examples RM-C14G illustrated here. Before you have all ...of a JVC Color Television. Quick Setup Unpacking your TV Thank you for your purchase of the following items. In addition to make sure you...
Instructions
Page 15
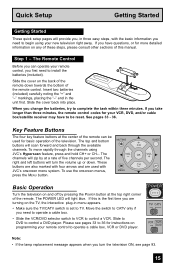
... Setup Getting Started Getting Started These quick setup pages will provide you, in three easy steps, with the basic information you need to begin using JVC's Hyperscan feature, press and hold CH+ or CH-. Slide the cover on the back of the remote. When you need to complete the task ... switch to CATV only if you change the batteries, try to install the batteries (included). The channels will light blue. POWER T TV CATV MUL VCR DVD Note: • If the lamp replacement message appears when you first need to operate a cable box. • Slide the VCR/DVD selector switch to VCR to...
... Setup Getting Started Getting Started These quick setup pages will provide you, in three easy steps, with the basic information you need to begin using JVC's Hyperscan feature, press and hold CH+ or CH-. Slide the cover on the back of the remote. When you need to complete the task ... switch to CATV only if you change the batteries, try to install the batteries (included). The channels will light blue. POWER T TV CATV MUL VCR DVD Note: • If the lamp replacement message appears when you first need to operate a cable box. • Slide the VCR/DVD selector switch to VCR to...
Instructions
Page 39
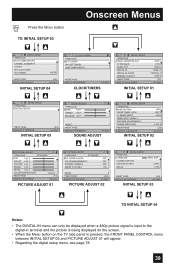
...picture signal is input to the digital-in terminal and the picture is being displayed on the screen. • When the Menu button on the TV side panel is pressed, the FRONT PANEL CONTROL menu between INITIAL SETUP 05 and PICTURE ADJUST 01 will appear. • Regarding the digital setup...PAGE SELECT OPERATE (4/5) MENU EXIT INITIAL SETUP 04 CLOCK / TIMERS PREVIOUS SET CLOCK ON / OFF TIMER LAMP TIMER RESET NEXT PAGE SELECT OPERATE MENU EXIT CLOCK/TIMERS INITIAL SETUP PREVIOUS VIDEO-1MONITOR OUT TV SPEAKER AUDIO OUT DIGITAL-IN DIGITAL-IN AUDIO CENTER CH INPUT NEXT PAGE SELECT OPERATE OFF ON...
...picture signal is input to the digital-in terminal and the picture is being displayed on the screen. • When the Menu button on the TV side panel is pressed, the FRONT PANEL CONTROL menu between INITIAL SETUP 05 and PICTURE ADJUST 01 will appear. • Regarding the digital setup...PAGE SELECT OPERATE (4/5) MENU EXIT INITIAL SETUP 04 CLOCK / TIMERS PREVIOUS SET CLOCK ON / OFF TIMER LAMP TIMER RESET NEXT PAGE SELECT OPERATE MENU EXIT CLOCK/TIMERS INITIAL SETUP PREVIOUS VIDEO-1MONITOR OUT TV SPEAKER AUDIO OUT DIGITAL-IN DIGITAL-IN AUDIO CENTER CH INPUT NEXT PAGE SELECT OPERATE OFF ON...

Instructions
Page 66
...EXIT Press the OK button while the above message appears on lamp replacement. 66 THE LAMP TIMER IS RESET SUCCESSFULLY. The lamp timer has now been reset. Notes: • You can use the Lamp Timer Reset only after replacing the lamp. • See Page 93 for instructions on the television ...screen. CLOCK / TIMERS PREVIOUS SET CLOCK ON / OFF TIMER LAMP TIMER RESET PRESS OK TO RESET THE LAMP TIMER. Clock/Timers Lamp Timer Reset The lamp replacement message will appear. After you replace the lamp, you need to reset the timer which is built into your television. &#...
...EXIT Press the OK button while the above message appears on lamp replacement. 66 THE LAMP TIMER IS RESET SUCCESSFULLY. The lamp timer has now been reset. Notes: • You can use the Lamp Timer Reset only after replacing the lamp. • See Page 93 for instructions on the television ...screen. CLOCK / TIMERS PREVIOUS SET CLOCK ON / OFF TIMER LAMP TIMER RESET PRESS OK TO RESET THE LAMP TIMER. Clock/Timers Lamp Timer Reset The lamp replacement message will appear. After you replace the lamp, you need to reset the timer which is built into your television. &#...
Instructions
Page 89
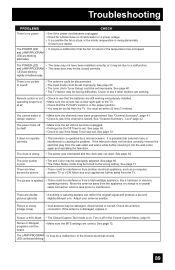
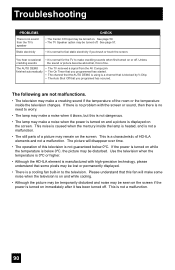
... further away from another electrical appliance, such as a computer, another TV or VCR. Adjust your dealer. Consult your antenna position. The POWER LED and LAMP/PROGRAM LED are still working . See page 40. • The TV station may be turned to see if the Sleep Timer was not reset...8226; Tint and Color may be having difficulties. You must be interference from the TV. See page 65. • Check to a malfunction. • The lamp door may not have been programmed. It is possible that the TV/CATV switch is in the Closed Caption Menu, page 51. There is no ...
... further away from another electrical appliance, such as a computer, another TV or VCR. Adjust your dealer. Consult your antenna position. The POWER LED and LAMP/PROGRAM LED are still working . See page 40. • The TV station may be turned to see if the Sleep Timer was not reset...8226; Tint and Color may be having difficulties. You must be interference from the TV. See page 65. • Check to a malfunction. • The lamp door may not have been programmed. It is possible that the TV/CATV switch is in the Closed Caption Menu, page 51. There is no ...
Instructions
Page 90
... may make a creaking sound if the temperature of the room or the temperature inside the lamp is heated, and is not a malfunction. • The still parts of HD-ILA elements and not a malfunction. See page 59. • The TV Speaker option may be disturbed. Troubleshooting PROBLEMS There is no need to worry. •...
... may make a creaking sound if the temperature of the room or the temperature inside the lamp is heated, and is not a malfunction. • The still parts of HD-ILA elements and not a malfunction. See page 59. • The TV Speaker option may be disturbed. Troubleshooting PROBLEMS There is no need to worry. •...

Instructions
Page 91
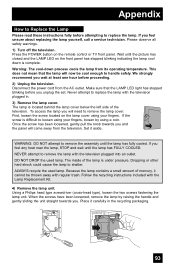
...used. It is very important that will deposit oils from your hand near the lamp, DO NOT TOUCH IT. After turning the power off and wait until the lamp has completely cooled before attempting to project images onto the television screen. The life of its operating life, you NEVER ... its operating temperature, the oil will cause a difference in could cause a malfunction and or damage to break. Do not keep the TV on the lamp surface that you may notice the picture becoming dark. Before attempting to its cooling cycle. The television is being shortened. Appendix Changing the...
...used. It is very important that will deposit oils from your hand near the lamp, DO NOT TOUCH IT. After turning the power off and wait until the lamp has completely cooled before attempting to project images onto the television screen. The life of its operating life, you NEVER ... its operating temperature, the oil will cause a difference in could cause a malfunction and or damage to break. Do not keep the TV on the lamp surface that you may notice the picture becoming dark. Before attempting to its cooling cycle. The television is being shortened. Appendix Changing the...

Instructions
Page 92
...'S MANUAL FOR REPLACEMENT INSTRUCTIONS. If this kit, consult your dealer or call 1-800-252-5722, or go to www.jvc.com. Press the OK button to make the message disappear, or replace the lamp. 92 PRESS OK, IF YOU DO NOT WANT TO SEE THIS MESSAGE AGAIN. See page 97 on the... TV when the lamp needs to be disposed of mercury, it cannot be replaced. AFTER REPLACING THE LAMP, PLEASE RESET TIMER IN THE TV MENU. Note: • This message will appear every time you need to purchase a replacement kit...
...'S MANUAL FOR REPLACEMENT INSTRUCTIONS. If this kit, consult your dealer or call 1-800-252-5722, or go to www.jvc.com. Press the OK button to make the message disappear, or replace the lamp. 92 PRESS OK, IF YOU DO NOT WANT TO SEE THIS MESSAGE AGAIN. See page 97 on the... TV when the lamp needs to be disposed of mercury, it cannot be replaced. AFTER REPLACING THE LAMP, PLEASE RESET TIMER IN THE TV MENU. Note: • This message will appear every time you need to purchase a replacement kit...
Instructions
Page 93
... a coin. Warning: The cool-down is under pressure. First, loosen the screw located on the remote control or TV front panel. Appendix How to Replace the Lamp Please read these instructions fully before proceeding. 2) Unplug the television. Please observe all safety warnings. 1) Turn off the... television. We strongly recommend you feel unsure about replacing the lamp yourself, call a service technician. The lamp is difficult to remove the assembly until the lamp has FULLY COOLED. Once the screw has been loosened, gently pull the knob towards ...
... a coin. Warning: The cool-down is under pressure. First, loosen the screw located on the remote control or TV front panel. Appendix How to Replace the Lamp Please read these instructions fully before proceeding. 2) Unplug the television. Please observe all safety warnings. 1) Turn off the... television. We strongly recommend you feel unsure about replacing the lamp yourself, call a service technician. The lamp is difficult to remove the assembly until the lamp has FULLY COOLED. Once the screw has been loosened, gently pull the knob towards ...

Instructions
Page 94
...recycling information, please contact your fingers. Note: If the lamp does not sit securely in the TV (flat in the right concave and close the lamp cover. WARNING! Please read the warnings on . Insert the lamp cover in the lamp housing area), it is designed to work specifically with part... number TS-CL110U only! Also, replace the lamp with this lamp. Disposal of ...
...recycling information, please contact your fingers. Note: If the lamp does not sit securely in the TV (flat in the right concave and close the lamp cover. WARNING! Please read the warnings on . Insert the lamp cover in the lamp housing area), it is designed to work specifically with part... number TS-CL110U only! Also, replace the lamp with this lamp. Disposal of ...
Instructions
Page 95
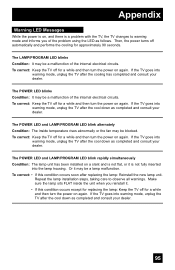
... of the problem using the LED as completed and consult your dealer. To correct: Keep the TV off for a while and then turn the power on again. Make sure the lamp sits FLAT inside temperature rises abnormally or the fan may be a malfunction of the internal electrical circuits... power is on, and there is not fully inserted into the lamp housing. The LAMP/PROGRAM LED blinks Condition: It may be a lamp malfunction. If the TV goes into warning mode, unplug the TV after replacing the lamp: Reinstall the new lamp unit. Then, the power turns off for approximately 90 seconds....
... of the problem using the LED as completed and consult your dealer. To correct: Keep the TV off for a while and then turn the power on again. Make sure the lamp sits FLAT inside temperature rises abnormally or the fan may be a malfunction of the internal electrical circuits... power is on, and there is not fully inserted into the lamp housing. The LAMP/PROGRAM LED blinks Condition: It may be a lamp malfunction. If the TV goes into warning mode, unplug the TV after replacing the lamp: Reinstall the new lamp unit. Then, the power turns off for approximately 90 seconds....
Instructions
Page 98
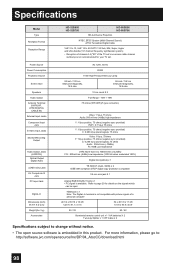
... 1 • PC signal is available. Specifications Model Type Reception Format Reception Range HD-52G886 HD-52G786 HD-ILA Device Projection HD-56G886 HD-56G786 NTSC, BTSC System (Multi-Channel Sound) ATSC Terrestrial, Digital Cable VHF 2 ... X D (cm) Weight (lbs / kg) Accessories AC 120V, 60 Hz 205W 110W High-Pressure Mercury Lamp 52 inch / 132 cm measured diagonally, 16:9 ratio 56 inch / 142 cm measured diagonally, 16:9 ratio 10...: More than 0 to : http://software.jvc.com/opensource/lnx/DP/04_AtscCC/download.html 98 Refer to page 29 for your TV set 's on-screen cable channel numbers) ...
... 1 • PC signal is available. Specifications Model Type Reception Format Reception Range HD-52G886 HD-52G786 HD-ILA Device Projection HD-56G886 HD-56G786 NTSC, BTSC System (Multi-Channel Sound) ATSC Terrestrial, Digital Cable VHF 2 ... X D (cm) Weight (lbs / kg) Accessories AC 120V, 60 Hz 205W 110W High-Pressure Mercury Lamp 52 inch / 132 cm measured diagonally, 16:9 ratio 56 inch / 142 cm measured diagonally, 16:9 ratio 10...: More than 0 to : http://software.jvc.com/opensource/lnx/DP/04_AtscCC/download.html 98 Refer to page 29 for your TV set 's on-screen cable channel numbers) ...


