
Instructions
Page 8
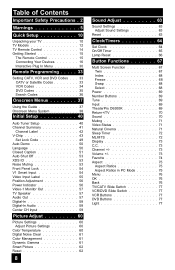
Table of Contents Important Safety Precautions . 2 Warnings 5 Quick Setup 10 Unpacking your TV 10 TV Models 12 TV Remote Control 14 Getting Started 15 The Remote Control 15 Connecting Your Devices 16 Interactive Plug In Menu 30 Remote Programming . . . . . 33 Setting CATV, VCR and DVD Codes . . . 33 CATV or Satellite Codes 33 ... Front Panel Lock 54 V1 Smart Input 54 Video Input Label 55 Position Adjustment 56 Power Indicator 56 Video-1 Monitor Out 57 TV Speaker 57 Audio Out 57 Digital-In 58 Digital-In Audio 58 Center CH Input 59 Picture Adjust 60 Picture Settings 60 Adjust...
Table of Contents Important Safety Precautions . 2 Warnings 5 Quick Setup 10 Unpacking your TV 10 TV Models 12 TV Remote Control 14 Getting Started 15 The Remote Control 15 Connecting Your Devices 16 Interactive Plug In Menu 30 Remote Programming . . . . . 33 Setting CATV, VCR and DVD Codes . . . 33 CATV or Satellite Codes 33 ... Front Panel Lock 54 V1 Smart Input 54 Video Input Label 55 Position Adjustment 56 Power Indicator 56 Video-1 Monitor Out 57 TV Speaker 57 Audio Out 57 Digital-In 58 Digital-In Audio 58 Center CH Input 59 Picture Adjust 60 Picture Settings 60 Adjust...
Instructions
Page 10
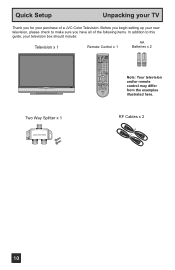
Two Way Splitter x 1 2-WAY SPLITTER RF Cables x 2 10 Quick Setup Unpacking your television box should include: Television x 1 Remote Control x 1 AA Batteries x 2 AA Alkaline AA Alkaline TV CATV VCR DVD POWER ASPECT MULTI SCREEN TWIN INDEX SELECT SLEEP FREEZE SWAP ML/MTS DISPLAY + INPUT 123 D/A 4 5 6 i.LINK MENU 78 TIMER TUNE THEATER FAVORITE ... begin setting up your new television, please check to make sure you for your purchase of the following items. In addition to this guide, your TV Thank you have all of a JVC Color Television.
Two Way Splitter x 1 2-WAY SPLITTER RF Cables x 2 10 Quick Setup Unpacking your television box should include: Television x 1 Remote Control x 1 AA Batteries x 2 AA Alkaline AA Alkaline TV CATV VCR DVD POWER ASPECT MULTI SCREEN TWIN INDEX SELECT SLEEP FREEZE SWAP ML/MTS DISPLAY + INPUT 123 D/A 4 5 6 i.LINK MENU 78 TIMER TUNE THEATER FAVORITE ... begin setting up your new television, please check to make sure you for your purchase of the following items. In addition to this guide, your TV Thank you have all of a JVC Color Television.
Instructions
Page 12
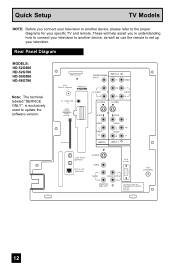
...Rear Panel Diagram MODELS: HD-52G886 HD-52G786 HD-56G886 HD-56G786 Note: The terminal labeled "SERVICE ONLY", is exclusively used to set up your television. Quick Setup TV Models NOTE: Before you in understanding how to connect your television to another device, please refer to the proper diagrams for your specific TV and remote.... These will help assist you connect your television to another device, as well as use the remote to update the software version. PATENTS 6,183,091 6,419,362 12
...Rear Panel Diagram MODELS: HD-52G886 HD-52G786 HD-56G886 HD-56G786 Note: The terminal labeled "SERVICE ONLY", is exclusively used to set up your television. Quick Setup TV Models NOTE: Before you in understanding how to connect your television to another device, please refer to the proper diagrams for your specific TV and remote.... These will help assist you connect your television to another device, as well as use the remote to update the software version. PATENTS 6,183,091 6,419,362 12

Instructions
Page 14
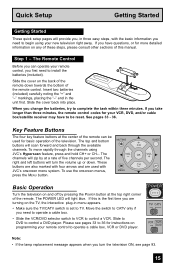
... GUIDE VOL OK VOL CH MENU VCR CHANNEL PREV NEXT BACK VCR DVD POWER TV VCR REW PLAY FF REC STOP PAUSE OPEN CLOSE STILL PAUSE RM-C14G RM-C14G MODELS: HD-52G886 HD-52G786 HD-56G886 HD-56G786 • For information on remote control buttons, see pages 67 - 77 and 81 - 86. • i.LINK MENU, TIMER...
... GUIDE VOL OK VOL CH MENU VCR CHANNEL PREV NEXT BACK VCR DVD POWER TV VCR REW PLAY FF REC STOP PAUSE OPEN CLOSE STILL PAUSE RM-C14G RM-C14G MODELS: HD-52G886 HD-52G786 HD-56G886 HD-56G786 • For information on remote control buttons, see pages 67 - 77 and 81 - 86. • i.LINK MENU, TIMER...
Instructions
Page 15
If you take longer than three minutes, the remote control codes for your remote control, you first need to operate a cable box. • Slide the VCR/DVD selector switch to VCR to begin using JVC's Hyperscan feature, press and hold CH+ or CH-. See pages 33 - 36. If you have...arrows and are turning on programming your new television right away. The channels will scan forward and back through the channels using your remote control to TV. The VOL OK VOL right and left buttons will turn the television ON, see pages 33 to install the batteries (included). ...
If you take longer than three minutes, the remote control codes for your remote control, you first need to operate a cable box. • Slide the VCR/DVD selector switch to VCR to begin using JVC's Hyperscan feature, press and hold CH+ or CH-. See pages 33 - 36. If you have...arrows and are turning on programming your new television right away. The channels will scan forward and back through the channels using your remote control to TV. The VOL OK VOL right and left buttons will turn the television ON, see pages 33 to install the batteries (included). ...
Instructions
Page 20
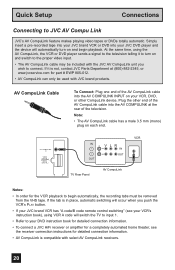
... to the proper video input. • The AV CompuLink cable may be included with the JVC AV CompuLink unit you push the VCR's PLAY button. • If your JVC brand VCR has "A code/B code remote control switching" (see your VCR's instruction book), using the AV CompuLink, the VCR or ... the same time, using VCR A code will automatically turn on each end. If the tab is compatible with JVC brand products. AV COMPULINK III VIDEO (DIGITAL) _ AUDIO (DIGITAL) IN V L R IN OUT OUT TV Rear Panel AV CompuLink VCR Notes: • In order for part # EWP 805-012. • AV CompuLink...
... to the proper video input. • The AV CompuLink cable may be included with the JVC AV CompuLink unit you push the VCR's PLAY button. • If your JVC brand VCR has "A code/B code remote control switching" (see your VCR's instruction book), using the AV CompuLink, the VCR or ... the same time, using VCR A code will automatically turn on each end. If the tab is compatible with JVC brand products. AV COMPULINK III VIDEO (DIGITAL) _ AUDIO (DIGITAL) IN V L R IN OUT OUT TV Rear Panel AV CompuLink VCR Notes: • In order for part # EWP 805-012. • AV CompuLink...
Instructions
Page 26
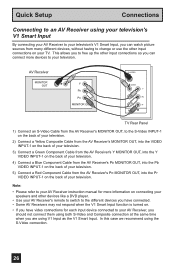
AV Receiver MONITOR OUT Y PB PR MONITOR OUT S-VIDEO OVER Y VIDEO L Pb I AUDIO I R Pr INPUT-1 TV Rear Panel 1) Connect an S-Video Cable from the AV Receiver's MONITOR OUT, to the S-Video INPUT-1 on the back of your television. 2) Connect a Yellow Composite Cable ... from many different devices, without having to change or use the other input connections on your TV. This allows you to free up the other devices like a DVD player. • Use your AV Receiver's remote to switch to the different devices you are using V1 Input as the V1 Smart Input. In...
AV Receiver MONITOR OUT Y PB PR MONITOR OUT S-VIDEO OVER Y VIDEO L Pb I AUDIO I R Pr INPUT-1 TV Rear Panel 1) Connect an S-Video Cable from the AV Receiver's MONITOR OUT, to the S-Video INPUT-1 on the back of your television. 2) Connect a Yellow Composite Cable ... from many different devices, without having to change or use the other input connections on your TV. This allows you to free up the other devices like a DVD player. • Use your AV Receiver's remote to switch to the different devices you are using V1 Input as the V1 Smart Input. In...

Instructions
Page 32
...you will not work during Auto Tuner Setup. • If you may, (depending on programming your remote control, or using the CHANNEL +/- SETUP IS NOW COMPLETE" is normal. Cable Box and Satellite Users... viewing experience. Quick Setup Plug-In Menu Auto Tuner Setup In auto tuner setup, the TV automatically scans through all available channels, memorizing the active ones and skipping over blank ones or...with weak signals. You can now begin watching your television, or you scan (using the JVC onscreen menu system to customize your auto tuner setup is complete, you choose SKIP, it...
...you will not work during Auto Tuner Setup. • If you may, (depending on programming your remote control, or using the CHANNEL +/- SETUP IS NOW COMPLETE" is normal. Cable Box and Satellite Users... viewing experience. Quick Setup Plug-In Menu Auto Tuner Setup In auto tuner setup, the TV automatically scans through all available channels, memorizing the active ones and skipping over blank ones or...with weak signals. You can now begin watching your television, or you scan (using the JVC onscreen menu system to customize your auto tuner setup is complete, you choose SKIP, it...

Instructions
Page 33
...10 key pad. 4) Release the DISPLAY button, and confirm the operation of codes shown below or to the code search function, use the remote control supplied by using the instructions and codes listed below. Cable Box Codes ABC Archer Cableview Citizen Curtis Diamond Eagle Eastern GC Brand Gemini ...satellite receiver. • If your cable box, satellite receiver, VCR or DVD player by the manufacturer. Remote Programming Setting the CATV, VCR and DVD Codes You can program your remote to operate your cable or satellite box does not respond to the first code, try the search codes function...
...10 key pad. 4) Release the DISPLAY button, and confirm the operation of codes shown below or to the code search function, use the remote control supplied by using the instructions and codes listed below. Cable Box Codes ABC Archer Cableview Citizen Curtis Diamond Eagle Eastern GC Brand Gemini ...satellite receiver. • If your cable box, satellite receiver, VCR or DVD player by the manufacturer. Remote Programming Setting the CATV, VCR and DVD Codes You can program your remote to operate your cable or satellite box does not respond to the first code, try the search codes function...

Instructions
Page 34
...Find the VCR brand from the list of codes shown below. 2) Slide the first 2-way selector switch to "TV" and the other 2-way selector switch to "VCR". 3) Press and hold down the REC button on page...081, 000, 001 Hitachi 023, 045, 058, 093, 027, 081 Instant Replay 024, 023 Jensen 003 JVC 003, 004, 005, 000, 001, 002, 006, 007 VCR Marantz Marta Memorex MGA Minolta Mitsubishi Multitech NEC..., 036, 067, 044, 064 063, 003, 004, 005 044, 082, 064, 094 Remote Programming VCR Codes The remote control is programmed with the 10 key pad. 4) Release the DISPLAY button, and confirm the operation...
...Find the VCR brand from the list of codes shown below. 2) Slide the first 2-way selector switch to "TV" and the other 2-way selector switch to "VCR". 3) Press and hold down the REC button on page...081, 000, 001 Hitachi 023, 045, 058, 093, 027, 081 Instant Replay 024, 023 Jensen 003 JVC 003, 004, 005, 000, 001, 002, 006, 007 VCR Marantz Marta Memorex MGA Minolta Mitsubishi Multitech NEC..., 036, 067, 044, 064 063, 003, 004, 005 044, 082, 064, 094 Remote Programming VCR Codes The remote control is programmed with the 10 key pad. 4) Release the DISPLAY button, and confirm the operation...

Instructions
Page 35
DVD Player Aiwa Apex Bose Denon Funai Go-Video Harman Kardon Hitachi JVC Kenwood KLH Konka Koss Codes 043 040, 054, 055 058 020, 037 038 032 053 031 000 035, 020 051 039 050 DVD Player Mintek ... properly. Remote Programming DVD Codes The remote control is programmed with DVD codes for power on/off, play, stop, fast-forward, rewind, previous/next chapter, tray open/close, and still/pause operation. 1) Find the DVD player brand from the list of codes shown below. 2) Slide the first 2-way selector switch to "TV" and...
DVD Player Aiwa Apex Bose Denon Funai Go-Video Harman Kardon Hitachi JVC Kenwood KLH Konka Koss Codes 043 040, 054, 055 058 020, 037 038 032 053 031 000 035, 020 051 039 050 DVD Player Mintek ... properly. Remote Programming DVD Codes The remote control is programmed with DVD codes for power on/off, play, stop, fast-forward, rewind, previous/next chapter, tray open/close, and still/pause operation. 1) Find the DVD player brand from the list of codes shown below. 2) Slide the first 2-way selector switch to "TV" and...

Instructions
Page 36
...set . If there was no response, repeat Step 3. If there was no response, use the remote control that came with your equipment. 5) Press RETURN+/TV to "VCR" or "DVD". 2) Press the VCR or DVD POWER and RETURN+/TV buttons. Hold for at least three seconds and release. 3) Press the POWER button on the... seconds and release. 3) Press the VCR or DVD POWER button, and see if the cable or satellite box responds. 4) If there was a response, press RETURN+/TV. Remote Programming Search Codes Cable/Satellite Search Codes Function 1) Slide the first 2-Way Mode Selector switch to exit. 36
...set . If there was no response, repeat Step 3. If there was no response, use the remote control that came with your equipment. 5) Press RETURN+/TV to "VCR" or "DVD". 2) Press the VCR or DVD POWER and RETURN+/TV buttons. Hold for at least three seconds and release. 3) Press the POWER button on the... seconds and release. 3) Press the VCR or DVD POWER button, and see if the cable or satellite box responds. 4) If there was a response, press RETURN+/TV. Remote Programming Search Codes Cable/Satellite Search Codes Function 1) Slide the first 2-Way Mode Selector switch to exit. 36
Instructions
Page 37
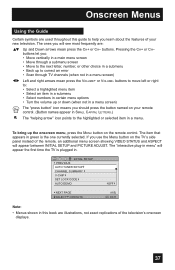
... plug-in a submenu • Back up the onscreen menu, press the MENU button on the TV's side panel instead of the remote, an additional menu screen showing VIDEO STATUS and ASPECT will appear the first time the TV is the one currently selected. The ones you : • Move vertically in a main menu... screen) Left and right arrows mean press the CH+ or CH- If you use the Menu button on the remote control. buttons. To bring up to correct an error • Scan through TV channels (when not in a menu. Onscreen Menus Using the Guide Certain symbols are used throughout this book are : ...
... plug-in a submenu • Back up the onscreen menu, press the MENU button on the TV's side panel instead of the remote, an additional menu screen showing VIDEO STATUS and ASPECT will appear the first time the TV is the one currently selected. The ones you : • Move vertically in a main menu... screen) Left and right arrows mean press the CH+ or CH- If you use the Menu button on the remote control. buttons. To bring up to correct an error • Scan through TV channels (when not in a menu. Onscreen Menus Using the Guide Certain symbols are used throughout this book are : ...
Instructions
Page 38
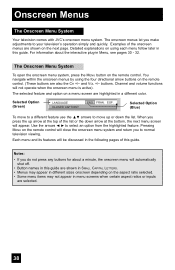
... simply and quickly. buttons. FRAN. Onscreen Menus The Onscreen Menu System Your television comes with JVC's onscreen menu system. Detailed explanations on using the four directional arrow buttons on the remote control will not operate when the onscreen menu is active). Pressing MENU on the... remote control. (These buttons are shown on the remote control. Notes: • If you to move to a different...
... simply and quickly. buttons. FRAN. Onscreen Menus The Onscreen Menu System Your television comes with JVC's onscreen menu system. Detailed explanations on using the four directional arrow buttons on the remote control will not operate when the onscreen menu is active). Pressing MENU on the... remote control. (These buttons are shown on the remote control. Notes: • If you to move to a different...
Instructions
Page 54
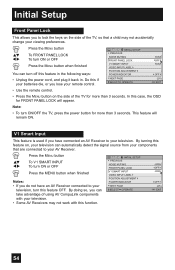
...8226; To turn ON or OFF Press the MENU button when finished Notes: • If you do not have connected an AV Receiver to your remote control. By turning this feature on, your television can automatically detect the signal source from your components that a child may not work with your ...INPUT LABEL POSITION ADJUSTMENT POWER INDICATOR NEXT PAGE SELECT OPERATE ON OFF ON OFF (2/5) MENU EXIT • Use the remote control. • Press the MENU button on the side of the TV for more than 3 seconds. Initial Setup Front Panel Lock This allows you to lock the keys on the side...
...8226; To turn ON or OFF Press the MENU button when finished Notes: • If you do not have connected an AV Receiver to your remote control. By turning this feature on, your television can automatically detect the signal source from your components that a child may not work with your ...INPUT LABEL POSITION ADJUSTMENT POWER INDICATOR NEXT PAGE SELECT OPERATE ON OFF ON OFF (2/5) MENU EXIT • Use the remote control. • Press the MENU button on the side of the TV for more than 3 seconds. Initial Setup Front Panel Lock This allows you to lock the keys on the side...
Instructions
Page 57
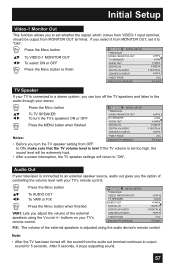
... ON or OFF Press the MENU button to the audio through your TV's remote control. Audio Out If your TV's remote control. Note: • After the TV has been turned off the TV speakers and listen to finish INITIAL SETUP PREVIOUS VIDEO-1MONITOR OUT TV SPEAKER AUDIO OUT DIGITAL-IN DIGITAL-IN AUDIO CENTER CH INPUT NEXT...
... ON or OFF Press the MENU button to the audio through your TV's remote control. Audio Out If your TV's remote control. Note: • After the TV has been turned off the TV speakers and listen to finish INITIAL SETUP PREVIOUS VIDEO-1MONITOR OUT TV SPEAKER AUDIO OUT DIGITAL-IN DIGITAL-IN AUDIO CENTER CH INPUT NEXT...
Instructions
Page 67
...-IN terminal will appear on the right. Note: After you press any multiscreen buttons, if you were watching before pressing TWIN will appear on the remote control. The channel (or input) you press the menu button, only the picture adjust screen will continue to normal television viewing, press TWIN again or..., TWIN, INDEX or FREEZE can enter the TWIN mode when the screen is in Twin mode. • When the cable card is inserted into the TV, the combination of screen: TWIN (2 channels) and INDEX (12 channels).
...-IN terminal will appear on the right. Note: After you press any multiscreen buttons, if you were watching before pressing TWIN will appear on the remote control. The channel (or input) you press the menu button, only the picture adjust screen will continue to normal television viewing, press TWIN again or..., TWIN, INDEX or FREEZE can enter the TWIN mode when the screen is in Twin mode. • When the cable card is inserted into the TV, the combination of screen: TWIN (2 channels) and INDEX (12 channels).

Instructions
Page 69
Button Functions Power Turns the TV on the remote, press the TUNE button. After you can change the input mode. button. • You can also access by pressing the INPUT button on the side of the TV instead of the INPUT button, you press the number buttons on or off for video devices like... is as true to what the film to the TV, select VIDEO-3. For example, to move to channel 12: 0 (Zero) 1 (One) 2 (Two) Tune Lets you have a PC connected to video editors intended it . Press the INPUT button By every press of the remote control. • i.LINK can not turn the power off...
Button Functions Power Turns the TV on the remote, press the TUNE button. After you can change the input mode. button. • You can also access by pressing the INPUT button on the side of the TV instead of the INPUT button, you press the number buttons on or off for video devices like... is as true to what the film to the TV, select VIDEO-3. For example, to move to channel 12: 0 (Zero) 1 (One) 2 (Two) Tune Lets you have a PC connected to video editors intended it . Press the INPUT button By every press of the remote control. • i.LINK can not turn the power off...

Instructions
Page 71
... CINEMA button Notes: The natural cinema mode is broadcast at the television rate of your TV. Gives a vivid picture with better contrast when viewing in a dimly lit room. Natural Cinema Natural cinema corrects the problem of the remote control. buttons ( √ OPERATE ® ). Gives a rich, film-like look...Resets the picture display to its previous level, press MUTING again. Choose VIDEO STATUS by pressing MENU† on the side of the TV instead of blurred edges which is shot at the edges of the VIDEO STATUS button, you change the mode by pressing the π...
... CINEMA button Notes: The natural cinema mode is broadcast at the television rate of your TV. Gives a vivid picture with better contrast when viewing in a dimly lit room. Natural Cinema Natural cinema corrects the problem of the remote control. buttons ( √ OPERATE ® ). Gives a rich, film-like look...Resets the picture display to its previous level, press MUTING again. Choose VIDEO STATUS by pressing MENU† on the side of the TV instead of blurred edges which is shot at the edges of the VIDEO STATUS button, you change the mode by pressing the π...
Instructions
Page 76
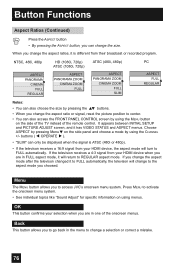
...correct a mistake. 76 NTSC, 480i, 480p ASPECT PANORAMA CINEMA FULL REGULAR HD (1080i, 720p) ATSC (1080i, 720p) ASPECT PANORAMA ZOOM CINEMA ZOOM...• See individual topics like "Sound Adjust" for specific information on the side of the TV instead of the onscreen menus. If the television receives a 4:3 signal from your selection when you...and ASPECT menus. buttons ( √ OPERATE ® ). • "SLIM" can change to access JVC's onscreen menu system. Press MENU to REGULAR aspect mode. Button Functions Aspect Ratios (Continued) Press the ... in one of the remote control.
...correct a mistake. 76 NTSC, 480i, 480p ASPECT PANORAMA CINEMA FULL REGULAR HD (1080i, 720p) ATSC (1080i, 720p) ASPECT PANORAMA ZOOM CINEMA ZOOM...• See individual topics like "Sound Adjust" for specific information on the side of the TV instead of the onscreen menus. If the television receives a 4:3 signal from your selection when you...and ASPECT menus. buttons ( √ OPERATE ® ). • "SLIM" can change to access JVC's onscreen menu system. Press MENU to REGULAR aspect mode. Button Functions Aspect Ratios (Continued) Press the ... in one of the remote control.


