Instructions
Page 4
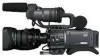
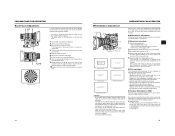
...equipment provided with normal progressive video. • User buttons added Enables you can select this manual are for private use . • Variable scan shutter There is not possible. (In ... shoot with the same number of dark subjects with 3-CCD system for purchasing the JVC GY-HD110U/CHU, GYHD110E/CHE and GY-HD111E/CHE HD CAMERA RECORDER. Recording in...connector (6-pin) provided. mat. HDV 720p (720 effective scan lines, progressive scan) HDV 1080i (1080 effective scan lines, interlaced scan) This camcorder supports HDV 720p format. (HDV 720p, 480p, 576p) HDV and are for...
...equipment provided with normal progressive video. • User buttons added Enables you can select this manual are for private use . • Variable scan shutter There is not possible. (In ... shoot with the same number of dark subjects with 3-CCD system for purchasing the JVC GY-HD110U/CHU, GYHD110E/CHE and GY-HD111E/CHE HD CAMERA RECORDER. Recording in...connector (6-pin) provided. mat. HDV 720p (720 effective scan lines, progressive scan) HDV 1080i (1080 effective scan lines, interlaced scan) This camcorder supports HDV 720p format. (HDV 720p, 480p, 576p) HDV and are for...
Instructions
Page 8
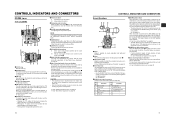
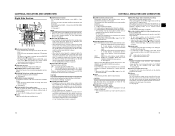
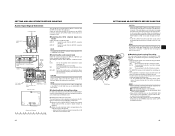
...color tone areas are indicated in accordance with the SKIN COLOR ADJUST item on the OTHERS [1/2] menu screen to position "M". 3IRIS ring Manual iris ring. M : Manual zoom mode. To adjust the focus of the macro image, rotate this ring in the direction of this button, the white balance ...8226; The back-focus knob is held down only. 9[S] IRIS speed adjusting control For adjusting the iris operation speed. To adjust the zoom manually, turn the ring anticlockwise to the SKIN AREA side, the color tone areas specified with the menu settings made for the microphone holder 3. 3Microphone...
...color tone areas are indicated in accordance with the SKIN COLOR ADJUST item on the OTHERS [1/2] menu screen to position "M". 3IRIS ring Manual iris ring. M : Manual zoom mode. To adjust the focus of the macro image, rotate this ring in the direction of this button, the white balance ...8226; The back-focus knob is held down only. 9[S] IRIS speed adjusting control For adjusting the iris operation speed. To adjust the zoom manually, turn the ring anticlockwise to the SKIN AREA side, the color tone areas specified with the menu settings made for the microphone holder 3. 3Microphone...
Instructions
Page 9
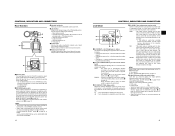
... is automatically adjusted according to input the HDV/DV signal from falling off the tripod. Set the AUDIO MONITOR item on page 18 dis- AUTO MANUAL : The audio level is possible with a 3.5 mm diameter plug. When you want to add additional time codes to time codes already recorded on the OTHERS...
... is automatically adjusted according to input the HDV/DV signal from falling off the tripod. Set the AUDIO MONITOR item on page 18 dis- AUTO MANUAL : The audio level is possible with a 3.5 mm diameter plug. When you want to add additional time codes to time codes already recorded on the OTHERS...
Instructions
Page 10
... controls and AUTO LED Allow you need to the USER1 - 3 buttons. Pressing this control does not operate. e[POWER] Power ON/OFF switch Switch that the camcorder will be accommodated in the main body of the new ND filter is displayed in the audio. X See "Backup Recording" on page 62. 0[ND FILTER... will be memorized into B. X See page 71. CAUTION There is a risk that turns the power ON/OFF. jLCD door LCD monitor door. The sound to "MANUAL". • When the FULL AUTO switch h on page 18 or the CH1/CH-2 AUDIO SELECT switch 2 on page 13 is set screw Screw for about...
... controls and AUTO LED Allow you need to the USER1 - 3 buttons. Pressing this control does not operate. e[POWER] Power ON/OFF switch Switch that the camcorder will be accommodated in the main body of the new ND filter is displayed in the audio. X See "Backup Recording" on page 62. 0[ND FILTER... will be memorized into B. X See page 71. CAUTION There is a risk that turns the power ON/OFF. jLCD door LCD monitor door. The sound to "MANUAL". • When the FULL AUTO switch h on page 18 or the CH1/CH-2 AUDIO SELECT switch 2 on page 13 is set screw Screw for about...
Instructions
Page 12
... sets to select the monitor sound output and playback sound output from the monitoring speaker. k[PLAY/STILL] Play/still button Press to the manual position. • The gain changes continuously until it stops automatically. (Tape protect mode) During still picture playback and search mode, press ... Pressing this setting is displayed, press the STATUS button to return to the normal screen. • You can select automatic adjustment mode or manual adjustment mode for 1 second or longer, the menu setting screen is set to fast forward the tape. • Pressing this button in the...
... sets to select the monitor sound output and playback sound output from the monitoring speaker. k[PLAY/STILL] Play/still button Press to the manual position. • The gain changes continuously until it stops automatically. (Tape protect mode) During still picture playback and search mode, press ... Pressing this setting is displayed, press the STATUS button to return to the normal screen. • You can select automatic adjustment mode or manual adjustment mode for 1 second or longer, the menu setting screen is set to fast forward the tape. • Pressing this button in the...
Instructions
Page 13
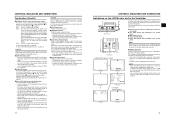
... Camera Mode 1 0 266S DD 9 8 7 6 5 4 2 3 STATUS 0 Screen • STATUS 0 1 Event Indication When the Gain or Shutter Speed is changed manually, the setting condition is displayed for the shutter speed differs depending on the video format. LCD BRIGHT indication 4 Indication of Black operation When the brightness... SD : Indicated when skin tone detail is made. X See page 71. *2 Displayed if functions were assigned to the DR-HD100 INSTRUCTION MANUAL.) 20 21 X See page 71. *3 Displayed when the [WHT.BAL] white balance selector switch c on page 15 is running HEADER ...
... Camera Mode 1 0 266S DD 9 8 7 6 5 4 2 3 STATUS 0 Screen • STATUS 0 1 Event Indication When the Gain or Shutter Speed is changed manually, the setting condition is displayed for the shutter speed differs depending on the video format. LCD BRIGHT indication 4 Indication of Black operation When the brightness... SD : Indicated when skin tone detail is made. X See page 71. *2 Displayed if functions were assigned to the DR-HD100 INSTRUCTION MANUAL.) 20 21 X See page 71. *3 Displayed when the [WHT.BAL] white balance selector switch c on page 15 is running HEADER ...

Instructions
Page 15
... Displays the time code data being displayed. X See page 75. * When inserting a brand-new tape, the remaining tape time is selected) EEI *The range for MANUAL mode) • STATUS 3 Displays a list of internal clock is equivalent to VTR operations. dication (32 K, 48 K, 44.1 K) 6 Audio level meter indication Displays the audio level...
... Displays the time code data being displayed. X See page 75. * When inserting a brand-new tape, the remaining tape time is selected) EEI *The range for MANUAL mode) • STATUS 3 Displays a list of internal clock is equivalent to VTR operations. dication (32 K, 48 K, 44.1 K) 6 Audio level meter indication Displays the audio level...
Instructions
Page 16
... alarm is generated while the STATUS 2, 3 screen is locked to the video signal. 2 Time Code Generator Setting Indicates the set to the DR-HD100 INSTRUCTION MANUAL.) MEMO When characters indicating the status are displayed in drop frame mode. In addition, the safety zone display is on or off depending on the...
... alarm is generated while the STATUS 2, 3 screen is locked to the video signal. 2 Time Code Generator Setting Indicates the set to the DR-HD100 INSTRUCTION MANUAL.) MEMO When characters indicating the status are displayed in drop frame mode. In addition, the safety zone display is on or off depending on the...

Instructions
Page 17
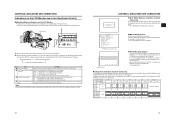
Use a FUJINON focus manual unit (FMM-8, CFH-3, CFC-12-990). UB RFRECEE REGEN LCD open 40° or more LCD close and normal/inverted operations. • If the LCD monitor is closed inside the camcorder with the screen in the normal display orientation, holding down the DISPLAY button, the display mode ...not work. • You can set to ON, the LCD monitor and viewfinder (VF) displays are as shown below . For details, please consult your JVC authorized dealer. 28 29 LCD Monitor Status LCD Closed Normal LCD Inverted LCD LCD Open Normal LCD Inverted LCD LCD Display OFF ON ON ON...
Use a FUJINON focus manual unit (FMM-8, CFH-3, CFC-12-990). UB RFRECEE REGEN LCD open 40° or more LCD close and normal/inverted operations. • If the LCD monitor is closed inside the camcorder with the screen in the normal display orientation, holding down the DISPLAY button, the display mode ...not work. • You can set to ON, the LCD monitor and viewfinder (VF) displays are as shown below . For details, please consult your JVC authorized dealer. 28 29 LCD Monitor Status LCD Closed Normal LCD Inverted LCD LCD Open Normal LCD Inverted LCD LCD Display OFF ON ON ON...
Instructions
Page 25
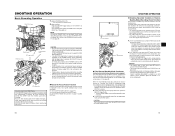
Set the IRIS mode switch to M (Manual). 3. through 8. Place a white object near the center of the screen under different lighting conditions. „ Setting procedure The FAW function can be completed. Press the ...-angle position. 10.Tighten the back focus ring retaining knob to secure the ring. The optimal subject for this interval. Set the zoom mode to M (Manual). 2. photo position. 5. Bring the subject into focus. 6. Do not shoot within this adjustment is a Siemens star chart. 1. Set the ND filter switch according to A or...
Set the IRIS mode switch to M (Manual). 3. through 8. Place a white object near the center of the screen under different lighting conditions. „ Setting procedure The FAW function can be completed. Press the ...-angle position. 10.Tighten the back focus ring retaining knob to secure the ring. The optimal subject for this interval. Set the zoom mode to M (Manual). 2. photo position. 5. Bring the subject into focus. 6. Do not shoot within this adjustment is a Siemens star chart. 1. Set the ND filter switch according to A or...
Instructions
Page 27
...or when the battery is running down the audio level control. • In the FULL AUTO mode, the audio level volume cannot be adjusted manually when the GYHD110 is in the INPUT1, 2 MIC REF. Select the audio from the INPUT2 connector into CH-2. INPUT2 : Inputs the audio ...input to "LINE" or turn down . * Do not increase the audio monitoring volume excessively; CAUTION When connecting a component that you want to adjust manually to this position when a microphone (phantom microphone) requiring +48 V DC power supply is connected. The reference input level is +4 dBs. : Set to...
...or when the battery is running down the audio level control. • In the FULL AUTO mode, the audio level volume cannot be adjusted manually when the GYHD110 is in the INPUT1, 2 MIC REF. Select the audio from the INPUT2 connector into CH-2. INPUT2 : Inputs the audio ...input to "LINE" or turn down . * Do not increase the audio monitoring volume excessively; CAUTION When connecting a component that you want to adjust manually to this position when a microphone (phantom microphone) requiring +48 V DC power supply is connected. The reference input level is +4 dBs. : Set to...
Instructions
Page 28
...iris is pressed, the GY-HD110 may pick up to about 3 seconds. „ To return to recording mode after the trigger button is manually moved abruptly during playback will put the unit in the FRONT TALLY and BACK TALLY items on page 80. (LONG PAUSE TIME item) •... standby mode at TAPE END. X See page 80. X See "OTHERS [1/2] Menu Screen" on the OTHERS [1/2] menu screen. Start recording. After playback, the camcorder returns to the video signal output connectors. 1. CAUTION This function does not work when the GY-HD110 is played back, and about 6 seconds of the...
...iris is pressed, the GY-HD110 may pick up to about 3 seconds. „ To return to recording mode after the trigger button is manually moved abruptly during playback will put the unit in the FRONT TALLY and BACK TALLY items on page 80. (LONG PAUSE TIME item) •... standby mode at TAPE END. X See page 80. X See "OTHERS [1/2] Menu Screen" on the OTHERS [1/2] menu screen. Start recording. After playback, the camcorder returns to the video signal output connectors. 1. CAUTION This function does not work when the GY-HD110 is played back, and about 6 seconds of the...
Instructions
Page 30
... mode : Drum rotation is stopped in order to protect the tape. • Noise may appear in the playback image. • This unit does not allow manual tracking adjustment. • When playing back a tape that the GY-HD110 is employed. Pressing the REW button executes search of the tape, the built-in...
... mode : Drum rotation is stopped in order to protect the tape. • Noise may appear in the playback image. • This unit does not allow manual tracking adjustment. • When playing back a tape that the GY-HD110 is employed. Pressing the REW button executes search of the tape, the built-in...
Instructions
Page 32
...REC/VTR trigger button or the STOP button on . 4. DV HDV : When dubbing in DV format : When dubbing in the camcorder. See the recording device user manual for the IEEE1394 input. tion. 9. Turn ON both devices on the GY-HD110 to start playback. 8. Press the PLAY/STILL ...Connect the IEEE1394 cable. 3. The VTR indicator lights. 5. IEEE1394 cable CAUTION • Set the IEEE1394 switch on this unit when switching modes from this camcorder to PLAY. 59 Normally, use the "AUTO" setting. 6. Place the GY-HD110 in the audio. IEEE1394 cable CAUTION • Set the IEEE1394 ...
...REC/VTR trigger button or the STOP button on . 4. DV HDV : When dubbing in DV format : When dubbing in the camcorder. See the recording device user manual for the IEEE1394 input. tion. 9. Turn ON both devices on the GY-HD110 to start playback. 8. Press the PLAY/STILL ...Connect the IEEE1394 cable. 3. The VTR indicator lights. 5. IEEE1394 cable CAUTION • Set the IEEE1394 switch on this unit when switching modes from this camcorder to PLAY. 59 Normally, use the "AUTO" setting. 6. Place the GY-HD110 in the audio. IEEE1394 cable CAUTION • Set the IEEE1394 ...
Instructions
Page 37
... the tonality in the black areas deterio- However, the tonality in CAMERA mode. However, the tonality in the highlight areas, automatically or manually. NORMAL (0) - 4, MAX (5)] Adjusts the video signal color level. Increase the number : Makes the colors more dense. Decrease the ...Adjusts the B (blue) component when in AWB (Auto White Balance) mode. FILMOUT : Fixes gamma curve at a luminance level of the camcorder. MEMO When this when A or B is set to the characteristics of the black. Decrease the number : Weakens the blue. [Settings: MIN...
... the tonality in the black areas deterio- However, the tonality in CAMERA mode. However, the tonality in the highlight areas, automatically or manually. NORMAL (0) - 4, MAX (5)] Adjusts the video signal color level. Increase the number : Makes the colors more dense. Decrease the ...Adjusts the B (blue) component when in AWB (Auto White Balance) mode. FILMOUT : Fixes gamma curve at a luminance level of the camcorder. MEMO When this when A or B is set to the characteristics of the black. Decrease the number : Weakens the blue. [Settings: MIN...

Instructions
Page 38
... selector switch c on page 15. (Fixed at this position. RET Description Does not function. to the USER3 button. NORMAL (0) - 4, MAX (5)] For manually adjusting the shading of the G axis of magenta color. [Settings: MIN (-5), -4 - Decrease the number : Reduces green and magenta. [Settings: MIN (-5),...lens RET button functions. (This does not function if there is in the CAMERA OPERATION menu screen. NORMAL (0) - 4, MAX (5)] For manually adjusting the color phase of the R axis of the color matrix (blue and yellow). Decrease the number : Narrows the range. [Settings:...
... selector switch c on page 15. (Fixed at this position. RET Description Does not function. to the USER3 button. NORMAL (0) - 4, MAX (5)] For manually adjusting the shading of the G axis of magenta color. [Settings: MIN (-5), -4 - Decrease the number : Reduces green and magenta. [Settings: MIN (-5),...lens RET button functions. (This does not function if there is in the CAMERA OPERATION menu screen. NORMAL (0) - 4, MAX (5)] For manually adjusting the color phase of the R axis of the color matrix (blue and yellow). Decrease the number : Narrows the range. [Settings:...
Instructions
Page 40
...:9 : 16:9 zone is displayed. 16:9+4:3 : 16:9 zone and 4:3 zone are display mixed. (This cannot be displayed when the camcorder is displayed in this position, press the SHUTTER dial to return to the instruction manual of focus in normal setting. FOCUS ASSIST Sets the display color for shooting duration. GREEN : Displays the area...
...:9 : 16:9 zone is displayed. 16:9+4:3 : 16:9 zone and 4:3 zone are display mixed. (This cannot be displayed when the camcorder is displayed in this position, press the SHUTTER dial to return to the instruction manual of focus in normal setting. FOCUS ASSIST Sets the display color for shooting duration. GREEN : Displays the area...

Instructions
Page 50
.... 2 m Power cord Power cord : 1 Approx. 2 m (U model only) : 2 Approx. 2 m (E model only) Core Filter :2 Clamp Filter :2 Audio cable :1 SD memory card :1 Instruction Manual : 1 Warranty Card :1 (USA and Canada only) For details, consult your JVC dealer. Record/play time : 63 minutes (with an M-DV63PROHD tape) [Connectors] Analog composite output : 1.0 V (p-p), 75 :, unbalanced (RCA) Analog component output...
.... 2 m Power cord Power cord : 1 Approx. 2 m (U model only) : 2 Approx. 2 m (E model only) Core Filter :2 Clamp Filter :2 Audio cable :1 SD memory card :1 Instruction Manual : 1 Warranty Card :1 (USA and Canada only) For details, consult your JVC dealer. Record/play time : 63 minutes (with an M-DV63PROHD tape) [Connectors] Analog composite output : 1.0 V (p-p), 75 :, unbalanced (RCA) Analog component output...


